macOS 12 Monterey is the name of Apple’s latest operating system, an evolution of the current Big Sur platform that offers new features and tweaks to some of the Cupertino giant’s most popular apps and services. Apple released macOS 12 Monterey on Monday, October 25.
In this guide, we’re going to walk you through the steps required to clean install macOS Monterey, including backing up your existing files and creating a bootable USB stick that will be used to perform the installation.
Why perform a clean install of macOS Monterey?
When we talk about a “clean install” of macOS Monterey, we mean erasing the main disk of all its files and then installing the new operating system on the freshly wiped drive.
Typically, when you’re offered an operating system upgrade from the Apple App Store, you’re encouraged to simply download the new version and to overwrite your existing setup, without wiping the entire disk and erasing your data.
There’s absolutely nothing wrong with this “standard” method of installation, but wiping the disk entirely and performing a true “clean install” will remove any potential problems, from outdated or third-party software. It will also remove any transient files and incorrect settings in your Library folder — things that could potentially cause issues days, weeks, and months down the road.
Will you risk losing any of your files?
Does the idea of wiping your current operating system fill you with dread? Well, with our step-by-step guide, you needn’t worry about losing any of your precious files, and we’ll help you to create several backup options just in case things don’t work out according to plan.
Convinced? Great! Let’s dive right in…
Is your Mac compatible?
macOS Monterey is the first major release from Apple that will contain features that only work with the new Apple M1 chips found in the latest MacBook Air, MacBook Pro, and Mac mini — and a further tier of features will only work on the more powerful 16 GB versions of those devices.
You can still clean install macOS Monterey on an older Intel machine, but it’s worth noting that most computers over 5-6 years old probably won’t be compatible.
Here’s the official list of supported devices:
- iMac – Late 2015 onwards
- iMac Pro – 2017 onwards
- Mac Pro – Late 2013 onwards
- Mac mini – Late 2014 onwards
- MacBook – 2016 onwards
- MacBook Air – 2015 onwards
- MacBook Pro – 2015 onwards
Step 1: Backup your existing installation
As you’re going to completely clean install macOS Monterey, your computer’s drive and all of the files stored on it will be completely wiped and replaced by the new operating system. As you can imagine, that means that before attempting to use your USB installer that you’ll want to ensure that:
- All of your files and folders can be easily added back to your new install.
- You have a complete backup of your old installation in case something goes wrong.
Start by making a Time Machine backup
When you clean install macOS, ideally, you should always make backup copies of your Mac just in case something goes wrong. In fact, regardless of whether you’re upgrading your operating system or not, it’s still prudent to keep your system backed up at all times. Luckily, Apple’s built-in Time Machine app makes this process extremely simple:
- Plug in a USB hard drive with enough space for your backup.
- Head to the settings panel.
- Click the Time Machine icon.
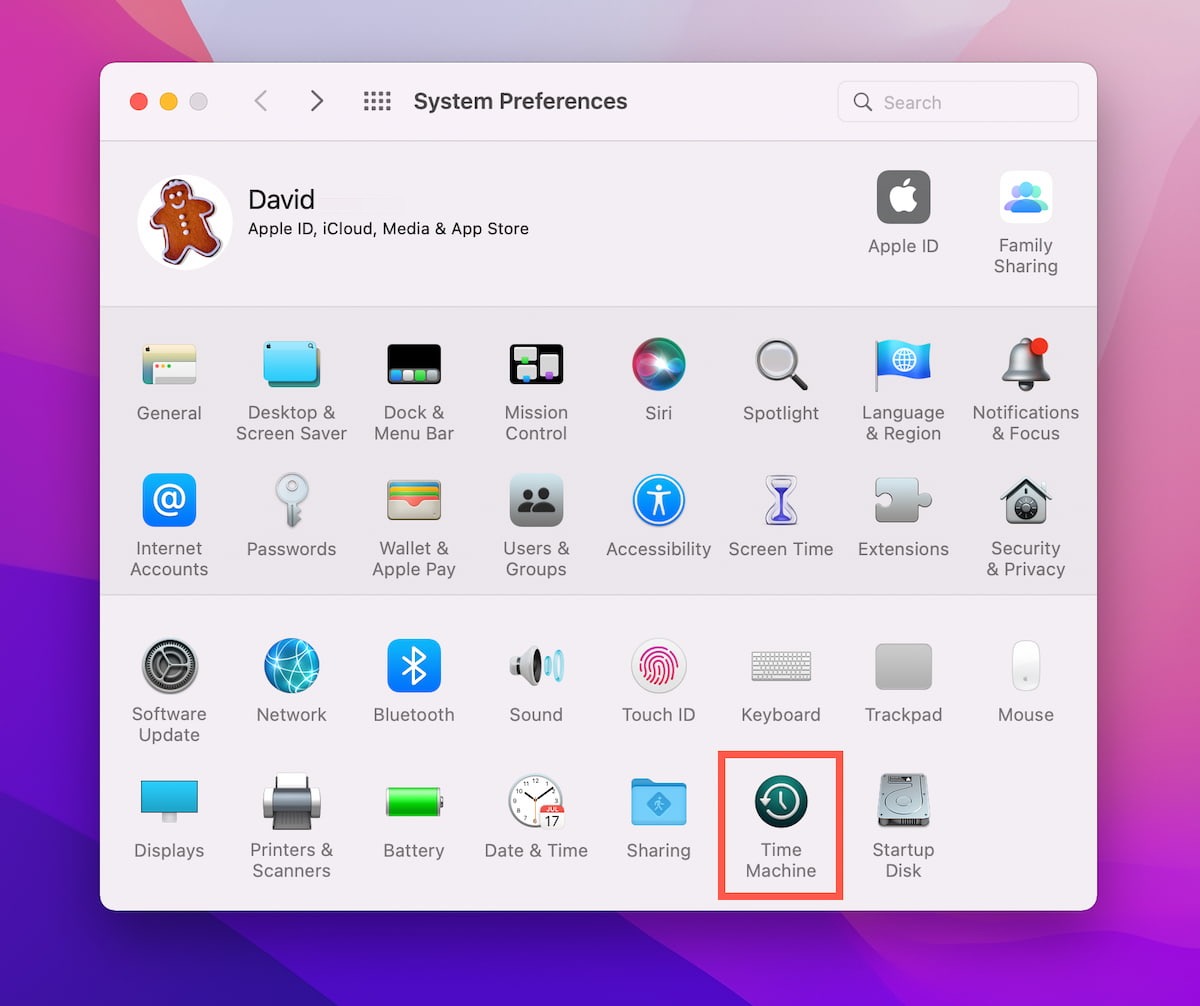
- Click Select Disk.
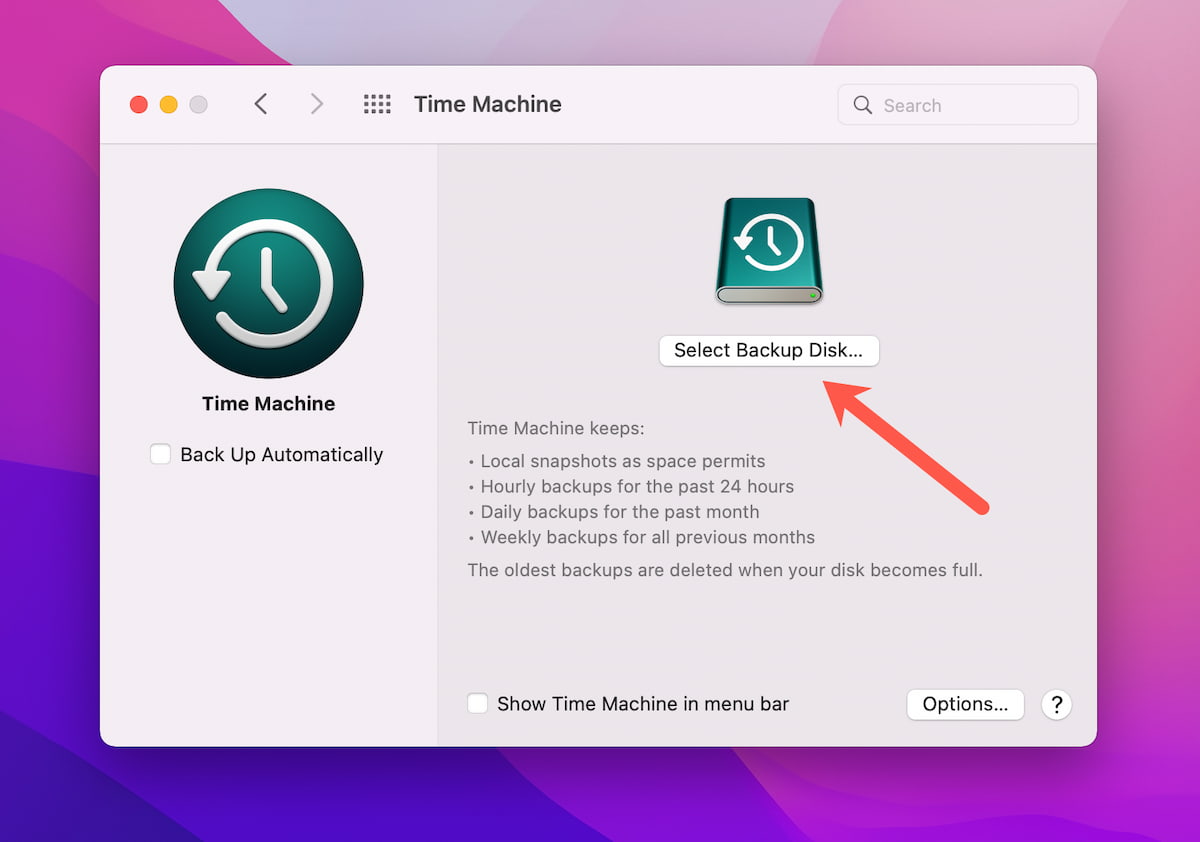
- Select the disk you’d like to use for backups.
That’s all there is to it. Time Machine works silently in the background, storing snapshots of your system every hour for 24 hours, then daily backups for one month, and, finally, weekly backups for all previous months. Once the disk gets full, Time Machine will free up space by overwriting the oldest copies first.
Once you have Time Machine up and running, you can click the Time Machine icon in the top right of the menu bar, then click “back up now” to ensure you have a recent backup of your computer.
Use Disk Drill to make an image of your entire disk
Disk Drill is a really handy (and free) app that allows you to recover lost or deleted data. The app also has a useful installer tool for making bootable macOS USB sticks, and it can even back up your entire disk to a .dmg image file.
Read also: Recover Lost Files After a macOS Monterey Update
Should something go wrong with your macOS Monterey install, you’ll be able to quickly and simply restore your old setup from this .dmg file. Here’s how to create the backup file:
- Download, install and open the Disk Drill app.
- Click “Byte-to-byte Backup” from the “Extra Tools” menu in the left column.
- You’ll now be shown a list of available disks that can be backed up into a .dmg file. Select your main system disk and click the “Create backup” button.
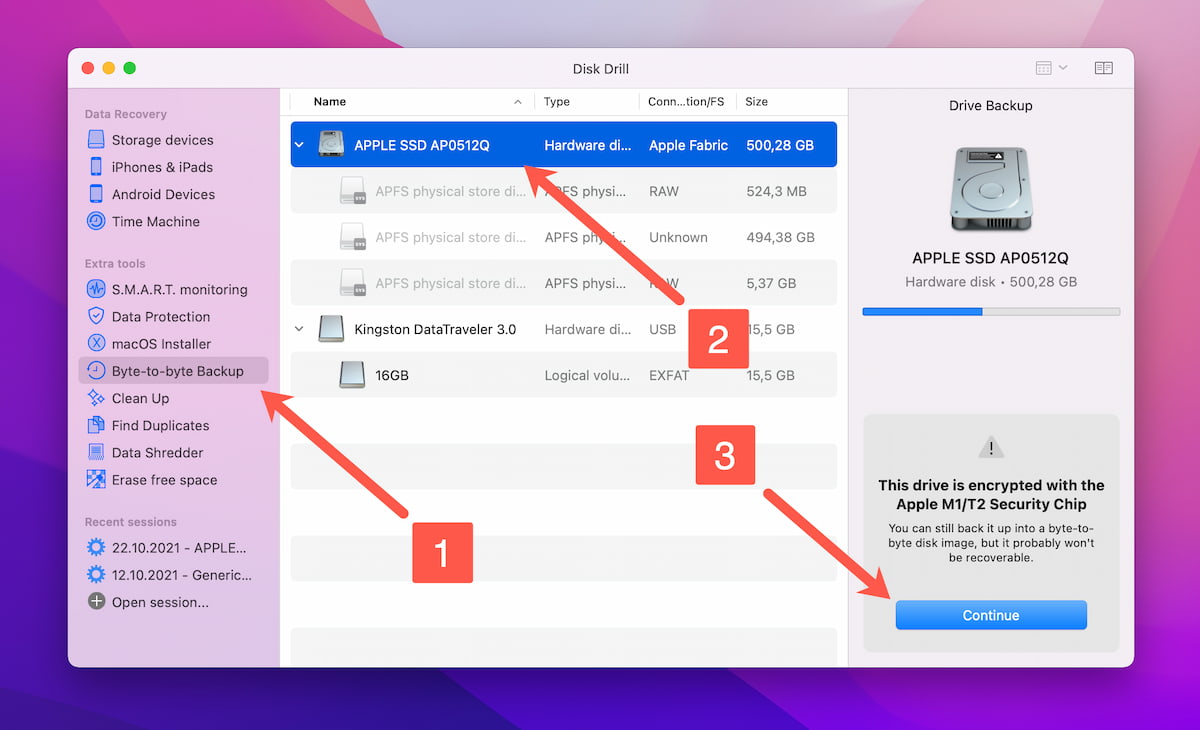
- Once you’ve named your file and selected a location to safely store the backup, clicking “save” will begin the creation process.
- Once your file has been created successfully, you’ll be ready to clean install macOS Monterey.
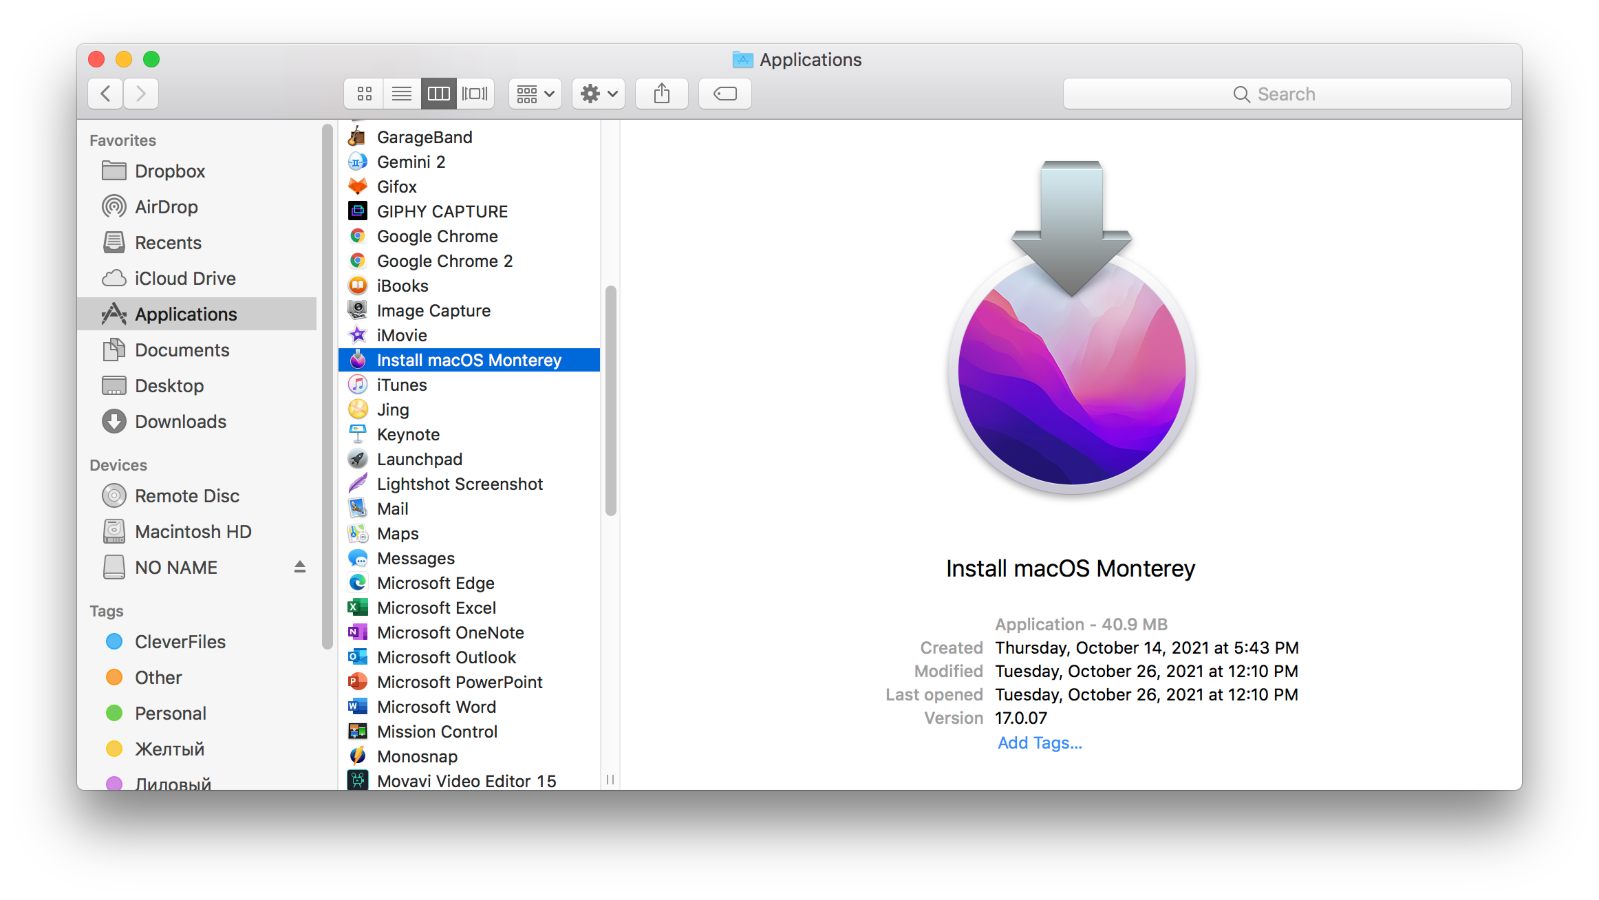
Step 2: Download the macOS Monterey Installer
You can download the macOS Monterey installer from the App Store:
- Launch the App Store.
- Click the search bar, type in “macOS Monterey,” and hit Return.
- Click macOS Monterey in the search results.
- Click the Get button to download the macOS Monterey installer.
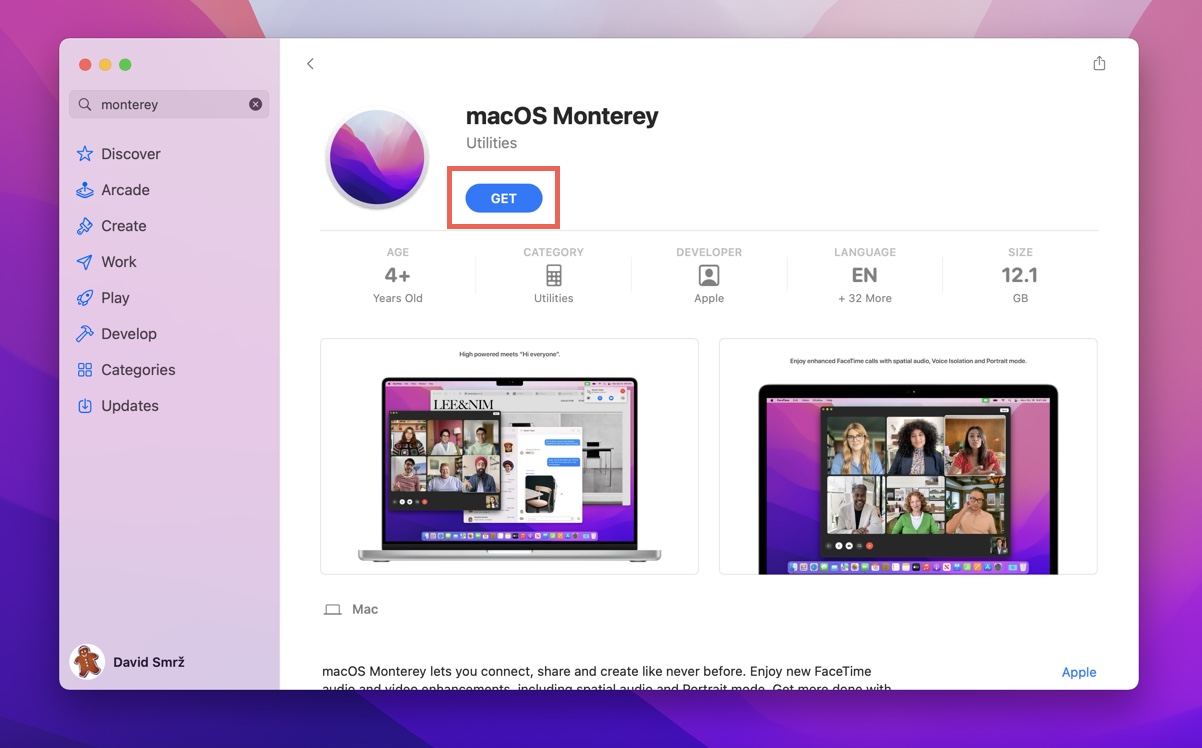
- Wait for the download to finish.
The macOS Monterey installer is around 12 GB large, so it may take a while for it to finish downloading, depending on the speed of your internet connection.
Step 3: Format a USB Flash Drive for macOS Monterey [Optional]
Now that you have a copy of the macOS Monterey Installer sitting in your Applications folder, it’s time to make a bootable USB stick. You’ll need to find one with at least 16 GB of space, as the macOS Monterey Installer tips the scales at around 12-14 GB.
Here’s what you’ll need to do to prepare the USB stick:
- Plugin the USB stick.
- If you’ve used the stick before, check for any important files that you might have forgotten.
- Open the Disk Utility (found in the /Applications/Utilities/ folder).
- Select your USB stick and click the “Erase” button (from the list of icons at the top of the window).
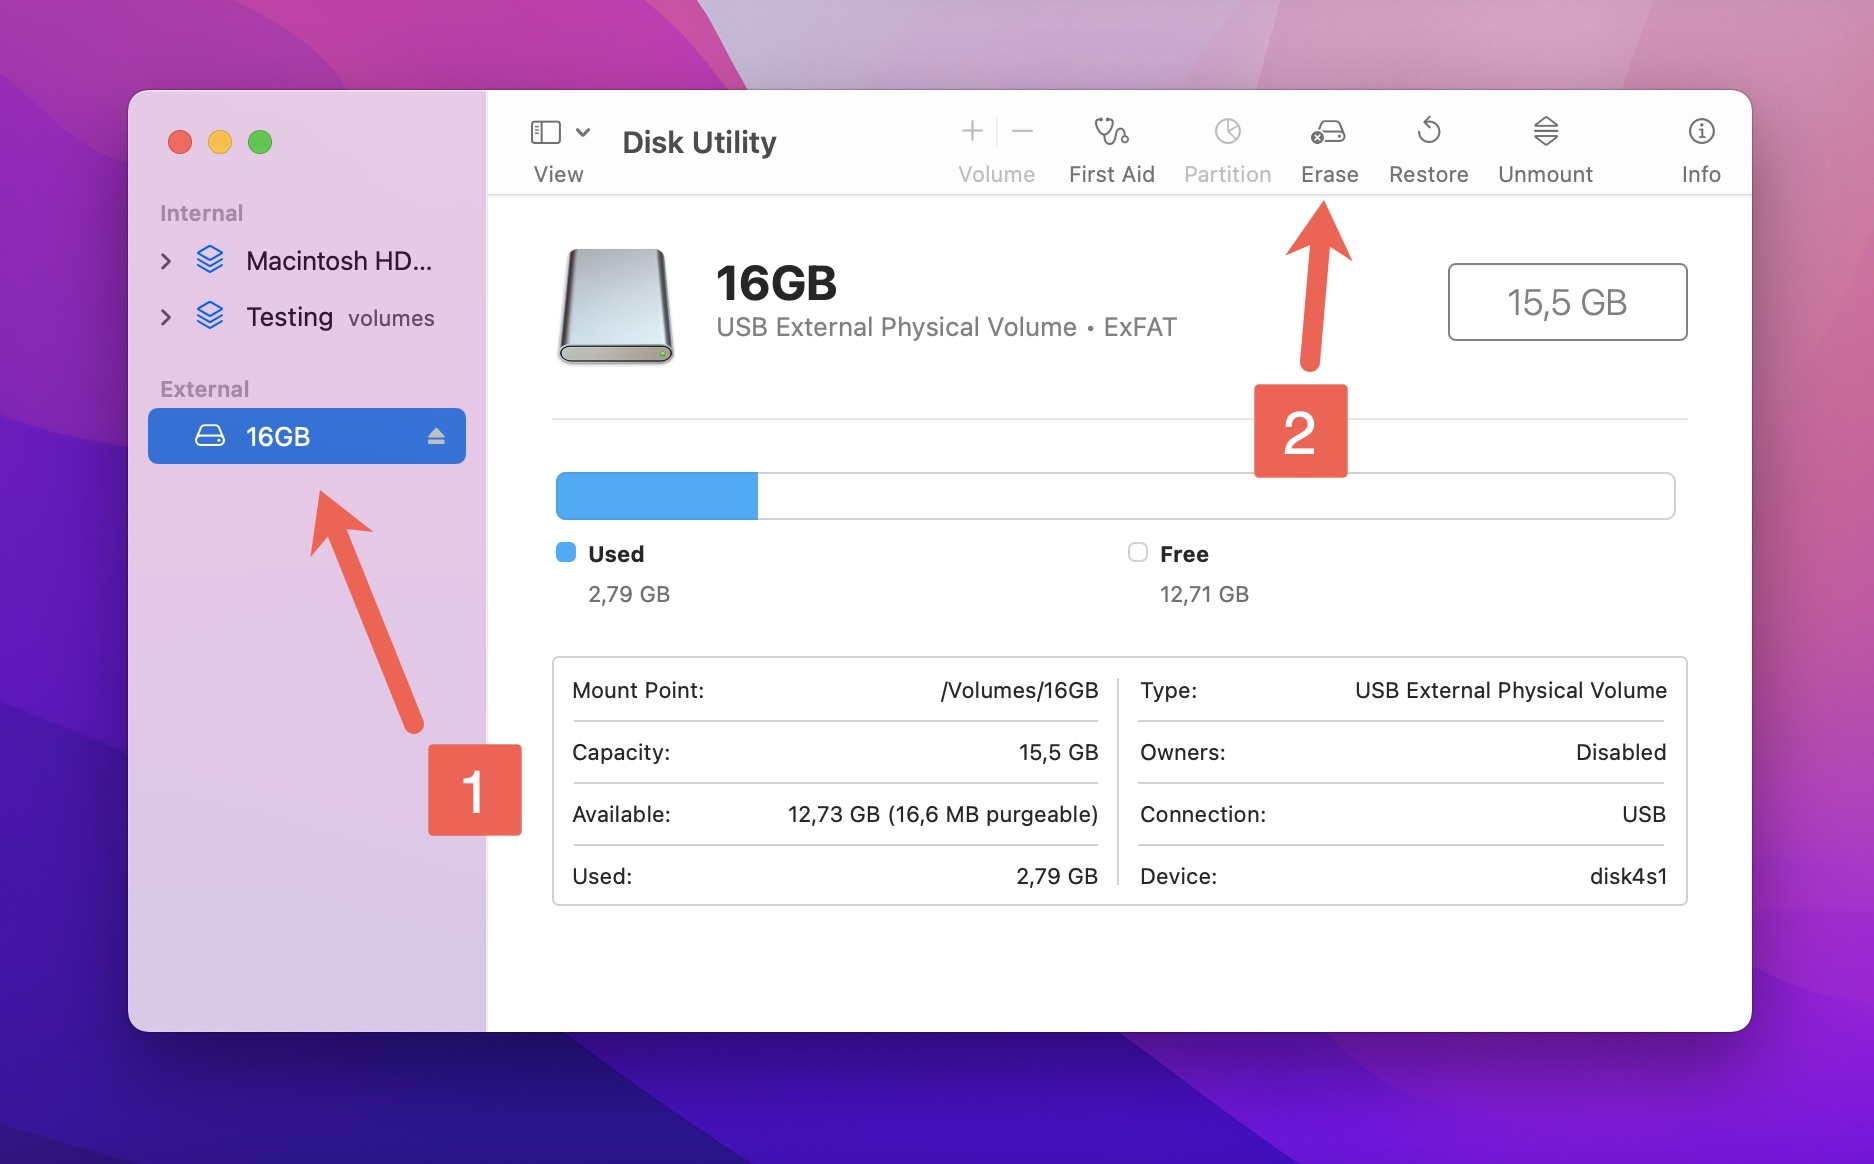
- Make sure “Mac OS Extended (Journaled)” is selected.
- Name your stick “MontereyUSB” or something else that’s easy to identify.
- Click the “Erase” button.

Step 4: Install macOS 12 Monterey onto your USB Drive
Once your USB drive is freshly formatted, it’s time to add the macOS Monterey installer that you downloaded earlier. This requires typing a few lines into the Terminal application — but don’t worry, it’s really simple!
- Open up the Terminal (found in the /Applications/Utilities/ folder).
- Paste the following command into the terminal window:
sudo /Applications/Install\ macOS\ Monterey.app/Contents/Resources/createinstallmedia --volume /Volumes/YOURUSBDRIVE --nointeraction
- Replace YOURUSBDRIVE with the actual name of your USB drive.
- Finally, hit the enter key and type your main admin account password.
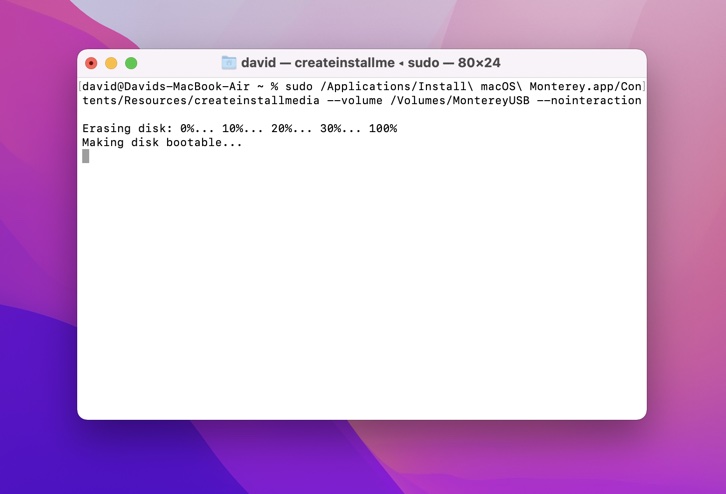
That’s it! You’ll be asked if you want to proceed with the installation, and if you agree, you’ll see a percentage indicator in the Terminal window indicating the progress of the copy.
After that’s completed, you’ll be the proud owner of a bootable macOS Monterey USB stick!
Alternative method: Disk Drill
If you’re a little reluctant to fire up the Terminal, there is another method that you can use to install macOS Monterey in a few simple clicks: Disk Drill.
- Launch Disk Drill and select “macOS Installer” from the left pane.
- Select “Install macOS Monterey” from the list of available options.
- If you can’t see the correct file, there’s an option to manually add it at the bottom of the window.
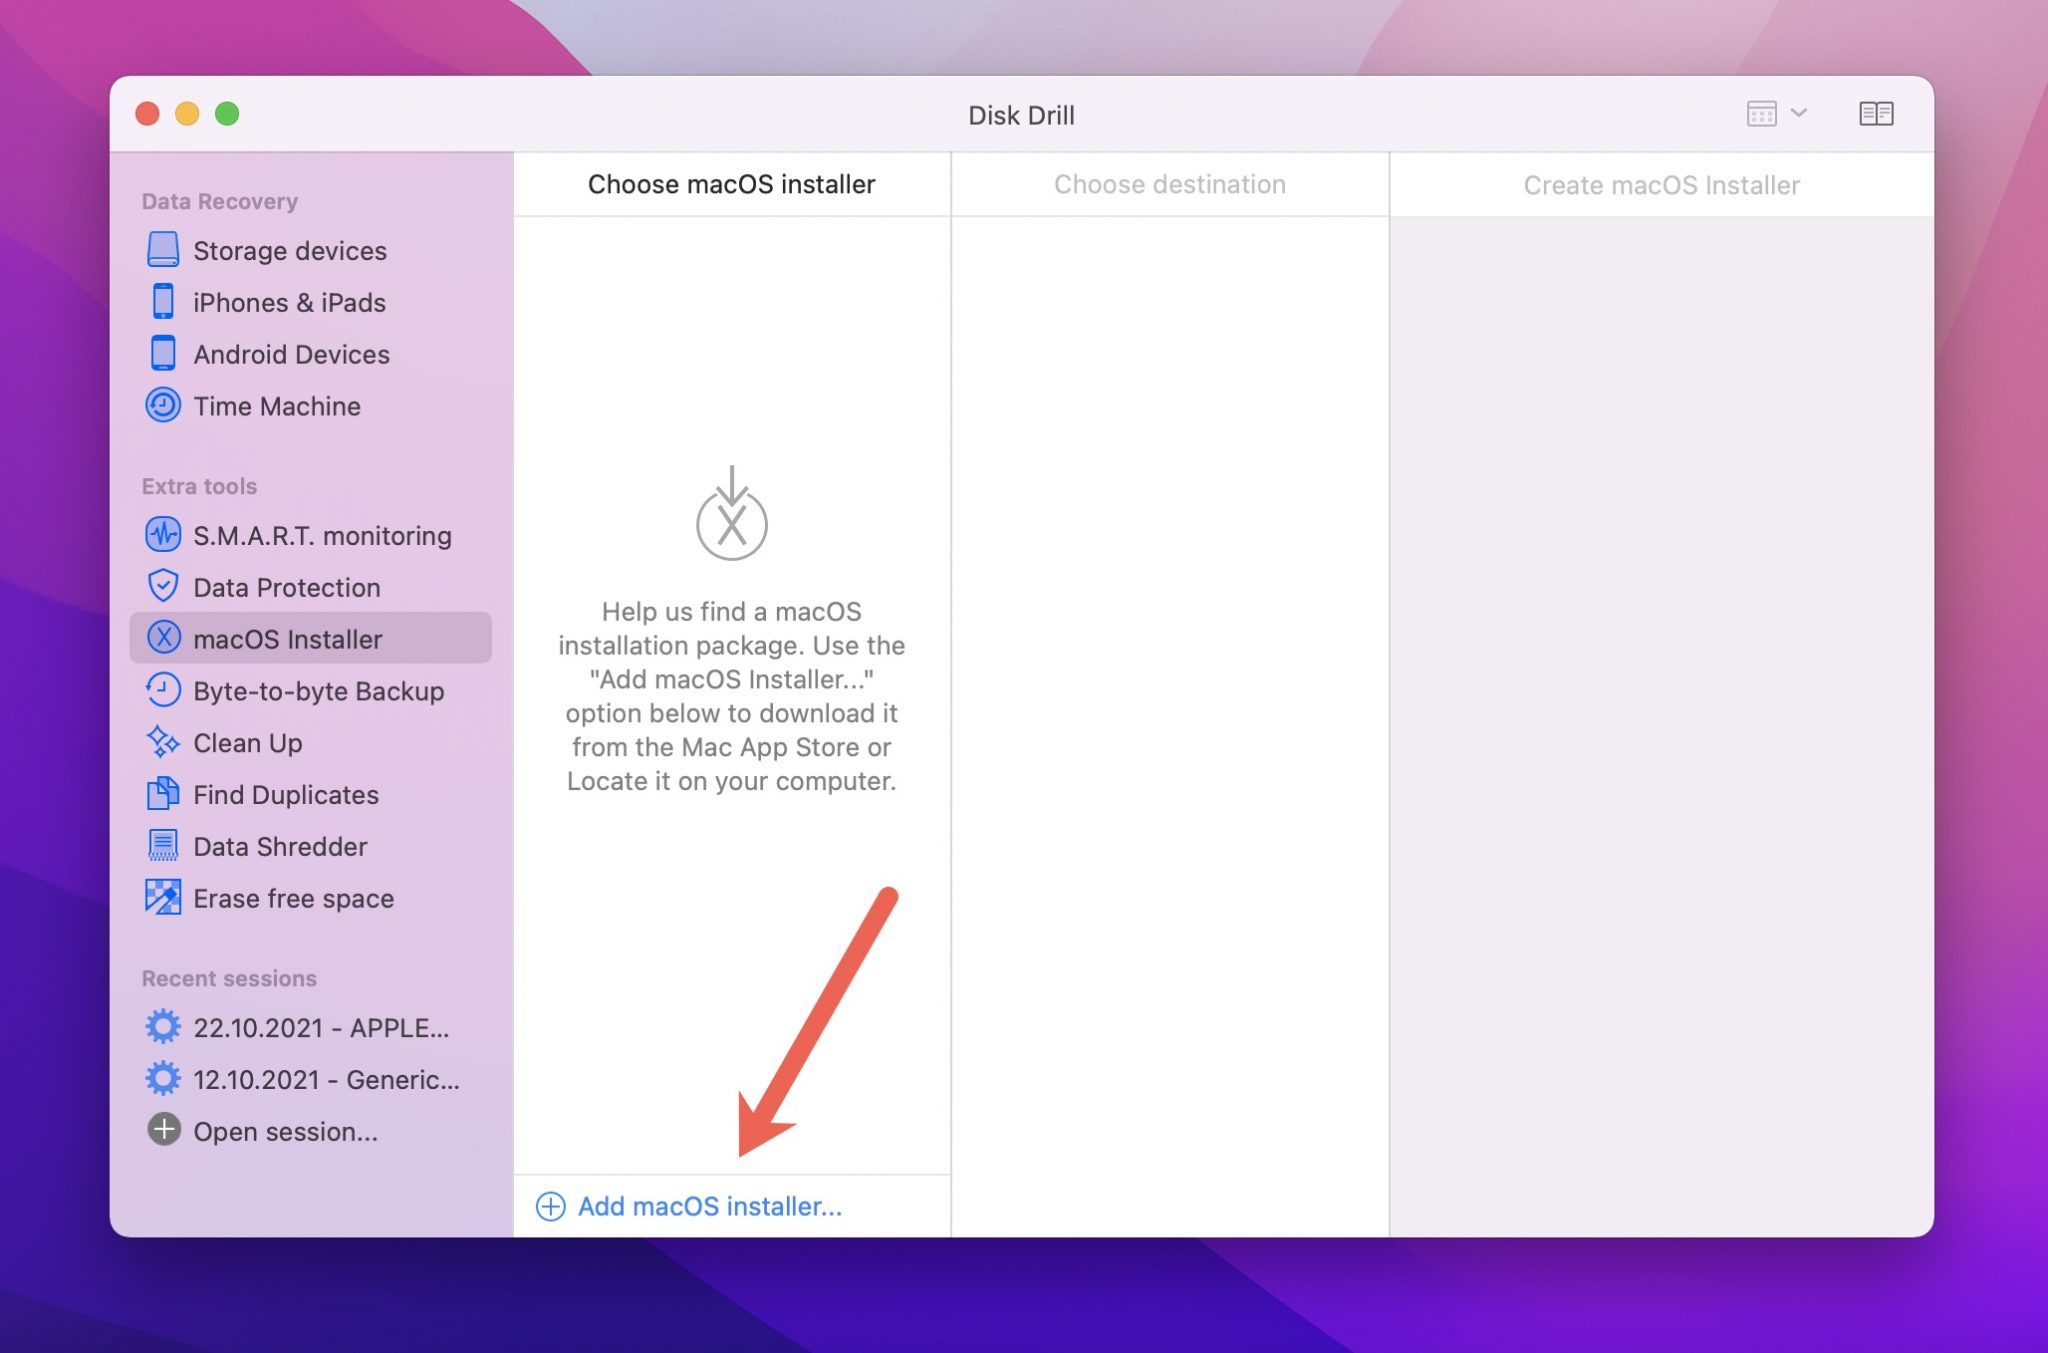
- Next up, select the USB stick you’d like to use.
- Click the “Create macOS Installer” button at the bottom right of the window, but remember that ALL data on the selected USB stick will be erased.
As you can see, the Disk Drill app makes the entire process extremely fast and simple, and it’s especially handy to have around as we approach the next stage of the install process.
Step 5: Clean install macOS Monterey
To begin to clean install macOS Monterey, you’ll need to shut down your machine, then boot again from the USB stick that you created, rather than the main drive.
Historically, this process was as simple as starting your machine whilst holding down the Option key and selecting the correct disk. Today, modern Macs require an extra security setting to be changed to allow the machine to boot using other media.
This process is really simple, but it does vary slightly depending on the age of your machine.
1. Enter recovery mode
To alter your security settings, you’ll first need to boot your machine in recovery mode:
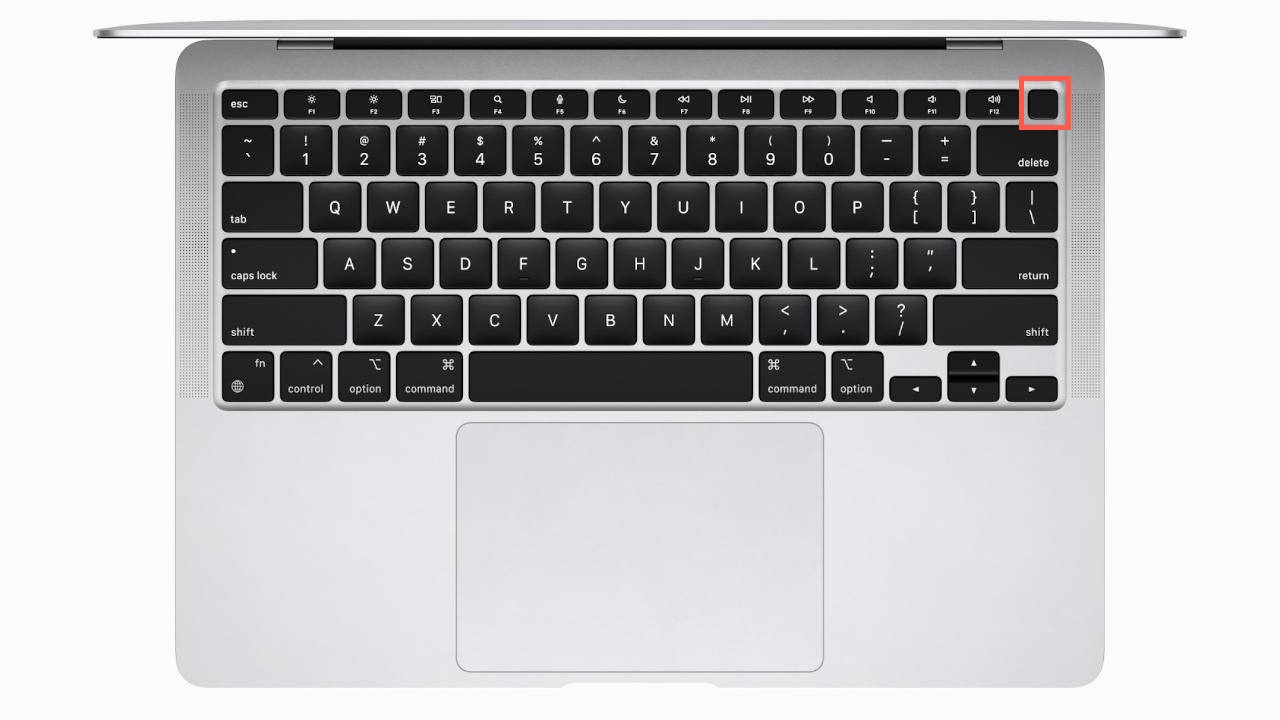
- If you have a new M1-powered machine, you can enter recovery mode by turning on your machine in the usual way, but keeping the power button held down until you see the Startup Options screen.
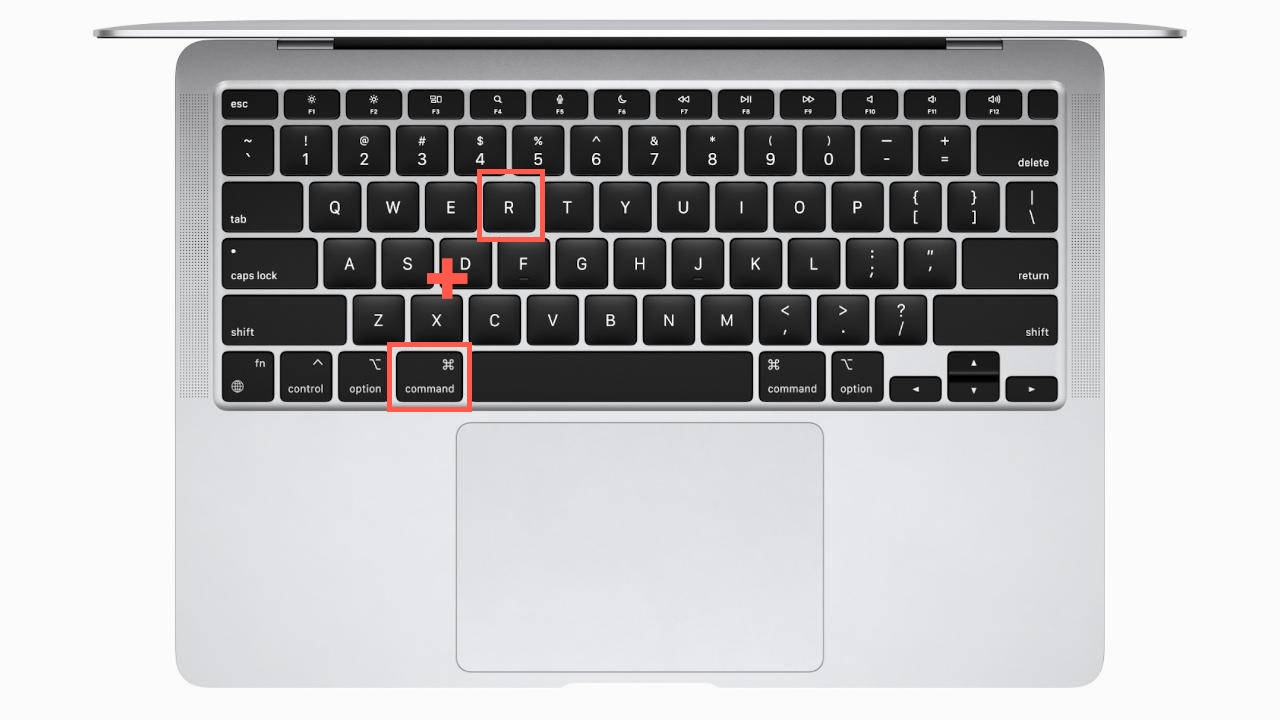
- For all other compatible Macs, you can enter recovery mode by holding down Command-R before the Apple logo appears and the startup chime sounds.
2. Update your startup security settings
Once your Mac is in recovery mode, you can update your security settings to allow the machine to boot from a USB stick. This procedure is also slightly different depending on the age of your machine:
- If you have an M1 Mac, click on the gear icon (Options), then click Continue. Once you see the main recovery screen, click on Utilities in the top menu bar. Next, go to Utilities > Startup Security Utility. Select your main drive and then click the Security Policy button. In the next window, select Reduced Security. You’re now ready to shut down your Mac.
- For Intel Macs with the T2 chip, you need to navigate to the same Utilities > Startup Security Utility screen once in recovery mode. Press the button Enter macOS password, and enter your password again when the StartUp Security Utility window appears. Under Secure boot, select Medium security. Select Allow booting external media under the Allowed boot media. Then, close the window by clicking the red X icon. but after being prompted for a password, you’ll need to select Medium Security, followed by “Allow booting external media”. Once the window is closed, the settings will be applied and stored. You can now shut down your Mac.
- For older Intel Macs without the T2 chip, click Utilities and select Startup Security Utility located at the top bar menu. Check if the option “Firmware Password Protection” is in the off state. If it is on, turn off password protection.
3. Install macOS Monterey
After all the hard work, you’re now finally ready to begin the actual clean installation of macOS Monterey. Once again, you need to follow slightly different instructions depending on if you have a Mac with Apple Silicone or Intel.
Mac with Apple Silicone (M1, M1 Pro, M1 Max)
- Make sure the USB drive with macOS Monterey is connected to your Mac.
- Turn off your Mac. Press and hold the power button until you see the Startup Options window.
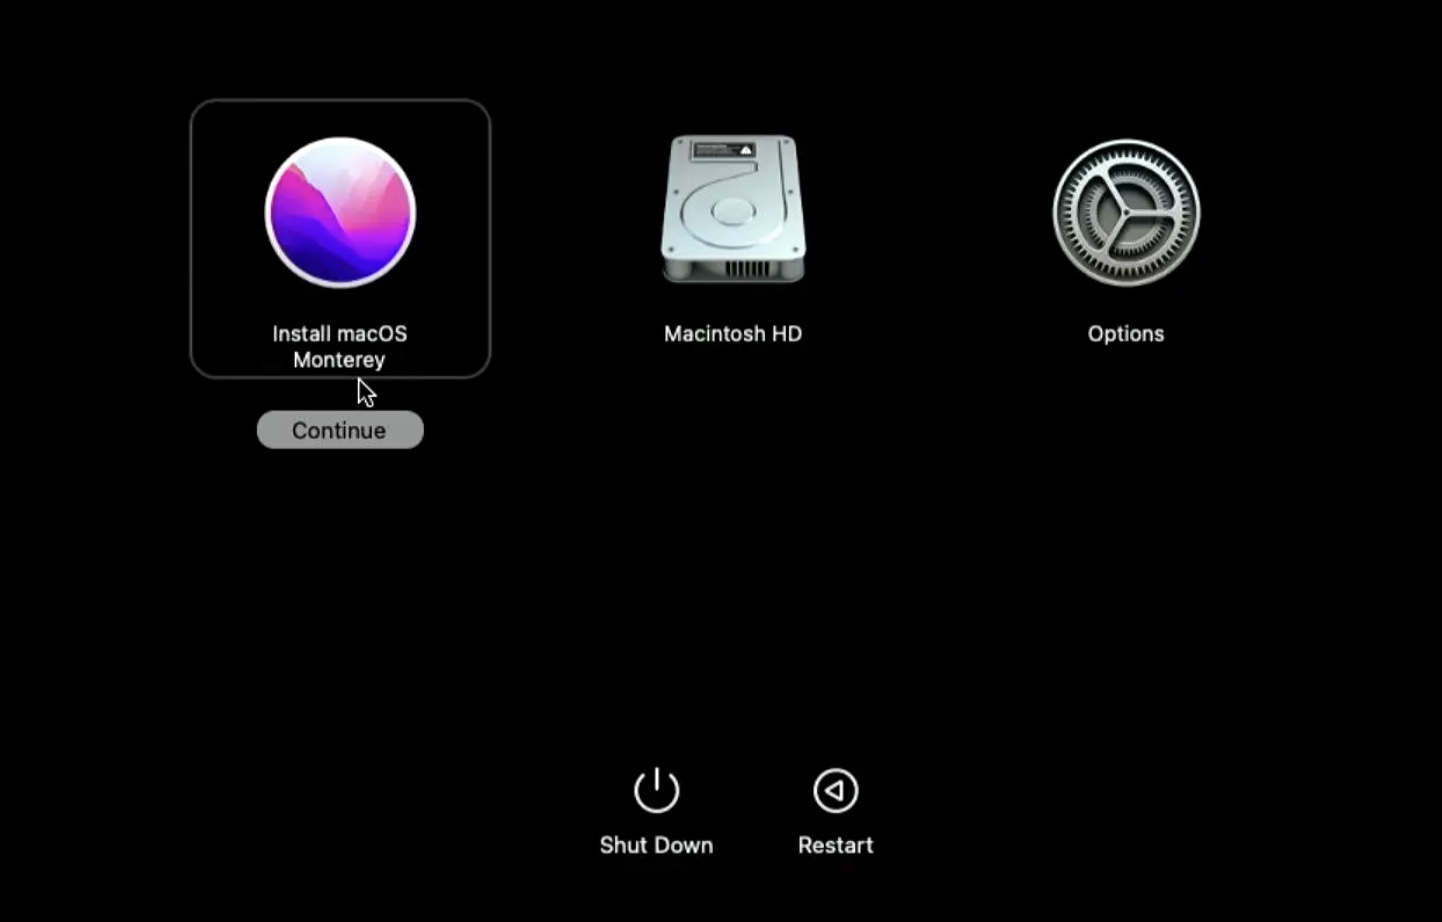
- Select Install macOS Monterey and click Continue.
- You will be presented with the macOS installer window. Close it by pressing Install macOS Monterey > Quit Install macOS.
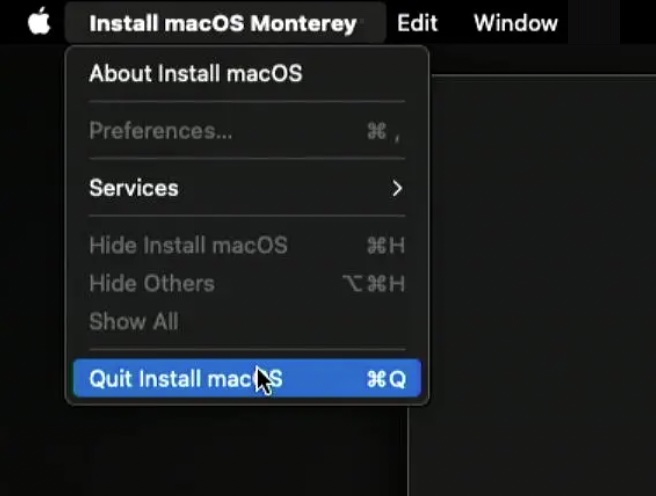
- Click Quit to confirm. We need to do this to enter Disk Utility to erase your main system drive.
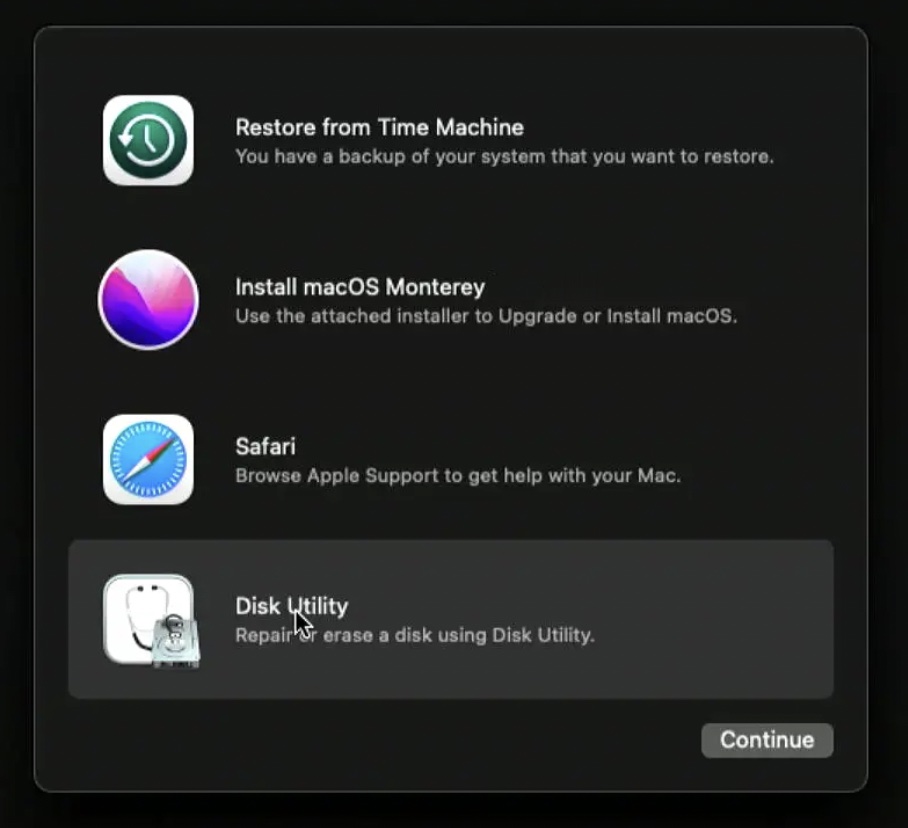
- Select Disk Utility from the list of available options.
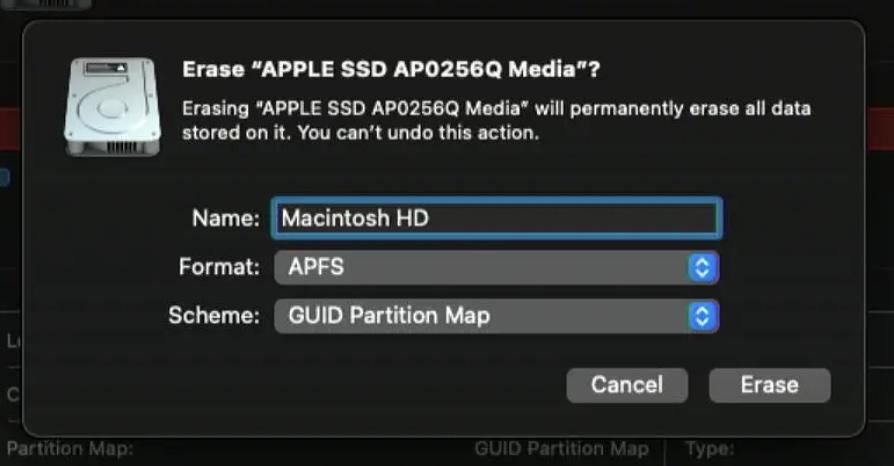
- Click the View button, select Show all devices, and then select your internal drive.
- Click Erase and choose APFS. Confirm.
- Your Mac will automatically restart and bring you to the activation screen. You need to have an internet connection to finish this process.
- Click Exit to Recovery Utilities.

- Shut down your Mac and press and hold the power button until you see the Startup Options window again,
- Select Install macOS Monterey and click Continue.
- Install macOS Monterey by following the installation wizard.

Macs with Intel processors (both with and without the T2 chip)
- Make sure the USB drive with macOS Monterey is connected to your Mac.
- Turn off your Mac. Start your Mac while holding down the Option key.
- Choose the Install macOS Monterey boot option.
- Then, enter your account password to access the macOS recovery menu.
- Choose Disk Utility.
- Click the view button, and select Show All Devices.
- Select your internal drive.
- Click Erase. Make sure to keep the format as APFS. Confirm.
- Your current macOS is now deleted. Close Disk Utility to go back to the Recovery window.
- Click Install macOS Monterey and continue by following the installation wizard.
The installation will begin. Don’t be surprised if your Mac restarts a couple of times during the installation process. After about 30 minutes, the clean installation of macOS Monterey should be finished, and you can enjoy your pristine operating system.
Conclusion
If you want to restore your Mac to its original state when you first started using it, a clean installation of the operating system is the only option. Without running a proper clean install, you risk keeping old data and application settings, which could drag down the performance of some applications and the operating system as a whole. As long as you take the necessary precautions to back up all personal files beforehand, this is a safe process that can help you restore some of the performance your Mac has lost over time.
FAQ
To perform a clean install of macOS Monterey, follow these steps:
- Backup your current installation and any personal files
- Download the official macOS Monterey installer
- Format a USB flash drive for macOS Monterey
- Load the macOS Monterey installation files onto your USB drive
- Install the operating system from the drive
Once you’re done with the reinstallation and no longer need the installer, it’s safe to delete it. However, it’s a good idea to keep the USB stick you’ve prepared in case you need to reinstall the operating system in an emergency.
If you want to downgrade to a previous version of macOS, like Big Sur from Monterey, you’ll have to make sure to specifically download that version from the official repository, and then follow the above steps for installing from a flash drive.
- Backup your current installation and any personal files
- Download the official macOS Big Sur installer
- Format a USB flash drive for macOS Big Sur
- Load the macOS Big Sur installation files onto your USB drive
- Install the operating system from the drive