


Did you lose data inside a virtual machine, or its own files? Our data recovery specialists have tested all virtual machine data recovery methods that can save files “trapped” inside a virtual machine, or restore its own files to render it usable again. This article presents their findings as friendly, step-by-step guides, with extra information where necessary, to provide you with the best solutions for both scenarios.
Can You Recover Data From a Virtual Machine?
You can recover data from a virtual machine, but choosing the best virtual data recovery method depends on what was lost or damaged:
- 🪆 Was your data lost inside a virtual machine that used “solid” files with a pre-allocated size for storage? You must stop using it to maximize your chances of recovering your files, but you can keep using the host OS as usual.
- ❌ Were one or more of the virtual machine’s own files deleted, lost, missing, or corrupted, rendering it unusable, or was it configured to use split/segmented storage files? Were its files stored on one of the host’s drives that got damaged? Then, try to minimize use of the host OS and avoid writing new data to the drive where the virtual machine’s files were stored. Otherwise, the deleted data could get overwritten.
If you need to recover a virtual machine’s own files, usually their virtual storage devices will be stored in one of the following file formats:
- Broadcom’s VMware products typically use their own VMDK format for their storage (read more about it at this Quora post).
- Microsoft’s Hyper-V virtualization usually stores data in VHD/VHDX files.
- Oracle’s VirtualBox virtualization software prefers its own VDI container format.
Common Virtual Machine Data Loss Scenarios
Virtualization data recovery can get complicated, because data loss…:
- 🧩 …can happen either inside a guest OS and its virtual disks, or outside it, on the host’s drive where the virtual machine is stored.
- 🧨 …may manifest in various ways, due to various causes.
Our data recovery experts’ findings helped us craft the following quick diagnostic table to help you find the correct recovery method for your symptoms and potential cause.
| Data loss scenario | Potential cause | Prioritized solution |
| Files missing from working VM | Files were deleted, the guest OS’s Trash/Recycle Bin was emptied, or data was removed from a shared folder. | Recover the deleted files directly on the guest OS from inside or, even better, outside the VM. |
| Unusable VM with existing storage file | Data crucial for the VM’s operation (like OS files, its virtual disk’s bootloader, or one or more partitions) is missing, corrupted, or damaged. | Mount the VM’s virtual disk on the host OS and copy the data from it to another storage device. |
| Files missing from unusable VM’s storage file | Although the VM’s virtual disk can be mounted and accessed, files were deleted and unavailable, partitions damaged, or its file system corrupted. | Recover files from the virtual disk with data recovery software. |
| Unusable VM without storage file | The VM’s folder is missing (potentially deleted or moved), a datastore failed, or the host drive where it was stored was formatted. | Recover the deleted/missing virtual disk from the host drive with a data recovery app. |
| Data loss with available backups/clones/snapshots | Despite losing data inside a VM or its own files, the VM was backed-up, cloned, exported, protected by a hypervisor/NAS/cloud backup, or there are available snapshots of its previous states. | Restore the Virtual Machine/its contents from a backup, cloned/exported version, or revert to older snapshot. |
| Host storage issues | The VM’s files were stored on a failing HDD/SSD/NVMe, external drive, RAID, NAS, or datastore. | Clone the problematic drive to a byte-to-byte image, and use recovery software on that to save the VM’s files. |
How to Perform Virtual Machine Recovery
Even when you know the ideal path for your data loss scenario, the actual steps for virtual machine recovery can be convoluted and confusing. Not, though, if you follow the guides below, where we will go over specific recovery steps and provide all necessary additional details for the five VM data recovery methods that cover most bases.
Method 1: Recover Files From a Virtual Disk With Data Recovery Software
Did your files inside a virtual machine go missing, are inaccessible, were affected by file system/partition damage, or were accidentally deleted?
Don’t install a data recovery app in the virtual machine; That would cause more write operations to its virtualized storage, potentially overwriting the files you want to recover. Instead, perform data recovery from outside the virtual machine to keep its virtual storage (and all files on it) intact. For that, you need a modern data recovery solution that, in addition to physical storage devices, can also work with virtual disk images.
Disk Drill is such an app, supporting a ton of the most popular disk storage formats, virtualized or not, including VMDK, DSK, BIN, DAT, RAW, DD, DMG, IMG, ISO, VHD, and VHDX.
To recover files from your virtual machine’s storage without having to power it on using Disk Drill:
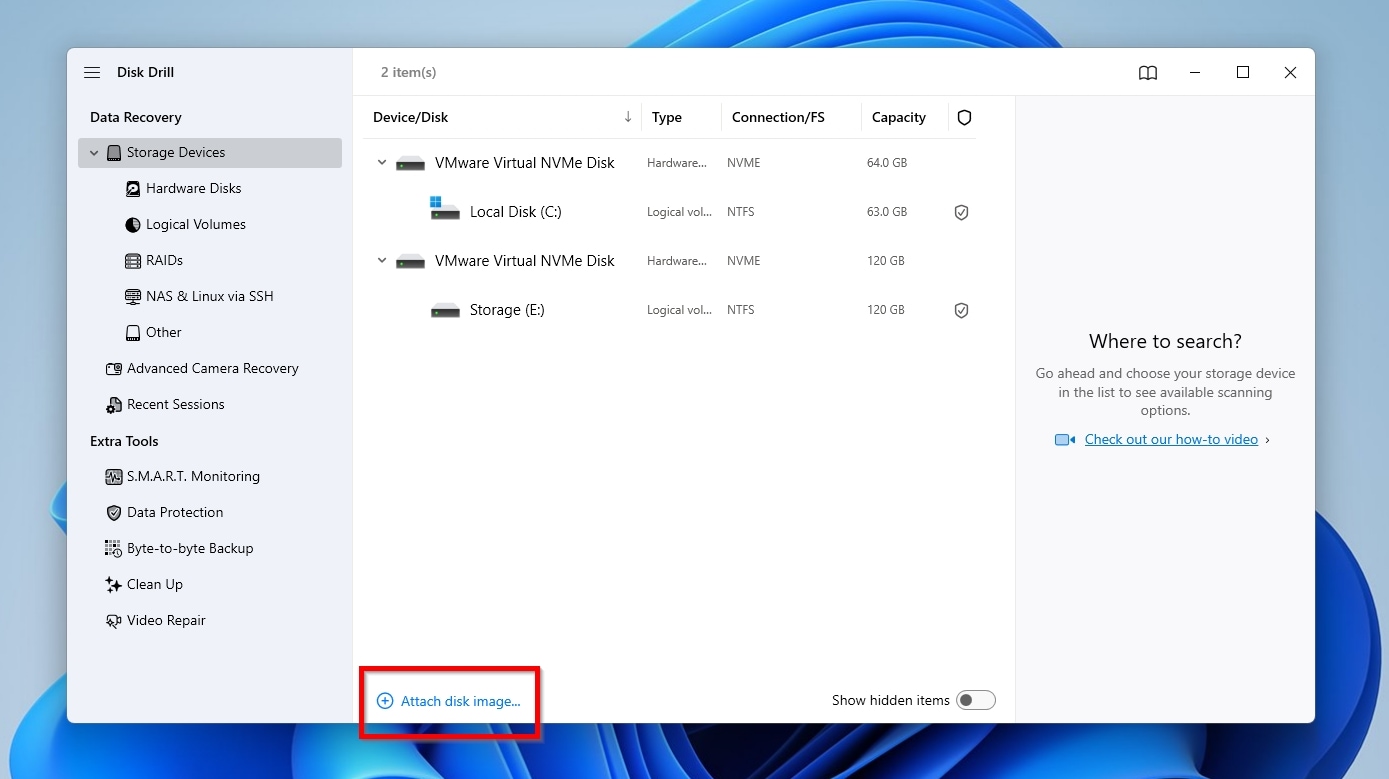
- Don’t power on your virtual machine. Download Disk Drill from its official site directly on your host OS, where you’re also running the virtual machine’s virtualization software. Install it, and run it. While on the app’s Storage Devices page, click Attach disk image on the bottom left of the Device/Disk list.
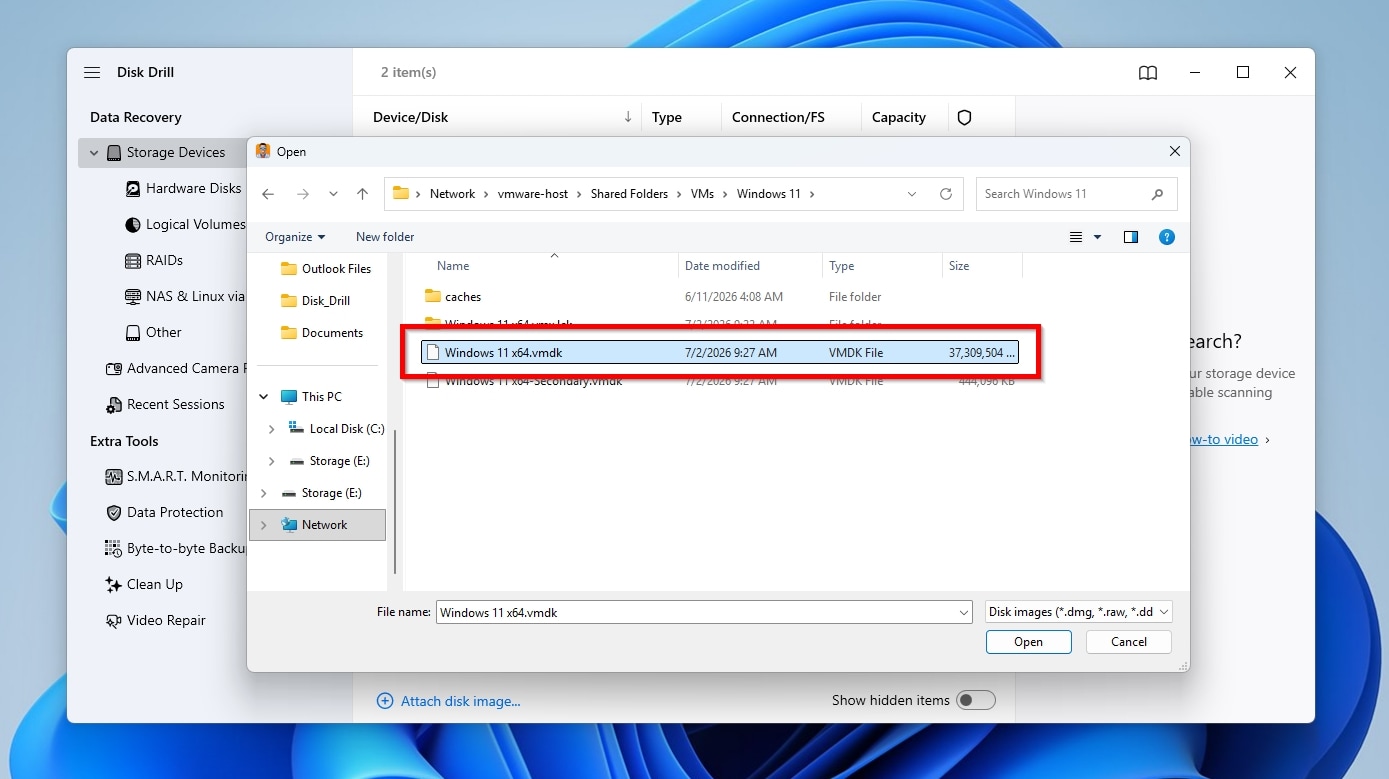
- Point the file requester to the file of your virtual machine’s disk from which you want to recover files. Note that your virtual machine could have been using more than one virtual disk, and they could even be stored on different paths, or with a mix of file types (like both VMDK and VHD on the same virtual machine when dealing with VMWare file recovery). If you don’t know the virtual disk’s file type and where to find it, check your virtual machine’s storage configuration in the virtualization app you were using.
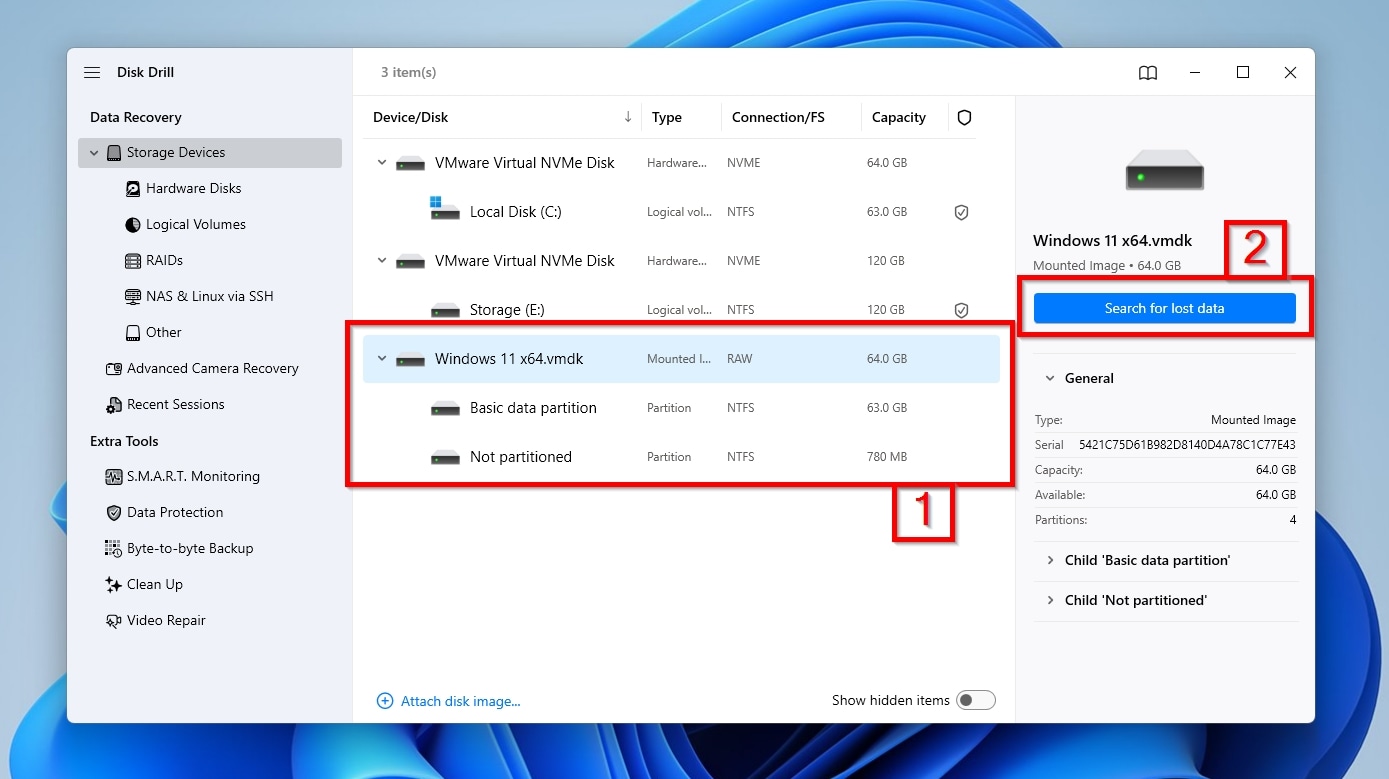
- After the app attaches the virtual disk image you selected, you’ll see the storage device within it appear in Disk Drill’s Device/Disk list (1). Click it, then click Search for lost data.
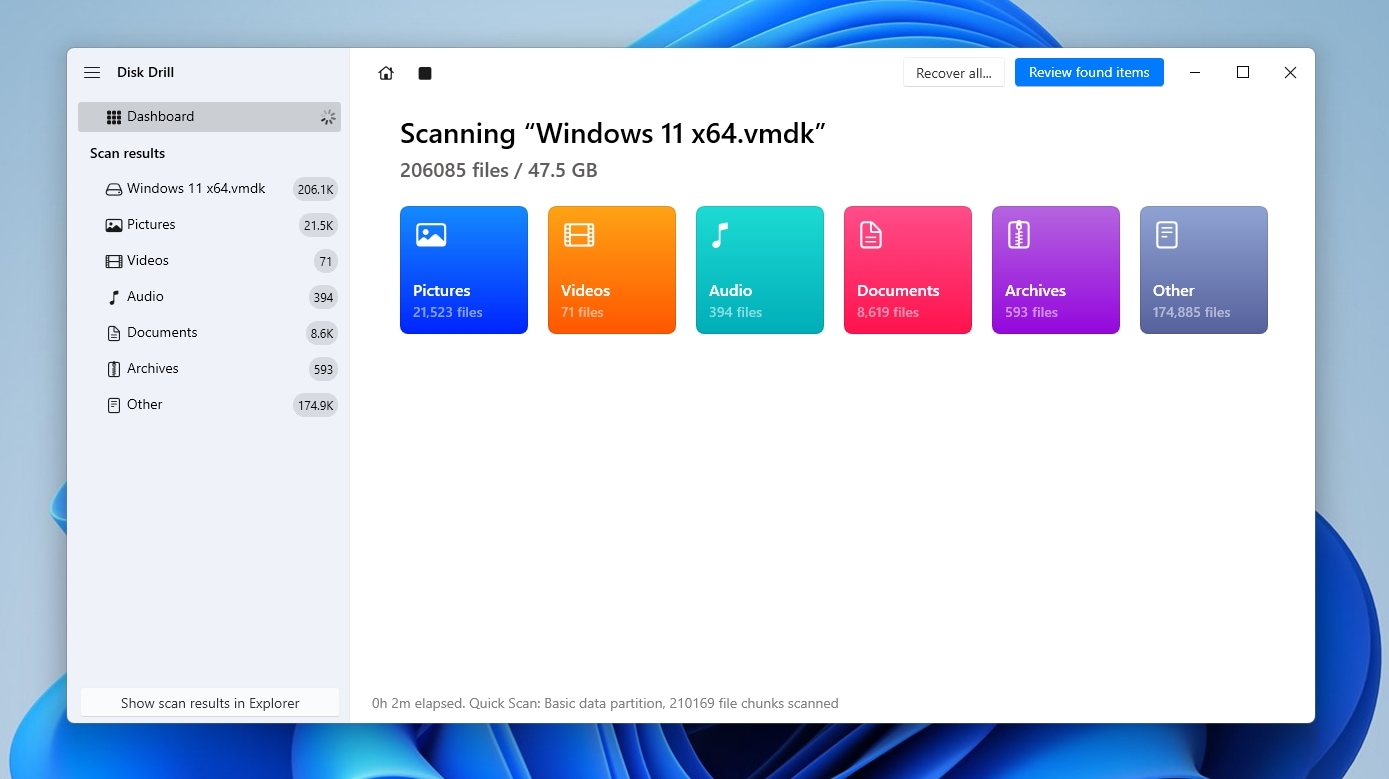
- Allow Disk Drill’s scan to complete to find as many files as possible. Its duration depends primarily on the host PC’s storage speed and capacity, and the CPU’s performance.
- When the scan completes, Disk Drill will show a pop-up stating “All recovery methods (are) complete” (1). You can safely close this and click Review found items (2) to see what the app found.
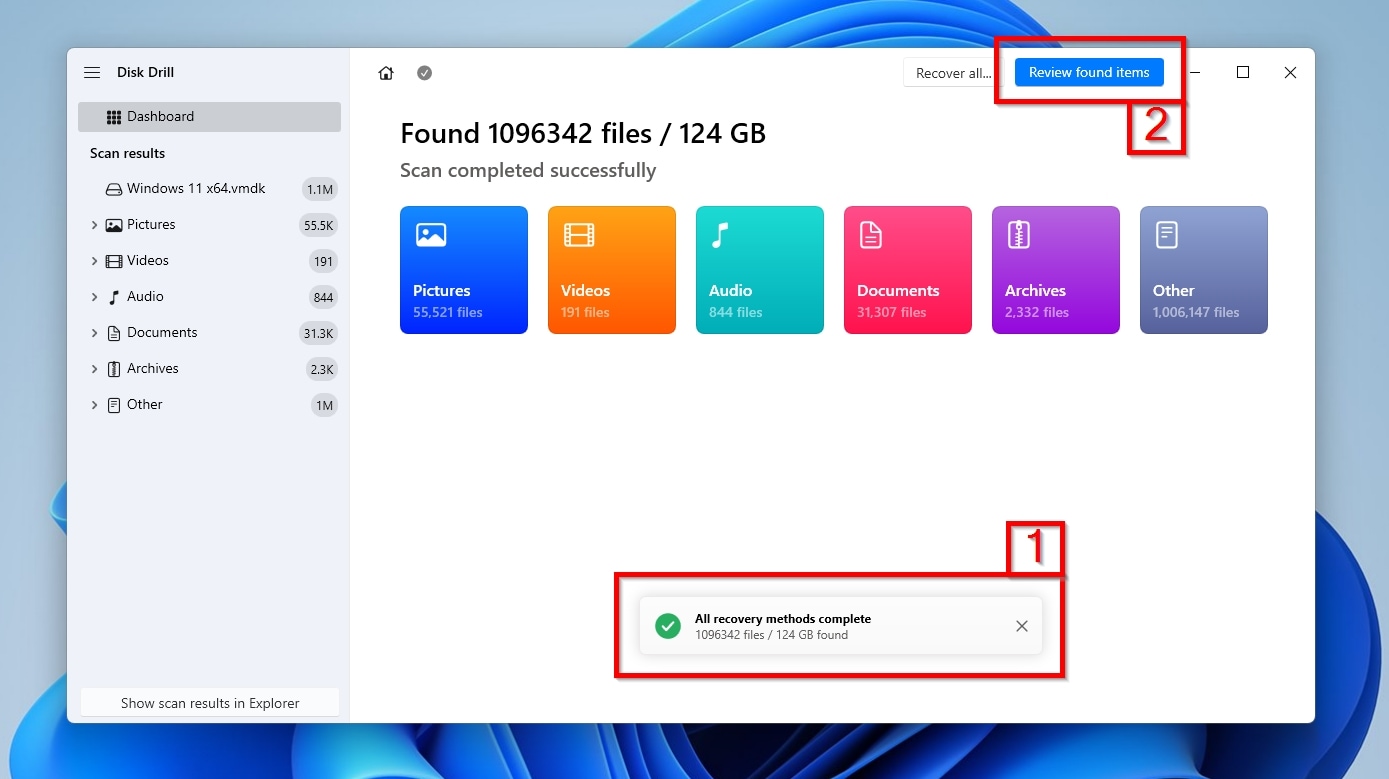
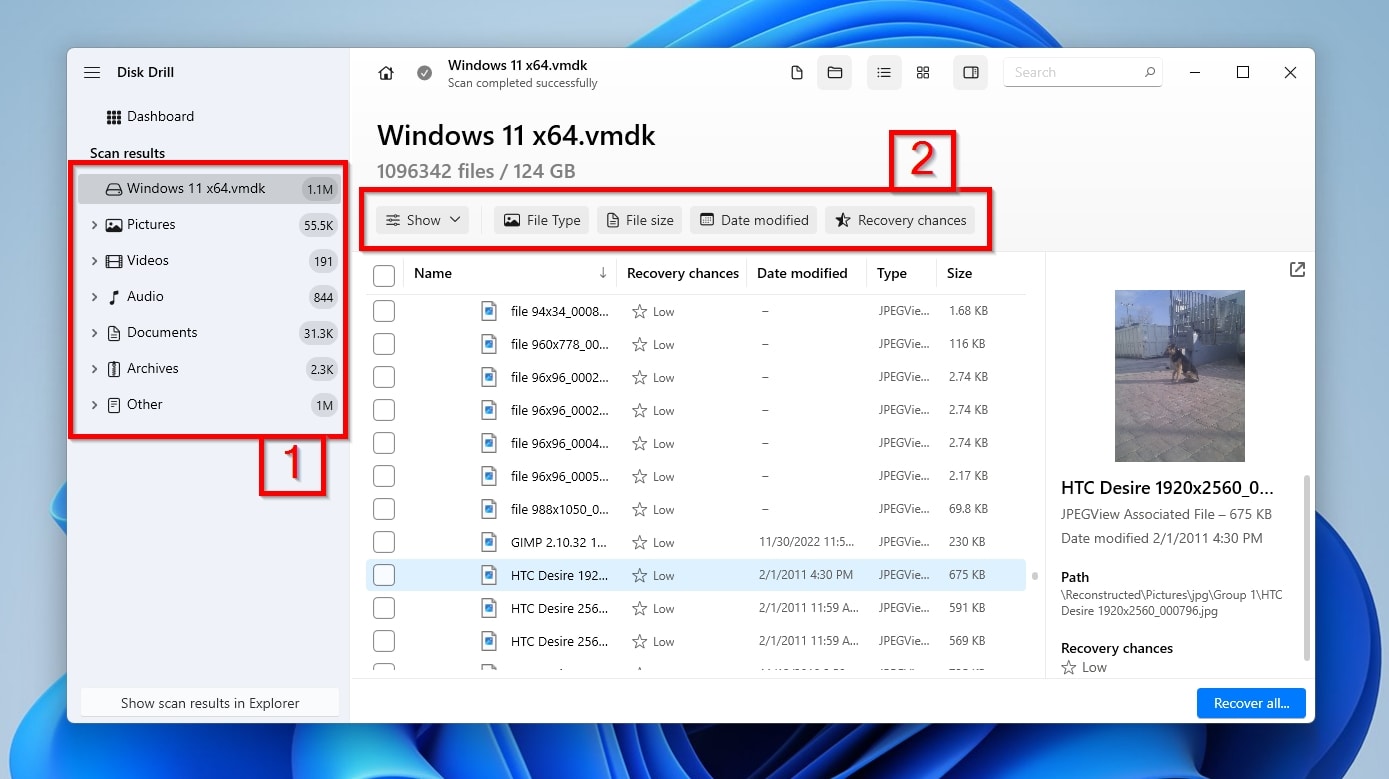
- Disk Drill’s results presentation is accompanied by two groups of Categories (1) and Filters (2) you can use to make sense of all the files it located, based on characteristics like their file type, size, and more.
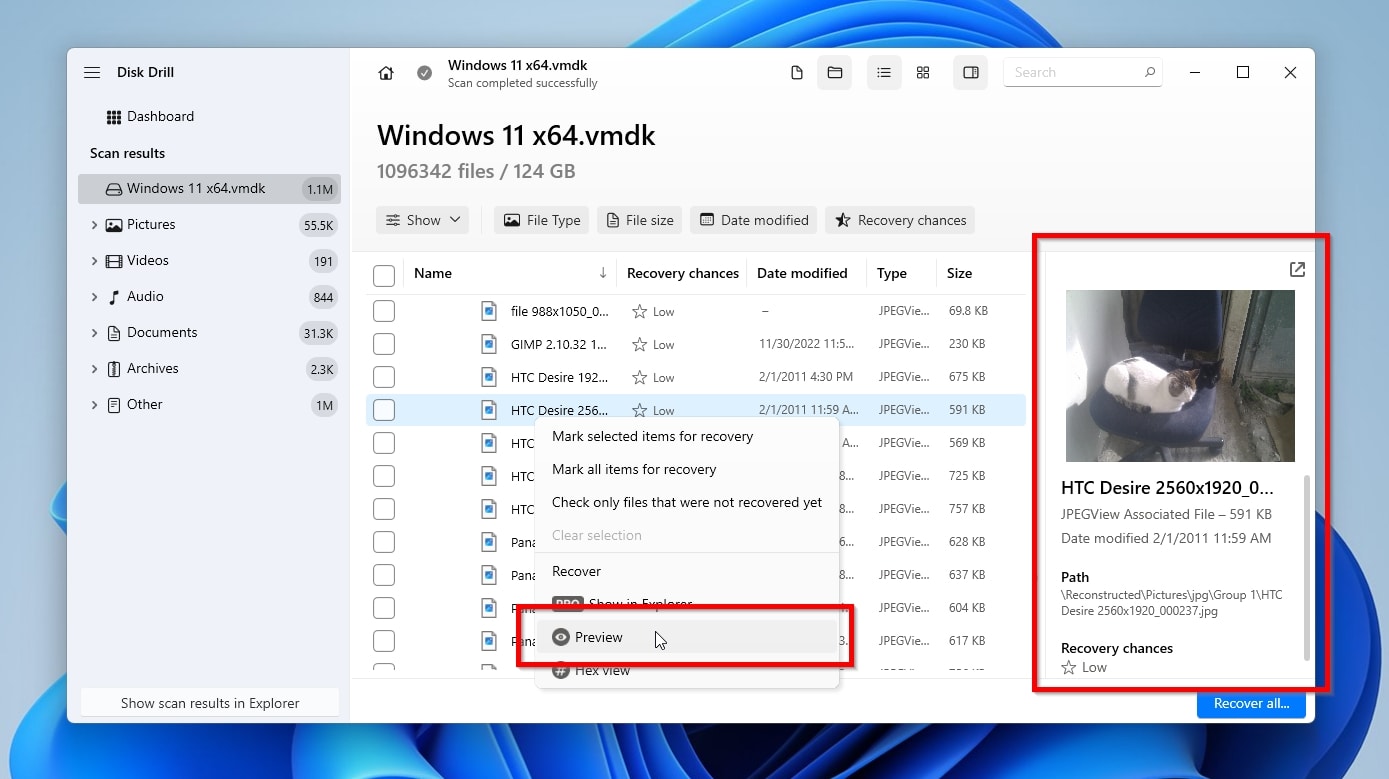
- If it’s not already visible on the right, enable Disk Drill’s Preview Pane by pointing at a file and clicking on the eye icon, or by right-clicking on it and choosing Preview. The app can natively preview many file types, from TXTs to JPGs, as well as those for which viewers are installed on the OS. A preview helps you select the correct files for recovery, but also acts as a preliminary test of their “recoverability”, since it hints at their contents being intact. Disk Drill offers an additional recoverability indicator for each file, in the Recovery chances column.
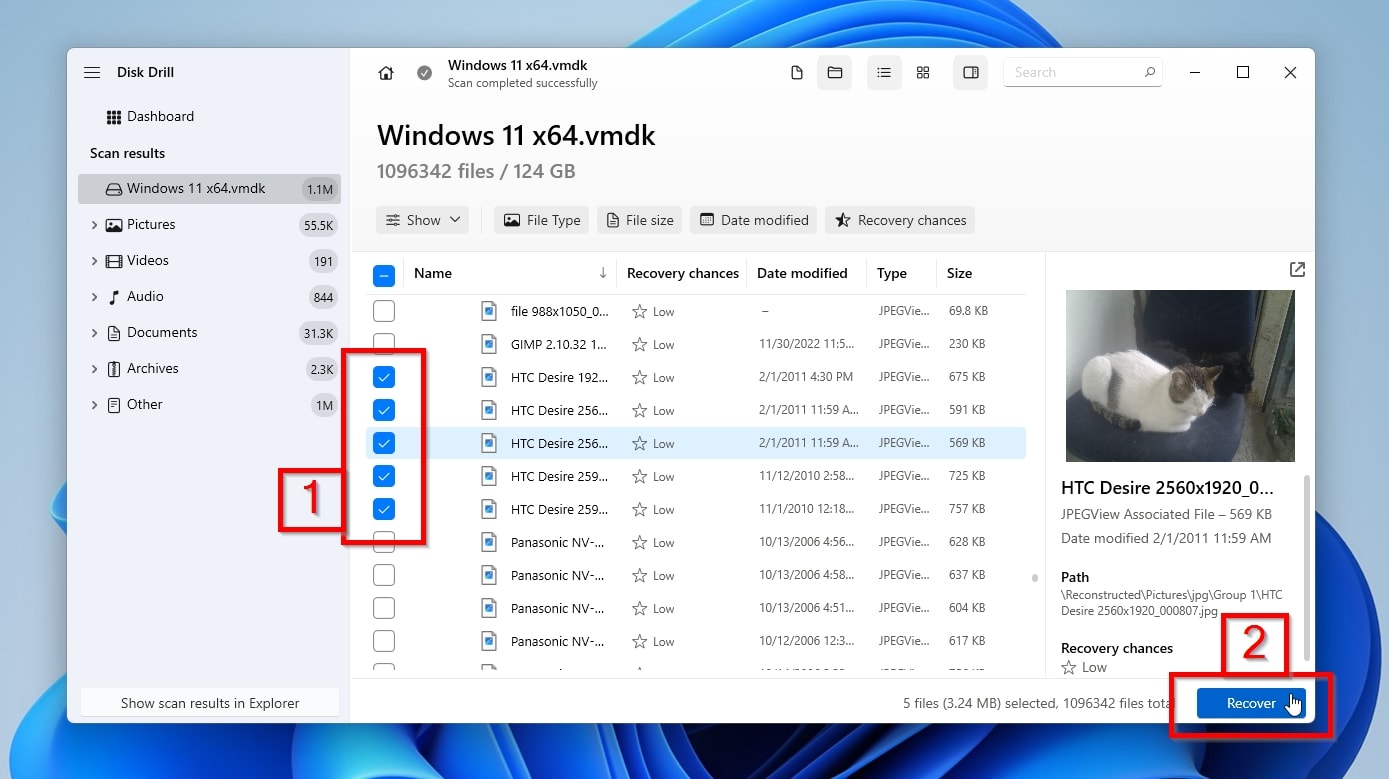
- When you’ve found the files you want to get back, mark them for recovery by placing a check mark on their left. When you’re happy with your selection, click Recover.
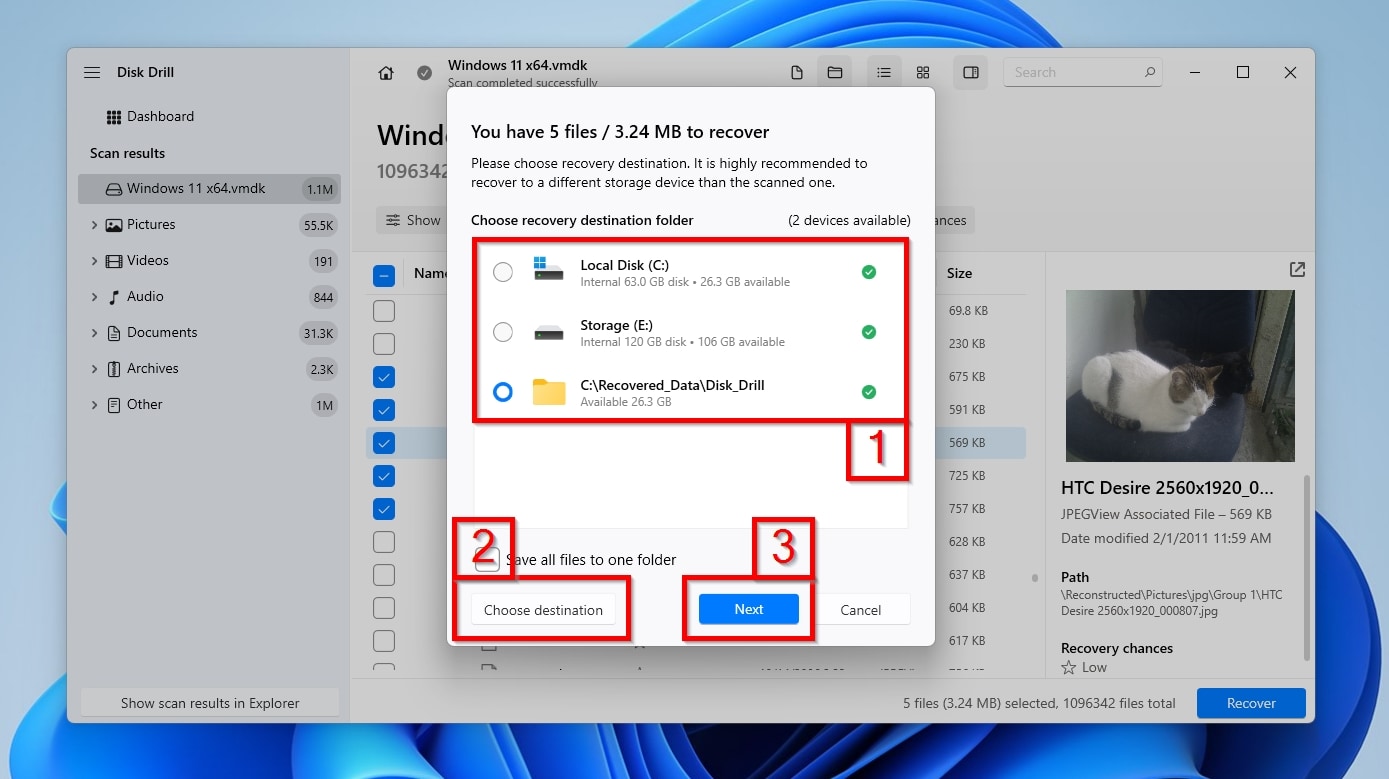
- Choose where you’d like to store the recovered files. If the path you want isn’t among those the app “remembers” from past recovery runs (1), select it by clicking Choose destination (2). When done, click Next.
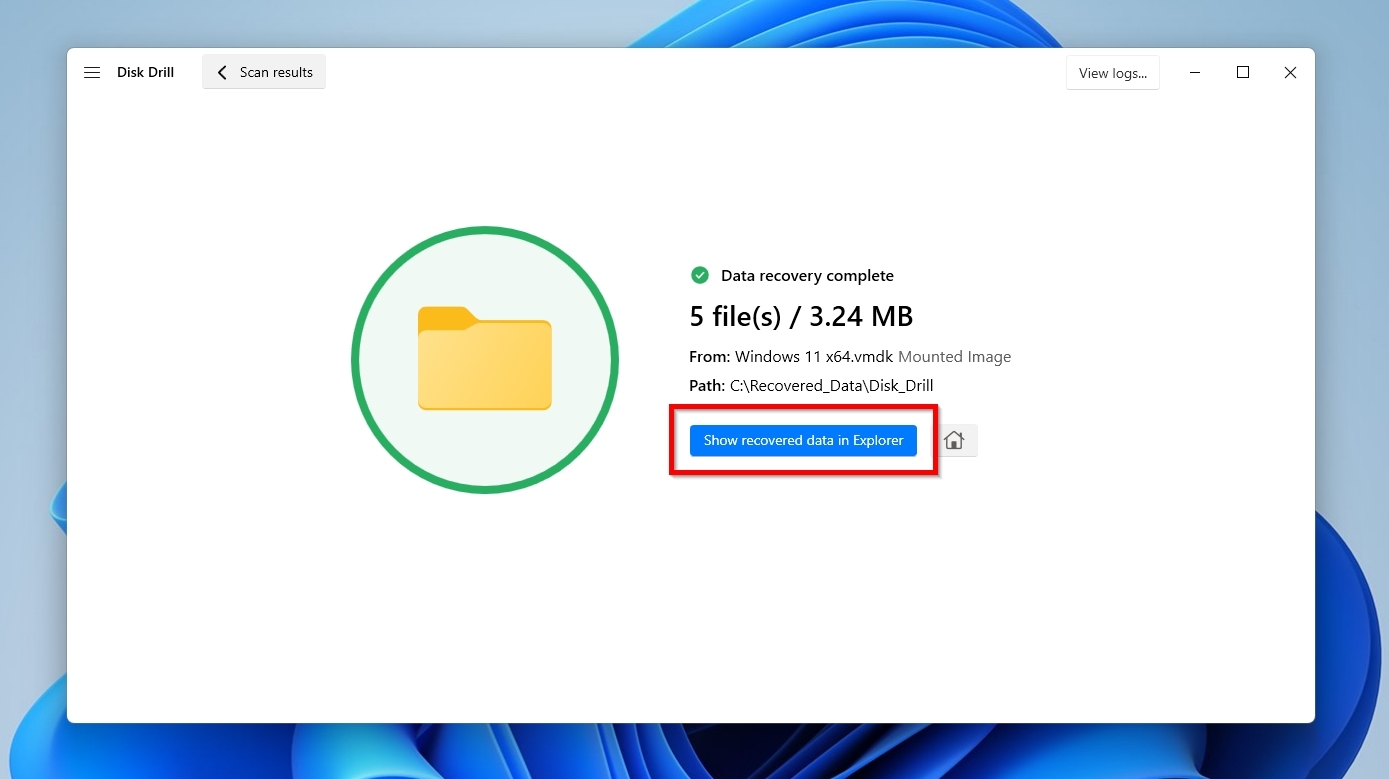
- After a while, Disk Drill will report that “Data recovery (is) complete”, with a few additional details about the recovery. Click Show recovered data in Explorer to insta-find and check the recovered files using the host OS’s default file manager.
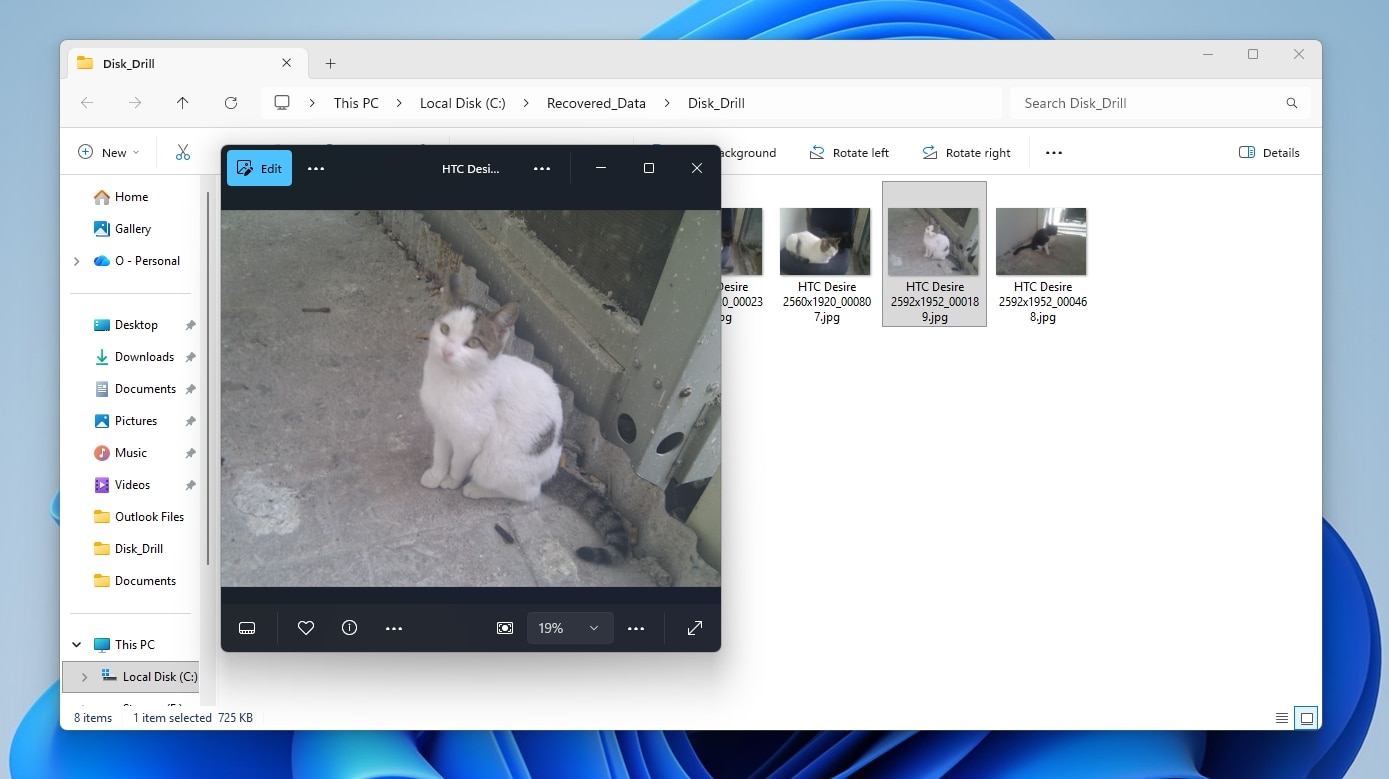
- Verify that all files were recovered correctly before proceeding with any drastic moves, such as deleting and re-creating your virtual machine (and all its virtual drives).
Method 2: Mount the Virtual Disk and Copy the Data Manually
Is your virtual machine unbootable, freezing, or generally “acting up”, but its virtual disks are intact? You can perform VHD data recovery “from outside” the virtual machine, working directly in the host OS with no third-party tools.
The catch is that this method only works with existing, visible, and normally accessible files within a healthy VHD/VHDX image. For deleted/missing files, or when dealing with issues like formatted partitions or corrupted file systems within the virtual disk image, stick with the first method.
Windows can directly mount VHD and VHDX files and access their contents like any storage device, but that functionality is hidden in the administrative Disk Management tool.
To mount your VHD/VHDX image as a storage device with Disk Management, and access its contents with Windows File Explorer:
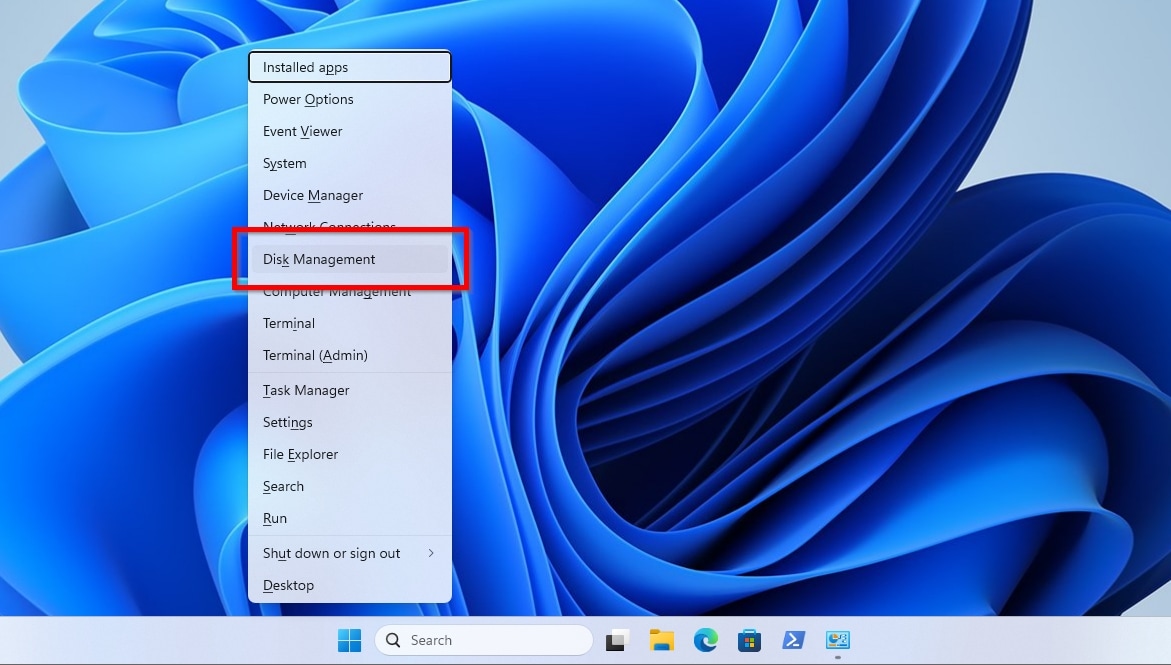
- Press Windows Key + X to access Windows’ quick access menu of administrative tools, and click Disk Management.
- Click the Action menu option to expand it, and choose Attach VHD.
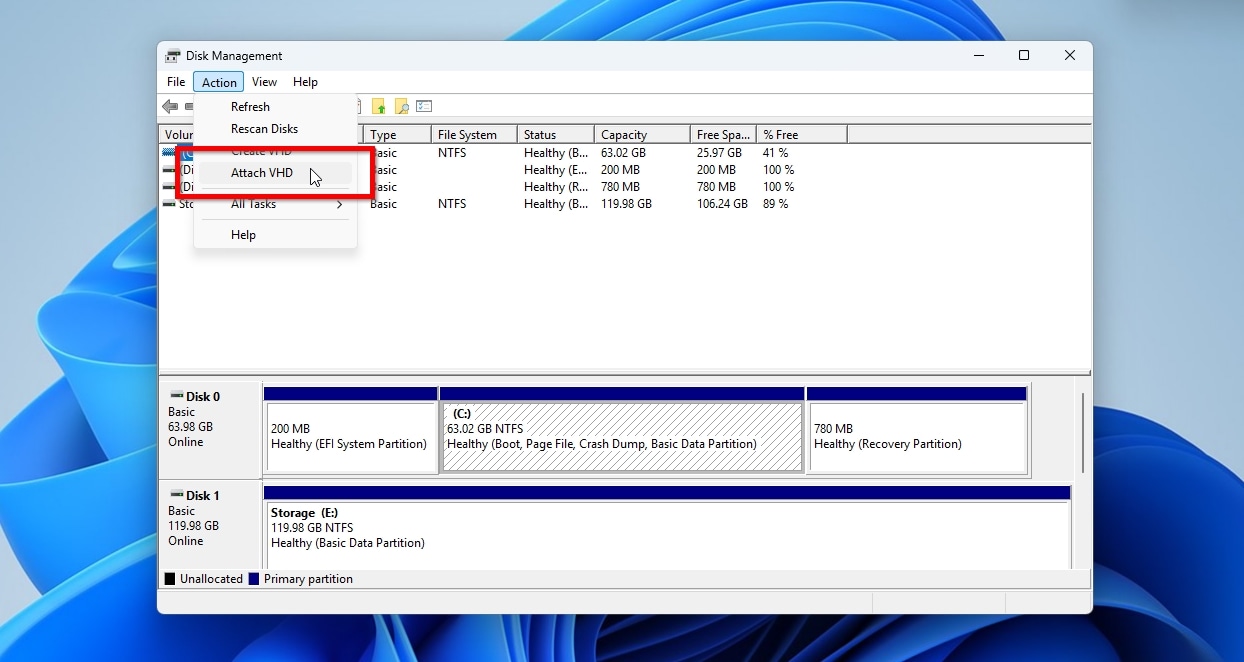
- Click the Browse button in the Attach Virtual Hard Disk dialog to select the VHD/VHDX disk image that you want to mount.
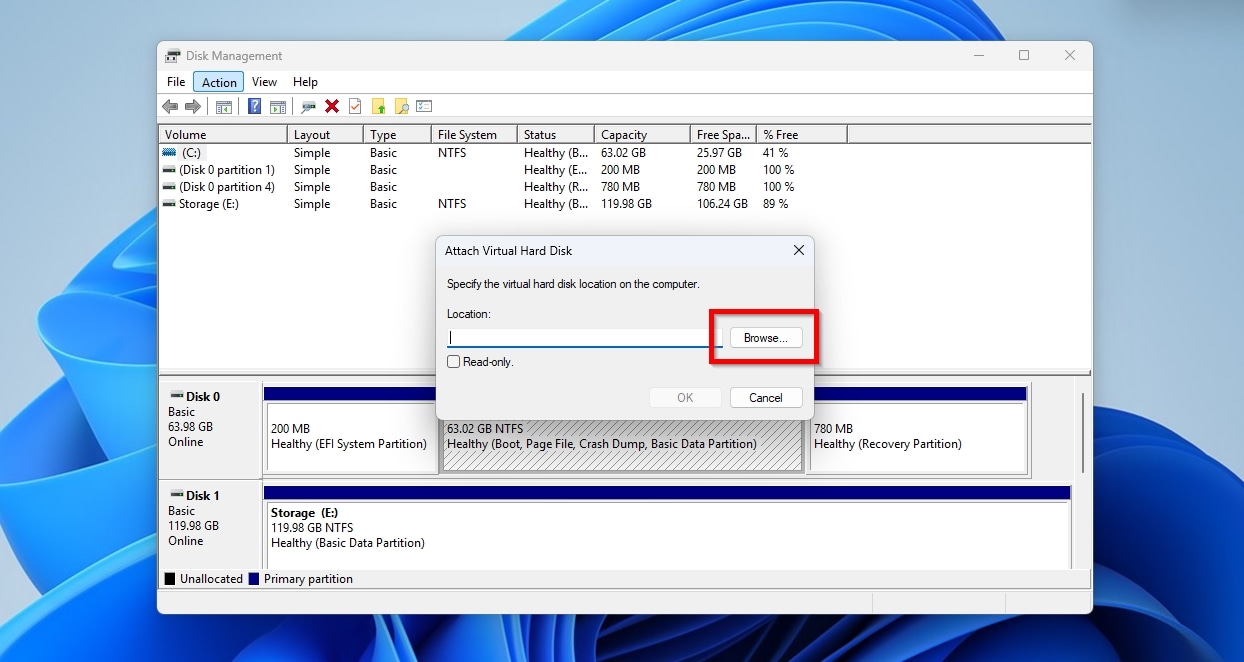
- Select your VHD/VHDX disk image through the requester, and you’ll see its full path in the Location textarea of the dialog. To eliminate any chance of newly-written data overwriting the files you want to get back, enable the Read-only flag directly underneath it. Then, click OK to attach the selected disk image.
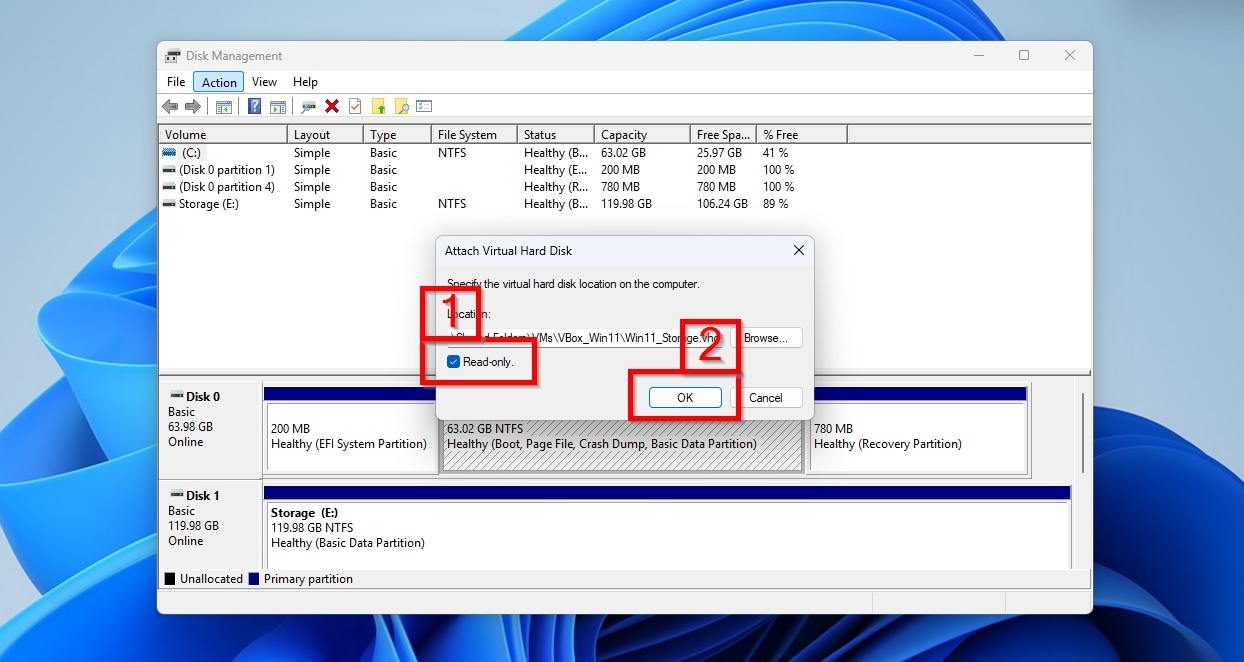
- Any attached storage, including disk images, remains inaccessible without a drive letter. If Windows doesn’t mount your image by auto-assigning a letter, right-click a partition, choose Change Drive Letter and Paths, then select the letter you want. Repeat for each partition if your image has more than one and you want to mount all of them. Avoid selecting letters that are already mapped to other storage devices or network paths.
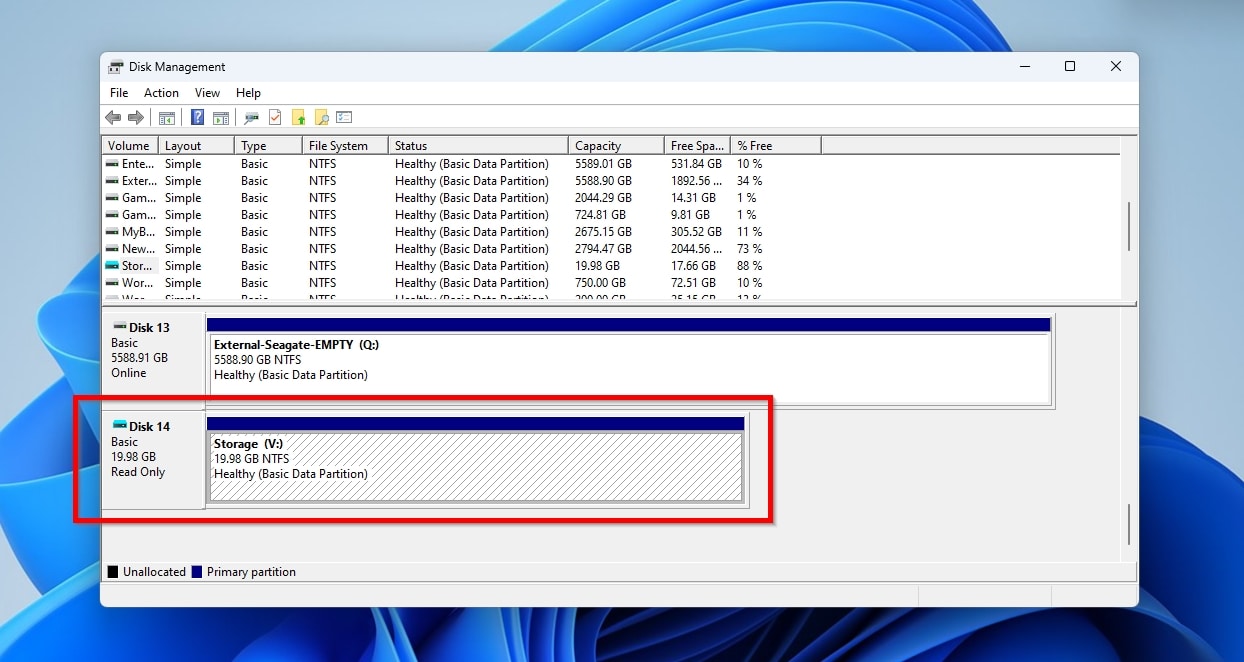
- With your disk image mounted, it should be accessible through a letter in any file manager such as Windows File Explorer, like your other storage devices. Use such an app as your virtual data recovery tool to find the files you want and copy them from your mounted disk image to a safe location outside it.
Method 3: Recover Deleted Files From Inside the Guest OS
Does your virtual machine and its guest OS work perfectly fine, but…
- 💾 …you’ve accidentally deleted some files.
- 🗑️ …you’ve absentmindedly emptied the Recycle Bin/Trash folder.
- 🧼 …an app’s automatic file consolidation/cleanup processes removed some files you’d prefer to keep.
Then, you can treat your virtual machine just like you would your actual PC, and follow an almost identical approach for your virtual data recovery.
To locate and recover files lost in your virtual machine from within it:
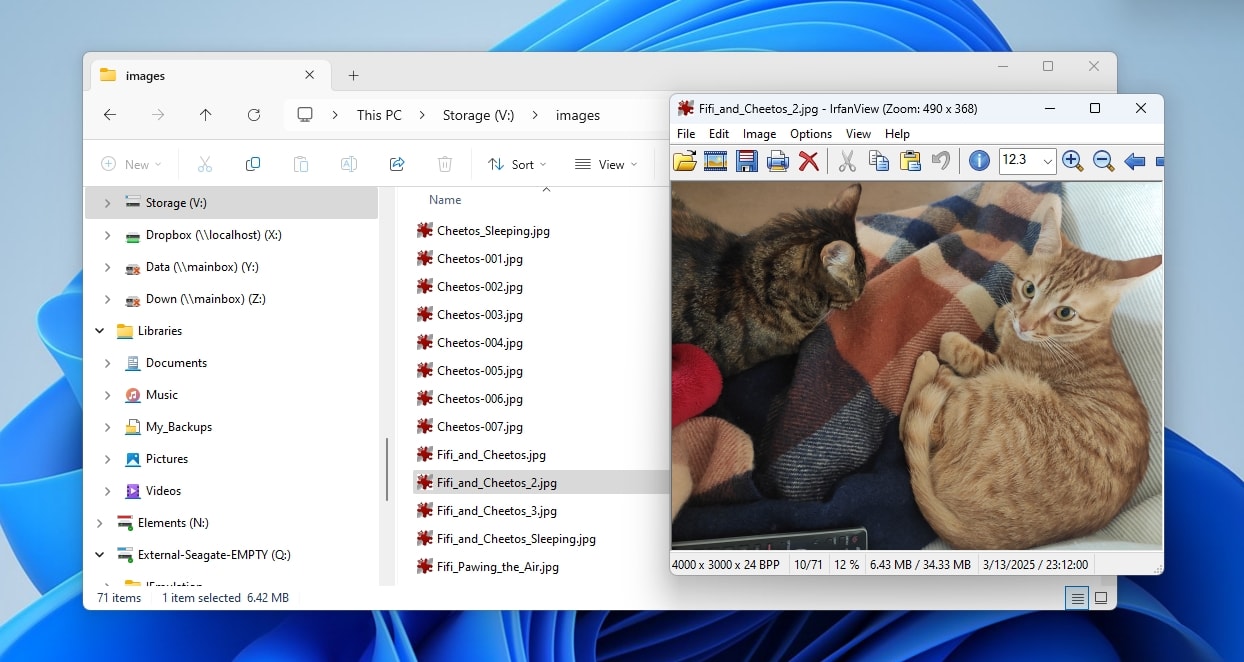
- Start by checking if your files are still inside the Recycle Bin/Trash. Double-click its icon on the desktop to check its contents with the default file manager. If the files you want to recover are still there, right-click on them and choose Restore.
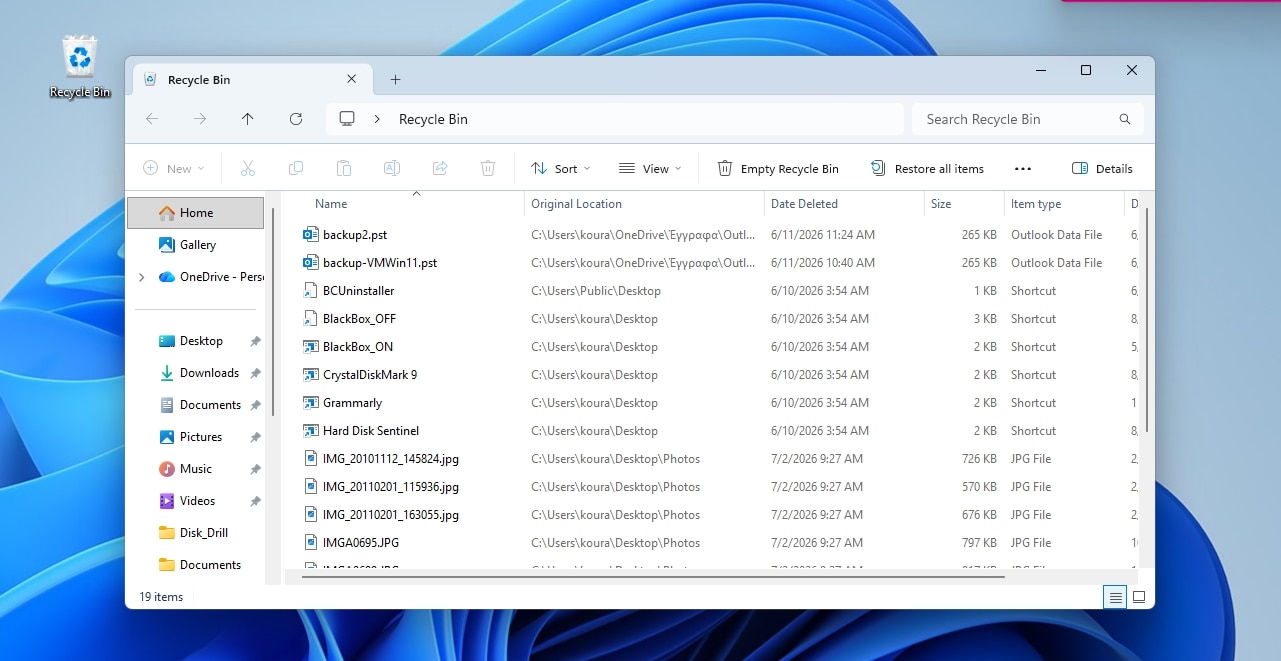
- If you remember any part of the lost files’ names, you can use it with Windows File Explorer’s search functionality to try to locate them (1). To find as many files as possible, start the search on your virtual drive’s root folder, and change the Search options (that show up on Windows File Explorer’s toolbar when a search is active) to look into All subfolders (2).
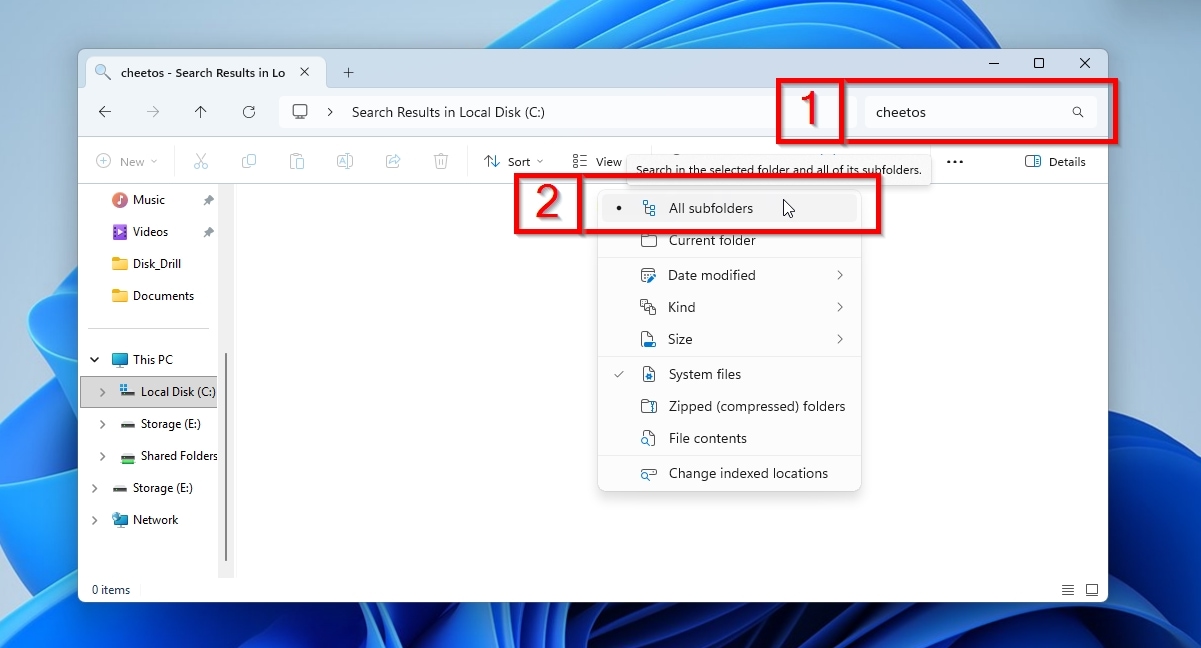
- A data recovery app like Disk Drill remains the best way to find and recover your lost files. You can follow the same approach we saw in our first method, but instead of attaching the virtual machine’s storage to Disk Drill, install the app inside the virtual machine, and use it to scan its virtual disk.
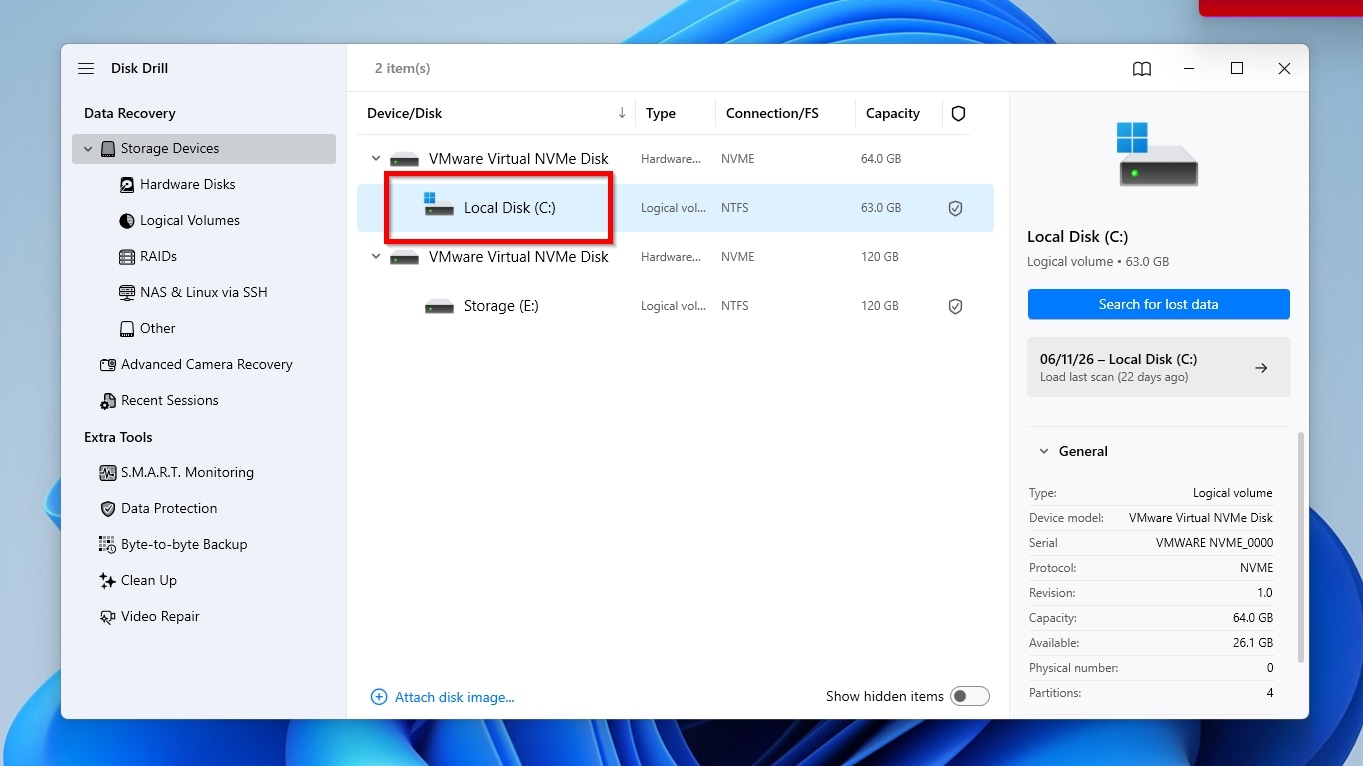
Method 4: Restore the Virtual Machine From a Backup or Snapshot
Do you have VMware snapshots, Hyper-V checkpoints, cloned VirtualBox disk images, OVF (Open Virtualization Format) exports? Had you included the virtual machine’s files in Windows Backup or File History plans, cloned the host’s drive to a disk image, or copied the virtual machine’s folder to a NAS?
If so, you can restore your virtual machine from those backups. This approach, though, comes with the following constraints:
- 🗃️ Requires pre-existing backups.
- ⌛ Doesn’t work “retroactively”, and can only recover data included in those backups.
- 👽 It might not help in more fringe cases where, for example, you only have saved states that don’t back up everything in the virtual machine’s storage devices, while dealing with a damaged file system in the guest OS.
If any of those apply to the issue you’re facing, skip this section and use a data recovery app instead.
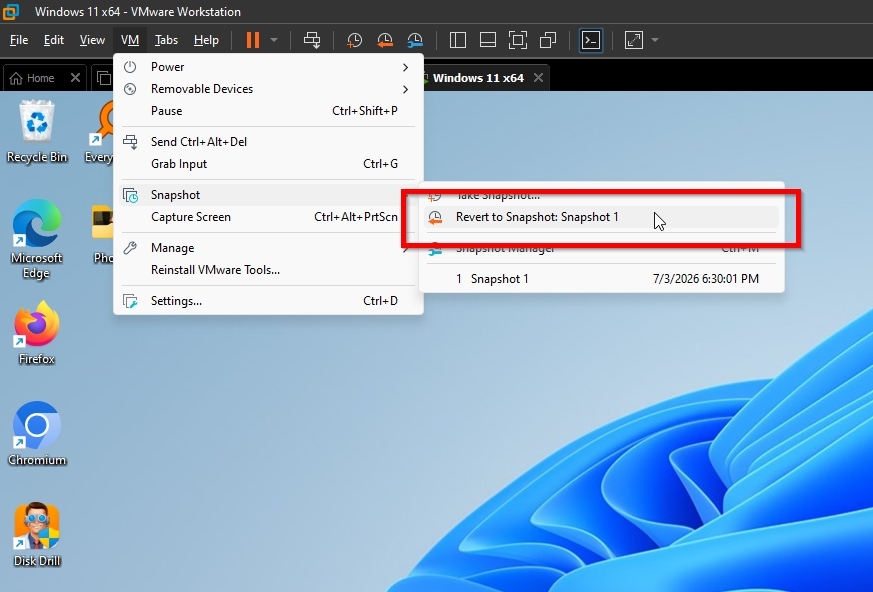
The approach you can take depends on the type of backup you have available. For example, in VMware Workstation Pro with available snapshots, VMDK file recovery can be as simple as selecting VM > Snapshot > Revert to Snapshot: Snapshot X from the app’s menu (where “X” is the snapshot number).
However, typical backups, like those kept by Windows File History, work “globally” across all virtualization solutions, as long as a virtual machine’s folders and files are included in those backups.
For virtualization data recovery using Windows’ File History:
- Use Windows File Explorer to find the folder where your virtual machine’s files are stored.
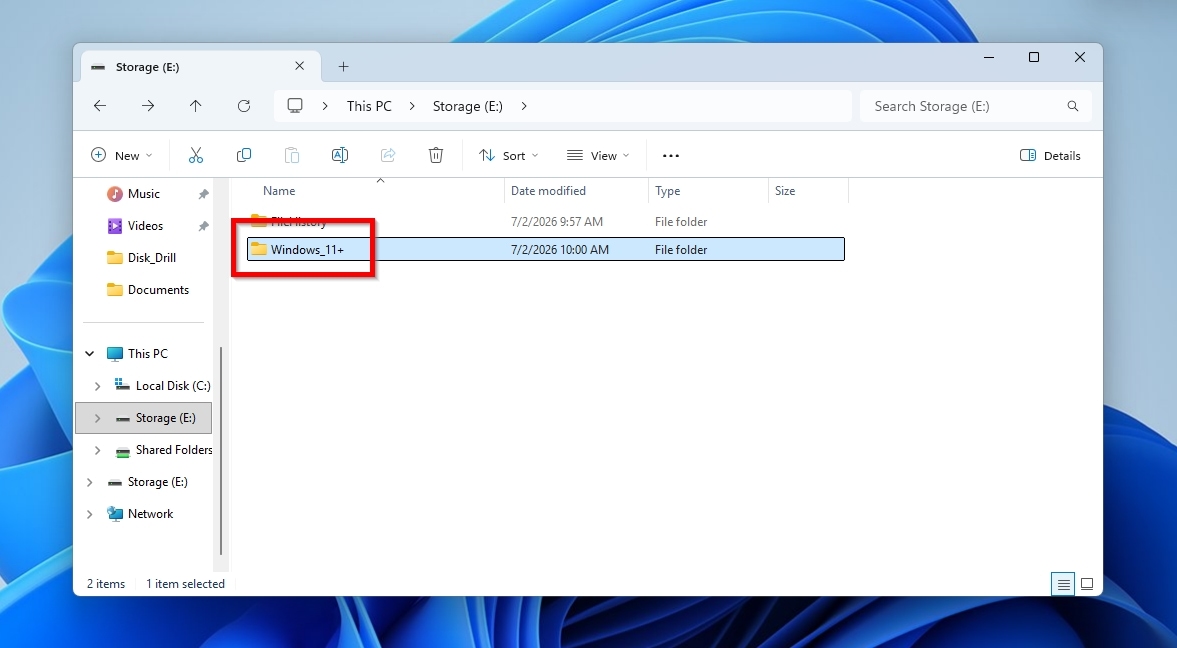
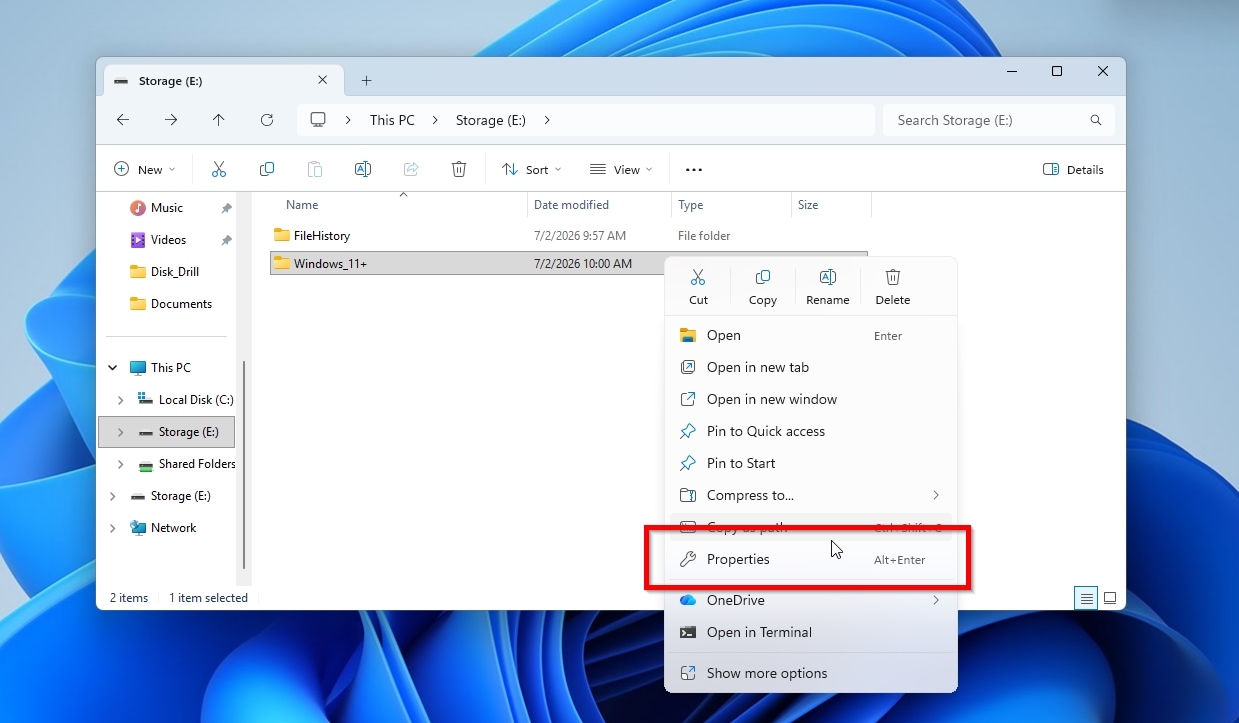
- Right-click on the folder, and choose Properties.
- From the folder’s Properties panel, move to the Previous Versions tab.
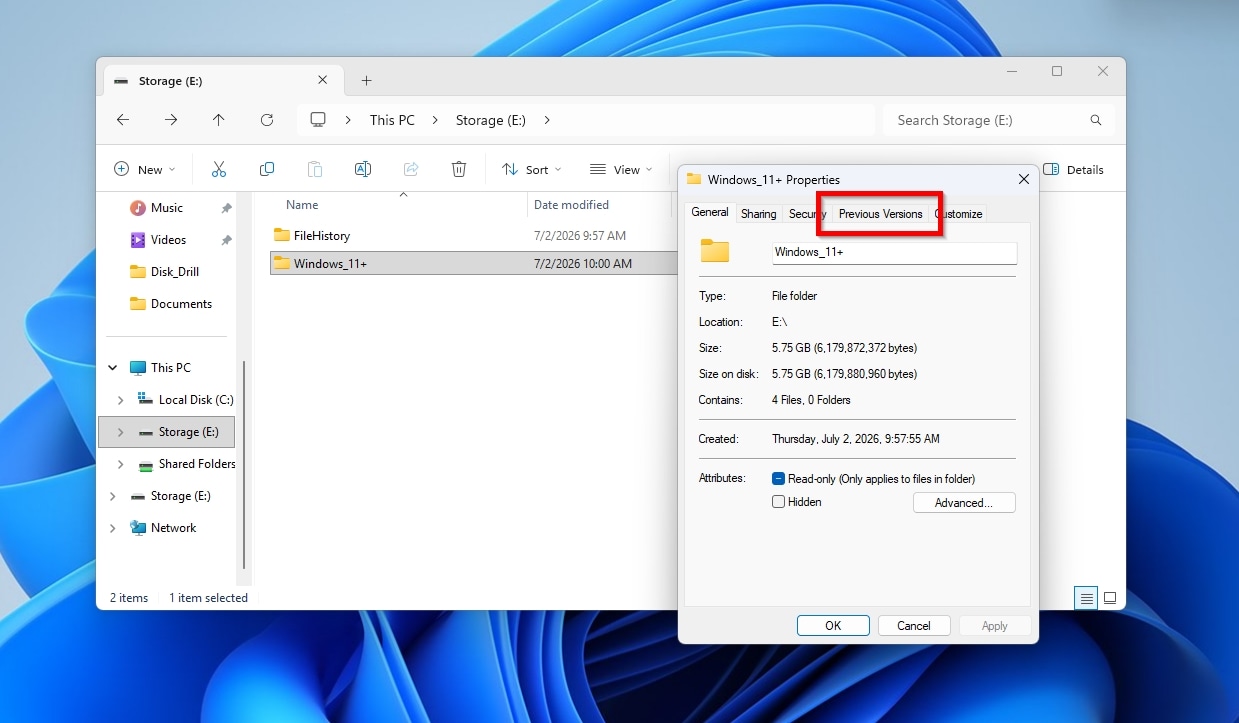
- Choose an older Folder version that matches the point in time where you want to revert your virtual machine (1), and click Restore (2).
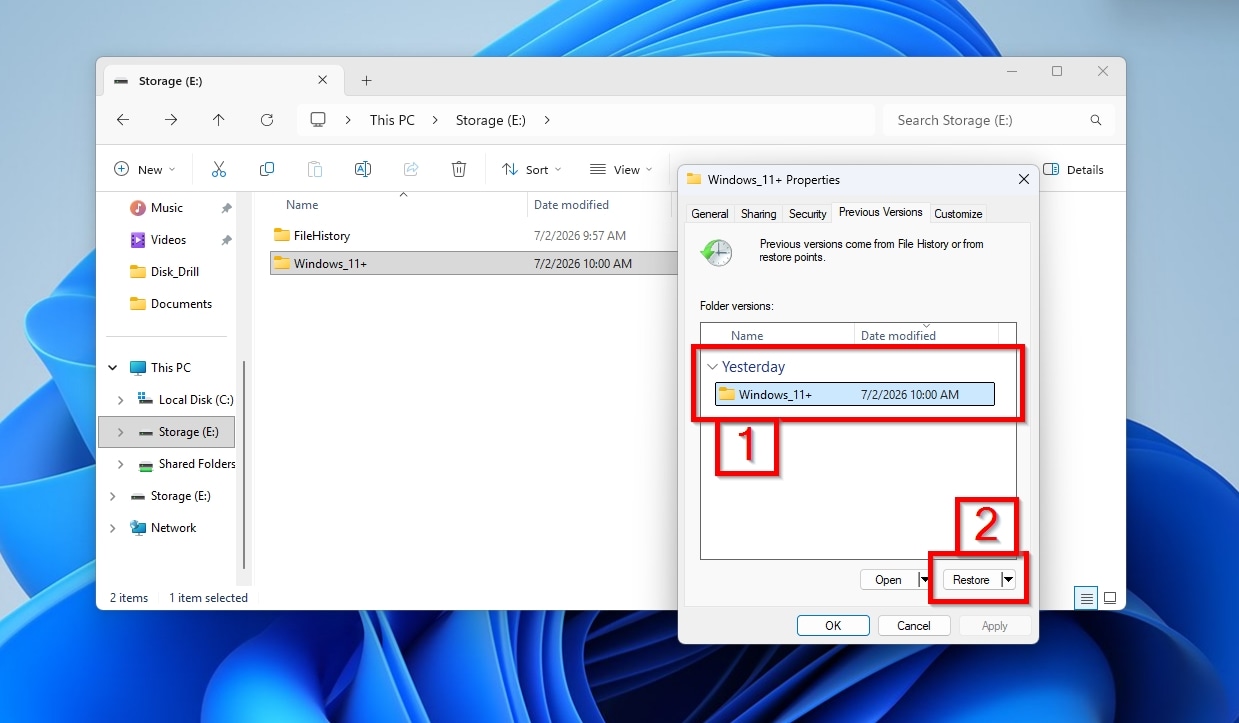
After a while, the selected folder will have reverted to its selected state/version. If you try powering on your virtual machine, its state should reflect that earlier point in time, and any data you lost should be back and accessible again.
Method 5: Recover a Deleted/Missing Virtual Disk From the Host Drive
When you didn’t lose files within a virtual machine, but its own virtual disk, and there are no backups of any sort available, a data recovery tool can save the day. It doesn’t matter if the virtual machine’s VMDK, VHD, VHDX, or other files got deleted, if its folder disappeared, if a datastore/NAS volume failed or the virtual disk got lost after partition or file system damage on the host, or even a whole hard disk with multiple virtual machines was reformatted to a different file system like in the case of one unfortunate Redditor. Any modern data recovery app worth its bytes can analyze the host’s storage where the virtual machine’s files were stored, find them, and recover them.
Using the host PC for this type of recovery results in more write operations, increasing the likelihood that lost data becomes unrecoverable. Thus, cloning the disk where the data was lost to a complete byte-to-byte image, especially if the drive acts unstable or the data on it deemed too important to lose, should be your first course of action.
Since Disk Drill includes byte-to-byte backup imaging, we’ll also use it for this part of our guide, noting the differences in this case.
To recover a virtual machine’s own virtual disk or other files from the host OS using Disk Drill:
- Leave your virtual machine unpowered. Download, install, and run Disk Drill directly in the host PC’s OS. Select the app’s Byte-to-byte Backup page.
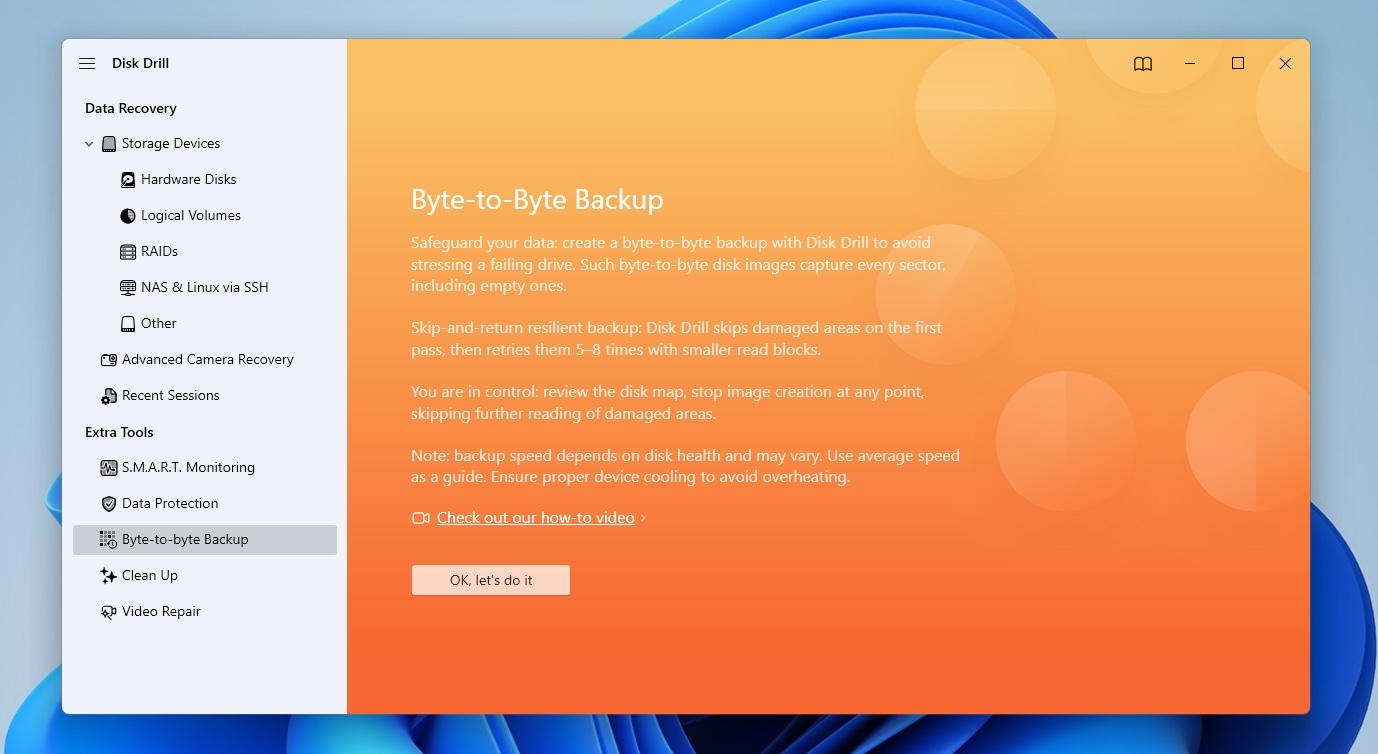
- Acknowledge and close the two warning pop-ups.
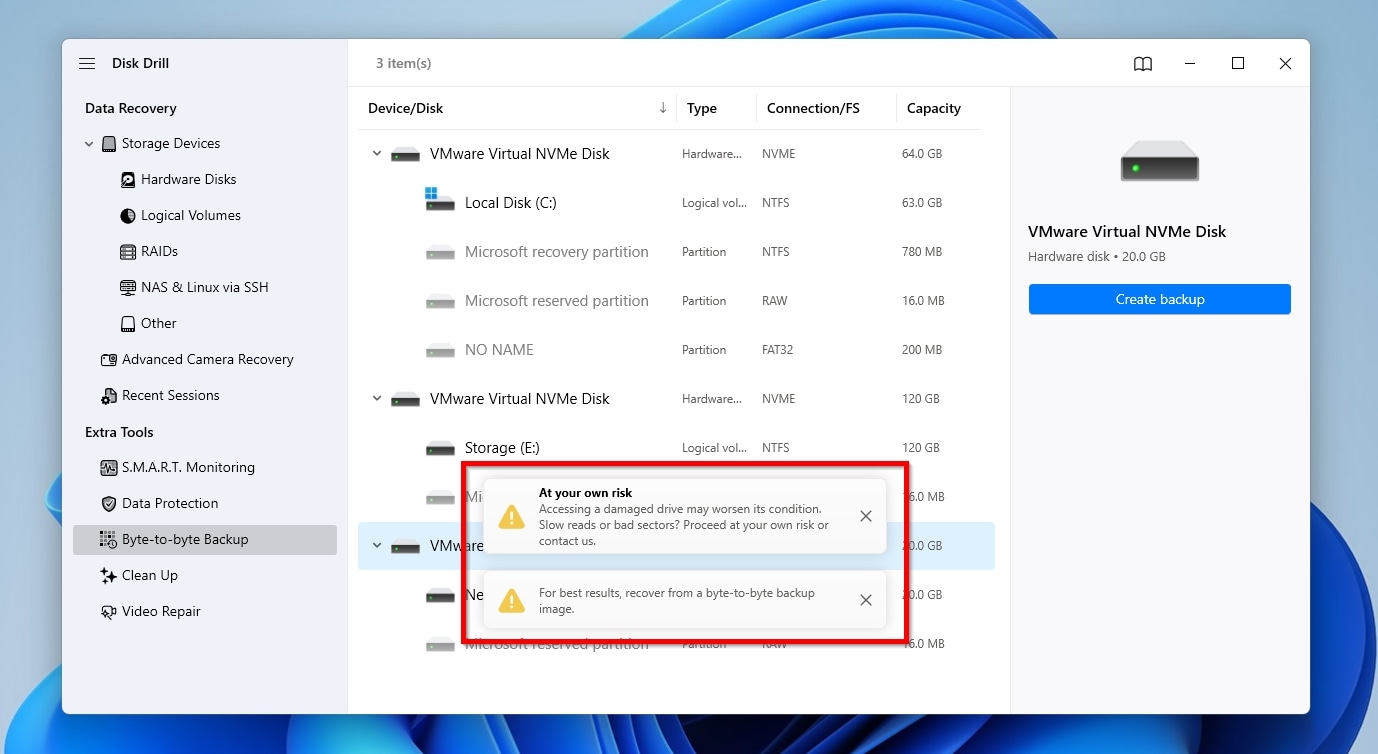
- Select the host’s drive where your virtual machine’s virtual disk was located from the app’s Device/Disk list (1). Then, click Create backup (2).
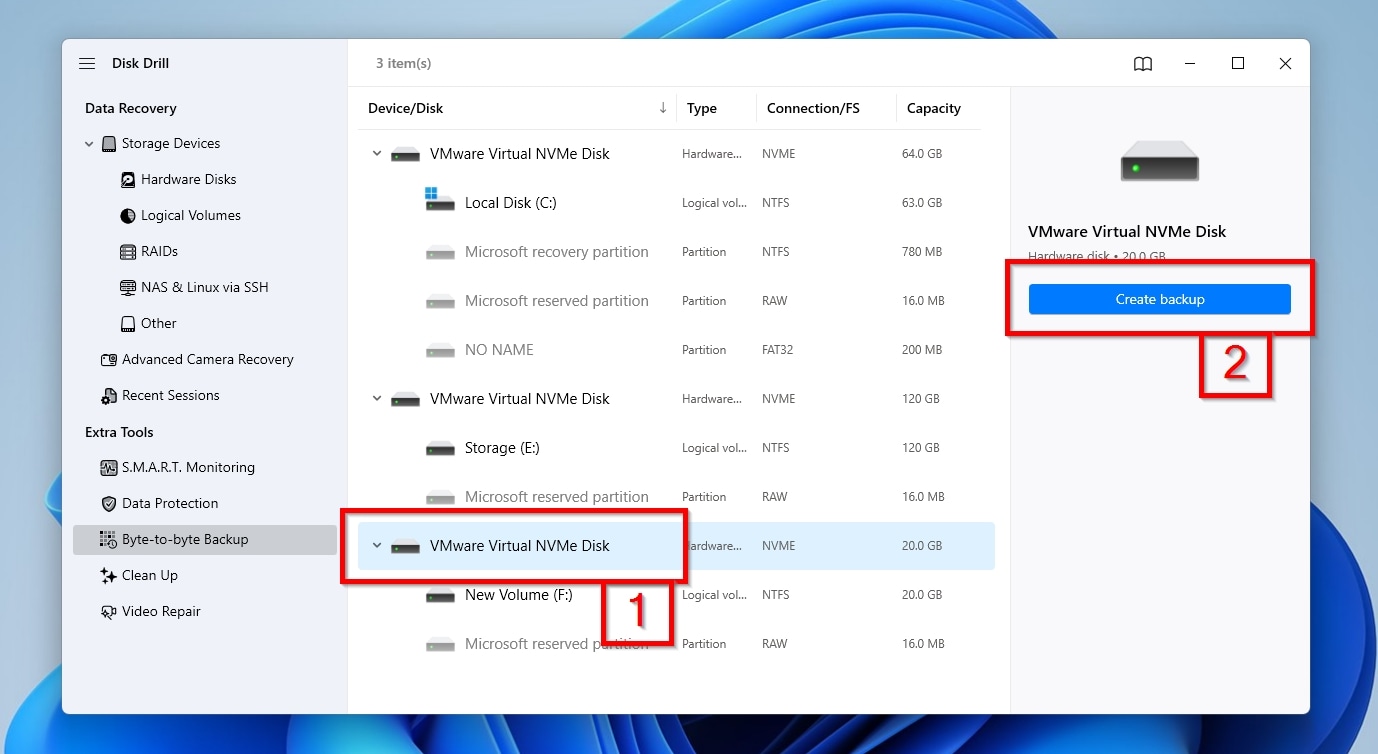
- From the new “Backup into byte-to-byte disk image” window that shows up, click on the button with the three dots, and choose the path where the host disk’s backup image will be stored. You can leave the rest of the values as they are. Then, click OK.
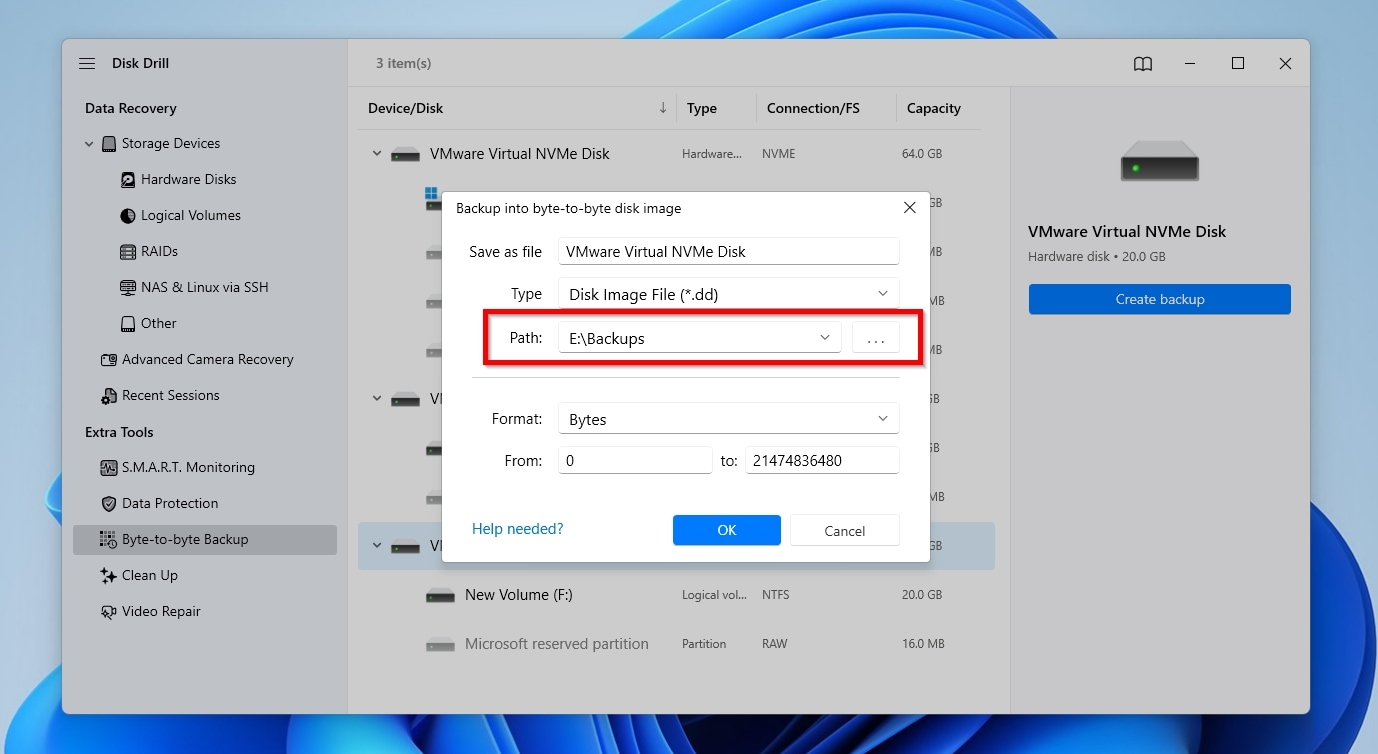
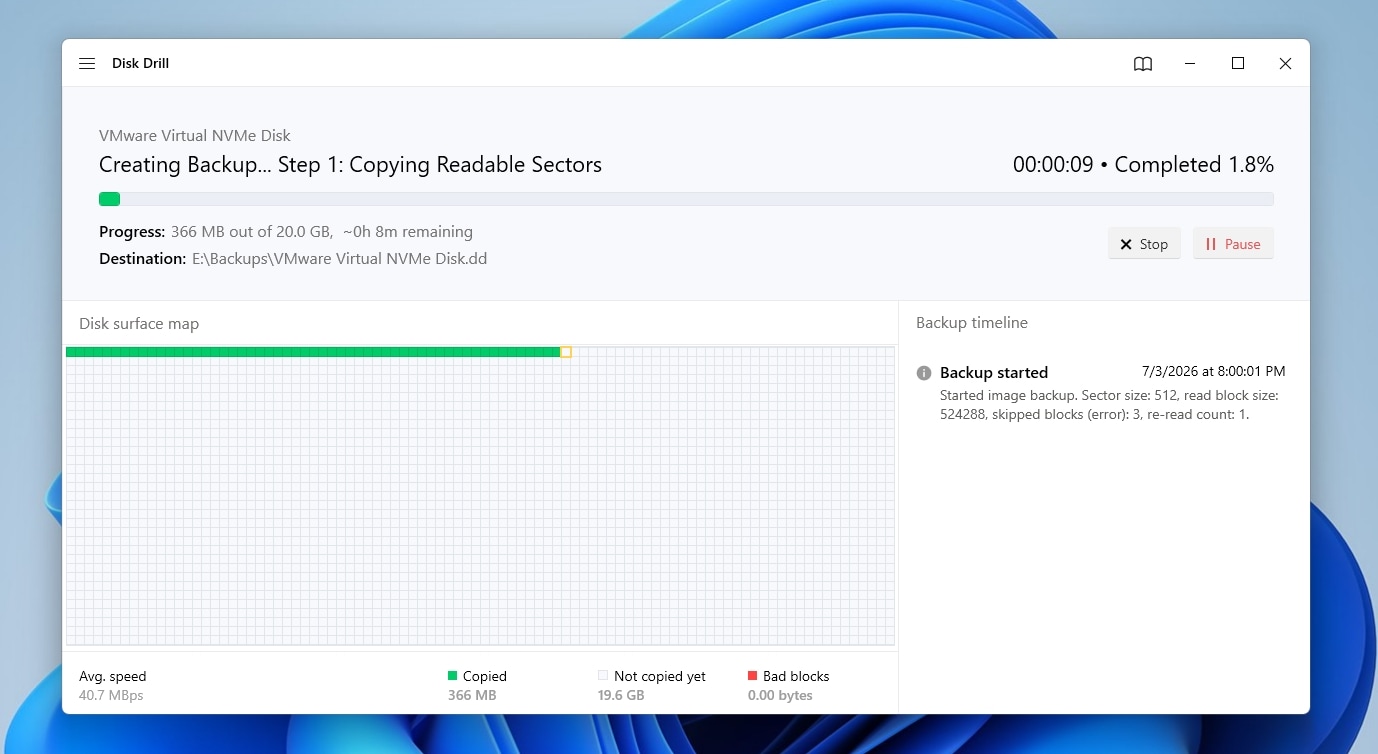
- Allow Disk Drill to image your host’s disk completely.
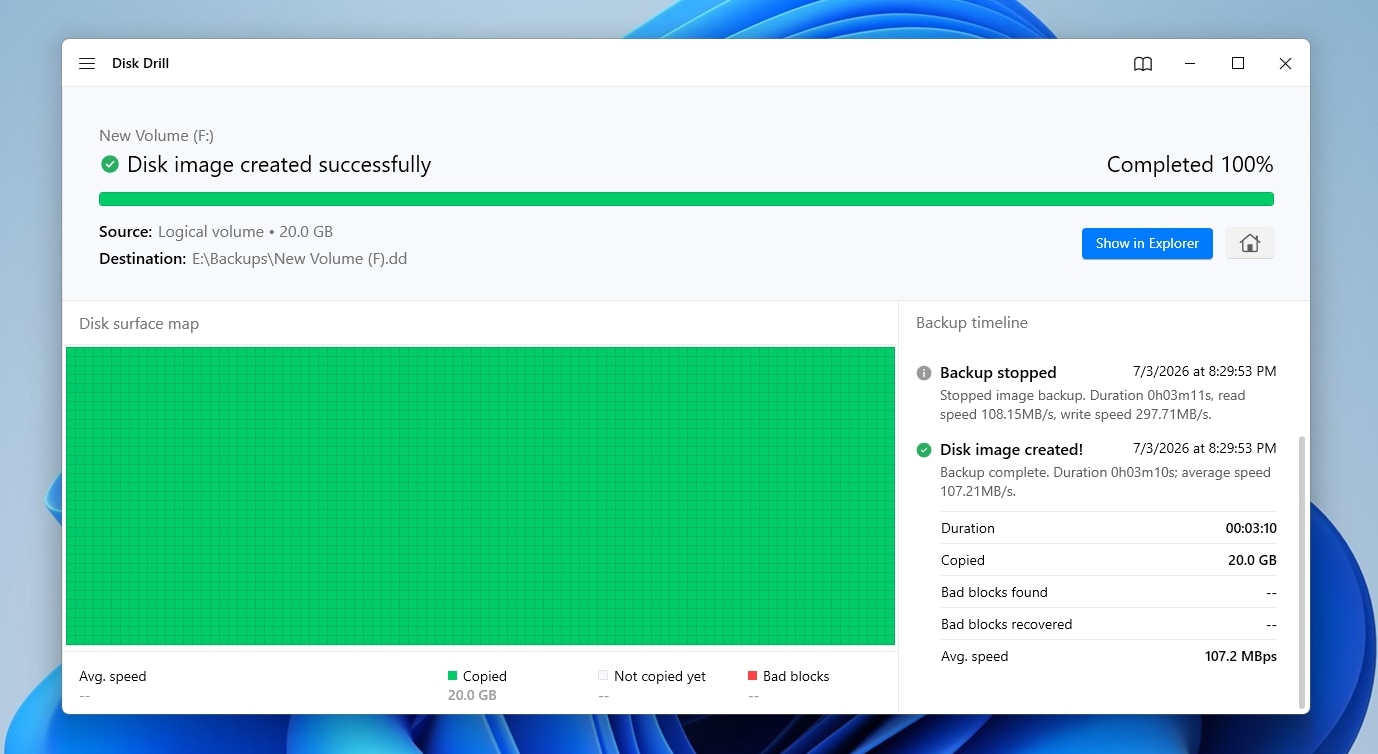
- When the process completes and Disk Drill reports that the “Disk image (was) created successfully”, click on the Home icon to return to the app’s main interface.
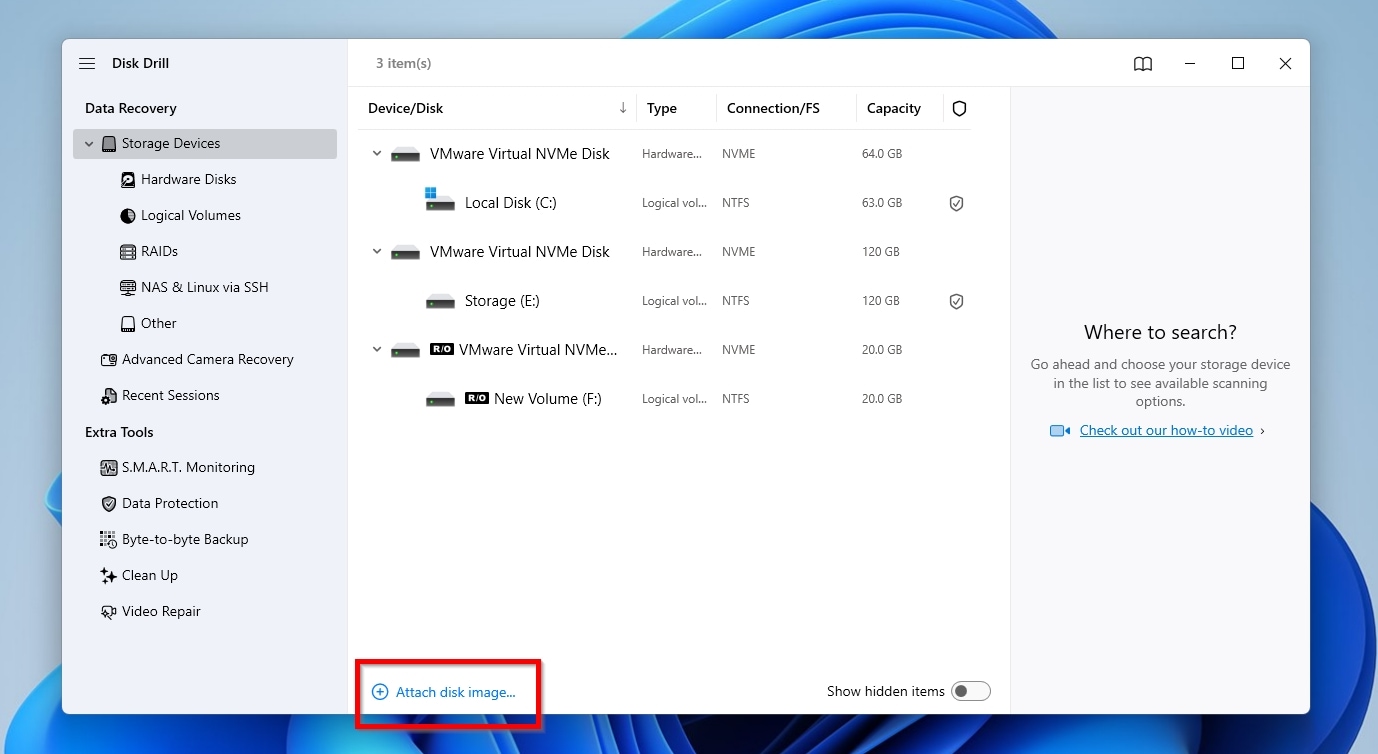
- Return to Disk Drill’s Storage Devices page, and click Attach disk image on the bottom left of its Device/Disk list. Then, select the disk inside it and scan it as we saw in our other Disk Drill guide.
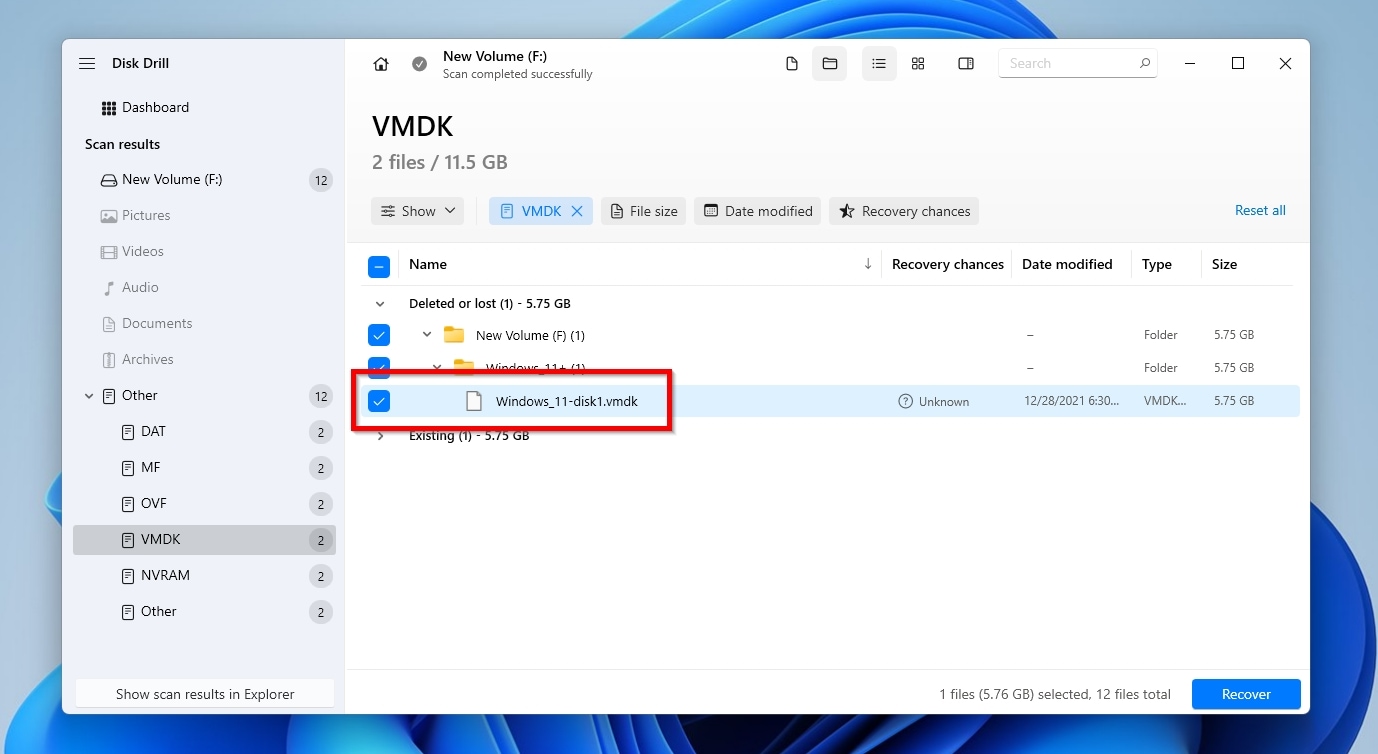
- While checking out Disk Drill’s scan results of your host drive’s image, if you only want to recover your virtual machine’s storage file, use the File Type filter (1) to narrow the list down by typing its file type in the text field that will appear directly underneath, or selecting it from the Other file type category (if it shows up there) (2). Depending on the virtualization solution and type of image you were using, this file type might be “VMDK”, “VHD”, “VHDX”, “IMG”, and more.
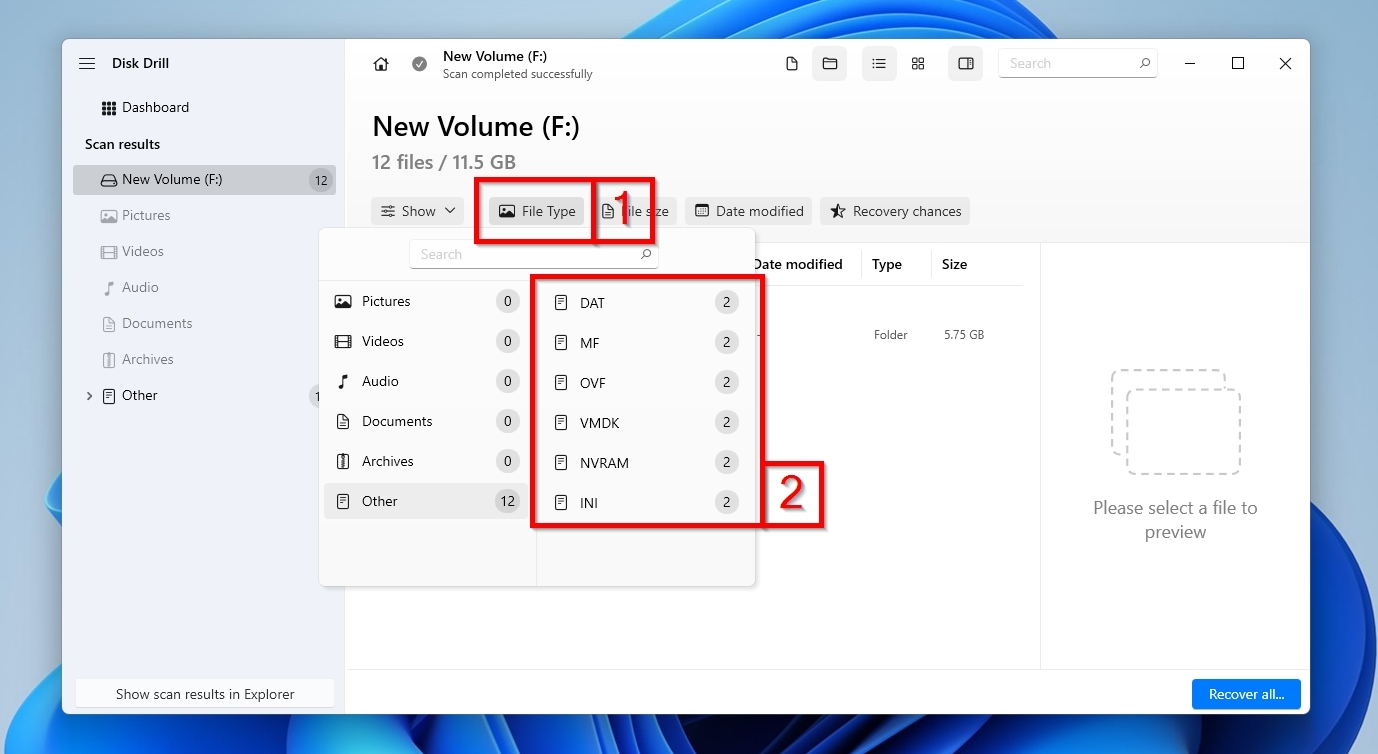
- To recover multiple types of files, repeat the last step for each type.
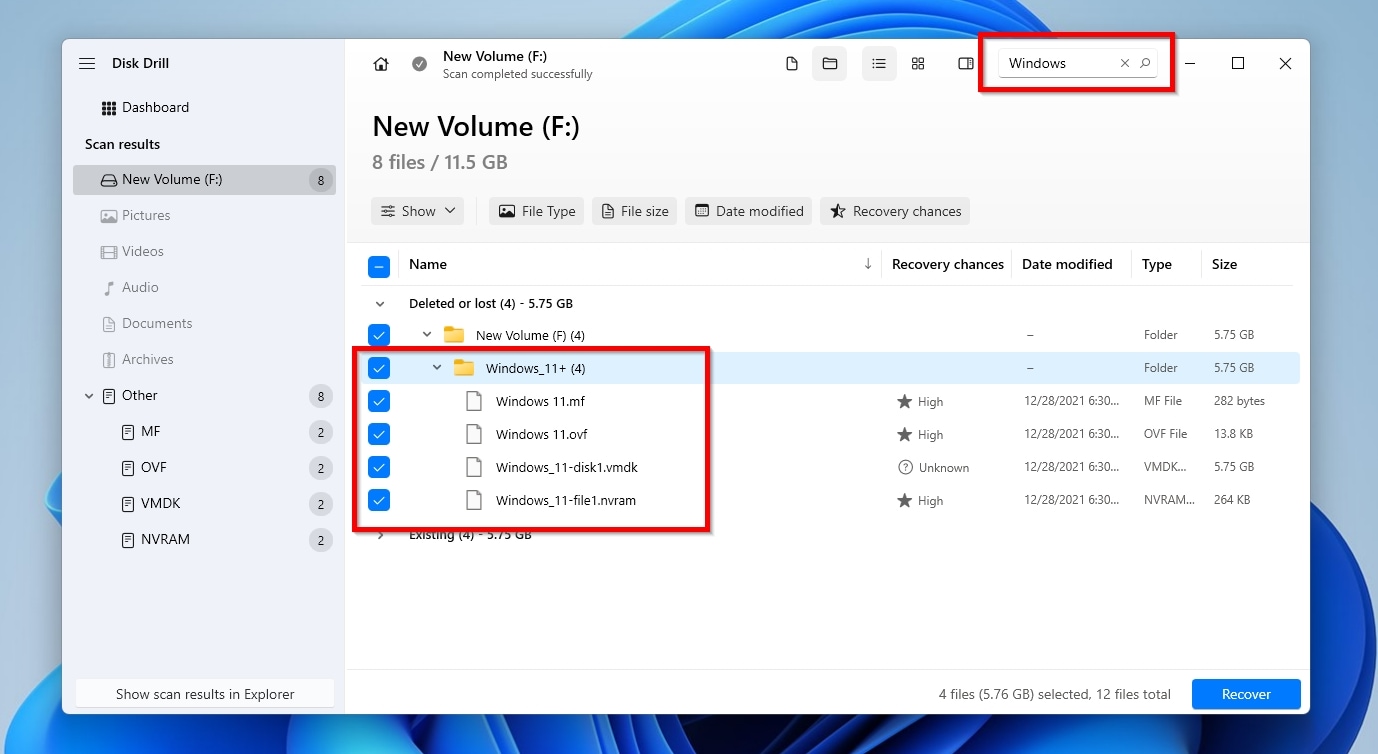
- If you want to recover all of your virtual machine’s files, or its entire folder, you can use Disk Drill’s search functionality to search for the folder’s name. Mark everything you want to recover by placing a check mark on its left, and proceed as we saw before. Remember that it’s best to select a separate physical drive as your target destination for the recovered files.
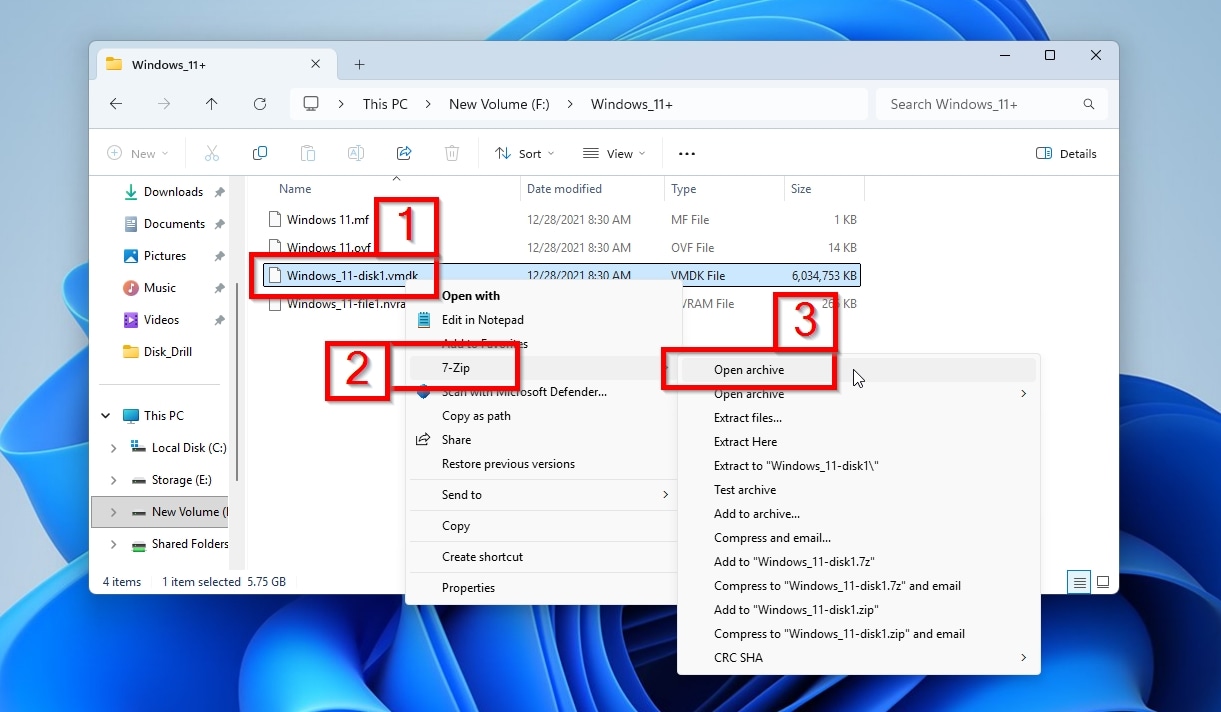
- Ideally, you should verify the integrity of the recovered virtual disk before mounting it or performing any repairs. That’s done differently for each virtualization solution (as is apparent in this conversation about VMware’s approach), and presenting detailed instructions for them would be outside the scope of this article. Still, one quick and “global” way to do it is to use the popular 7-zip archiver, which is compatible with many virtual disk formats. With 7-Zip installed, to check your virtual disk’s contents, right-click on it (1), select “7-Zip” (2), and then “Open archive” (3). For a more thorough test, you can extract all of the virtual disk’s contents to a folder by choosing “Extract to (name of archive)” instead of “Open archive” from the same submenu.
When Virtualization Data Recovery Is No Longer Safe to DIY
Our team’s experience points to DIY being the right first approach for most VM data recovery cases. It’s usually simpler, faster, and much cheaper than sending a drive to a lab for analysis. However, sometimes it’s best to skip any DIY attempt and contact a professional.
Professional help proves the safer route when:
- 🔨 You’re dealing with physical damage to the host drive or storage device, such as clicking sounds, repeated disconnects, or freezes during scans.
- 🧠 There’s damage to the drive’s storage area, controller, or firmware, that causes it to report an incorrect capacity.
- 🧑⚕️ The disk’s S.M.A.R.T. status shows a low health level or warns about imminent failure.
- 🗄️ RAID/NAS failure prevents any access to the storage’s contents.
- ⏱️ Large virtual disk files were stored on a rapidly failing SSD/HDD.
Still in doubt about whether you should try DIY or delegate the task to data recovery experts?
| Try DIY | Refer to professionals |
| Files accidentally deleted or lost inside otherwise working and accessible virtual machine. | Repeated attempts at DIY didn’t reap usable results. |
| Corrupted or lost virtual disk in host OS without other issues. | Virtual machine files stored on failing/physically damaged host drive. |
| Virtual machine files stored on corrupted or formatted but working and healthy host disk. | Data lost on storage that isn’t detected by the host OS anymore. |
What Is the Best Way to Recover Virtual Machine Data?
So, which is the best path depending on the virtual machine data loss scenario you’re facing?
- Virtual machine’s own files missing: Scan the host drive or a byte-to-byte image with a data recovery app to get back the main storage VMDK/VHD/VHDX file, and any other files related to the virtual machine.
- Deleted or lost files inside existing virtual disk: scan the virtual disk with data recovery software that supports such images to find and recover the files.
- Non-booting virtual machine with intact virtual drives: Mount the virtual disk on the host OS as a virtual drive, then copy the files from it using a file manager.
- Data loss on its own files or within it, but with backups, snapshots, checkpoints, exported versions, or clones of the virtual machine available: Restore the virtual machine to a previous state before the data loss. Make sure to copy the current state first if it may contain newer data you’d like to preserve.
- Low health, physical damage, or imminent failure of the host drive or datastore: Drop any DIY attempts and contact a professional data recovery lab.
FAQ
Yes, VMDK files are virtual disk files used by VMware’s products, from which you can recover data as long as you use an app that can access their contents.
Similar to VMDK files, VHD and VHDX files are virtual disk images, often used with Hyper-V, VirtualBox, and other virtualization solutions. Like VMDK files, you can recover files from them using a data recovery solution that can open and scan them.
A virtual data recovery tool must:
- Support your virtual disk formats (e.g., VMDK/VHD, VHDX).
- Come with a performant scanning and recovery engine to find as many files as possible and recover all their data successfully.
We like Disk Drill because it ticks both boxes and is extremely user-friendly.
The contents of a virtual disk container aren’t directly accessible like those of other storage devices. Thus, a data recovery app must be able to parse a virtual disk’s file format, peek inside it, understand its structure, and locate and recover files from within it.
Yes, since like any other file, a virtual machine’s files can be recovered from a host PC in various ways. However, you have to act quickly, since the more you use the host OS, the greater the chance that newer data may overwrite the virtual machine’s files, rendering it unrecoverable.
There’s no definitive answer, since this question may refer to two similar but distinct data loss cases:
- Is the virtual disk image file intact and usable, but the virtual disk defined within it corrupted? Then the answer is yes: you can open the file with a compatible data recovery app, scan it, and recover the files from it to another storage device.
- Is the virtual disk image file itself corrupted beyond recognition, and no solution can detect it for what it is? Then the answer is maybe, but not with a DIY approach. Data recovery specialists may be able to thoroughly analyze the virtual disk’s remnants and extract files from it.
