Users of Windows computers have become accustomed to the concept of automatic updates. It’s very appealing to allow your operating system or applications to update themselves whenever they feel the need. Your software stays up to date and you never have to worry about it. That is until a problem occurs with the update.
Recently, some Windows 10 users had the unpleasant experience of an update gone wrong, according to techradar.com. The October 2018 update caused a myriad of problems including blue screens of death and data loss.
Even if the results are not this dramatic, having updates installed automatically can negatively impact your system’s performance. You might experience slow response time and as the updates download they can stress your network connection. Luckily, the October update was only installed if users specifically looked for updates, but the point is well taken.
Windows 10 installs cumulative updates when it chooses to do so. Even the most diligent pre-release testing cannot eliminate the potential for unforeseen issues in operating system updates. Perhaps you want to decide when your operating system gets updated. We’re going to show you a few ways to do that.
Disabling Automatic Window 10 Updates
We are going to look at five ways to disable or minimize automatic updates in Windows 10.
They are:
- Turning Off the Windows Update Service
- Group Policy Editor
- Editing the Registry
- Set Up a Metered Connection
- Use the Microsoft troubleshooter tool
Turning Off the Windows Update Service
Windows Update is a just another Windows Service and can as such be turned off. Follow these steps to stop Windows 10 updates:
- Fire up the Run command (Win + R). Type in “services.msc” and hit Enter.
- Select the Windows Service Update service from the Services list.
- Click on the “General” tab and change the “Startup Type” to “Disabled”.
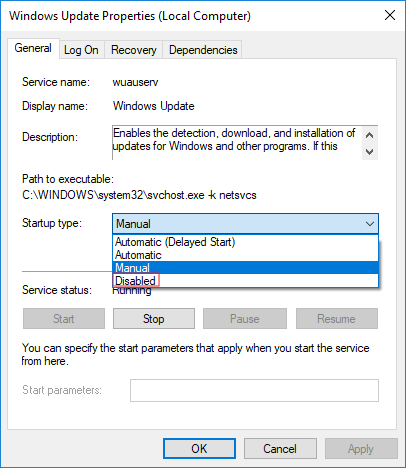
- Restart your machine.
When you want to re-enable automatic updates you just follow the same procedure except you select “Automatic” when choosing the “Startup Type”. This may only work temporarily as the system seems to re-enable the service after a period of time.
Using the Group Policy Editor
Users of Windows 10 Pro, Education or Enterprise editions can modify the Group Policy Editor if they choose to do so. You cannot use this method if you are using the Windows 10 Home edition. Here is the procedure to follow to limit automatic updates in this manner:
- Launch the Run command (Win + R) and type in and enter “gpedit.msc” to open the group policy editor.
- Navigate through the “Computer Configuration” to “Administrative Templates”.
- Choose “Windows Components” and then select “Windows Update”.
- Select the option to “Configure Automatic Updates”.
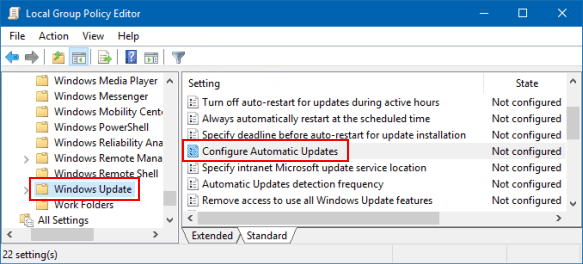
- Choose the option titled “Notify for download and notify for install”.
- Click “Apply” and “OK”.
- Type “Windows Update” into the Start menu and then choose “Windows Update Settings”.
Now check for updates. If there are any available, Windows will notify you. Most automatic updates will no longer be installed after making this change.
Restart your computer to complete updating the group policy editor.
When you choose this option, your system will react to updates much like older versions of Windows. Security updates will still be installed automatically but all other updates will require you to choose when to install them. The fact that this process will not work on the Home edition is a testament to Microsoft’s belief that most users should not have this level of control over their system’s ability to update itself automatically.
Experienced users with valid editions of the OS can use this method. Once you implement this change, you will be responsible for making sure that updates get downloaded and installed.
Editing the Registry
There are registry edits that can help control how updates are handled. Again, these are only available in the Windows 10 Enterprise and Pro editions. Registry edits can produce unintended consequences that can cripple your machine, so if you choose this route you must proceed with extreme caution.
You can modify the registry to have Windows never notify you or check for updates. You can also set it to notify you before downloading and installing the updates. This is the option you would most likely want to choose. The end result of editing the registry is the same as modifying the group policy editor and poses more risks if something were to go wrong. For that reason, we do not recommend this method of turning off automatic updates.
Set Up a Metered Connection
Windows 10 users can set up a metered connection to the Internet if they employ a WiFi network. When you have a metered connection only high priority updates are automatically downloaded and installed. This is done to conserve metered bandwidth.
While this does not totally stop automatic updates from occurring, it does minimize driver and software feature updates that are notorious for introducing stability issues. Here’s how to set up a metered connection.
- Open the Windows Settings application (Win + I).
- Click on “Network & Internet”.
- Open “Wi-Fi” and select the “Advanced Options” tab.
- Toggle the “Set as metered connection” option to “On”.
Perhaps they have a good reason for this limitation, but currently you can only use this option if you use a WiFi connection. Microsoft has decreed that if you connect to the Internet through a cable you cannot have a metered connection.
Using the Microsoft Troubleshooter Tool
The Microsoft Download Center has a troubleshooter tool available that can help with automatic updates of device drivers. Driver problems can cause critical issues with your system and having the ability to control these updates can be instrumental in reducing unexpected stability and performance issues with your computer.
This download allows you to show or hide updates and can be used to delay driver updates until you decide to install them. More details are available from Microsoft as well as a link to download the tool on this webpage.
Why Are There Automatic Updates Anyway?
This idea of automatic updates is not something that we readily accept in other aspects of our lives. While you definitely want your computer protected with the most recent security updates, some input into when the updates occur is to be expected. You wouldn’t let your automobile manufacturer suddenly change things without your knowledge.
How would you like getting in your car in the morning and realizing the sound system didn’t work because of some upgrade to an unrelated part that was performed without your knowledge. Maybe you wouldn’t want the engine upgraded on the day before you were leaving on a long and important trip. Better to wait until you get back, just in case something went wrong.
You would like to think that you maintain the same degree of control over your computer and operating system. After all, it may serve a pivotal role in your personal and business life. Perhaps you don’t want your system updated without having the ability to backup your data or end some important processes gracefully. Automatic updates deny you these opportunities.
This lack of control seems to demand that there be a way to stop automatic Windows 10 updates and regain control over our operating systems. While nothing can totally stop security updates from occurring, the methods outlined above can minimize the frustration that can be caused when your system decides on its own when it will install updates. Good luck implementing the method you choose, and remember to periodically check for updates yourself.