Is your Mac acting up? Then it might be the right time to reinstall Mac OS X and start from scratch. Yes, you will have to spend some time installing your favorite applications and configuring everything to your liking, but you’ll be rewarded for your effort with a stable, fast, and, above all, fresh computer that doesn’t feel like a punishment to use. Best of all, it’s actually very easy to Mac reinstall operating system, and we’ll show you how to do it in this article.
Before You Reinstall Mac OS X
We understand that you’re anxious to reinstall your Mac and see it perform as if it were brand-new, but there are some things we need to go through first to ensure a smooth reinstall, the chief among which is the creation of a proper backup.
Even if you’re convinced that there are no important files on your Mac computer, we highly encourage you to create a backup anyway. There’s nothing worse than wiping all data from the disk only to remember after a few days or weeks that you’ve deleted an important note with a password reminder to your Bitcoin wallet or a video of your newborn child.
As a Mac user, you can use one excellent backup tool that’s already present on your computer: Time Machine. This backup software application was introduced in Mac OS X Leopard, and it creates incremental backups of files that can be restored at a later date, allowing users to restore the whole system or specific files from the Recovery HD or the Install DVD.
Various cloud-based file storage solutions, such as iCloud, OneDrive, Google Drive, or Dropbox, can be used as versatile alternatives to traditional backup tools. Even after a complete system wipe, your files will still be available online, and you can easily synchronize them with your computer, or any other device you own.
Last but not least, there are also partition and disk imaging tools like Clonezilla, which make it possible to create a backup copy of the entire system drive. You can later use your backup copy to restore your computer to its original configuration, all your data, applications, and settings included.
How to Reinstall Mac OS X
Once you’re confident that there are no important data left to back up on your Mac, you’re ready to begin the reinstall process:
- Turn off your Mac.
- Immediately after pressing the power button to turn on your Mac, hold down Command-R to install the latest macOS that was installed on your Mac, without upgrading to a later version.
- Alternatively, you can hold down Option-Command-R to upgrade to the latest macOS that is compatible with your Mac, or you can hold down Shift-Option-Command-R to install the macOS that came with your Mac, or the version closest to it that is still available.
- Once you see the Apple logo, release the keys.
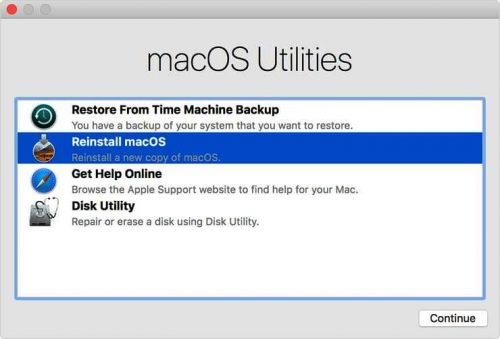
- You should see a window titled “macOS Utilities”. Select the “Reinstall macOS” option and click Continue.
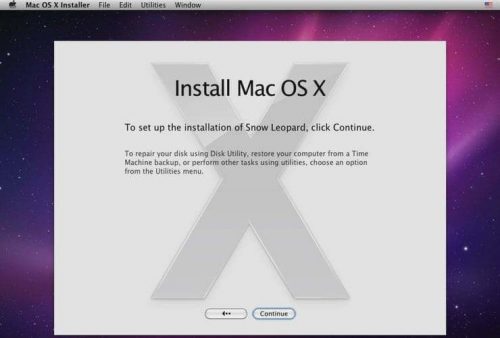
- Follow the onscreen instructions. You might be prompted to enter your Apple ID to verify eligibility to install macOS.
- Your Mac computer will automatically restart after installation is complete.
The above-described Mac installation method reinstalls the version of your operating system that is running on the computer. If you would like to perform a clean installation, which involves erasing your hard drive, follow the instructions below:
- From the “macOS Utilities” window, select the “Disk Utility” option and click Continue.
- In the sidebar, select your device and click the Erase button.
- Complete the required fields (Name, Format, Scheme) and click Erase again.
- Disk Utility will automatically return to the “macOS Utilities” window once complete.
- Reinstall macOS by following the steps above.
Alternatively, you can use Disk Drill’s amazingly simple feature that creates a bootable macOS installation drive. It takes just a few minutes to get the emergency drive for that day when your Mac may accidentally refuse to boot up.
How to Update Mac
If you’re wondering how to update my Mac, this section is for you. Just like when reinstalling a Mac computer and starting from scratch, you should start by backing up your data. While Mac OS X updates usually go without any hiccups, you never know when you stumble upon some rare bug that hasn’t been fixed, or even discovered, yet.
Next, visit Apple’s update page and verify that your Mac computer is compatible with the latest version of macOS. You should also check that you have enough free storage space. If you don’t, consider deleting old files or removing unused applications.
To update Mac OS to the latest version, which is macOS High Sierra, go to its Mac App Store page and click Download. A file named Install macOS High Sierra will be downloaded to your Applications folder and open automatically after the download is complete. Then, follow the onscreen instructions to complete the update process.
How to Update Mac Applications
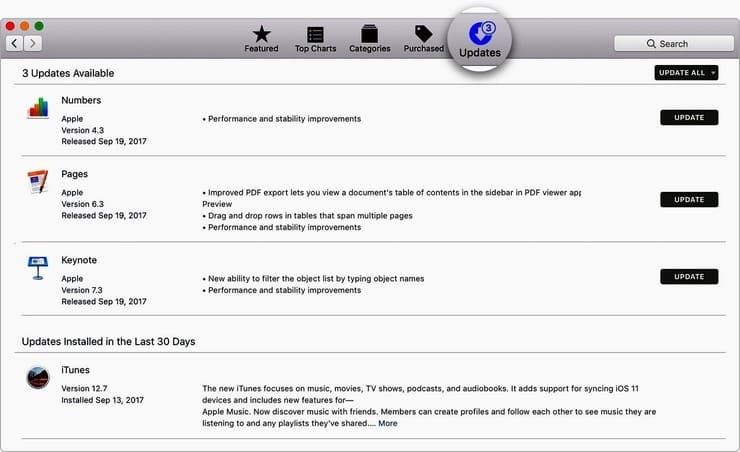
From time to time, use the App Store to check whether you’re using the latest version of your apps as well as the Mac operating system itself. To do that, simply open the App Store app on your Mac and go to the Updates tab in the App Store toolbar. You can update apps individually, or you can install all available updates at once. If you know that a newer version of an app is available, but you don’t see the expected update in the App Store, restart your computer and return to the Updates tab later. It can sometimes take a while for updates to reach all Mac users, and some updates, such as updates for Safari, don’t appear in the Updates tab at all because they are part of macOS system updates.
By keeping your Mac updated, you avoid exposing yourself to serious security threats, and your overall computing experience is guaranteed to be vastly improved. Don’t be afraid to reinstall your Mac by yourself because there’s really nothing that can go catastrophically wrong if you have backed up all important data.