


Have one or more photos on your iPhone that you want to compare? Depending on their image dimensions and your own preference in viewing them, there are a few convenient ways to examine multiple photos at the same time.
In this guide, we’ll cover several reliable (and unique) methods to compare photos side by side on your iPhone, as well as a few tips on choosing the best one.
What Makes One Photo Better Than Another?
There’s a lot of nuance and technical complexity that goes into what makes a “good photo.” However, there are a few basic criteria that can help you identify which photos in a group are better than the others, even at first glance.
Here are some key points to keep in mind when you start to compare photos on your iPhone:
- Subject: Your subject will always be the priority of your shoot; photos that best capture your subject are the first ones you should save.
- Image quality: Blurry photos look careless and unprofessional, especially when viewed alongside sharper images. Overall image quality is second only to the subject in importance.
- Lighting: Lighting can drastically change an image; when done poorly, it’s especially noticeable once you compare it to other photos or edit it digitally.
- Composition: At the most basic level, nothing that isn’t part of the scene should be captured in the photo. Choose photos with no distracting objects in the background.
How to Compare Photos Side by Side on iPhone
In this section, we’ll show you 5 ways to compare pictures side by side on an iPhone. One method might be more suitable for your workflow or visual analysis than the others, but we started with the easiest and least intrusive solutions first.
1. Move Photos to a New Album
Adding the photos to their own albums isolates them from the rest of your library. This makes it easier to find them and swipe between them rapidly. Here’s a quick way to create a new album using one of the photos you want to compare:
- Open the Photos app.
- Locate one of the photos you want to compare in your library, collections, or albums. Then, tap and hold each image; in the context menu that appears, select Add to Album.
- In the top right corner of the pop-up, tap the + button.
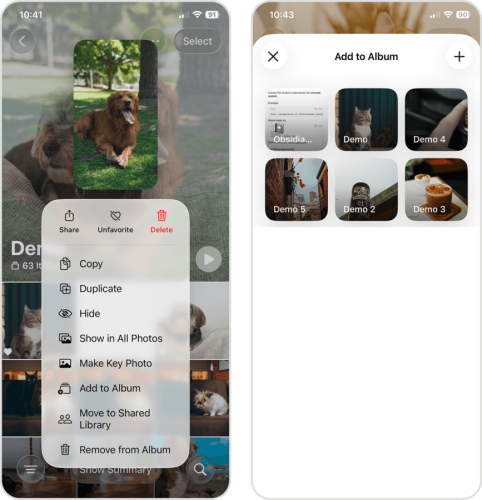
- Type Compare Photos and tap Create.
- Find the other photo you want to compare. Tap and hold the image, then select Add to “Compare Photos.”
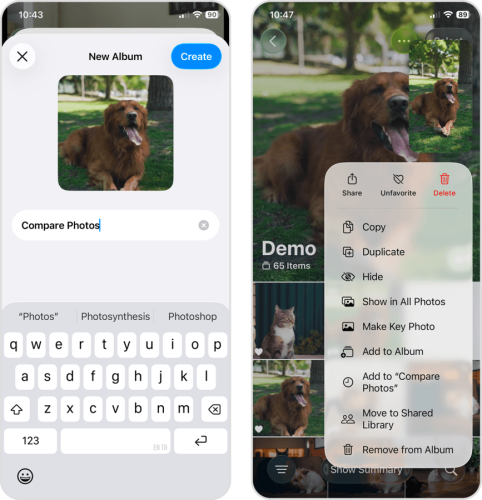
- Repeat steps 5 and 6 until all the photos you want to compare are saved to the new album, which you can find under Albums in the Collections page.
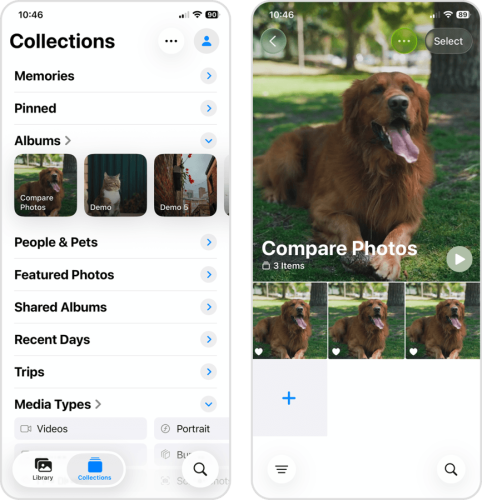
You can also resize the photo grid inside the album by pinching the screen in and out–this lets you scroll through photos vertically, instead of having to swipe left and right.
2. Insert Photos Into a Note/Pages App
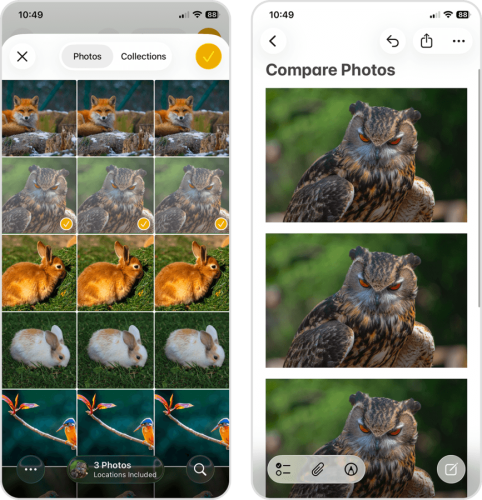
If swiping between photos sounds tedious, a smoother way to compare photos is to insert them into a note or document. This displays your photos side by side or one on top of the other. However, note that they will probably be scaled down for everything to fit your screen.
- Open the Notes app.
- Tap the create note button 📝 in the bottom right corner of the screen.
- Add a title for the note, then press the enter key ⏎ on your iPhone’s keyboard to create a new line. Once you’re in the body of the note, tap the attachment button 📎 (it looks like a paperclip) > Choose Photo or Video.
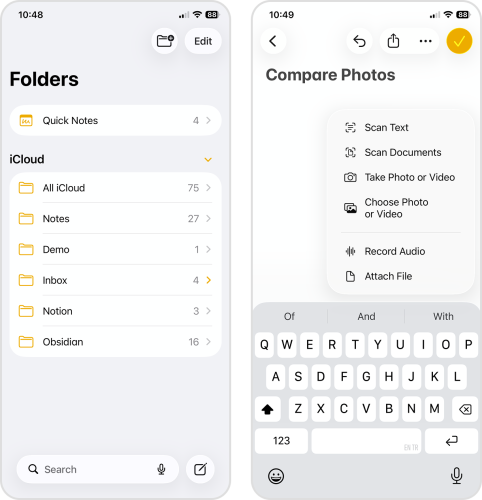
- Tap the photos you want to add to the note, then tap the check button ✔ in the top right corner of the screen.
- All the photos you selected in step 6 will be added to the note, either side by side or one on top of the other, depending on their size.
3. Create a Side-by-Side Photo Comparison With Shortcuts
Shortcuts is a native iOS app that allows you to combine different system actions into a chain. This lets you automate a wide variety of tasks on your iPhone, including functionality that isn’t built in natively.
For this method, we’ll be creating a shortcut that automatically generates a collage or Photo Grid, using photos that you select every time you run the tool. Here’s how to do it:
- Open the Shortcuts app.
- Select Gallery from the bottom menu. Then, in the search field, type Photo and select Photo Grid (which should appear first on the list).
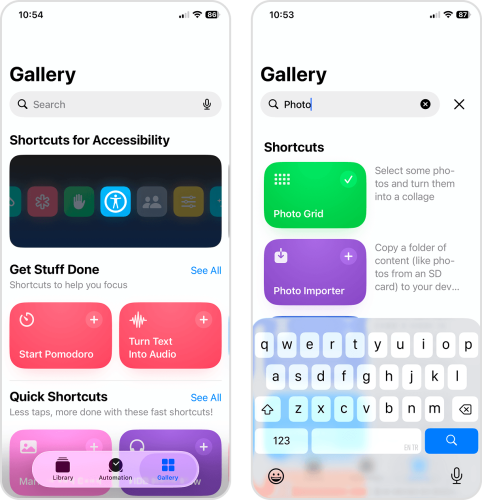
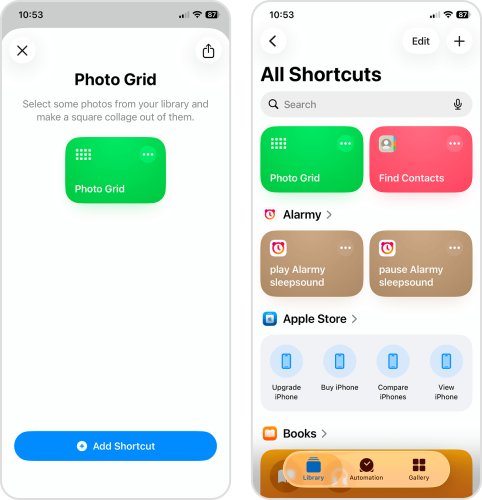
- Tap Add Shortcut.
- Exit the search field. Once you’re back on the Gallery page, tap Library from the bottom menu. Then, on the Library page, select Photo Grid.
- In the new menu that slides up your screen, select the photos you want to add to the collage. Then, tap the check button ✔.
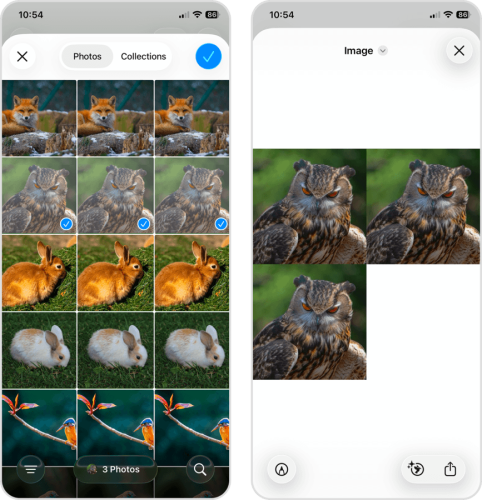
Once your photos have been added to the collage, they’ll immediately be displayed on-screen side by side. Note that you can choose for the photos to be combined either horizontally or vertically. In fact, Shortcuts are super flexible; try leveraging different actions or workflows to better suit your needs.
4. Compare and Get Rid of Similar Photos With a Cleaner App
Third-party cleaning apps are unusually suited for this task because most of them have a tool that automatically groups similar-looking photos together (which are usually what you want to compare). You won’t have to track them down yourself. As a bonus, you can easily delete the unwanted photos after you choose the ones you want to keep.
For this guide, we’ll be using Clever Cleaner: AI Cleanup App. It has the exact feature we need, aptly called Similars, which also detects the “Best Shot” within the group automatically. The app is completely free as of this writing, with no ads. Here’s a demo:
- Open the App Store, then download Clever Cleaner: AI Cleanup App.
- Run Clever Cleaner. Then, tap Manage Access and grant the app full access to your library.
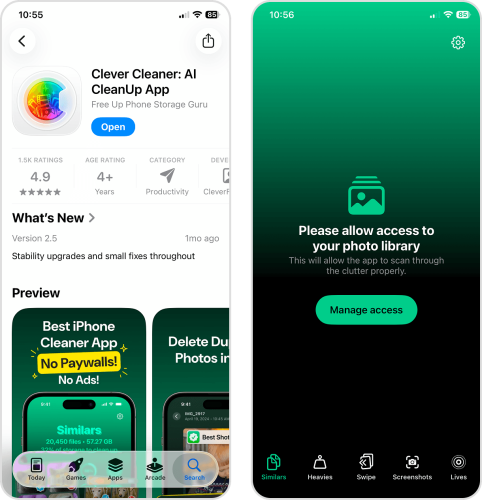
- Wait for Clever Cleaner to finish scanning your iPhone, and for the Similars page to appear. Then, tap a group of similar photos you want to review.
- Each group of photos will display its images side by side–simply swipe left and right to compare them. If you only want to keep the best photos from the group, select the ones you want to delete and tap Move to Trash.
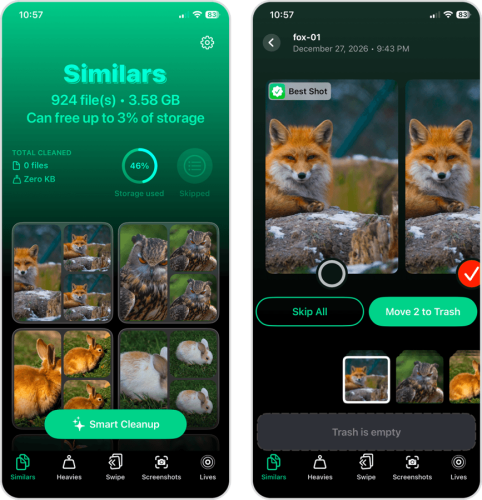
If you want to get rid of other unwanted photos and videos from your library, Clever Cleaner has a bunch of different tools that can help. Here’s a quick rundown of its other features:
- Heavies: You can sort videos by size or by date (unlike the native Photos app), and you can choose to delete or compress videos–which can greatly reduce their file size at the cost of some visual quality.
- Swipe: Clever Cleaner organizes your entire library into monthly folders, where you can review individual photos and use swipe gestures to keep or delete them.
- Screenshots: View your screenshots labeled with their individual file sizes, and delete all of them at once with one button.
- Lives: You can delete multiple or all Live Photos from your iPhone, or you can convert them to still images (which take up way less storage space).
5. Photos on Your Mac
Do you have a Mac? If you do, you can open your photos in different windows to compare them side by side (and in a much bigger resolution) using the Preview app. And if iCloud sync is enabled on your iPhone and your Mac, you can easily grab the photos from your library.
- On your Mac, open the Photos app.
- Locate the photos you want to compare. Then, drag them to your Desktop.
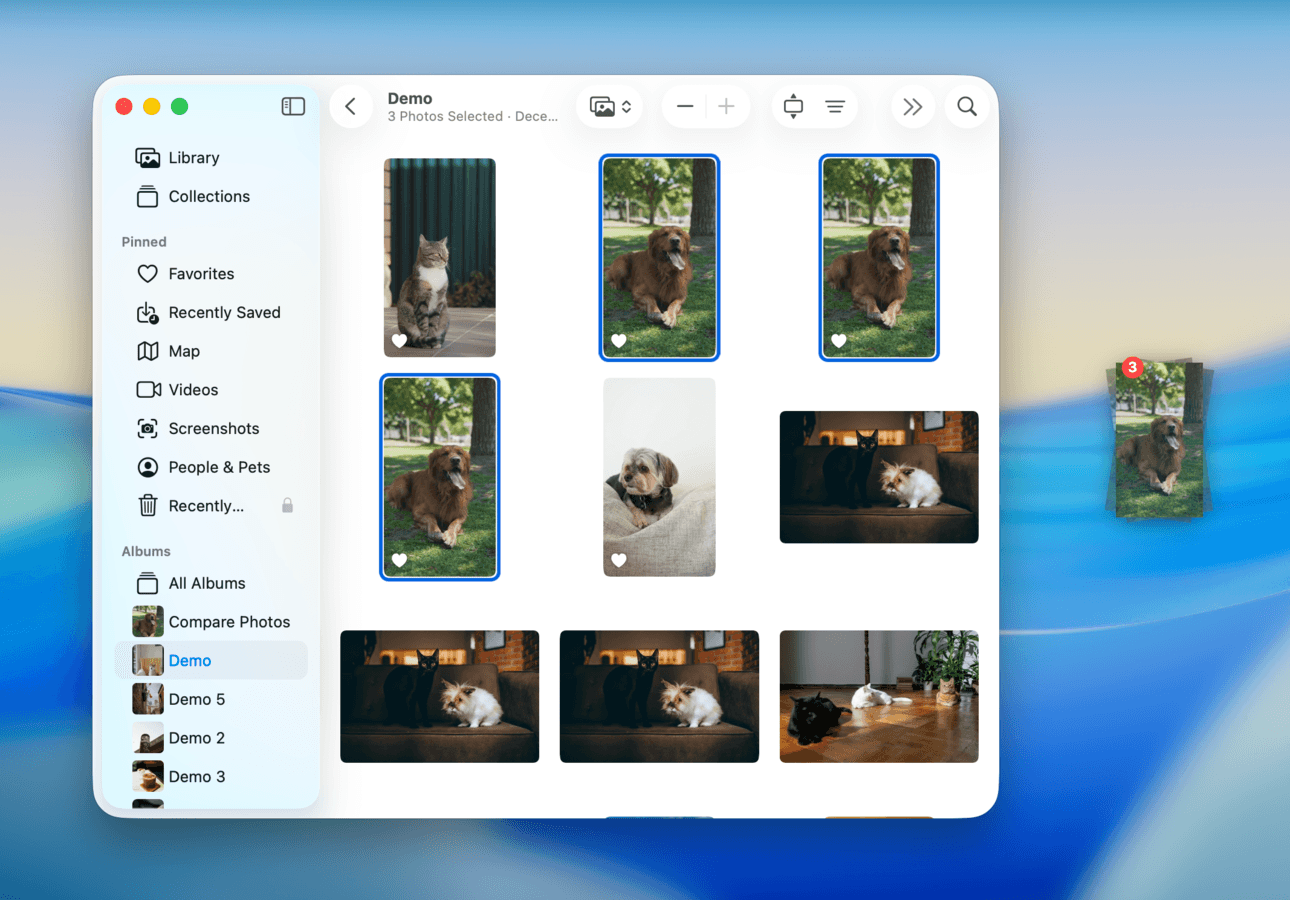
- Select all the photos by holding down the left mouse button and dragging the selection box around them. Then, right-click one of the files and select Open With > Preview.
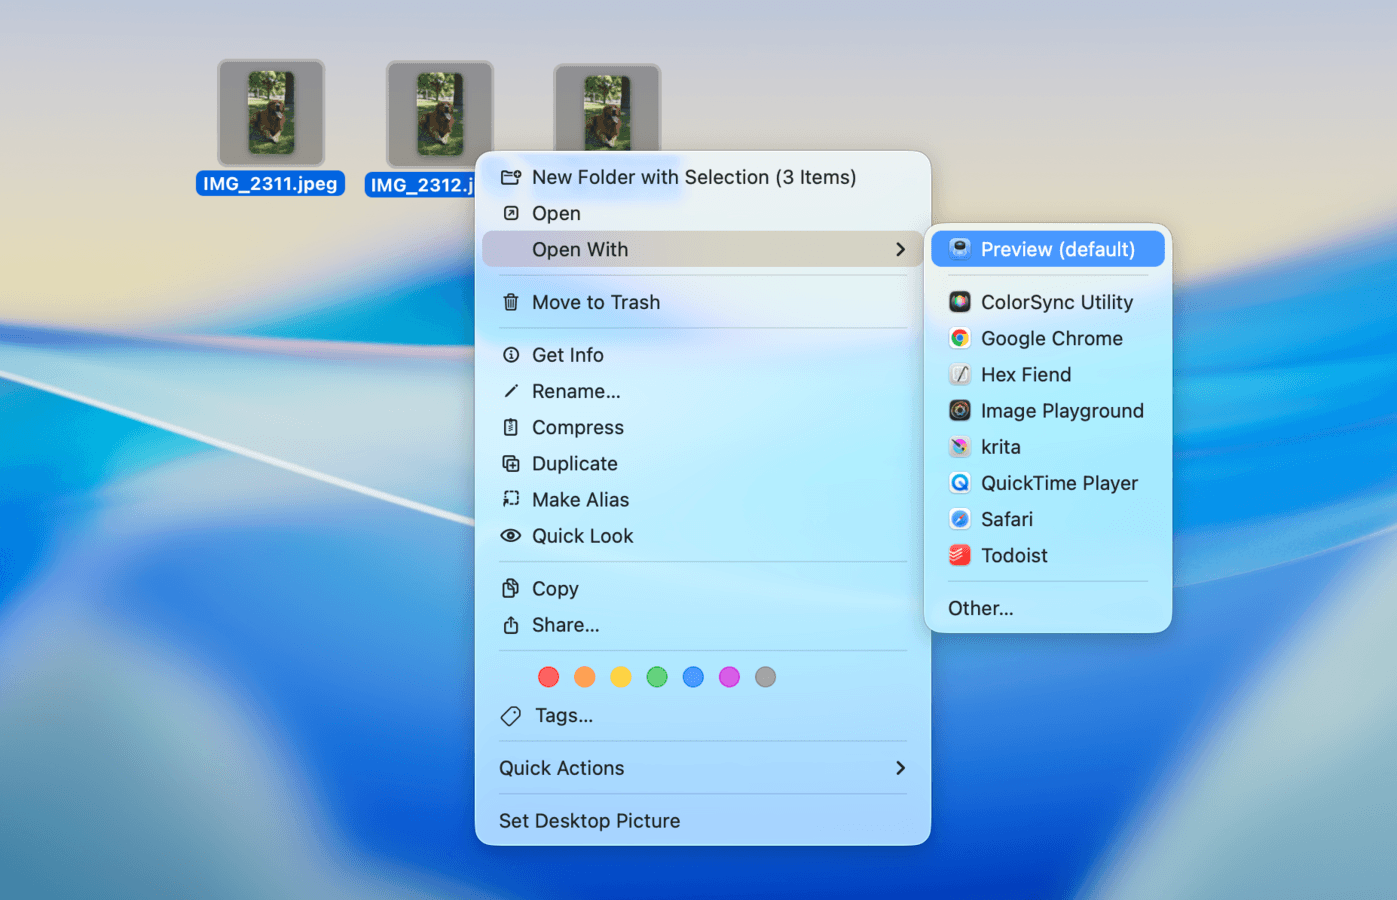
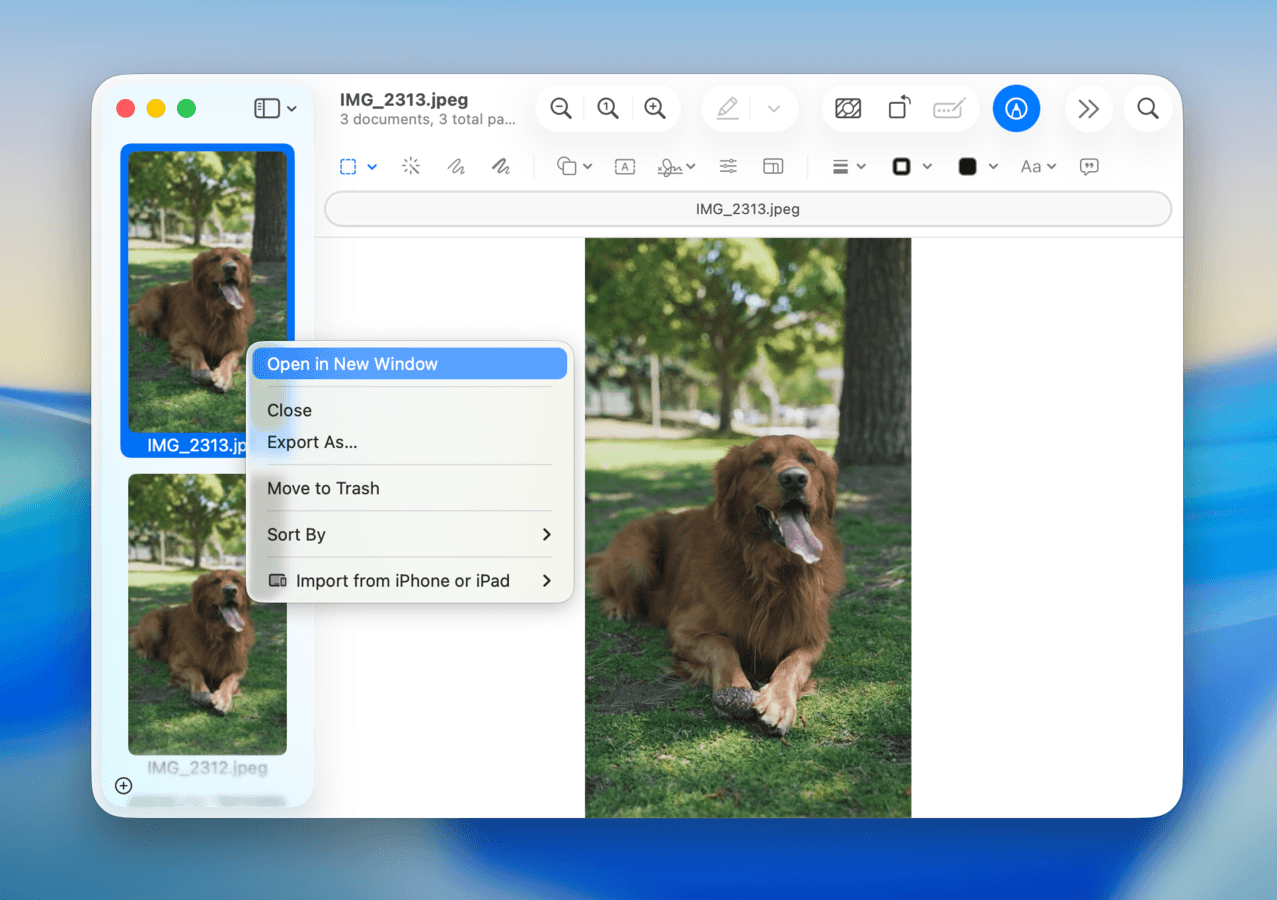
- In the Preview window, right-click one of the thumbnails in the left sidebar and select Open in a New Window. Then, arrange the windows side by side.
Conclusion
So you can easily refer back to this guide, here’s a quick summary of every method we used to compare photos, along with their links (so you can easily jump back in):
- To easily swipe between photos you want to compare, add them to a new album, or use an app like Clever Cleaner to automatically group similar photos.
- If you want to view the photos simultaneously, add the photos to a note or document, or use the Shortcuts app to create a Photo Grid.
- If you have a Mac, copy the photos from your library to your computer and open them in separate Preview windows.
FAQ
The iPhone doesn’t support system-wide split-screen. Instead, you can utilize native and third-party apps to simulate the experience. The best way to do this is to insert the photos into a note or document, which displays them side by side or on top of each other. Alternatively, if you have a Mac (with iCloud sync enabled), you can drag the images from the Photos app to your Desktop and open them in separate Preview windows.
There are two ways we recommend comparing similar photos on an iPhone:
- Swipe back and forth between the photos you want to compare. To make it easier, add them to an album in the Photos app or use a third-party cleaning app that automatically groups similar photos together (Clever Cleaner’s Similars tool has a good interface for this).
- Create collages to compare photos side by side. Insert the photos into a notes app or document editor, so they’re displayed together, or use the Shortcuts app to create a temporary Photo Grid.
The easiest way to compare photos on an iPhone is to use a third-party cleaning app that specifically has a feature that detects similar photos (not just duplicates). This way, you can compare visually similar photos without having to find them yourself, as well as delete the ones you don’t want to keep. There are several to choose from, but we recommend Clever Cleaner, as it’s completely free (and ad-free) as of this writing.
If you’re editing the photo with the Photos app (using the Edit panel), and if the changes haven’t been saved yet, you can simply tap the photo to instantly switch between the original and edited versions. In other cases, here are some alternative methods:
- Add the photos to a new album and use swipe gestures.
- Insert the photos into a note or document.
- Use a third-party cleaning app that automatically groups similar (not just duplicate) photos together. We recommend Clever Cleaner, which has a suitable interface and is completely free as of this writing.
