Now, more than ever, there’s been an increase in the use of text and images methods to convey a message to people. Visual communication has become the preferred choice of putting a message across in a clear and succinct manner.
In the recent past, the use of screenshots has gained popularity as a quick and convenient way of communicating ideas and illustrations. Since the advent of Windows Vista Operating System, the screenshot feature has come in handy and remains the most convenient way of capturing and saving a picture on your desktop. Modern PCs using Windows 7, 8, 10 and other operating systems like Mac and Linux come equipped with inbuilt tools for taking screenshots.
So, what is a screenshot?
A screenshot is a digital image of a monitor or part of a PC monitor. It’s created by an application software running in Operating Systems like Windows 7, 8, 10, Android and iOS or by pressing a combination of keys on the keyboard.
Before we delve deeper into the screenshot tools, it’s prudent to ask ourselves: Why are screenshots important?
Screenshots make it easier to drive your point home and dispel any ambiguity or incoherence. Most software download guides, manuals and technical tutorials rely heavily on screenshots to make it easier for clients to follow the instructions and get it right. Research has shown that someone is likely to have more recollection of a visual presentation that a verbal one, hammering the point home about the significance of screenshots in Windows 7, 8 and 10.
Students too have relished the powerful screenshot feature in sharing information with their peers. They take notes by screenshotting online articles and using them as a reference for online assignments. People nowadays relish taking screenshots of funny social media posts on Facebook, Twitter and share outrageous posts and gaffes made by notable political figures and key media personalities and celebrities. Screenshots have also played a key role as an FBI tool and for sharing hot gossip.
In this article we will answer the questions that most users ask themselves when needing screen capture software, like: How to take a screenshot on Windows? How to screenshot on PC? What is a Windows screenshot? What is a Screenshot on PC? And how do you take a screenshot on a PC?
Ways to Take a Screenshot on Windows
Windows PCs (7, 8, 10) make it easy and convenient to take screenshots irrespective of the device you are using. You are spoilt for choice as there are many ways you can go about this without breaking a sweat from using the built-in snipping tool to a myriad of keyboard shortcuts and free applications. Let’s delve deeper and see how this can be accomplished. These are some ways of how do you take screenshot on a PC with Windows Operating Systems.
1. Taking a Screenshot Using the Snipping Tool
Windows Operating Systems (7, 8, 10) come with a built-in application for taking screenshots called Snipping tool. It can capture all or part of your PC screen. It’s a versatile app and can capture the following types of snips:
- Full-screen snip – This mode makes a capture of the entire screen (also known as Windows screenshot).
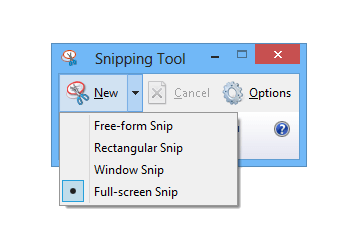
- Rectangular snip – This mode gives you a cursor which you can drag around your screen to capture a rectangular area.
- Free-form snip – This mode allows you to draw a free-form shape around an object.
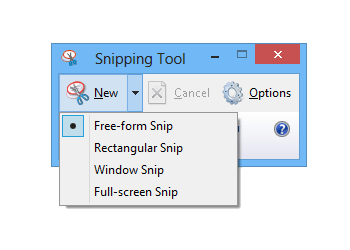
- Window snip – This allows you to select your preferred dialogue box or part of a window e.g. browser that you want to capture.
Opening the Snipping Tool
On Windows 7 or 10:
Hit the ‘Start’ button and type ‘Snipping Tool’ in the search box that appears, click on the Snipping tool icon to launch the program.
On Windows 8:
Using a mouse, point to the lower right corner of the screen and move the mouse pointer upwards and click search. Type Snipping tool in the search field that appears and select it. We can find some useful tips for taking screenshots in Windows over CNET, “3 tips for taking faster screenshots in Windows 10”.
Capturing a Snip on Windows 7, 8 and 10
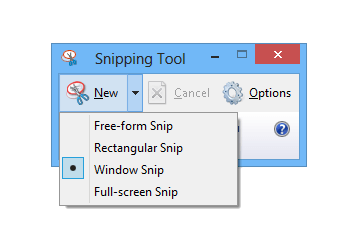
After launching the snipping tool application, select ‘mode’ and a drop-down list of the 4 modes you wish to pick appears. Select your preferred snip and select the area you wish to capture. This will allow you to make a screenshot on PC.
Capturing a Snip of a Menu
- After launching the snipping tool program, open a menu that you want a picture of. When using Windows 7, hit the Esc key first before opening the menu.
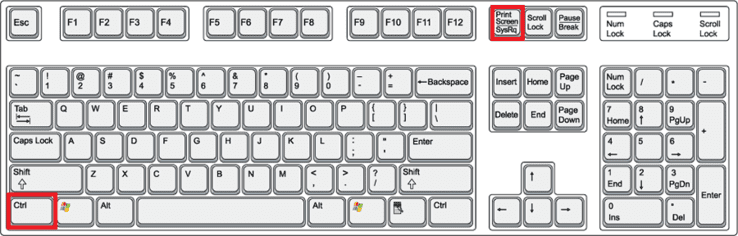
- Press the Ctrl + PrtSc keys. This captures the entire screen including the open menu.
- Select the drop-down arrow adjacent to the snipping mode and select ‘Window Snip’. A mouse pointer with a hand symbol will appear and all you need to do is to point to the menu you wish to capture.
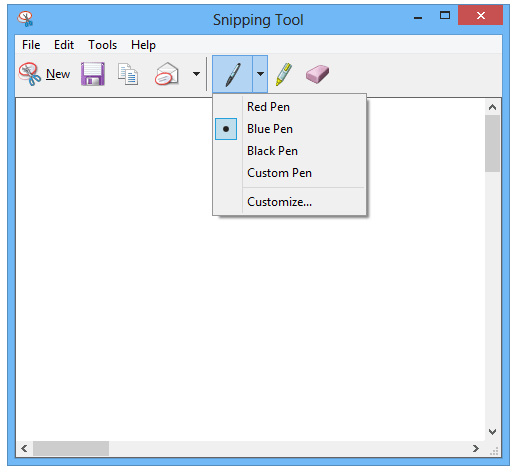
How to Annotate a Snip
After capturing the snip, you can scribble or write on or around it using the highlighter or Pen tools. If undesirable, you can use the eraser to efface the lines that you’ve scribbled.
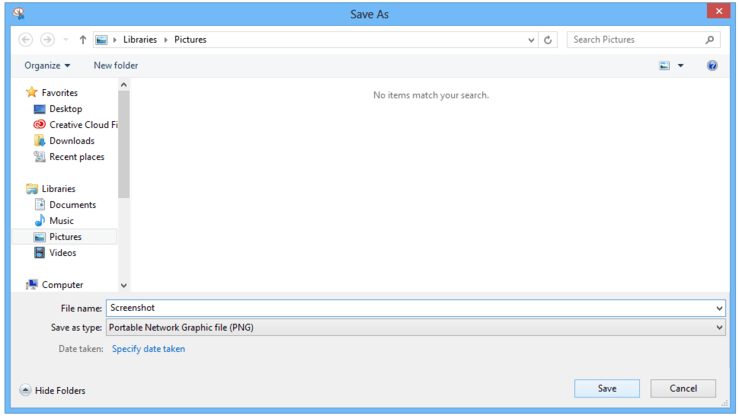
Saving a Snip
After capturing the snip hit the Save button.
In the Save As dialog box, type your desired file name and select Save.
How to Remove the URL from a Snip
After capturing a snip from a browser and saving it as an HTML file, the URL still appears below the snip. To prevent this from happening, follow the below steps:
- Select the ‘Options’ button.
- In the dialog box that appears, clear the ‘Include URL below snips’ (HTML only).
Sharing the Snip
To share the snip as an email attachment, locate the ‘Send snip’ button and select the drop-down arrow adjacent to it. This will present two options of sending it as an email attachment.
Keyboard Shortcuts Used in Snipping Tool Application
- Alt + M – Choosing a snip mode
- Alt + N – Create a new snip in the same mode as the last one
- Alt + D – Delay the capture by 1-5 seconds
- Ctrl + C – Copying the snip to clipboard
- Ctrl + – Saving the snip
2. How to Take a Screenshot of Your Entire Screen on Windows 7, 8 or 10 Using Keyboard Shortcuts
- On your keyboard, press the fn + PrintScreen key (abbreviated as PrtSc) key to copy your current screen. This will automatically save the screenshot in the OneDrive pictures folder.
- If you wish to paste it into a Microsoft Word Document or a blank document in any editing application press Ctrl + V to paste it into an image editor or into a blank Microsoft Word Document.
- For MS Paint, click on the Paste tab and select the paste option in the drop-down menu that appears.
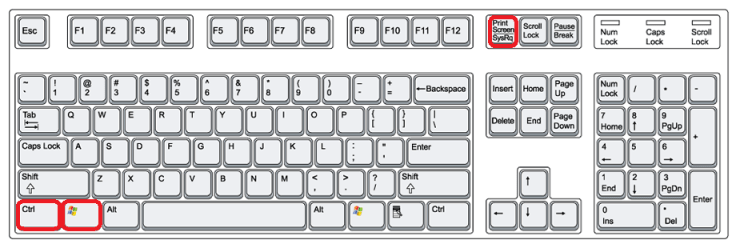
Windows 10 machines come with a new screenshot capture combination. For those whose keyboard comes with an fn key, hit the Windows key (Windows Logo) + fn + PrtSc key to save the screenshot automatically in the Photos folder eliminating the need of pasting it into a blank document.
The screenshot captures are saved in the following location: This PC > Pictures > Screenshots
3. How to Capture and Save a Screenshot to the Pictures Folder of OneDrive (Windows 7, 8, 10)
If you are running Windows 10 with OneDrive installed on your system, you have an easy convenient way of capturing and storing your screenshots in the cloud. Upon hitting the combination fn + PrtScn key, OneDrive will pop up a notification informing you that your screenshot has been saved to the Pictures folder. Below is the full path.
C:\Users\account_name\OneDrive\
Pictures\Screenshots
Alternatively, you can press the Windows key + fn + PrtScn button to save the screenshot directly to Pictures folder without pasting it anywhere else.
Alt + Fn + PrtScn also does the trick and similarly saves the screenshot in the OneDrive Pictures folder.
4. Taking a Screenshot on Microsoft Surface
Method 1:
The easiest and most convenient way of taking a screenshot on your Surface Pro 3 device is to tap and hold down the Windows key at the front and simultaneously pushing down the volume down button. The screen is captured and saved to the ‘Screenshots’ folder inside the Pictures library.
This PC > Pictures > Screenshots
Method 2:
If there’s a PrtScn key on your type cover, you can equally take a screenshot by pressing and holding down the Windows key and hitting the PrtScn key. The shot will be saved to the ‘Screenshots’ folder as mentioned earlier in Method 1.
Method 3:
Alternatively, you can press the PrtScn key. This will save the screenshot to the ‘Screenshots’ folder in the Pictures Library. If OneDrive is installed, it will be saved in the Pictures Library on OneDrive.
Method 4:
If you want to take a screenshot of just the active window on your screen, press and hold down the Alt key and hit the PrtScn key. This will automatically be saved in OneDrive as discussed in Method 3.
Method 5:
If you double-click the top button of your surface pen, the screenshot of the desktop will be saved in the screenshots folder on OneDrive. Moreover, this method presents you with an option of immediately cropping your image.
Method 6:
Finally, for a more precise screenshot, you can use the snipping tool feature that can capture part or the whole window area. Type ‘Snipping Tool’ in the search bar or Cortana and launch the application. This has been discussed in earlier examples.
Top 6 Popular Applications to Take a Screenshot on a PC
Apart from the default built-in Windows applications, there are free and premium apps that can equally come in handy. As mentioned over Creative Market “Best Screenshot Apps for Mac & Windows”. Let’s have a look at some of them that you can download at any moment:
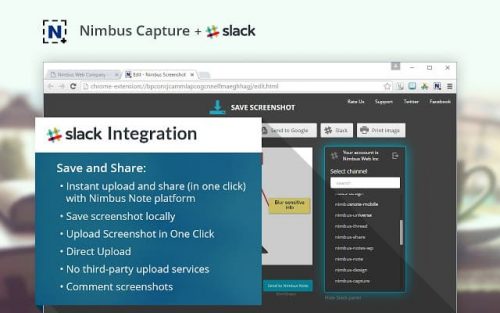
1. Nimbus Screenshot
Price: Free
This is available as a plugin for Chrome and Firefox and as a desktop application in Windows. It allows users to take screenshots of the entire browser window, part of the window or an entire webpage.
It also offers capabilities such as annotating and editing of Windows screenshot taken. Thereafter, images can be saved on your drive or uploaded to cloud for easier sharing. Download its desktop application, it comes with a screencasting tool for recording videos.
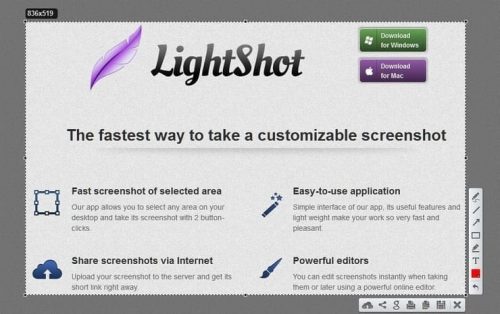
2. Lightshot
Price: Free
This works for both Windows and Mac.
The application sits in the system tray until needed. It comes with an editor for annotating (adding notes & highlights). A free account can be created by users to enable them to upload the shots to printscrn.com and create an online gallery for reference and secure backup.
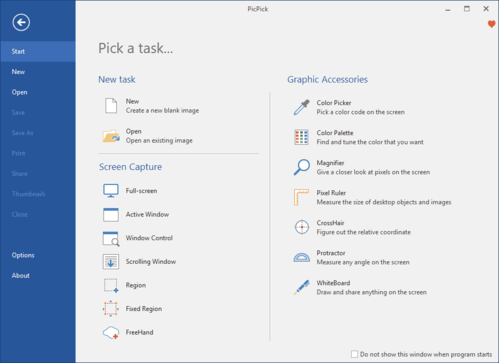
3. PicPick
Price: Licensed per user and comes with Technical support, auto update, lifetime upgrade and can be used for both commercial and personal purposes. Starts at $29,99.
It’s a full-featured screen capture tool, that allows a user to capture and edit screenshots using numerous integrations such as crosshairs, protractor, and pixel ruler to mention just but a few. You can also add annotations, arrows, and shapes in the built-in editor.
Moreover, it’s a portable program that can be downloaded on a flash disk and executed without the need for installation.
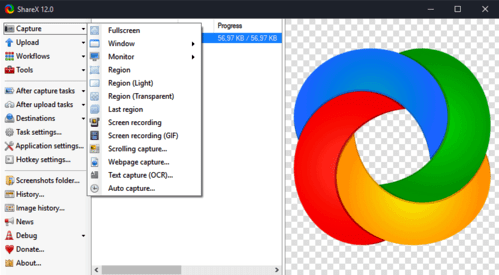
4. ShareX
Price: Free
This is an intuitive screen capture tool with numerous integrations & extensive editing features that allow you to edit, annotate and save screenshots.
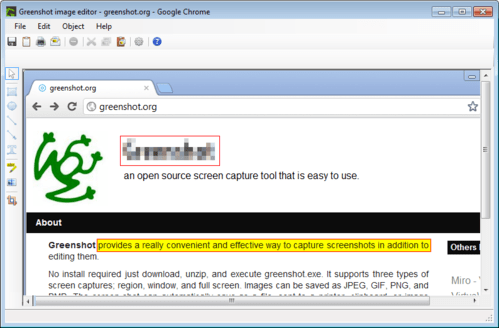
5. GreenShot
Price: Free
It’s a lightweight capture tool and editor packed with numerous convenient features and a built-in editor for annotations and highlighting sections of the screenshots.
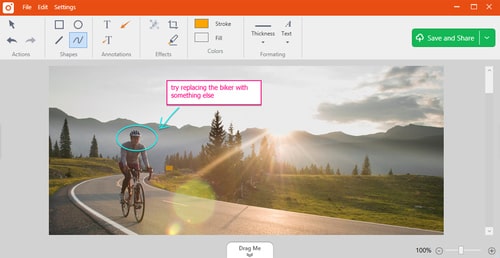
6. TinyTake
Price: Free (For 5-minute-long videos)
It’s a versatile screen capture and video recorder tool that also allows you to edit screenshots and add annotations. You can capture part or the entire screen of your desktop either as videos or screenshots. Images can be stored in the cloud for backup and ease of access.
How to Recover Deleted or Lost Screenshot
Now that you know how to take a screenshot on multiple versions of Windows, you need to learn how to restore your favorite and valuable screenshots if they get accidentally deleted with the help of data recovery apps like Disk Drill.

While you may not think about data recovery often, you should. If you don’t maintain regular backups, losing your data may be very painful, but not only that, imagine losing your important college thesis or work related documents without been able to recover them.
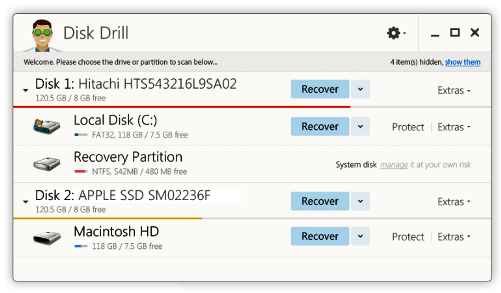 Disk Drill Data Recovery Software is a complete, easy-to-use recovery solution trusted by hundreds of thousands of Mac and Windows users every day. Our software is also capable of creating real-time backups of your data for free using Recovery Vault and Guaranteed Recovery features, and can be used to recover lost data with our state-of-the-art recovery engine. Don’t lose your important files, save them with Disk Drill!
Download Disk Drill now to start protecting your data, or get back to it when you need a data recovery software.