You may be surprised to know that your Windows operating system and the applications that run on your computer generate temporary files.
This article is meant to help you understand what these temporary files are used for and how they may impact the performance of your computer and the capacity of your internal hard disk.
What are Temporary Files?
In the Windows operating system, temporary files are created both by the OS itself and many of the applications running on your computer.
Many of Windows’ temporary files are denoted with a file type of .tmp or are prefaced with a tilde (~). Most of the temporary files that are created end up in the Windows Temp folder.
They are used for a variety of reasons including:
- Operating system requirements such as providing space for virtual memory.
- Work files for applications that hold data while the program is running.
- Files created as backups for works in progress such as Microsoft office creates for open documents.
Why Should I Remove Temporary Files?
There are two main reasons to clear out the temp files in Windows 11 or any version of Windows for that matter. They are:
💽 Regaining storage space – Temporary files can end up taking up a lot of storage space. Over time, they can accumulate and represent a significant percentage of your disk’s storage. Removing temporary files which are no longer needed gives you more space for the important data that you need to store.
💡Improving computer performance – Temporary files that are needed by Windows or other applications can negatively impact your computer’s performance as they grow larger.
Loading and searching these large files can slow down your computer and the applications that you are using. Eliminating these files can considerably speed up your machine’s performance.
How to Delete Temporary Files in Windows
Before you can delete the temporary files on your machine, you need to locate them. Here is how you can find the Temp folder in Windows 11 as well as earlier versions of the OS.
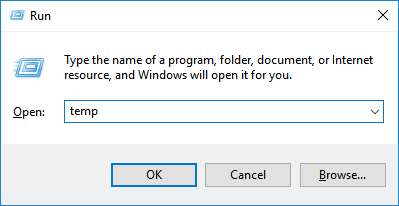
1. The first is located at c:/Windows/Temp and is used by the OS to store temporary files. Press Windows + R, type: temp and press Enter.
2. The second is the Temp file related to the user currently logged into the system. Here is how to find those temporary folders.
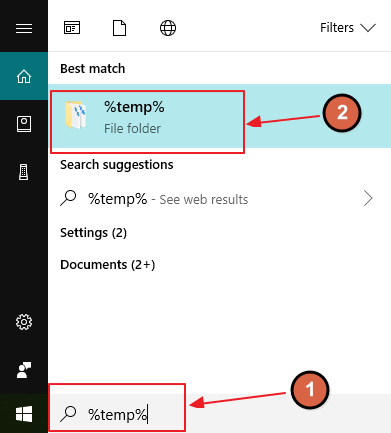
Windows 11/10 – Using the search field located to the right of the Start button, enter %temp%. The folder at the top of the results is the Temp folder.
Windows 8 – On the “Start” page click on the magnifying glass icon located in the top right of the window – next to your username. Type in %temp% and click on the folder named Temp.
Windows 7, Vista & XP – Click on the Start button and in the search field type: %temp% Click on the folder called Temp.
Steps to Delete Temporary Files in Windows:
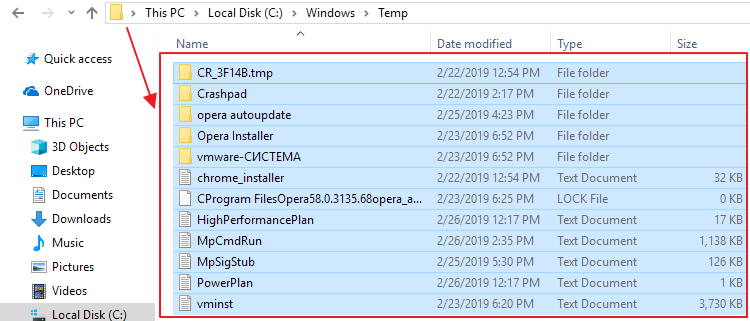
You can follow this procedure on both the WindowsTemp folder as well as the folder returned from the searches listed above. The below process remains the same on any version of Windows. We’ve illustrated using Windows 10.
- Select all of the files that you want to delete. You are probably safe deleting them all unless there are specific files that you know you want to keep.
- Delete the files using the delete key on your keyboard. If you are asked to confirm the deletion of hidden temporary files, give it a Yes.
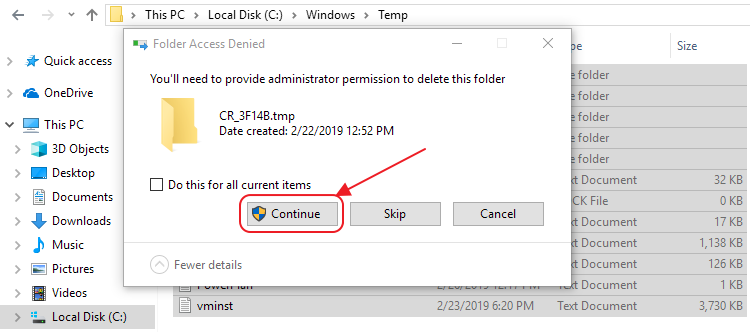
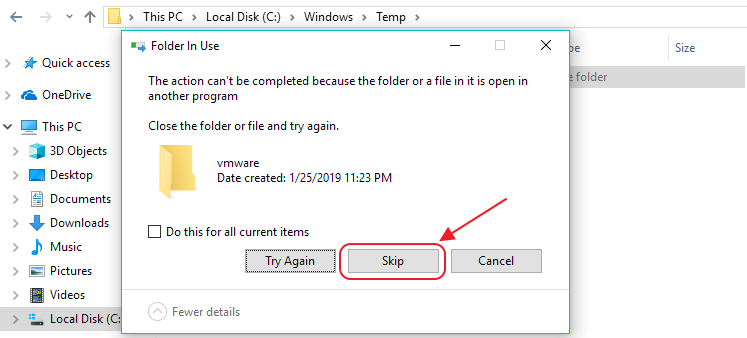
- If you get messages indicating that a file or folder is in use, skip these files as they are locked by Windows or another application.
- Wait for the process to complete, which can take some time if you are deleting large temporary files.
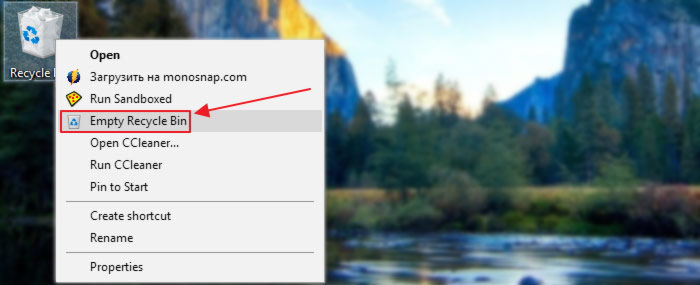
- Empty your Recycle Bin to permanently delete the files and recover the separate space that they occupied.
Other Methods to Remove Temporary Files
Apart from the traditional method of deleting the temp folder, here are a few more techniques to get rid of your temporary files:
Method #1: Disk Cleanup
Windows 11
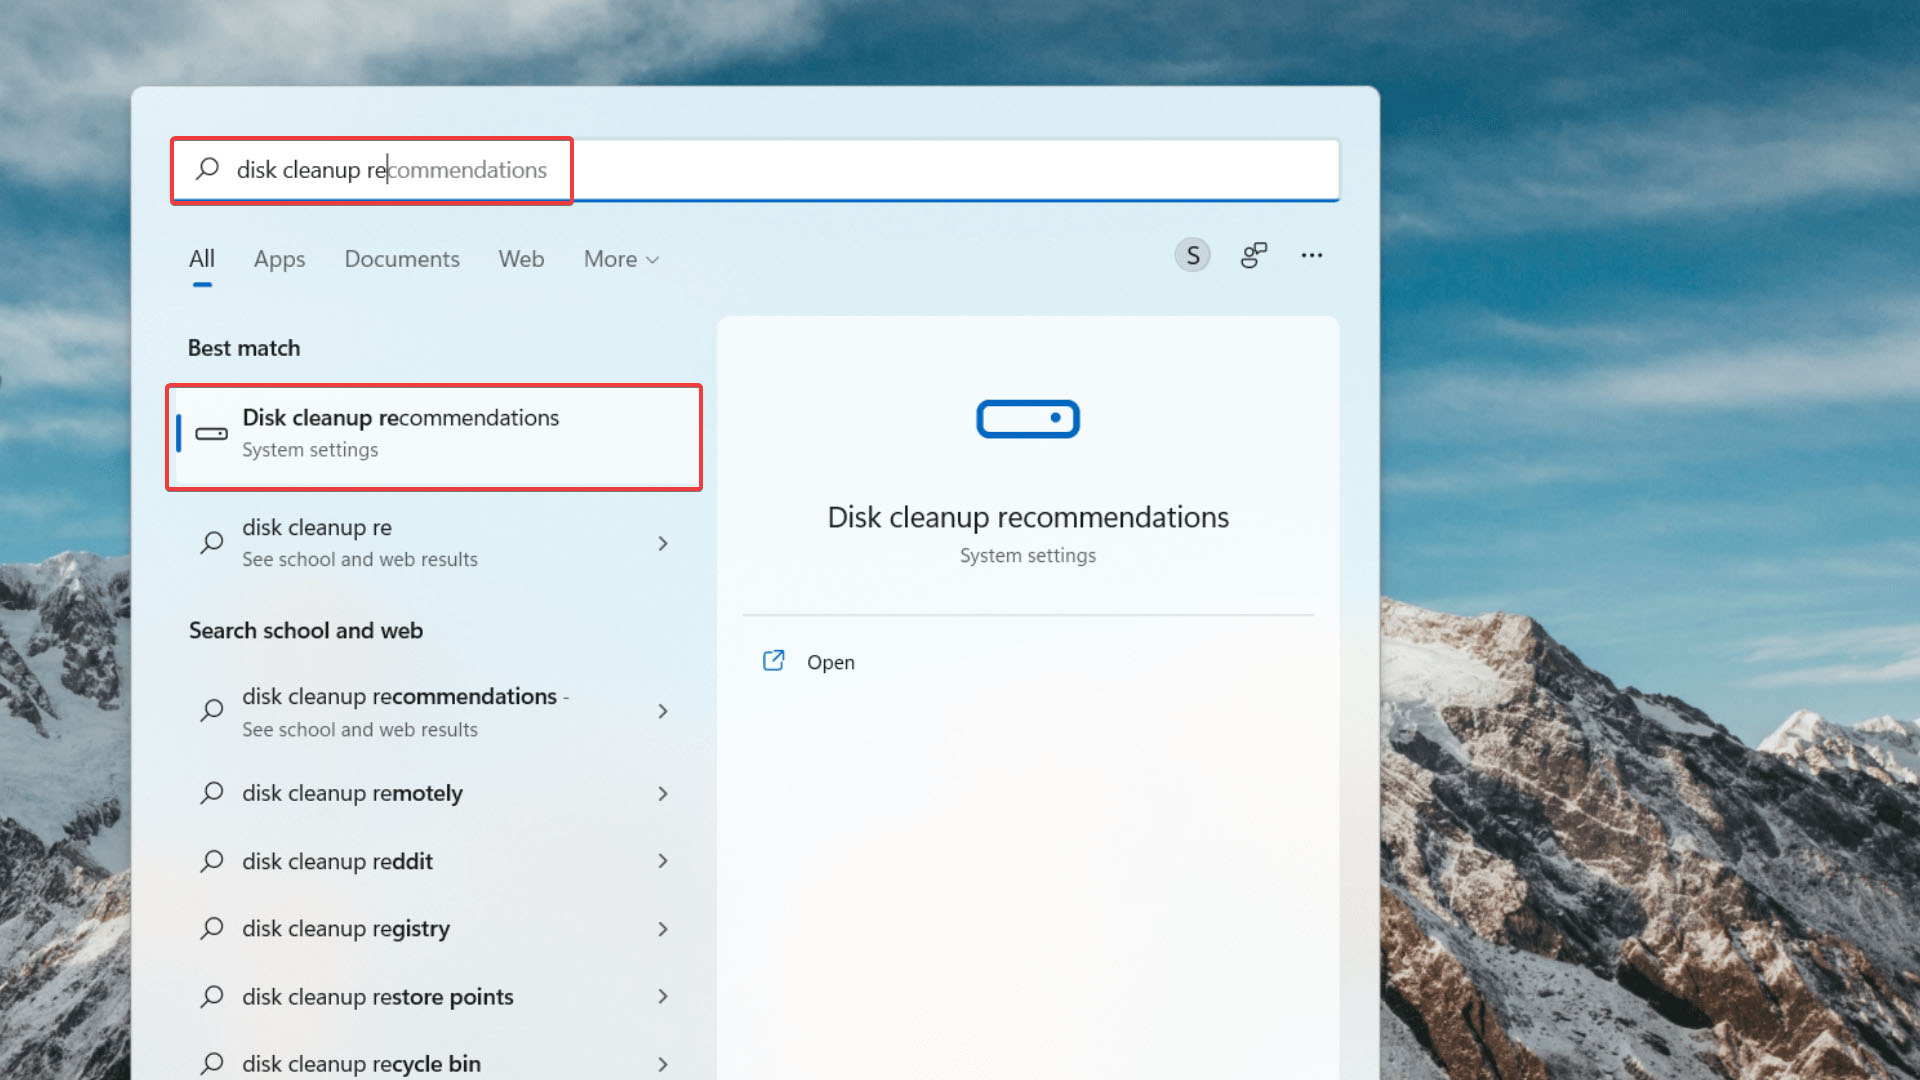
- Press the Windows key and type in Disk cleanup recommendations.
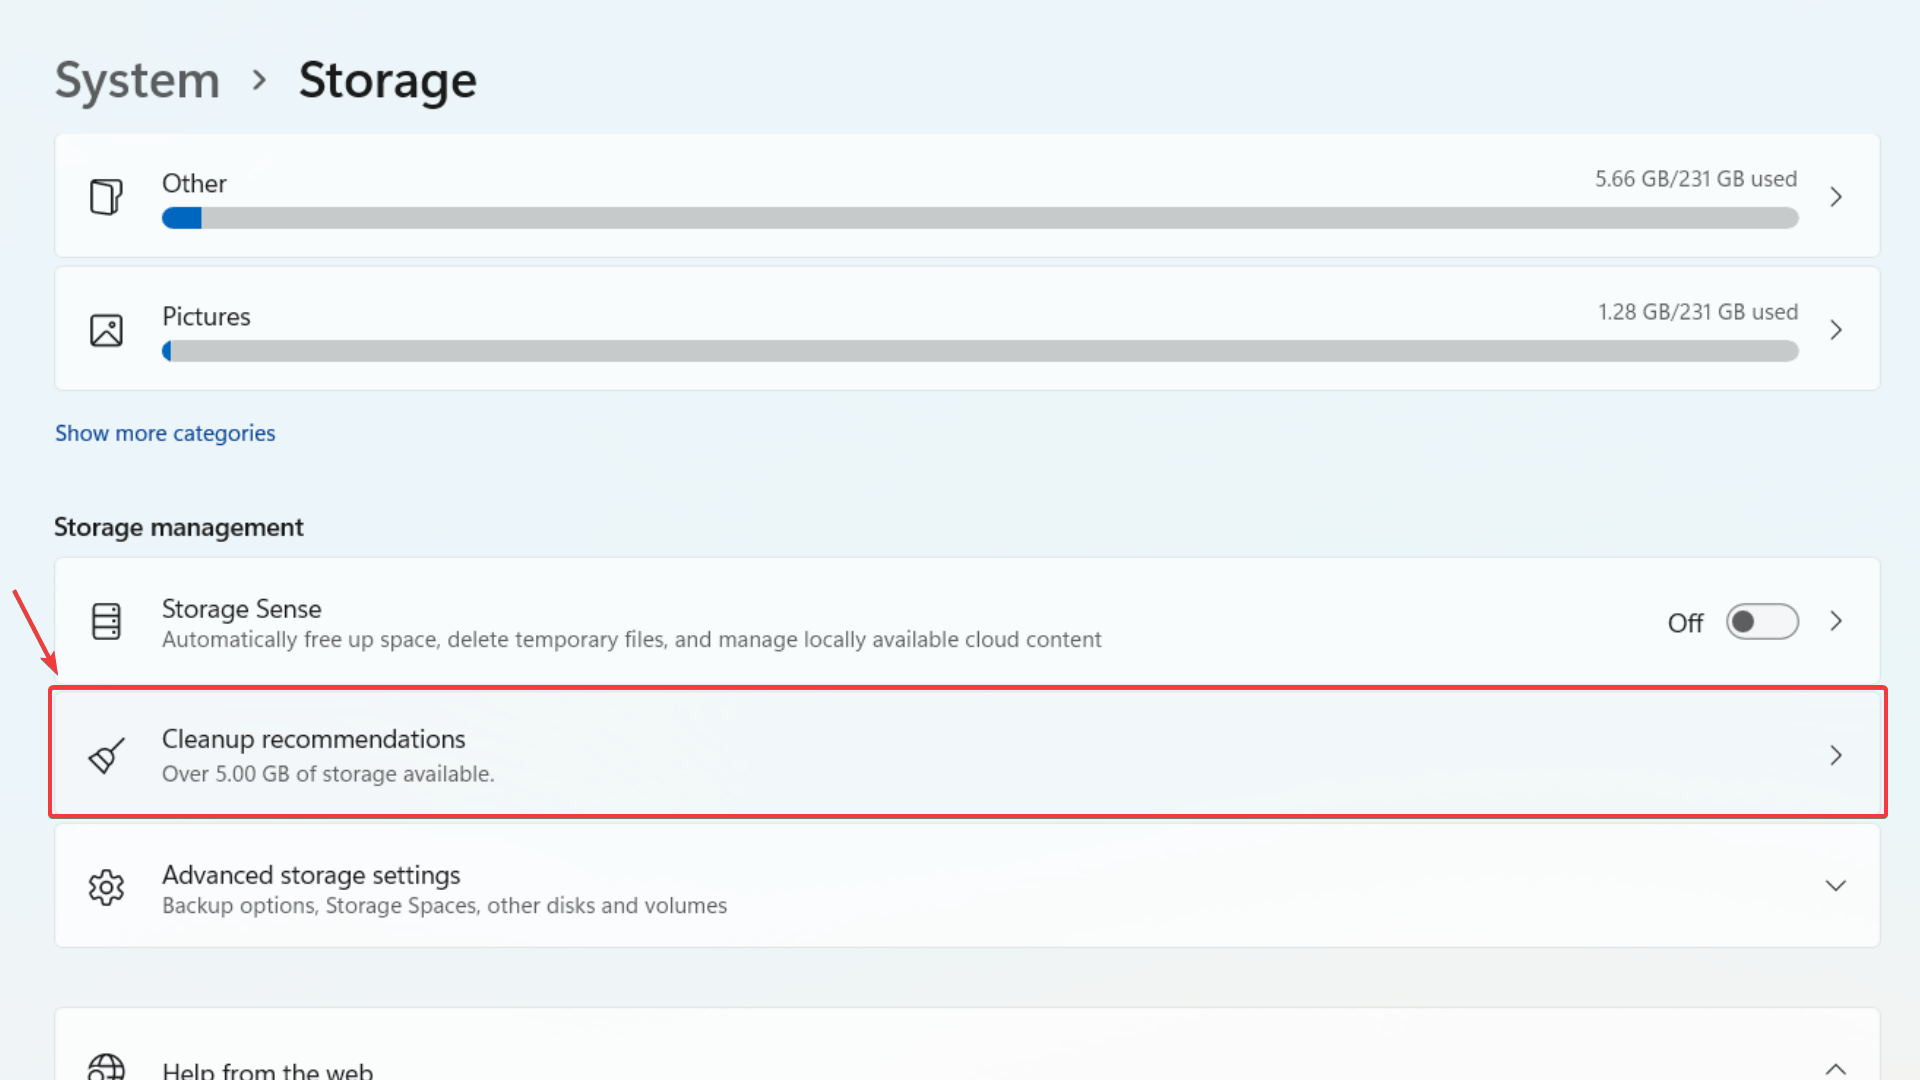
- Next, navigate to the Cleanup recommendations section under Storage Management.
- Now, expand the Temporary Files option, and select the folders you wish to delete. You can tick or untick items to remove them from the selection.
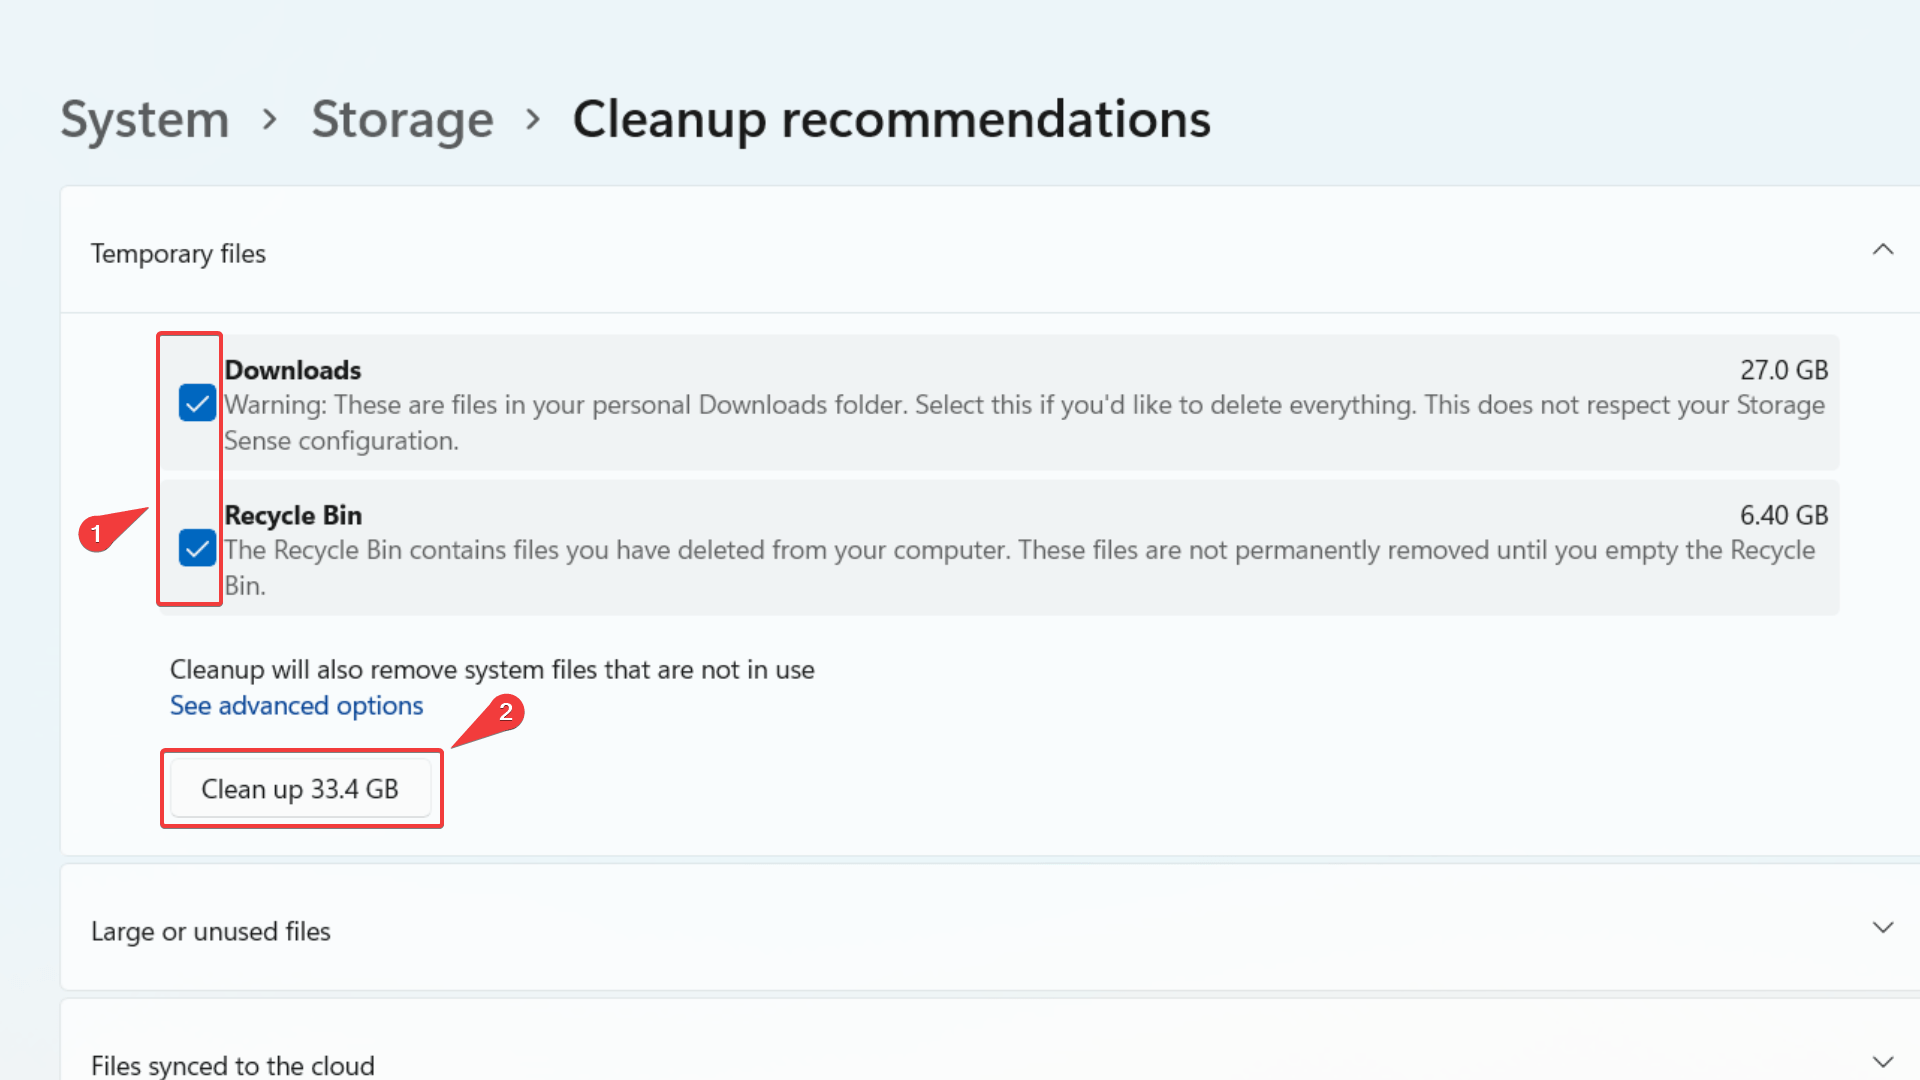
- Finally, click the Clean up button to delete the temporary files safely.
Windows 10
- Press the Windows key, type in Disk Cleanup, and select the option from the results list.
- The Disk Cleanup screen will appear. Under Files to delete, tick the files or folders you wish to delete.
- You can also click the Clean up system files button. Disk Cleanup will calculate how much space the system can free up safely to clear out the drive space.
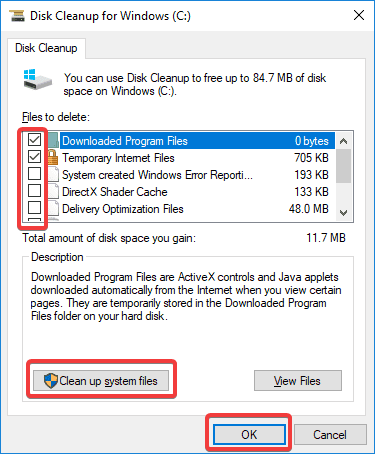
- Finally, click the OK to get rid of temporary files.
Method #2: Using CMD
Another way to completely delete temporary files and folders from your Windows operating system is by using the Command Prompt. We’ve used Windows 11 to illustrate this method. However, this will work on other versions of Windows as well.
Here’s how you can delete temp files via the Command Prompt:
- Press Win + S, then type cmd in the search bar.
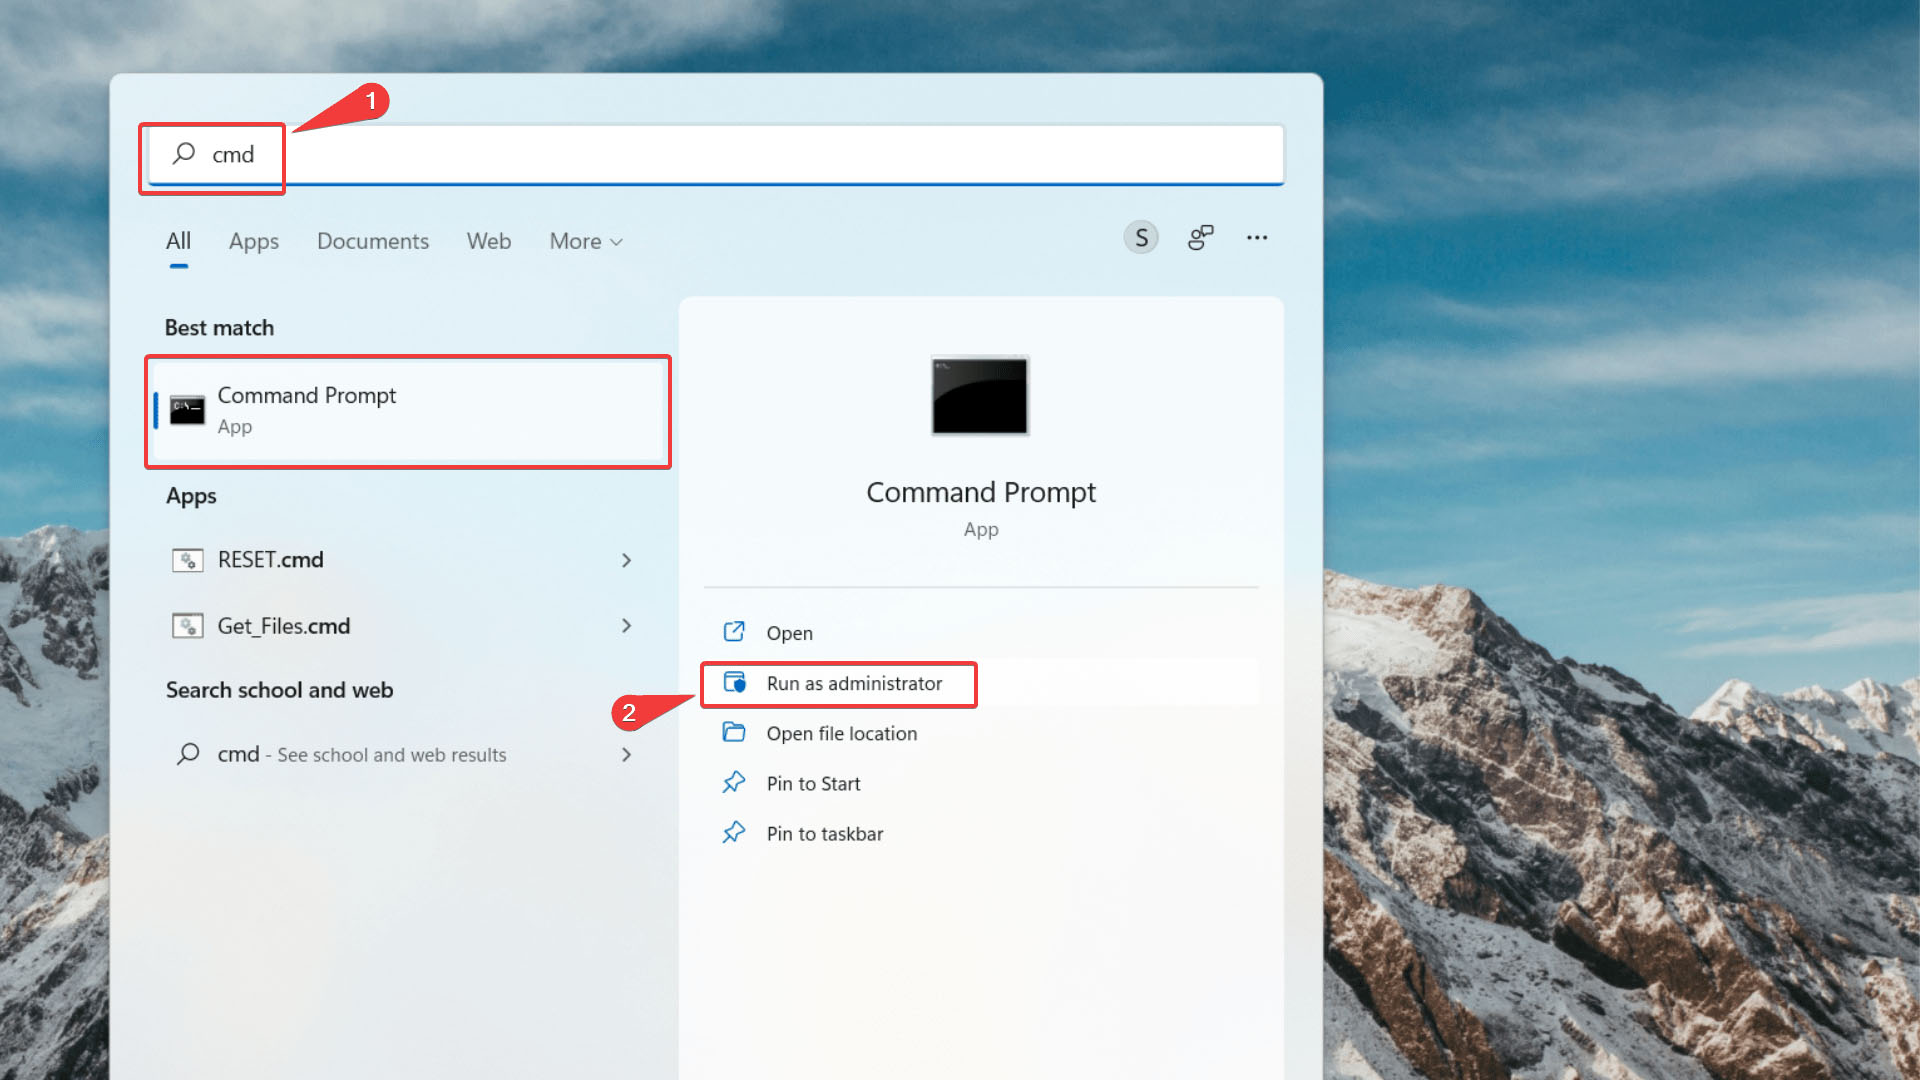
- Right-click Command Prompt from the results list and select the Run as administrator option.
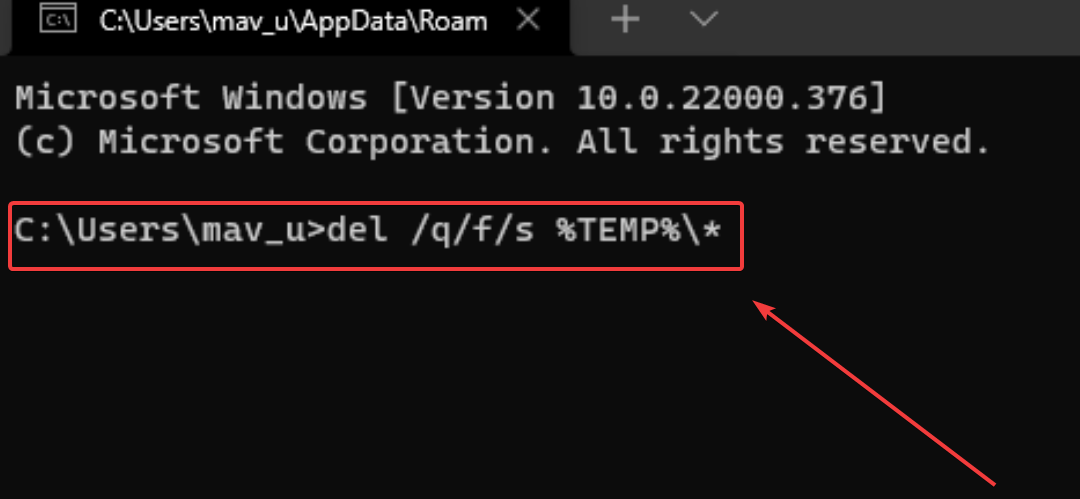
- Now, type the following command in the cmd window and hit enter:
del /q/f/s %TEMP%\*
Method #3: Remove Temp Files by Cleaning Your Browser
Internet browsers can leave behind a lot of temporary data, such as cached files from websites, cookies, and the user’s browsing history. You can delete these temporary files on Windows by cleaning your browser.
Here’s how you can delete browsing data in Google Chrome for Windows 11 and older versions:
- Open Google Chrome and press CTRL + H to open the History menu.
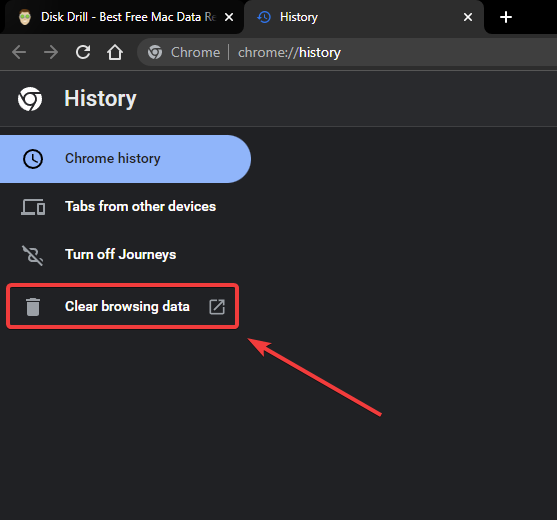
- Click Clear browsing data from the left-side menu.
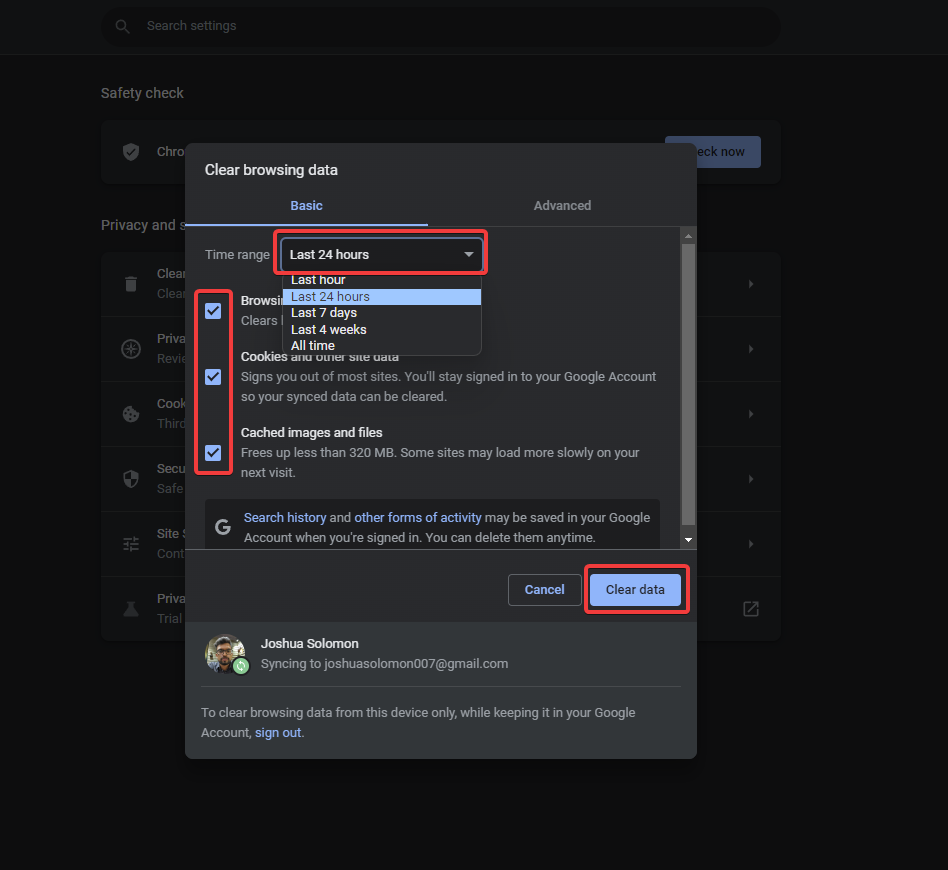
- Now, select the types of browser data to delete, choose a time range, and finally click Clear data.
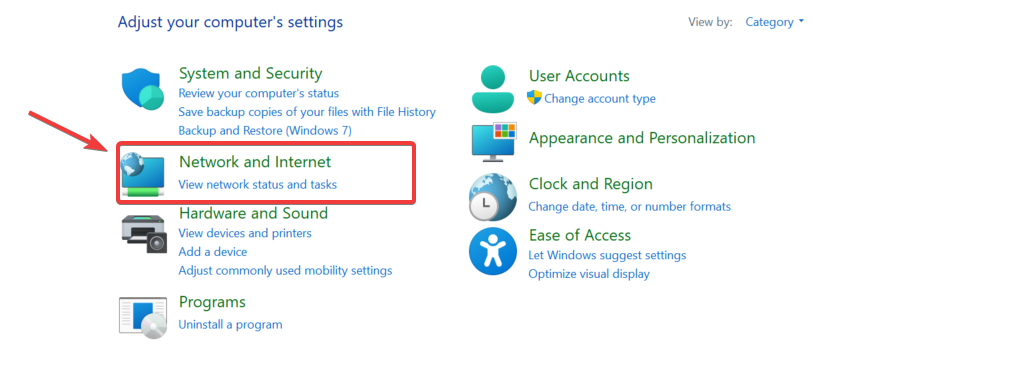
Another generic way to clean your browser on your system is through the Control Panel:
- Click Start and navigate to the Control Panel. Select Network and Internet.
- Go to Internet Options, then select Delete browsing history and cookies.
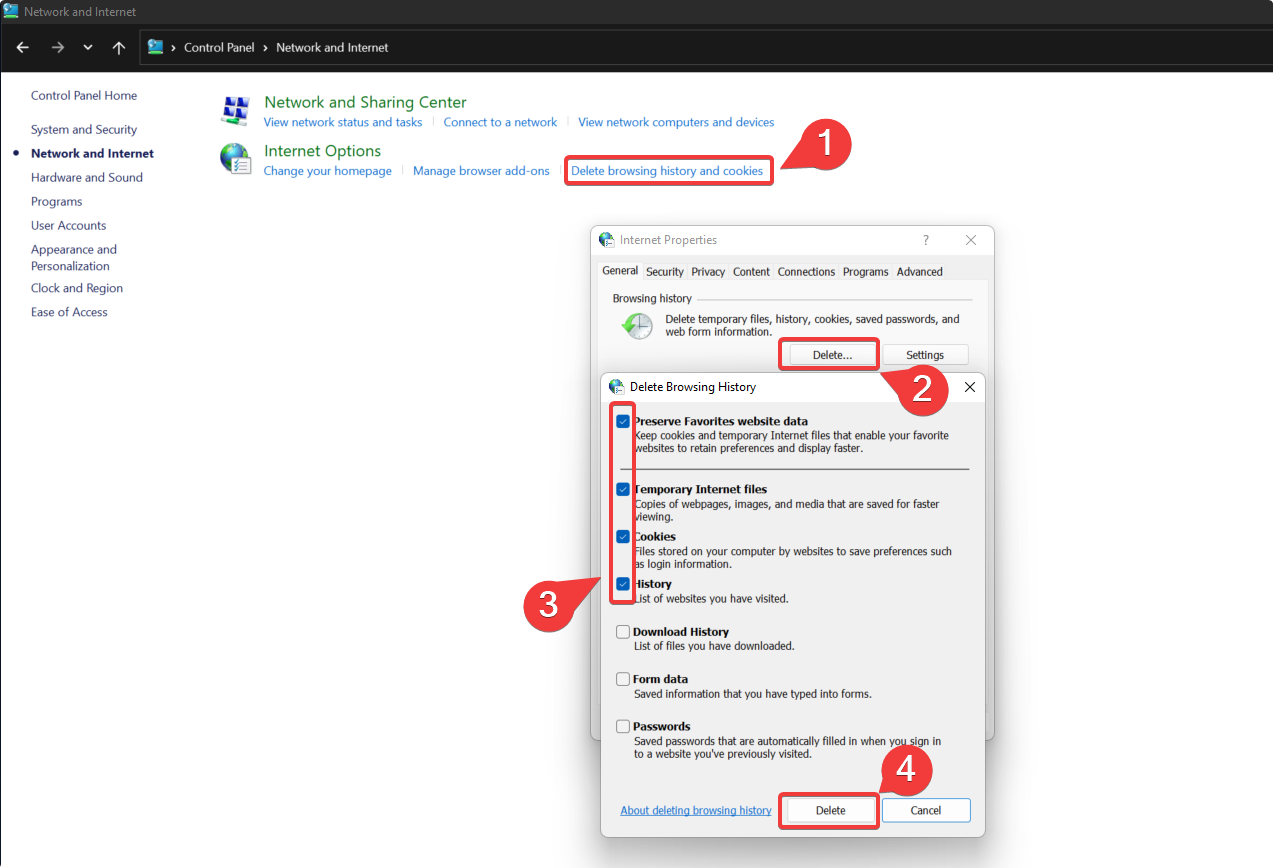
- Select the files and folders you wish to get rid of, then click Delete.
Method #4: How to Delete Temporary Files with Avast Cleanup
It’s important to regularly clean up temporary data from your PC to free up space and optimize its performance. This means keeping your browser clean, and getting rid of cookies and other temp files for an effortless experience.
Such a task may seem taxing if you have to do it manually, but Avast Cleanup thoroughly scans your PC to remove gigabytes worth of junk files from apps, browsers, and even the Windows operating system.
Here’s how to delete temp files with Avast Cleanup:
- Download and Install the Avast Cleanup free trial from their official website.
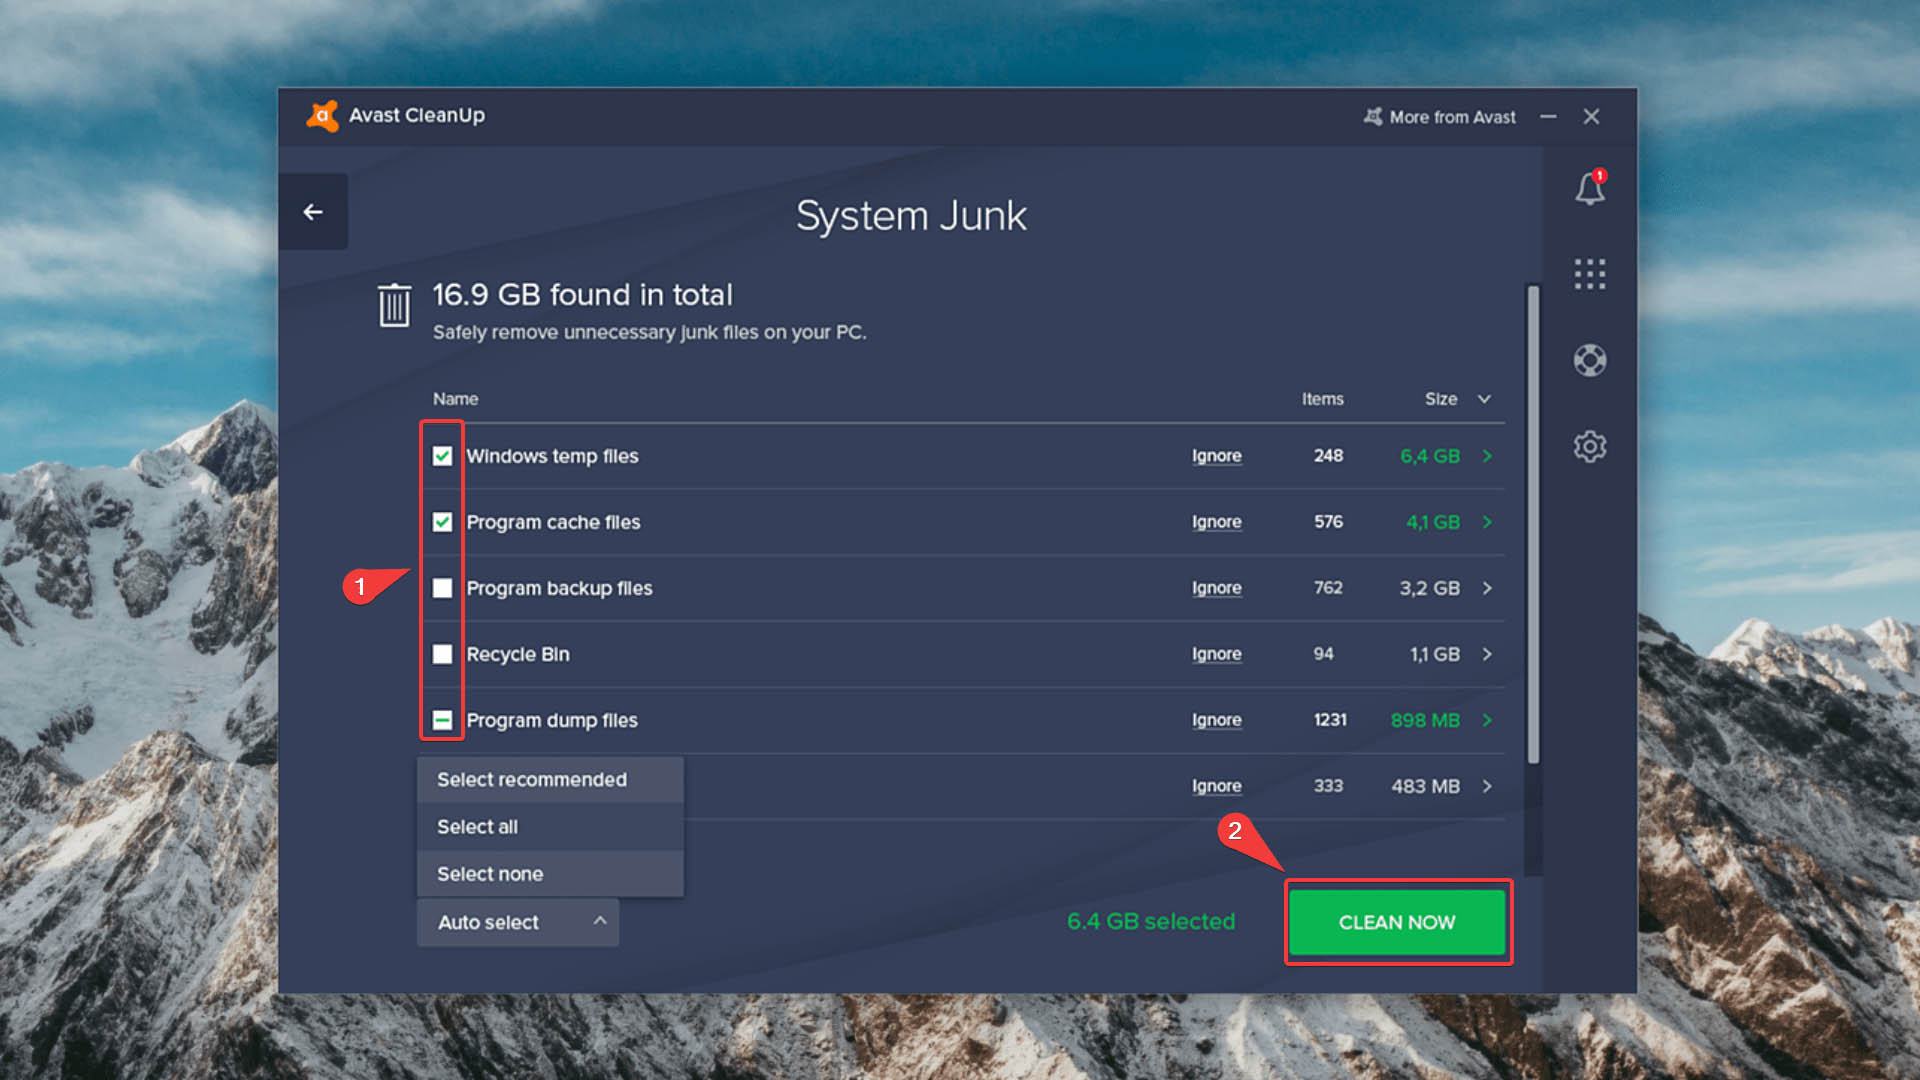
- From the Avast Cleanup dashboard, click Maintenance to scan your device for junk files on your system.
- Go to System Junk to select temporary files and folders for cleanup. You can either select files manually, select all files, or rely on AI recommendations for temp files you should delete.
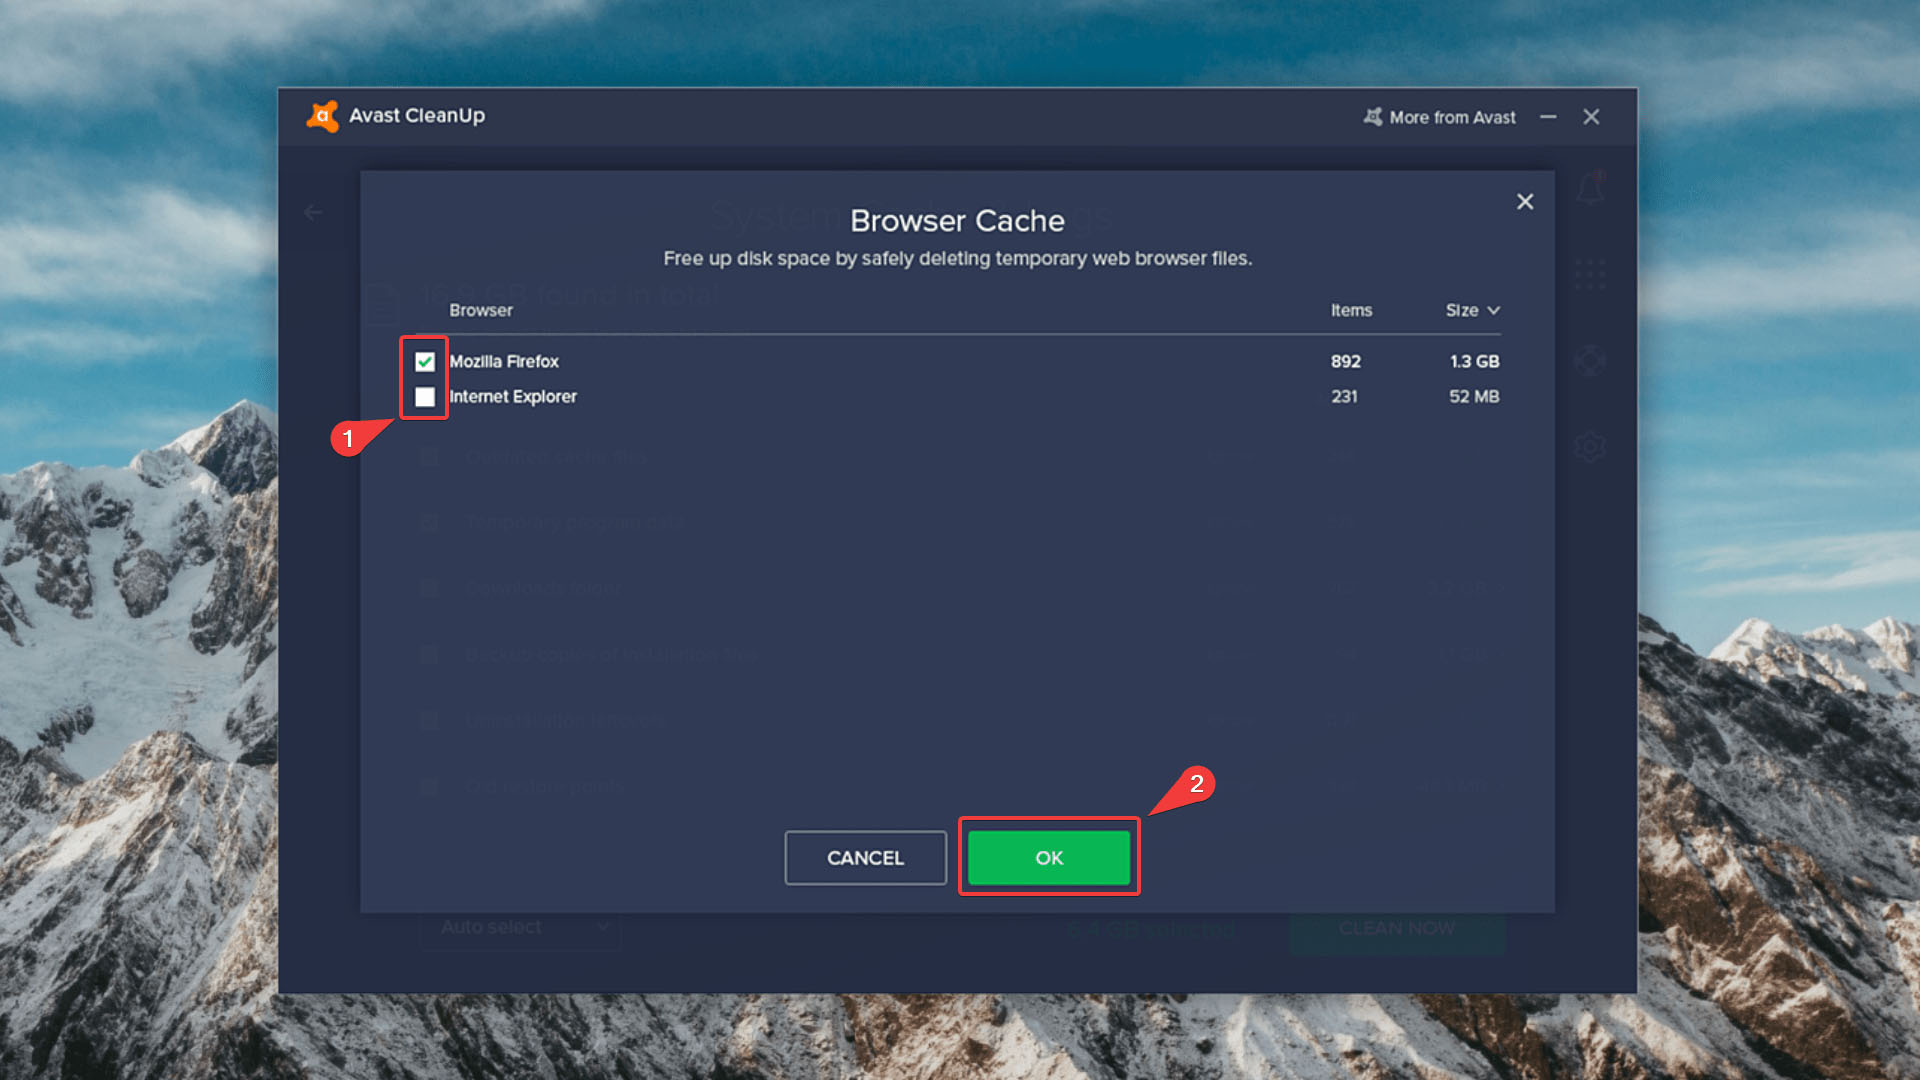
- You can also select Browser cache to delete your temporary web browser files and create more space on your hard drive.
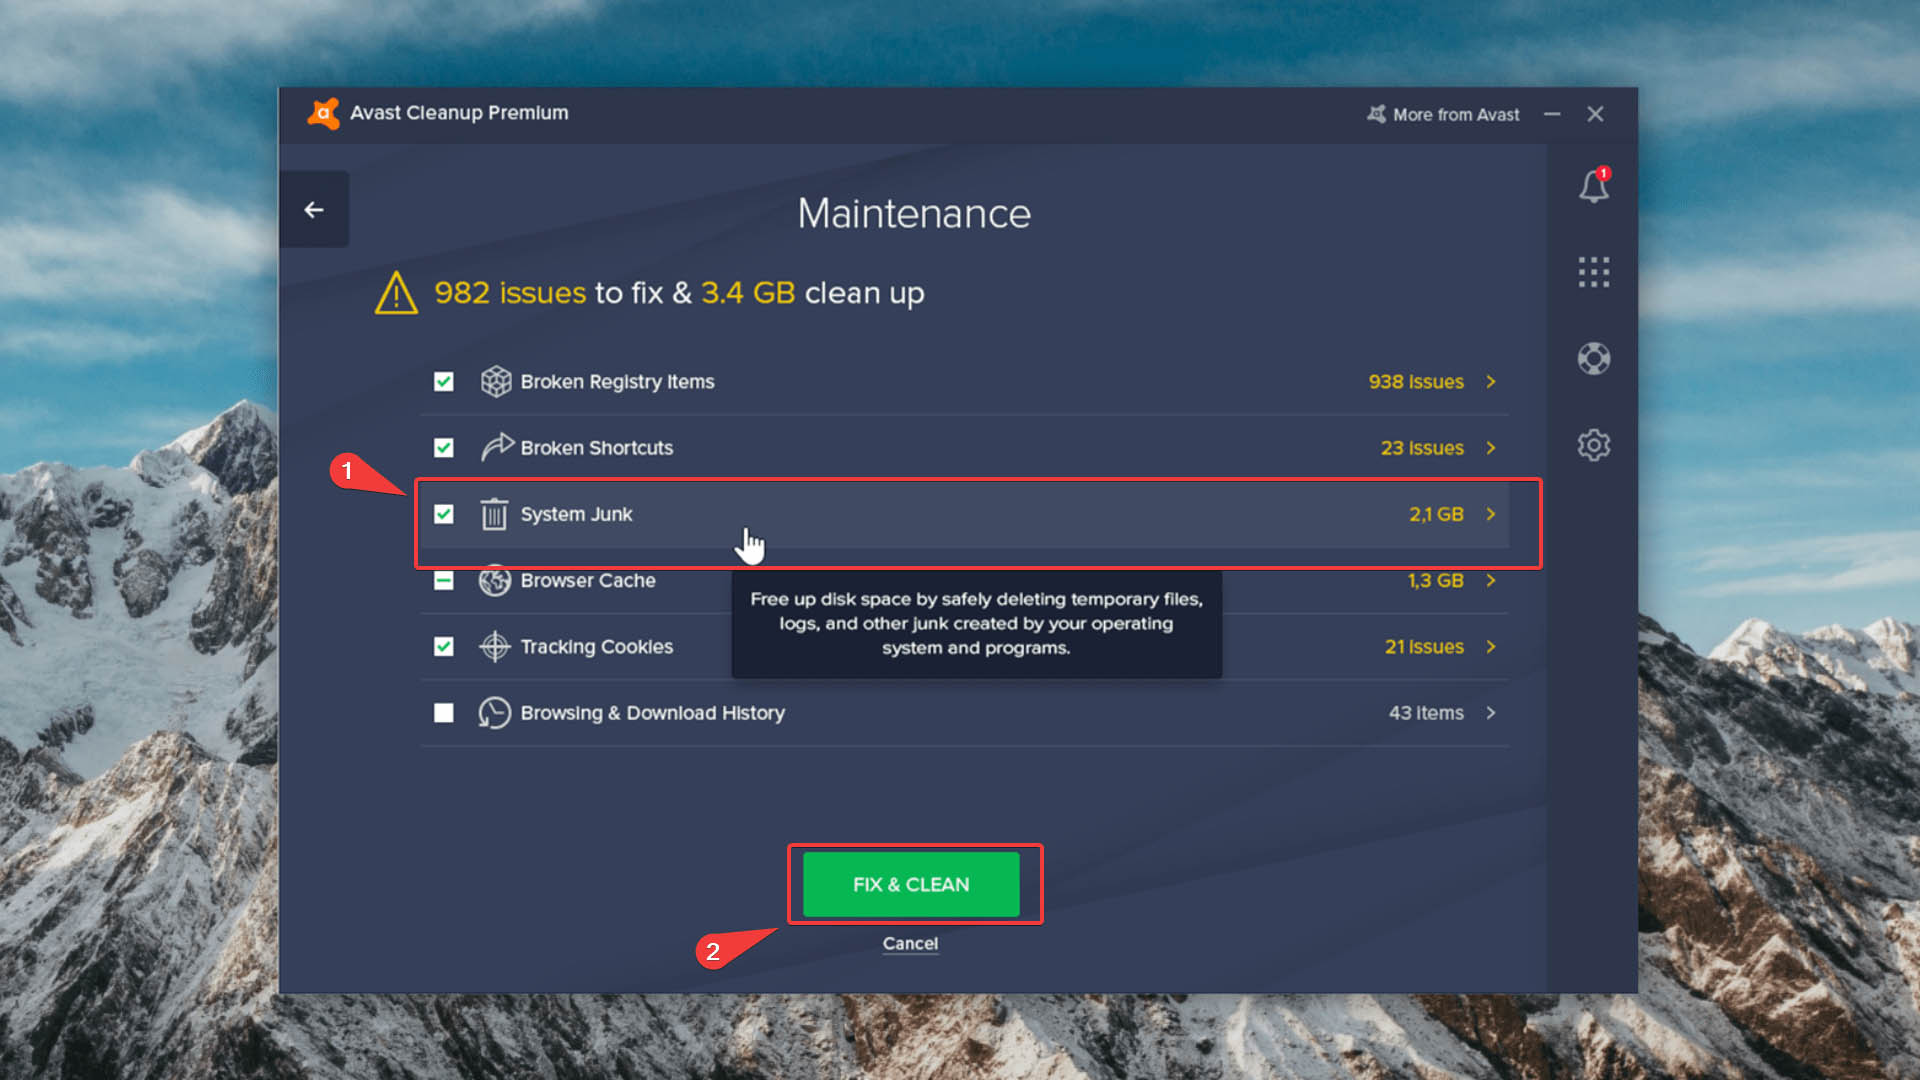
- Once you’ve selected all the items you want to clean up or delete, click Fix & Clean. You’re all set now!
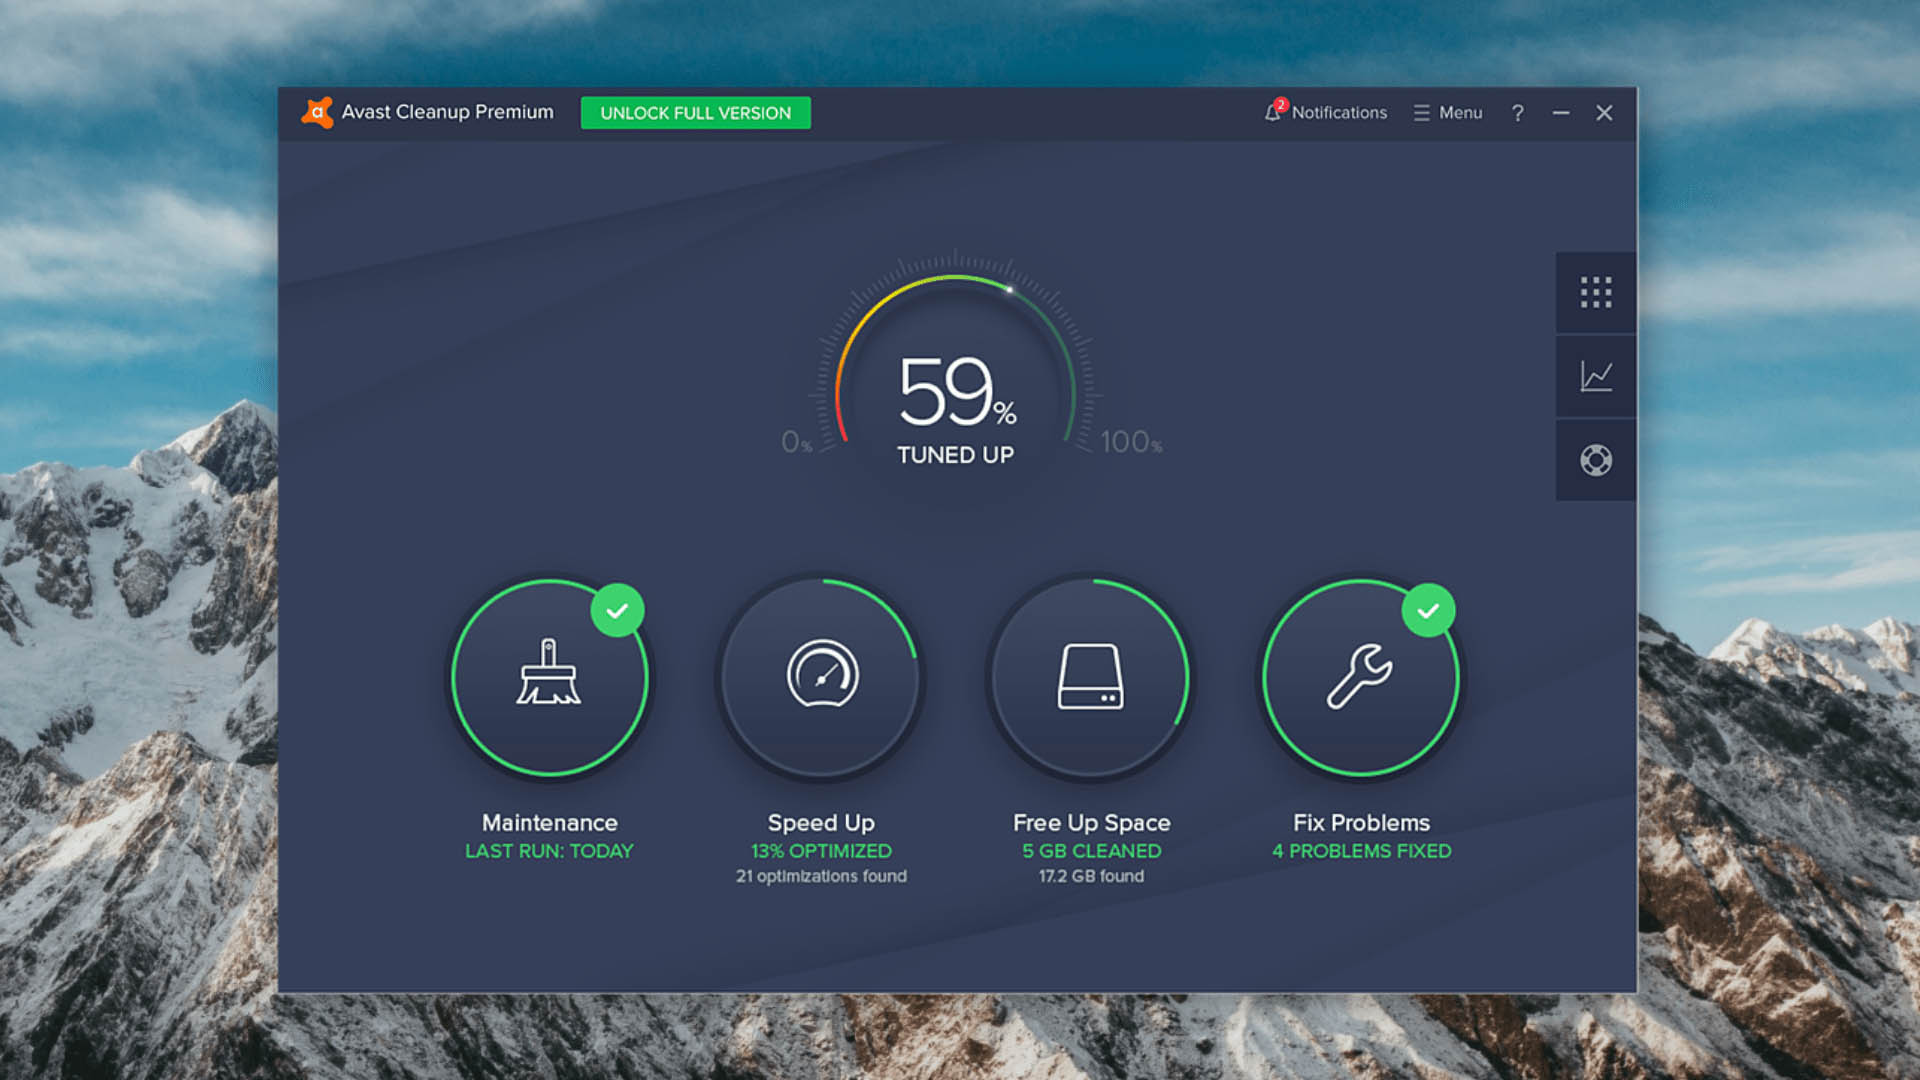
- Now, you can view the summary reports of your cleanup activity.
Recovering Accidentally Deleted Files and Folders on Windows 11
It is possible that in your quest to clean up the temporary files and folders on your system, some files may be accidentally deleted. In deleting temporary files and emptying the Recycle Bin, you may realize that you inadvertently removed a file or folder.
As soon as you discover that there are files you need to recover, stop using the computer. This gives you the best chance of recovering the files by limiting the possibility that the OS will overwrite the files before they can be restored.
Steps to recover deleted files & folders on Windows 11:
- Download and install Disk Drill for Windows. We strongly recommend that you use a USB drive or another external storage device for this task. This removes the possibility that the download and install can overwrite the files you are interested in recovering.
- Now, launch Disk Drill. Now, select your main hard drive from the list of disks. You can choose your recovery method – Quick Scan or Deep Scan.
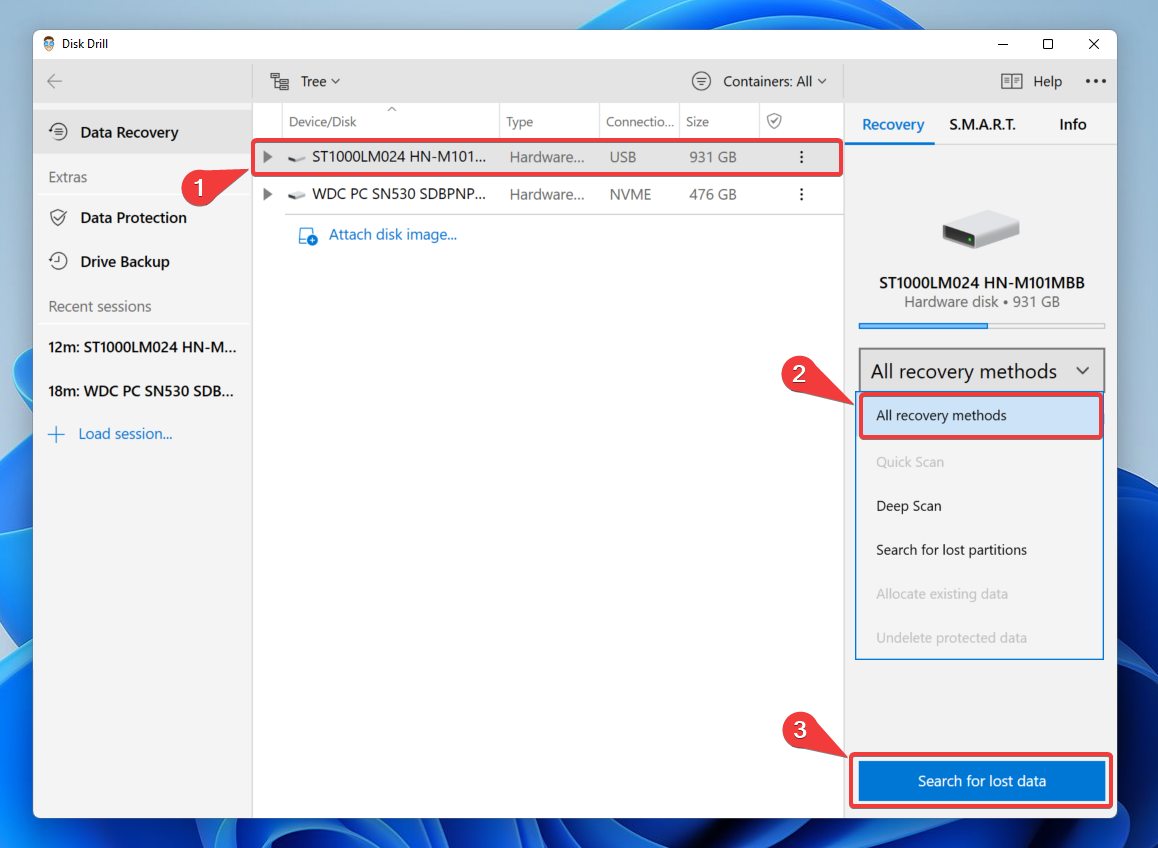
- Click Search for Lost Data. The advanced algorithm will scan the device for lost files, and a progress bar will indicate the progress.
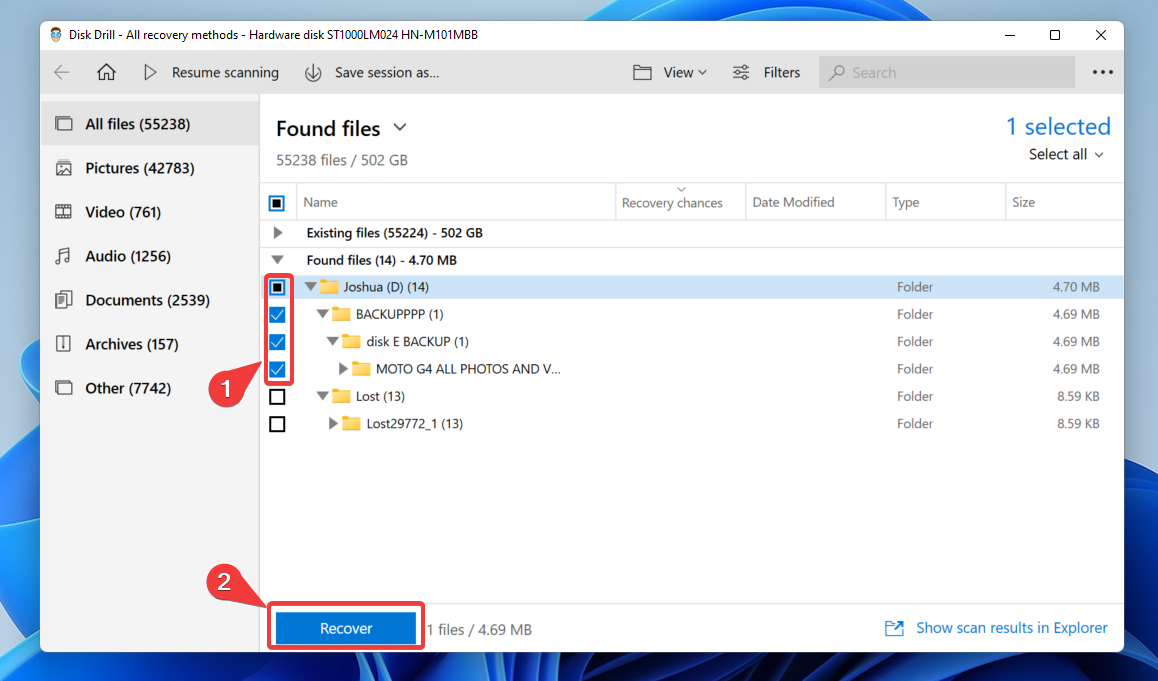
🆓For the low, low cost of free: run a scan, preview unlimited items, and, on Windows, recover up to 100 MB at no charge. Perfect if your cleanup nuked the wrong docs, PDFs, or a small photo set; upgrade only if you need more! - Filter through the search results to select the items you wish to recover. Click on Recover.
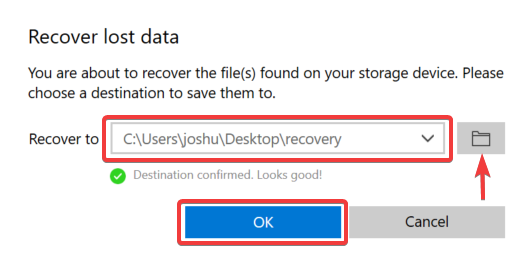
- Now, choose the recovery location. Ensure that you don’t use their original locations, as this can lead to corrupted files that are overwritten as they are recovered. Click on OK.

Disk Drill’s powerful scanning algorithms will interrogate your disk on a sector-by-sector basis and recover any files that can be salvaged. It is a great tool to have available in case you make a mistake when you are cleaning up your machine by deleting temporary files.
Conclusion
Every system has temporary data from applications, cached files, browsing history, etc. If these files aren’t cleared out regularly, they can affect your PC’s health and performance.
This article lists all the ways you can safely delete temporary files from Windows 11 and its older versions. While you can manually clear out temporary files and folders at regular intervals, we suggest turning on Storage Sense. This Windows tool automatically clears out unnecessary files and prevents wastage of drive space.
FAQ
While there are several ways to remove temporary files from your computer, here’s how you can delete temp files in four easy steps on any Windows version:
- Click Start and type %temp% into the search box.
- Press Enter to open the Temp folder.
- Now, press Ctrl + A to select all files from the Temp folder, then press Shift + Delete to delete all files.
- Finally, empty the Recycle Bin to complete the process.
Several apps are dedicated to cleaning junk and temp files off your phone. While you can use a third-party app, Google has its own Files app that does the task well on Android phones. Just follow these simple steps:
- Open Files by Google on your Android device,
- On the bottom left, tap Clean.
- On the Junk Files banner, tap Clean.
- You can also select log files or temporary app files you want to delete,
- Once the confirmation pops up, tap Clear.
To delete temporary files on Windows 11 via Settings, follow these steps:
- Press the Windows key and type Disk cleanup recommendations.
- Navigate to the Cleanup recommendations section.
- Under the Temporary Files option, select the folders you wish to delete.
- Finally, click the Clean up button to delete the temporary files safely.
Remember that large temporary files accumulate on your system over time. If you don’t clear out your PC regularly, temp files or folders can accumulate from cached data, browser history, or various applications. Often, such temporary files can take up a lot of space in your main hard drive. Thus, to avoid such a situation, turn on Storage Sense.
In the Windows operating system, temporary files are created by the operating system itself and several applications running on your computer. These files often end up in the Windows Temp folder. Temp files on Windows 10 can be from running applications, backups of works, browsing history, or even system requirements.