


Is Windows preventing you from accessing a disk you were using before, saying you have to initialize it? Ignore it until you check the solutions we’ll cover here. Initializing the disk overwrites its partition table and can lead to permanent data loss. Our experts have dealt with this scenario countless times and have helped us craft this guide that will allow you to initialize your disk without losing data.
What Does It Mean to Initialize a Hard Drive?
Consider what happens when you initialize a disk as creating “a map”, known as the partition table, that tells the OS where to store data.
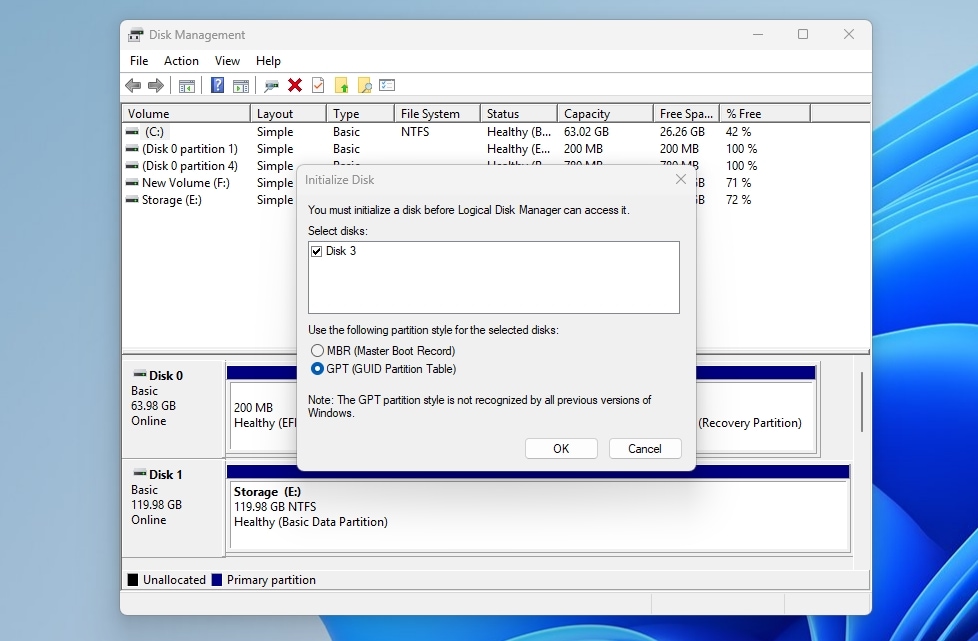
You can choose between two types of such “maps”:
- MBR for old-style small-capacity drives and simple demands.
- GPT for newer multi-terabyte disks with potentially dozens of partitions.
Can You Initialize a Disk Without Losing Data?
If you’re asking “does initializing a disk erase data?”, the honest answer is: it depends on what you do after it.
Initializing a disk is like resetting the disk and makes it look empty. Previously existing data is lost only after a complete format, when newer files overwrite it, or when TRIM runs on an SSD or NVMe drive.
The safest way to initialize a disk without losing data on Windows is to:
- Ideally, take a full byte-to-byte backup image of the disk.
- Recover all data (preferably from a full byte-to-byte image, or directly from the disk) to another drive. If that fails, or for more information on the topic, check out our guide to recovering data from uninitialized disks.
- Make sure you can find all your data at the new secondary location. If so, initialize the disk using the Disk Management app.
- Create one or more volumes on the re-initialized disk, and format them.
- Move the recovered files back to the disk.
How to Initialize a Disk Without Losing Data on Windows
You might wonder: why does initializing a disk in Disk Management erase data, when the process doesn’t actually delete or overwrite files, and only writes a new partition table? Actually, no data is erased, although it looks that way. That’s because a disk’s partition table also works as the index that tells the OS where to find each file. Re-initializing the disk replaces the existing index, so the OS “doesn’t know where to find each file” and presents the disk as empty, even if all past data remains intact.
Thus, to safelyinitialize a hard drive without losing data:
- Choose backup software that can create a pristine clone of your disk and all the data on it even if it currently looks inaccessible. Typical file backup/copying solutions are useless in this scenario, since, like the OS itself, they “can’t see” your data on the disk as files and folders.
- Work with an advanced data recovery app that can locate and recover files even from backup images of disks that lack “proper logical data structures”, like a working partition table and, by extension, usable file systems. Such an app should also know about all the types of files you had stored on your disk, to recover them successfully.
That’s why we recommend Disk Drill as the optimal choice for such cases: it’s not only a widely-used and trusted data recovery app that “knows about” almost 400 file formats, but it also comes with a complete byte-to-byte imaging solution. So, instead of having to use two separate apps, you can get the best of both worlds in a single user-friendly interface. With Disk Drill, creating disk images, scanning them, and recovering files from them, takes just a few clicks on both Windows 11 and Windows 10.
Step 1: Create a Byte-to-Byte Disk Image
Disk Drill can scan your problematic disk directly. For such cases, though, we recommend you first use the app’s byte-to-byte backup functionality to clone the drive into a disk image.
A Windows call to initialize the disk could be caused by a software glitch after, for example, a driver update. However, it may also stem from more significant issues, like partition table damage, bad sectors, or even the disk’s controller failing.
Prolonged use of a disk in such scenarios could worsen the problem. Cloning the disk into a backup image and then scanning that copy will preserve your data’s current state and minimize the stress on the disk.
To create a byte-to-byte backup of your disk using Disk Drill:
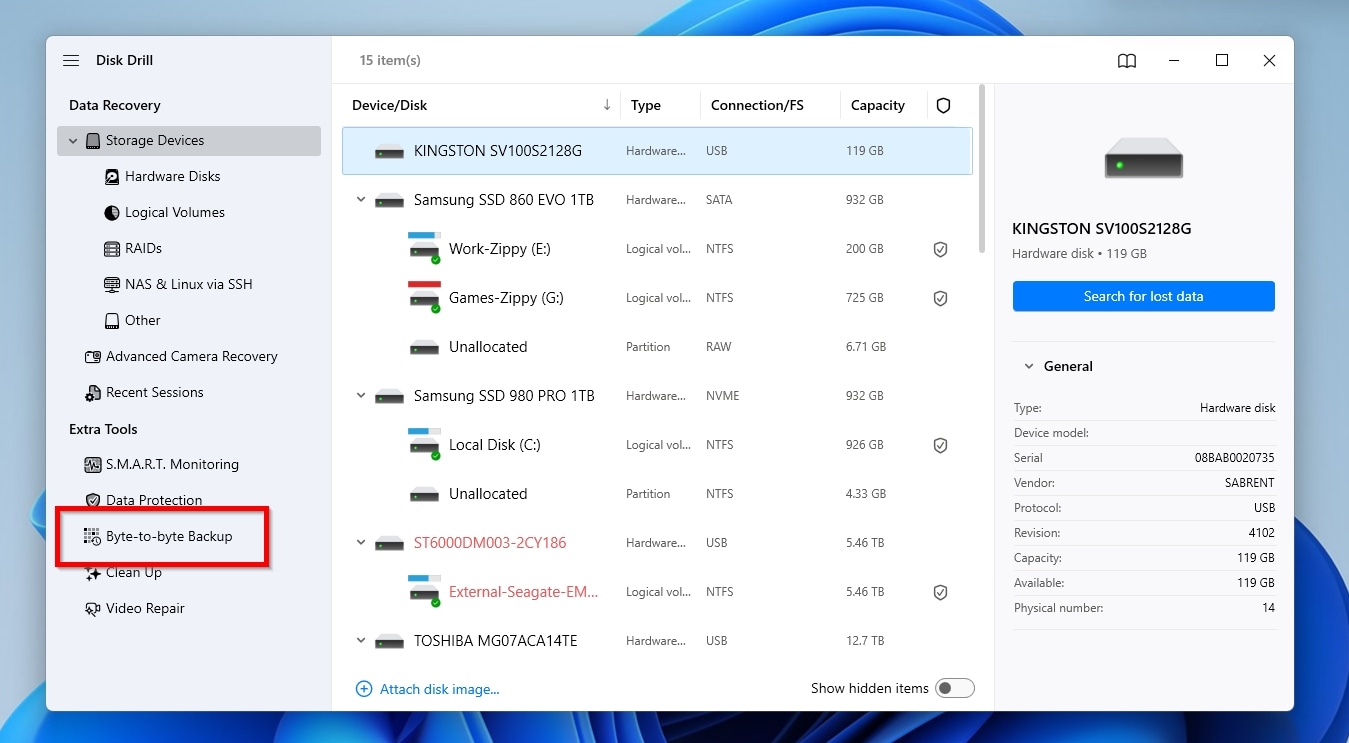
- Download Disk Drill from its official site, install it, and run it. Select Byte-to-byte Backup under Extra Tools on the left.
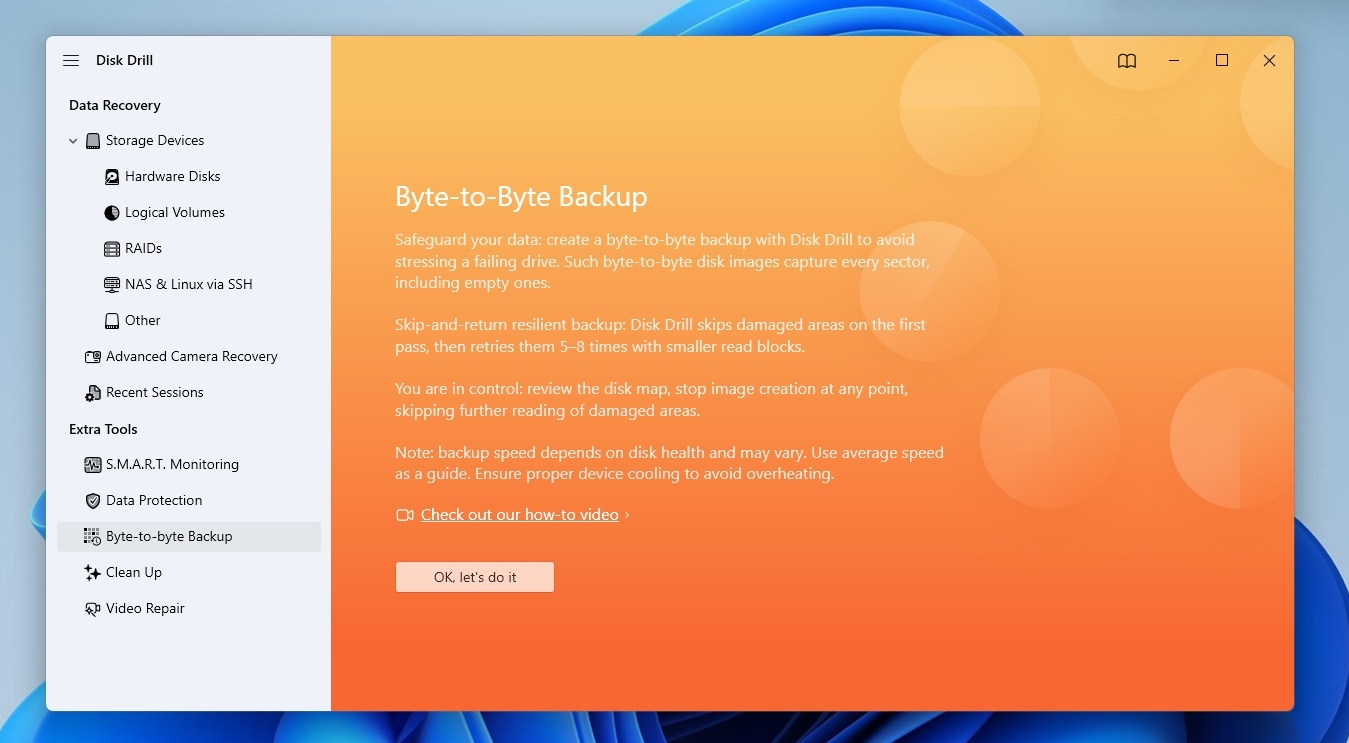
- Read the information Disk Drill shows about the byte-to-byte backup process, then click OK, let’s do it.
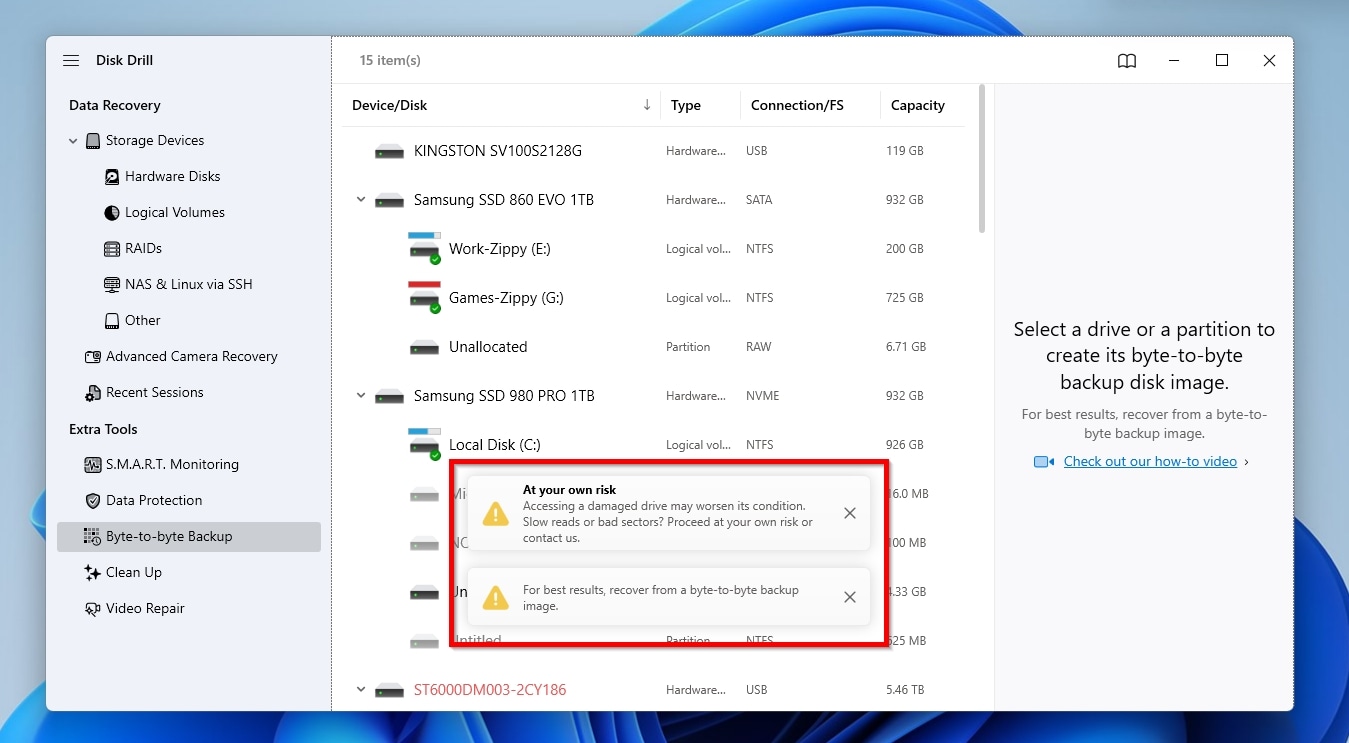
- Make sure you also read, understand, and take into account the warnings and info Disk Drill presents in hovering windows before closing them.
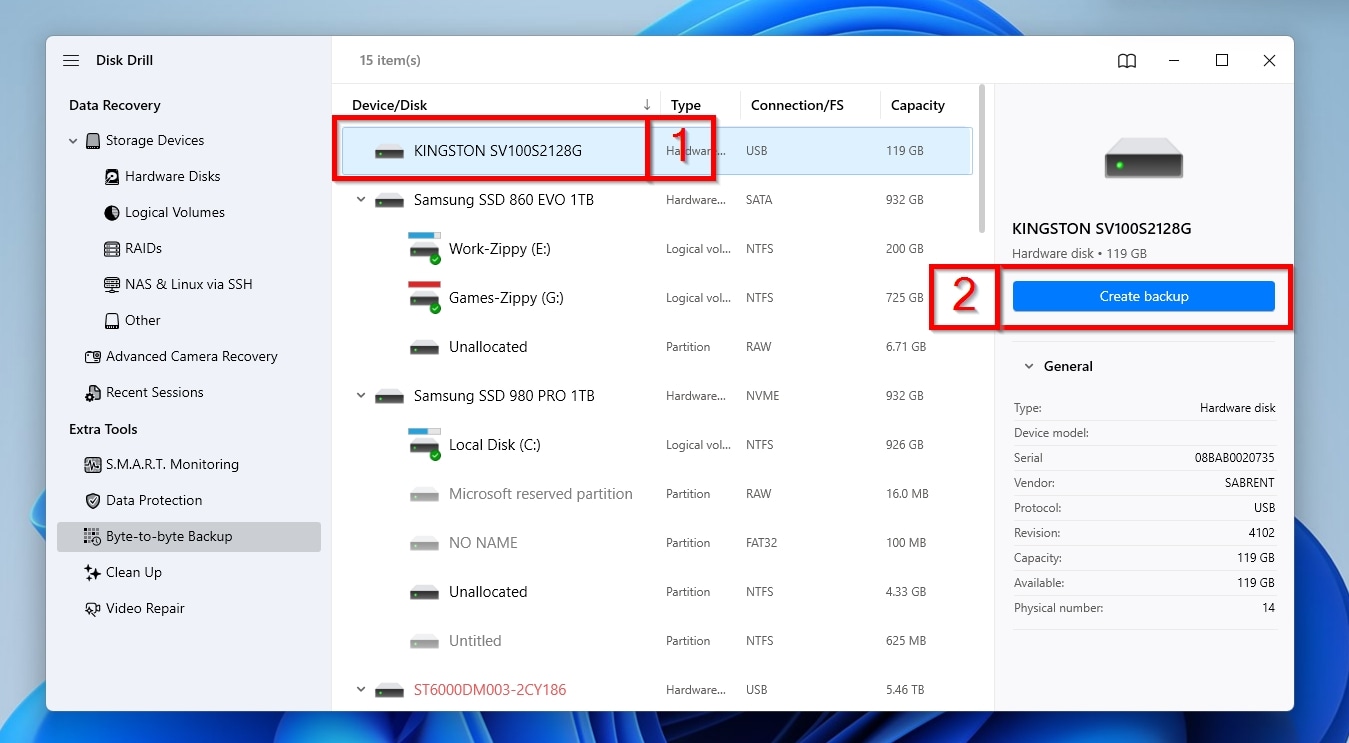
- Select the problematic disk from the Device/Disk list (1) and click Create backup (2).
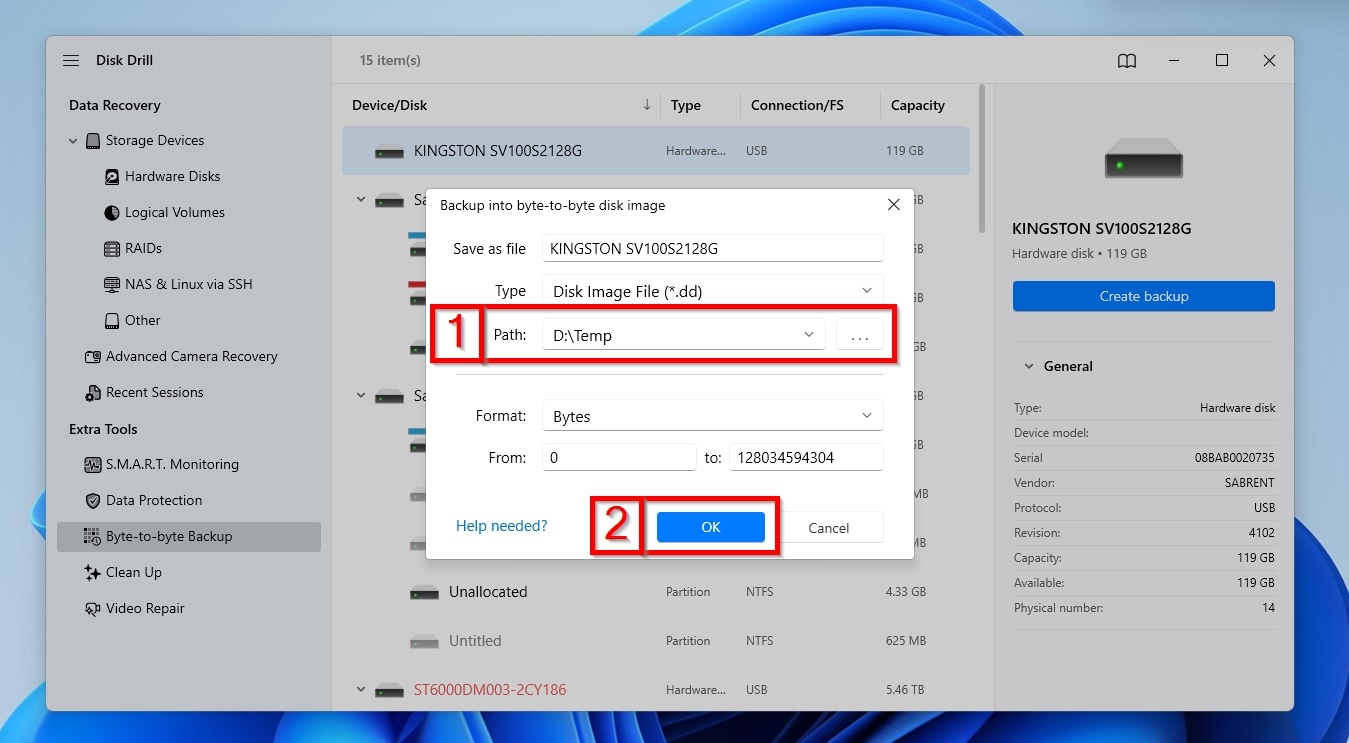
- You can safely skip most of the options Disk Drill shows next, apart from Path. Click on the button with the three dots on its right (1), and choose where you want the app to create the backup image. Then, click OK (2).
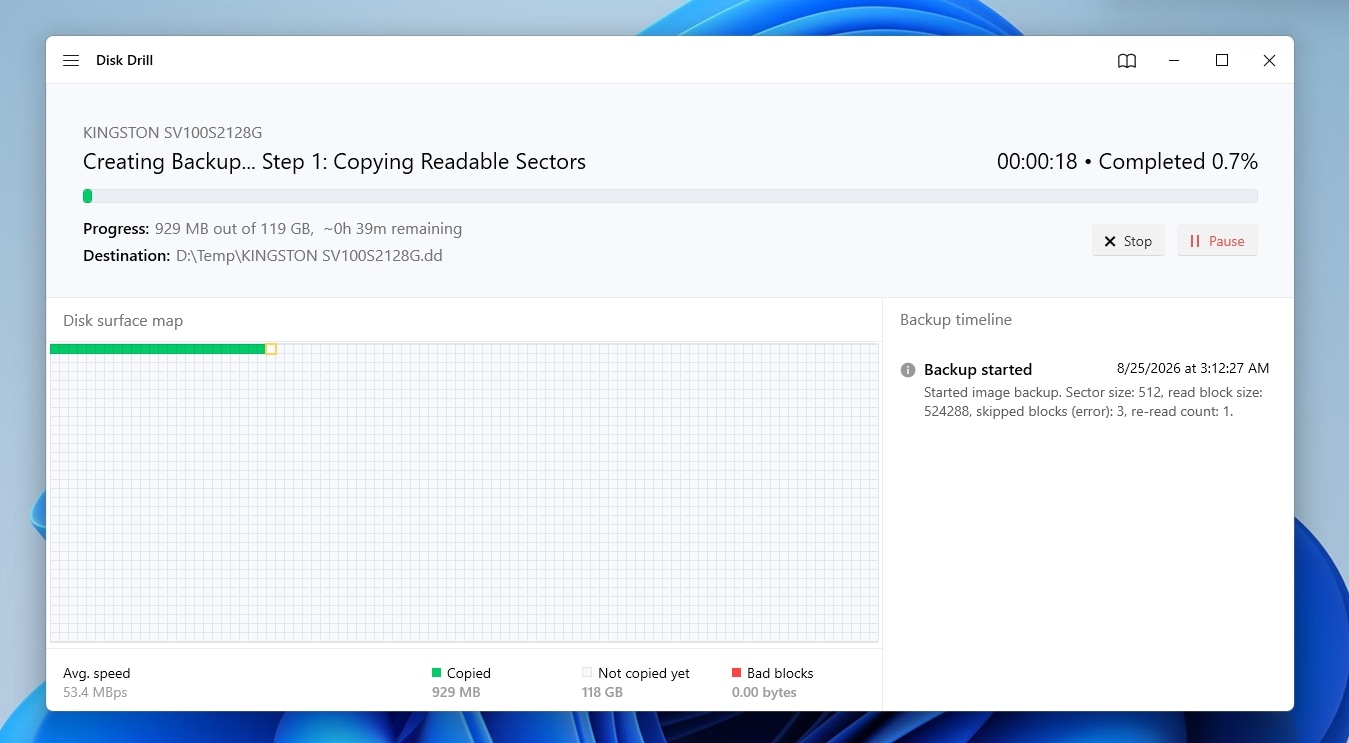
- Allow the process to finish: an incomplete image means some data hasn’t been copied, which could then turn to data loss.
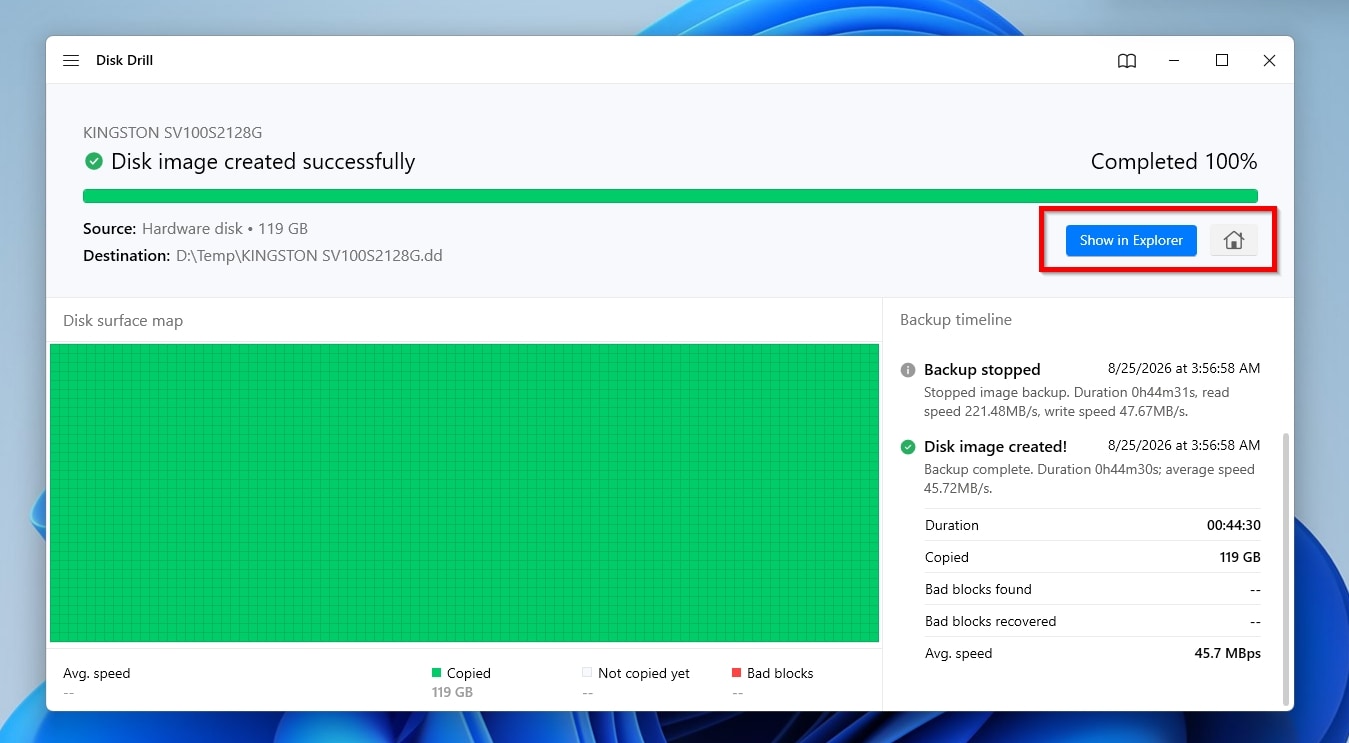
- When the process completes, click Show in Explorer to view the generated backup image in the operating system’s default file browser, or click the home icon to return to the app’s initial page.
Step 2: Recover Data From the Disk Image to Another Drive
After creating the byte-to-byte image, you should scan it instead of the original disk. Thankfully, with Disk Drill, the process is as easy as working with actual storage devices.
To recover your data from a byte-to-byte backup image using Disk Drill:
- Visit the app’s Storage Devices page (under Data Recovery on the left). Click Attach disk image at the bottom of the Device/Disk list, and select your disk’s byte-to-byte backup image.
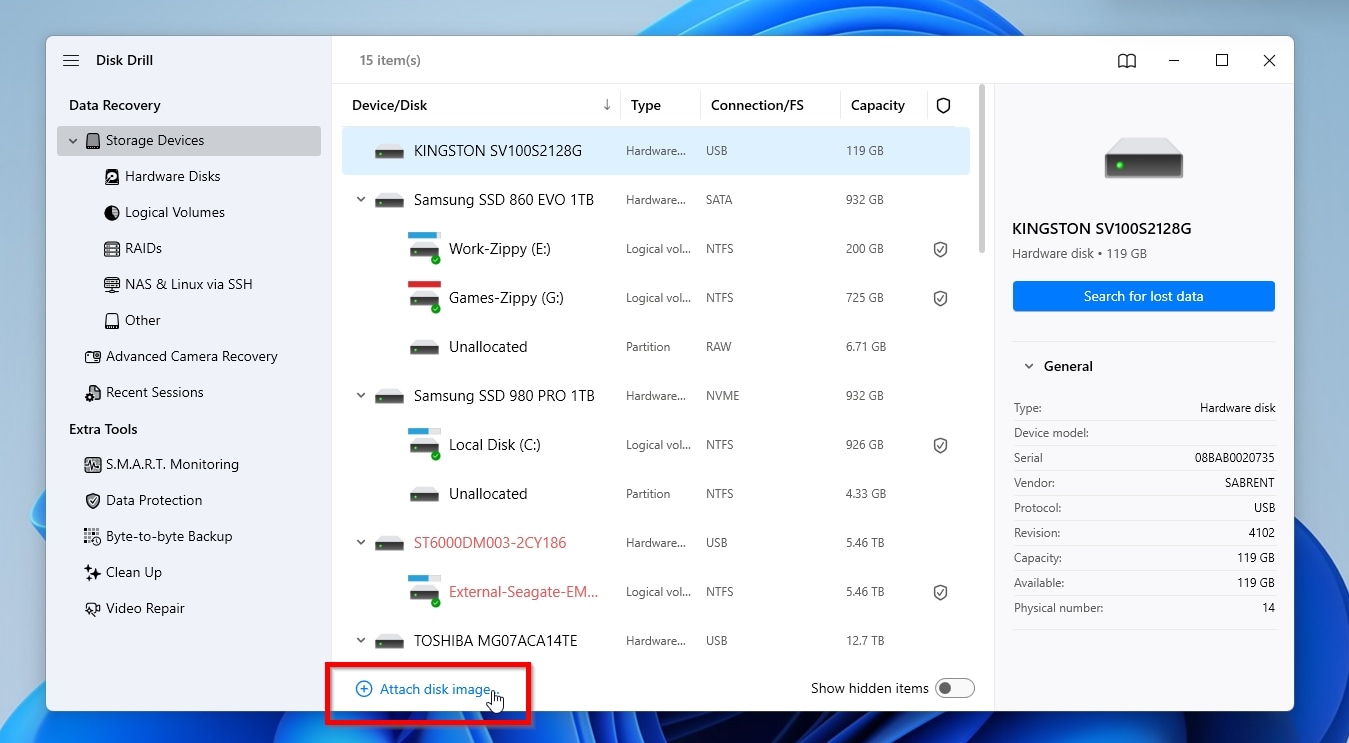
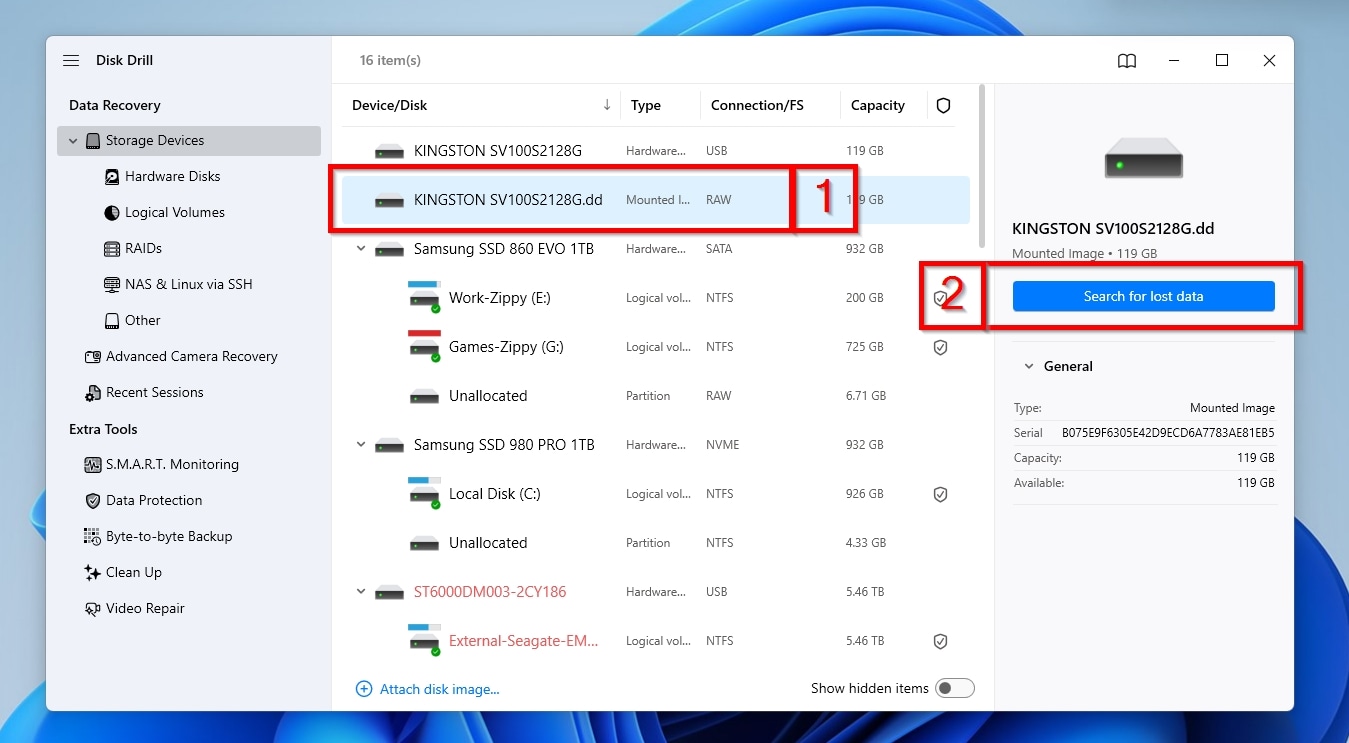
- Select the attached image from the Device/Disk list (1), and click Search for lost data (2).
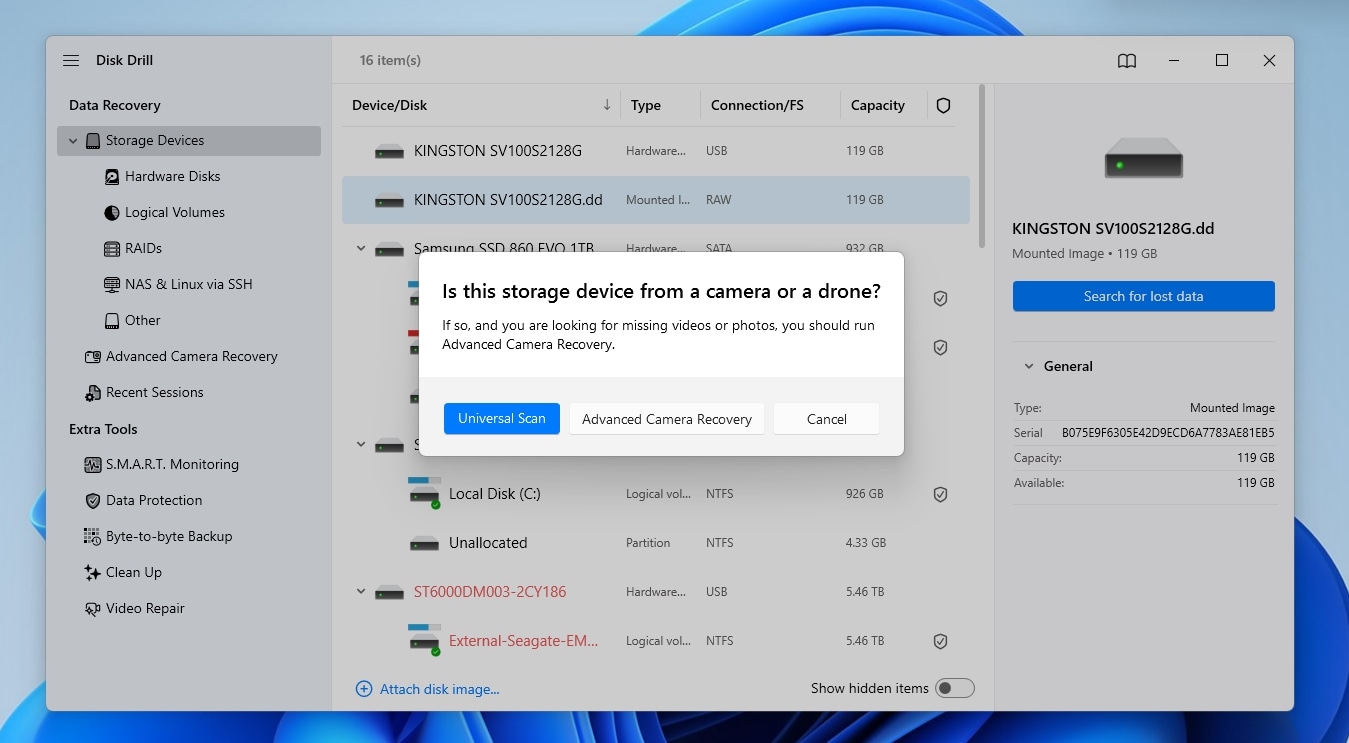
- Disk Drill may ask you to choose its scanning mode. Advanced Camera Recovery specializes in media from cameras or drones. For recovering more types of files, go for the more versatile Universal Scan instead.
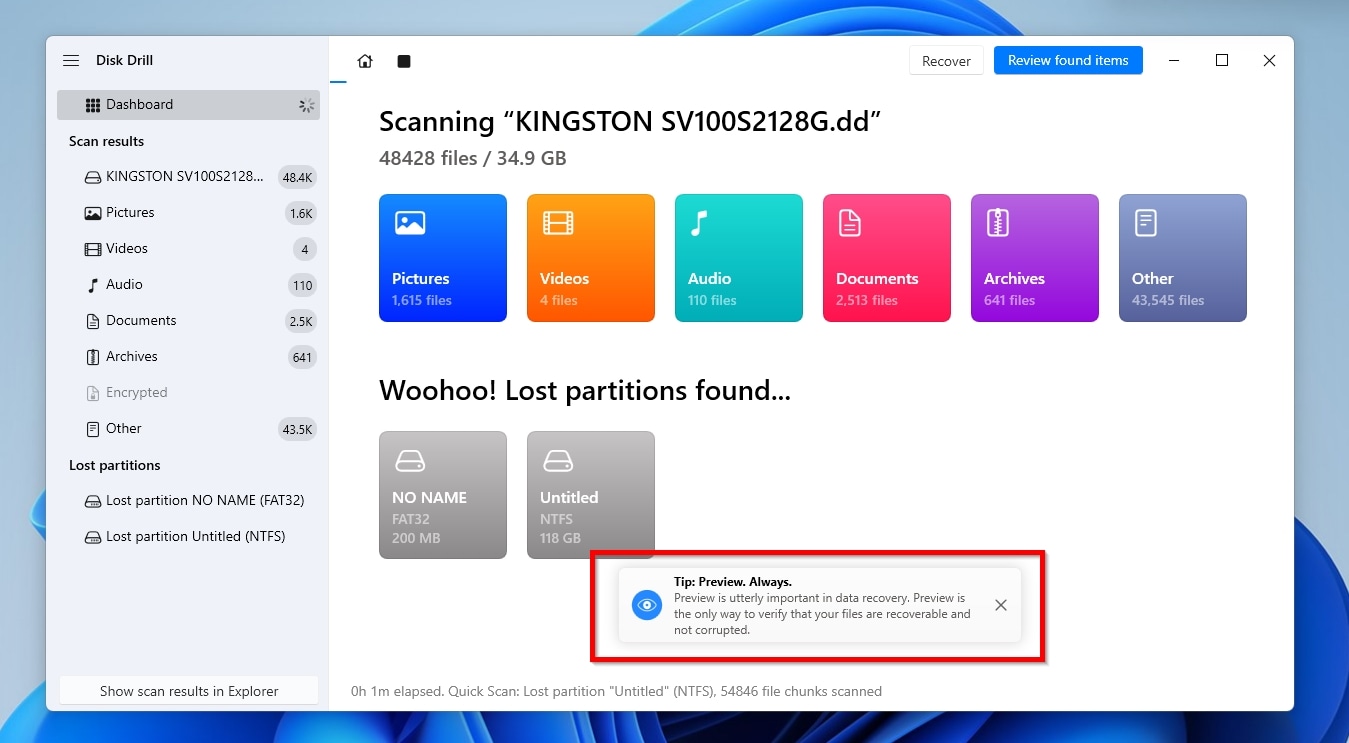
- You can safely close any tips Disk Drill presents during its scan, but it’s worth reading them first.
- When the process finishes, Disk Drill will change its state to “Scan completed successfully”, and show a new info window with the message “All recovery methods complete”. Close it and proceed to the next step.
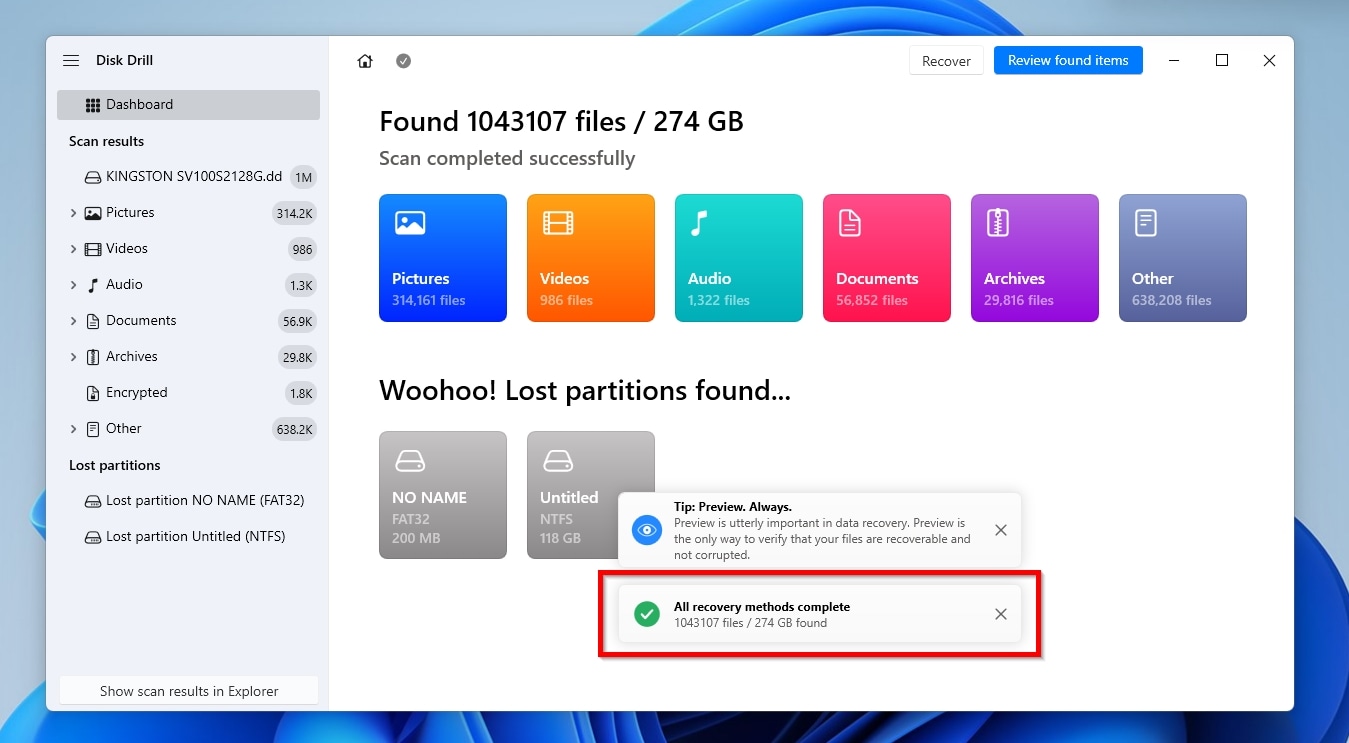
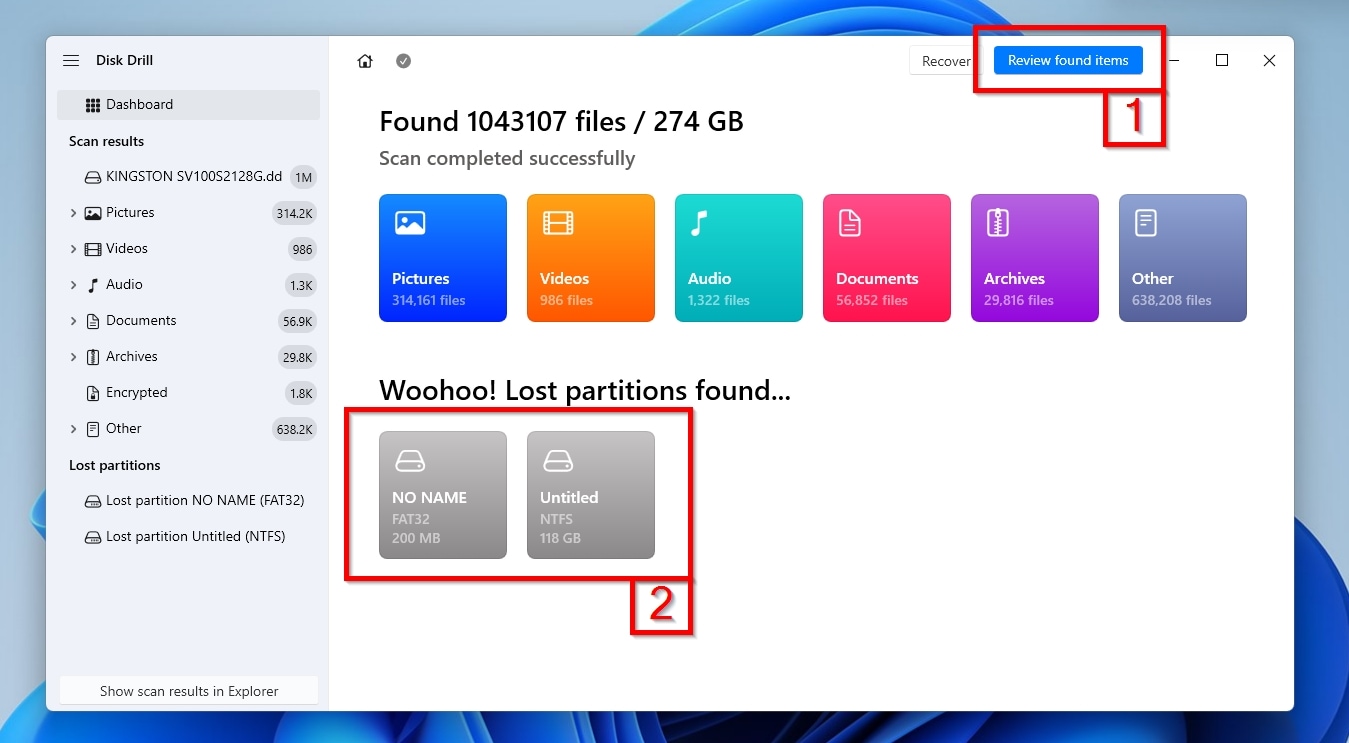
- Click Review found items on the top right to see everything Disk Drill found (1). If Disk Drill locates one or more lost partitions, you can see their files by clicking on them (2).
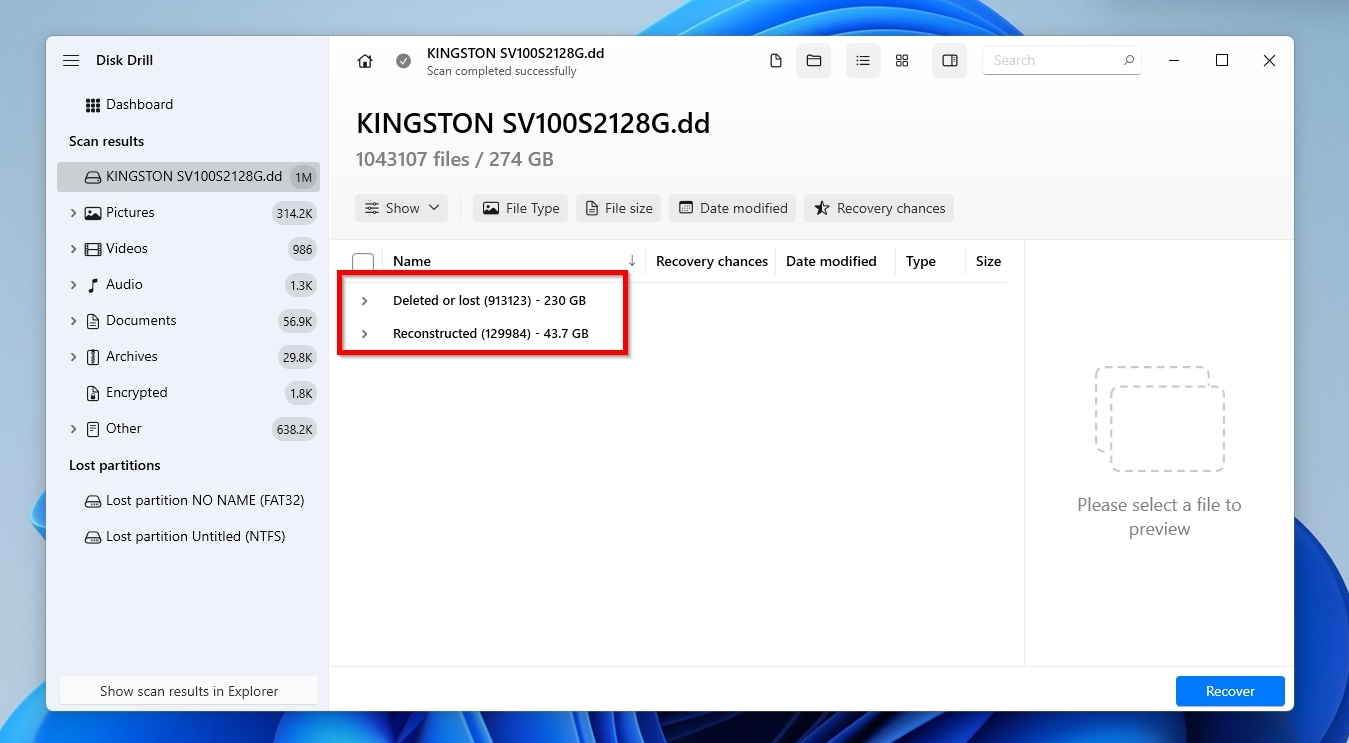
- Disk Drill organizes its findings into three groups: “Deleted or lost” contains all data that cannot be accessed normally. “Reconstructed” presents all the files Disk Drill reassembled from scattered pieces. A third group (missing from our screenshot and scenarios like the one we’re tackling), “Existing”, includes all files that remain normally accessible on a device.
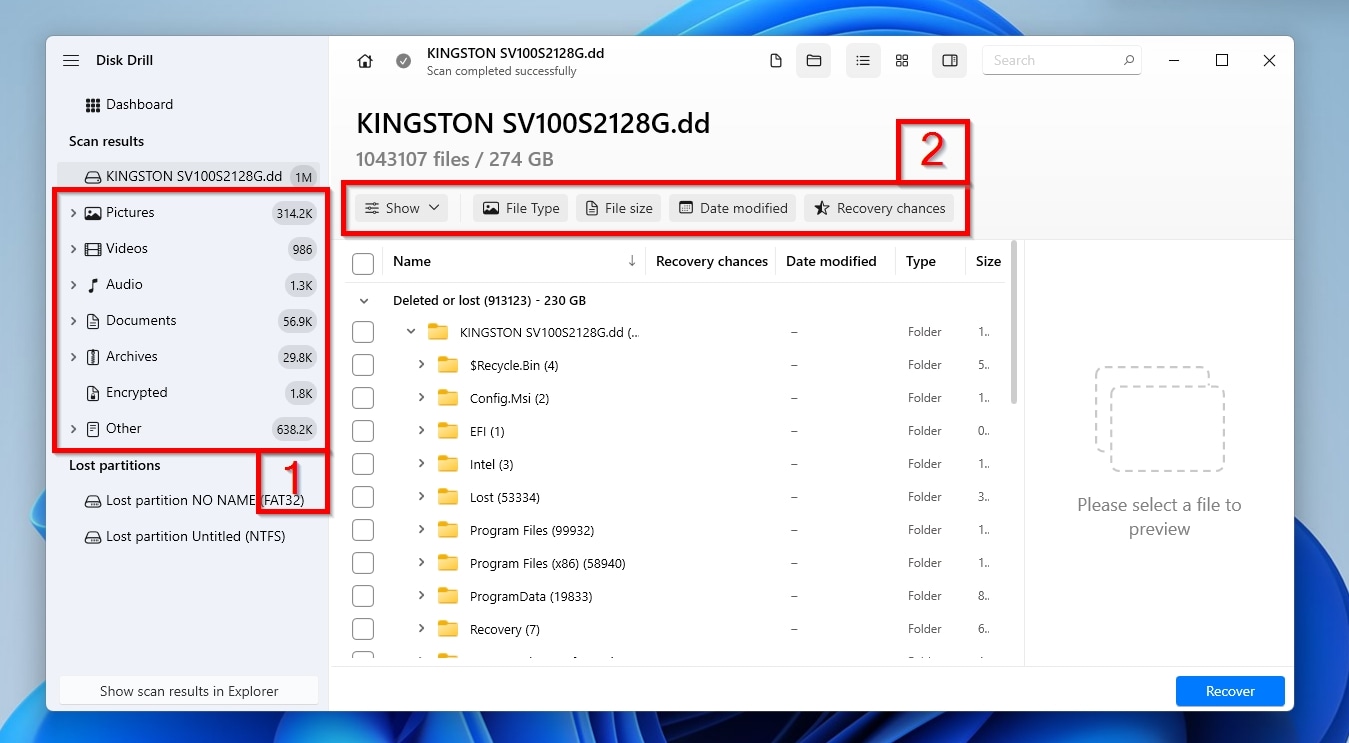
- You can use Disk Drill’s Categories (on the left) (1) and filters (above the results) (2) to have the app only show files based on their type, size, last date of modification, etc.
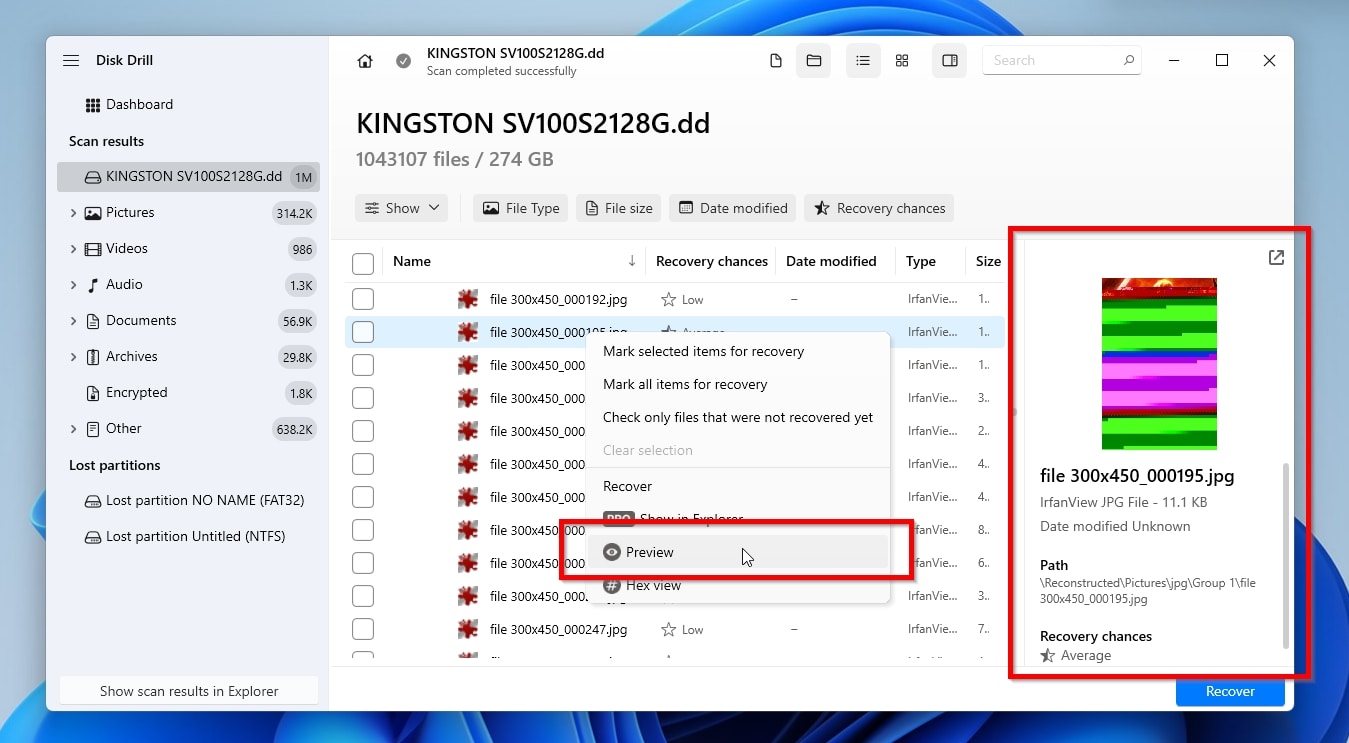
- Hover over a file and click on the eye icon, or right-click on it and select Preview, to enable the preview pane if it’s hidden. The app can show previews of many types of files it knows about or for which viewers are installed. If such a preview looks “glitched”, and especially if its Recovery chances are Average or lower, it’s probably best to prioritize other files.
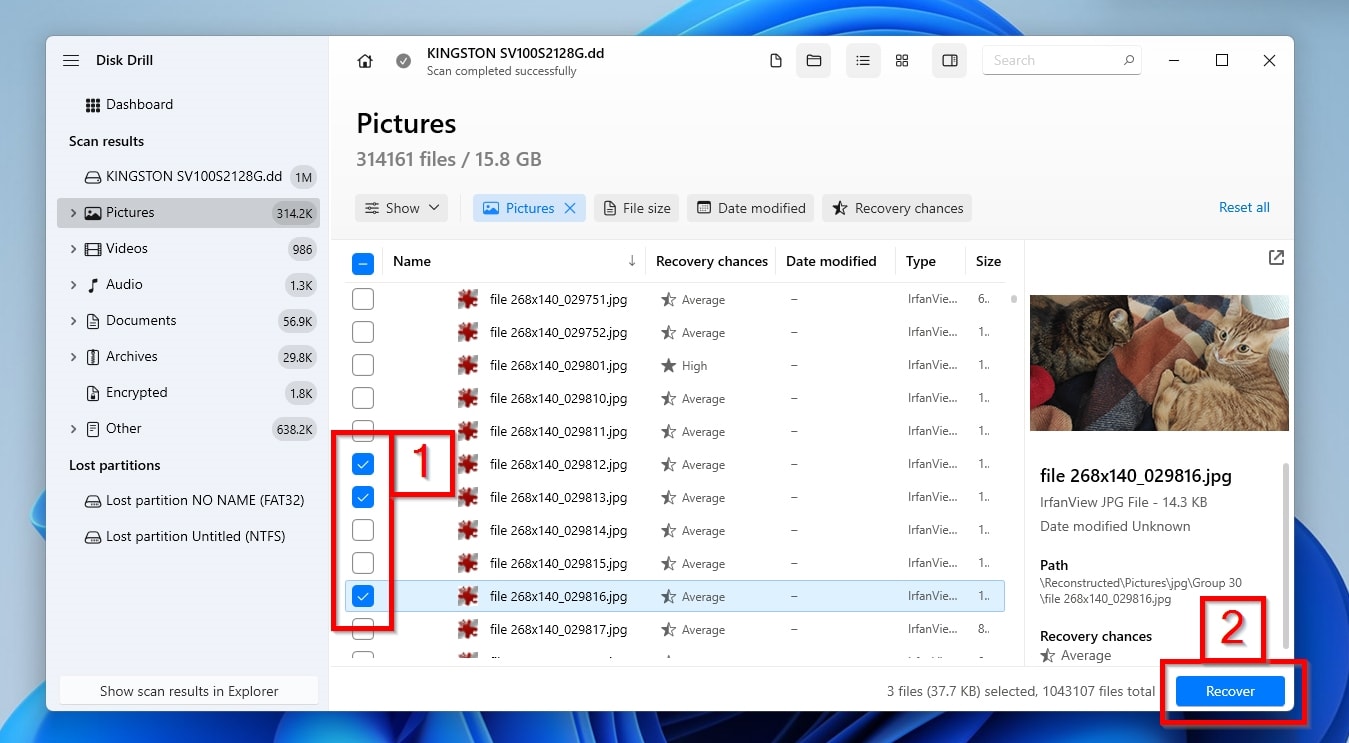
- When you find the files you want to recover, mark them with a checkmark (1). When done, click Recover (2).
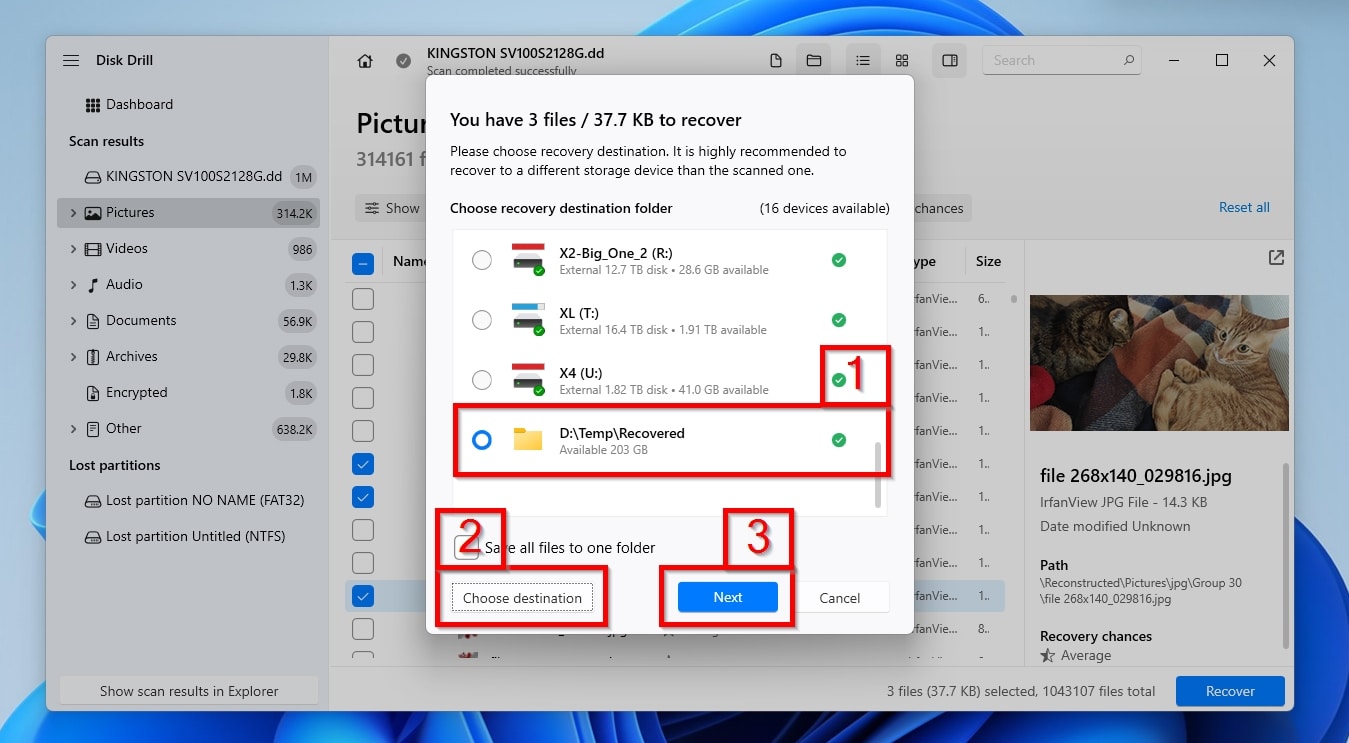
- Disk Drill will ask you to choose where to store the recovered files, presenting a mix of suggested destination folders and ones it remembers from previous scans (1). If the one you want isn’t among them, click Choose destination (2) and select it. Then click Next (3).
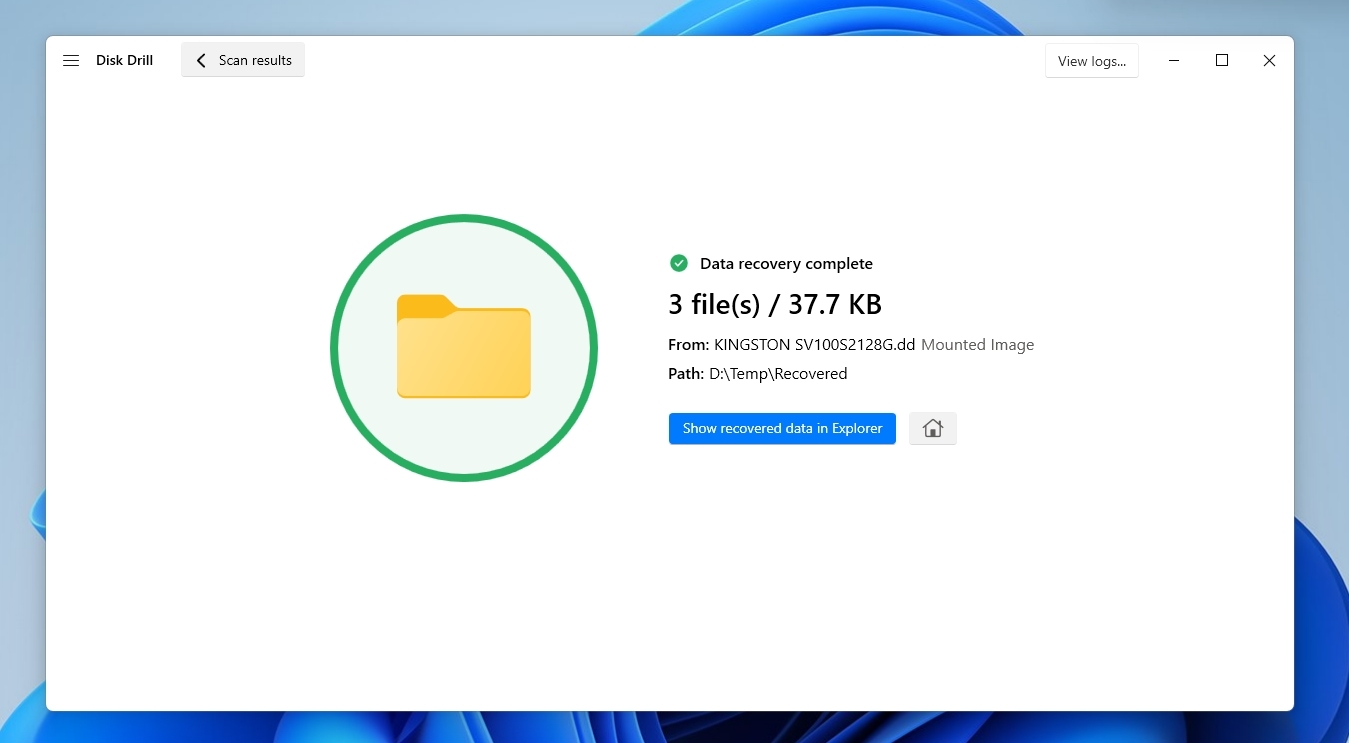
- After a while, depending on the size of the data you are recovering, the state of the image and the disk where it’s stored, and your computer’s CPU speed, Disk Drill will show its Data recovery complete page. Click Show recovered data in Explorer to check out your files using the operating system’s default file manager, the home icon to return to the app’s main screen, or close its window to exit it.
Step 3: Open Disk Management and Initialize the Original Disk
Did you finish recovering all your important files from your disk and checked them out to make sure everything’s OK? Then, you can initialize the disk to render it usable again. For most Windows users, the safest and easiest way to do it is using the Disk Management app.
To initialize your disk using Disk Management:
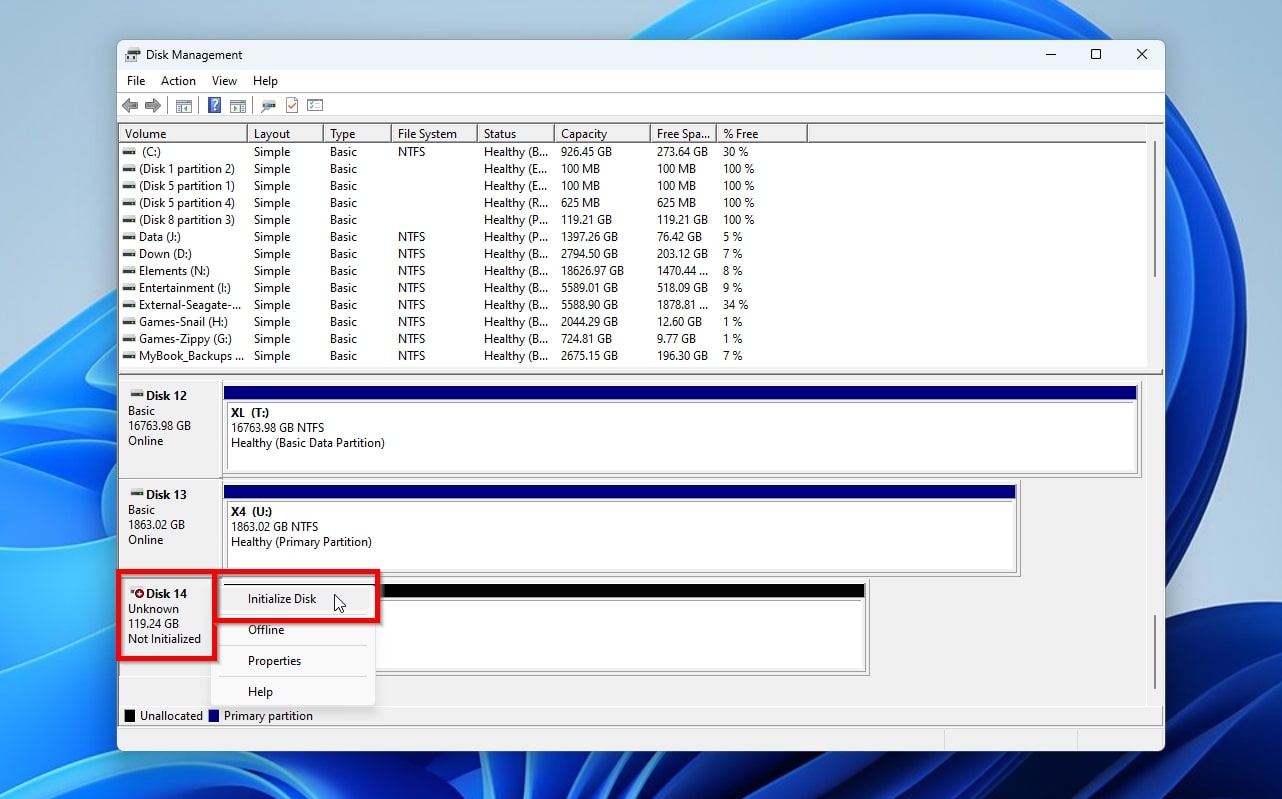
- Press Windows Key + X to open the Quick Access (Power User) menu, then launch Disk Management. From Disk Management’s window, locate your “Unknown”/“Not Initialized” disk, right-click on it, and choose Initialize Disk.
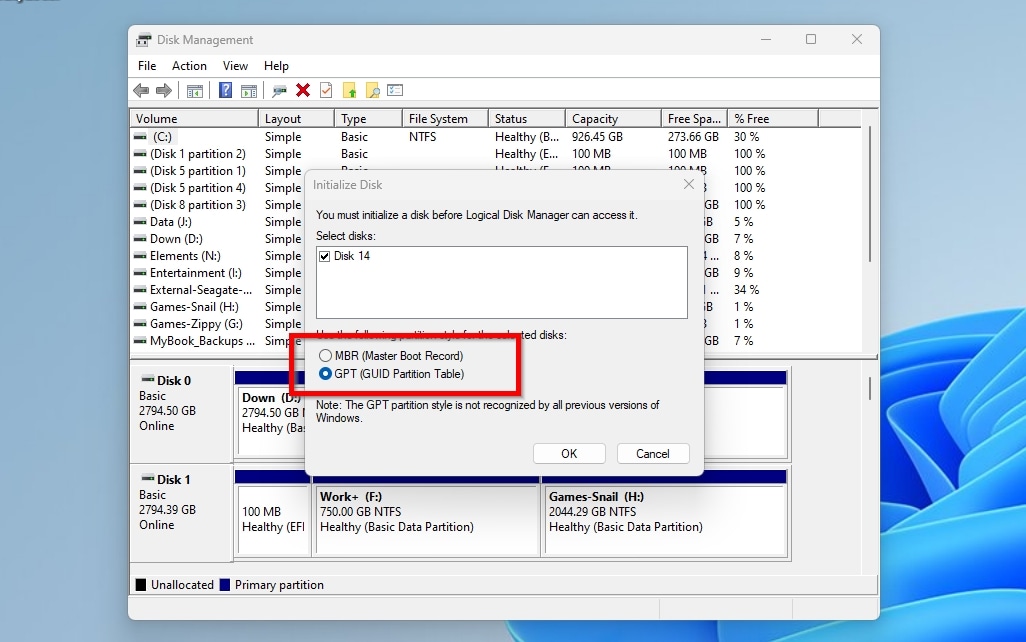
- Choose whether to use a Master Boot Record or a GUID Partition Table on the disk.
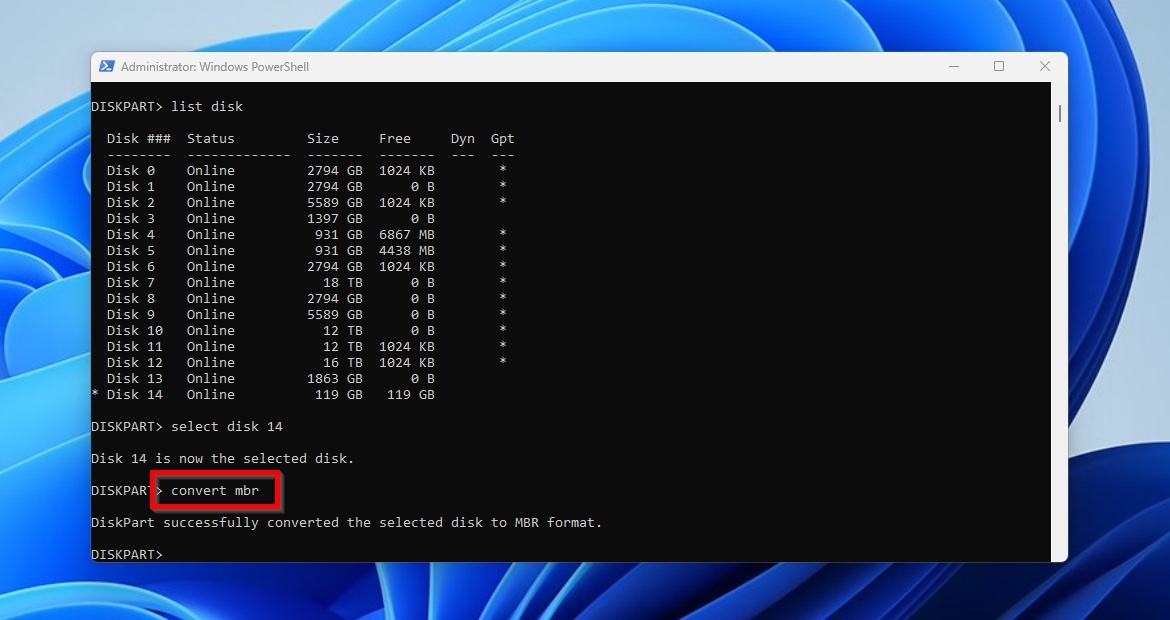
Windows offers an alternative, albeit somewhat more complicated, keyboard-friendly way to do the above: DiskPart. To initialize your disk using DiskPart, run PowerShell as an administrator. There, type “diskpart” followed by “list disk” to see all detected drives. Choose your problematic disk with “select disk NUMBER”, and initialize it with either “convert mbr” or “convert gpt”.
Step 4: Create and Format a New Volume
Initialization creates the partition table, but you also have to create volumes on it and format them, “inside” which Windows can write and read data. That process is a logical continuation of what we saw in the previous section, and can be performed with the same tools.
To create and format a new volume using Disk Management:
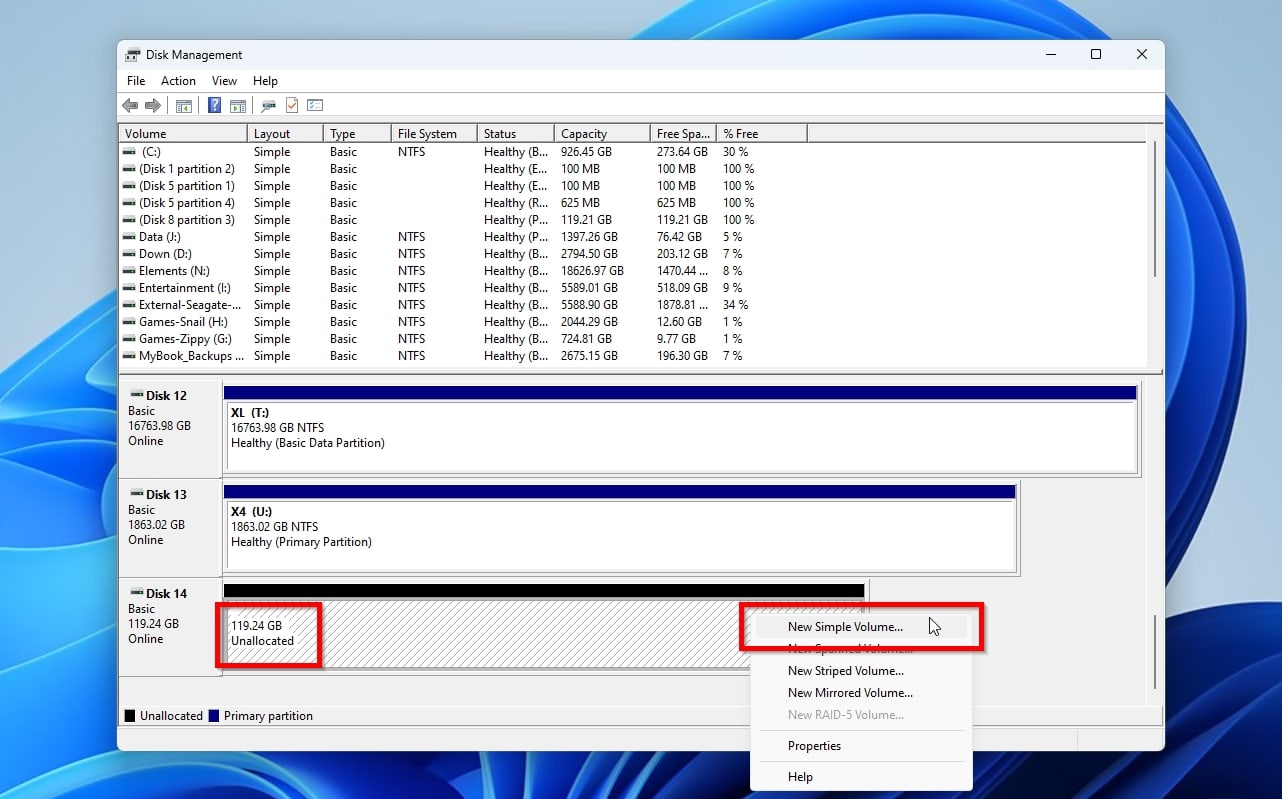
- If Disk Management isn’t running, launch it as we saw in the previous section. Locate your initialized but currently “Unallocated” disk among the available storage devices, right-click on its space, and choose New Simple Volume.
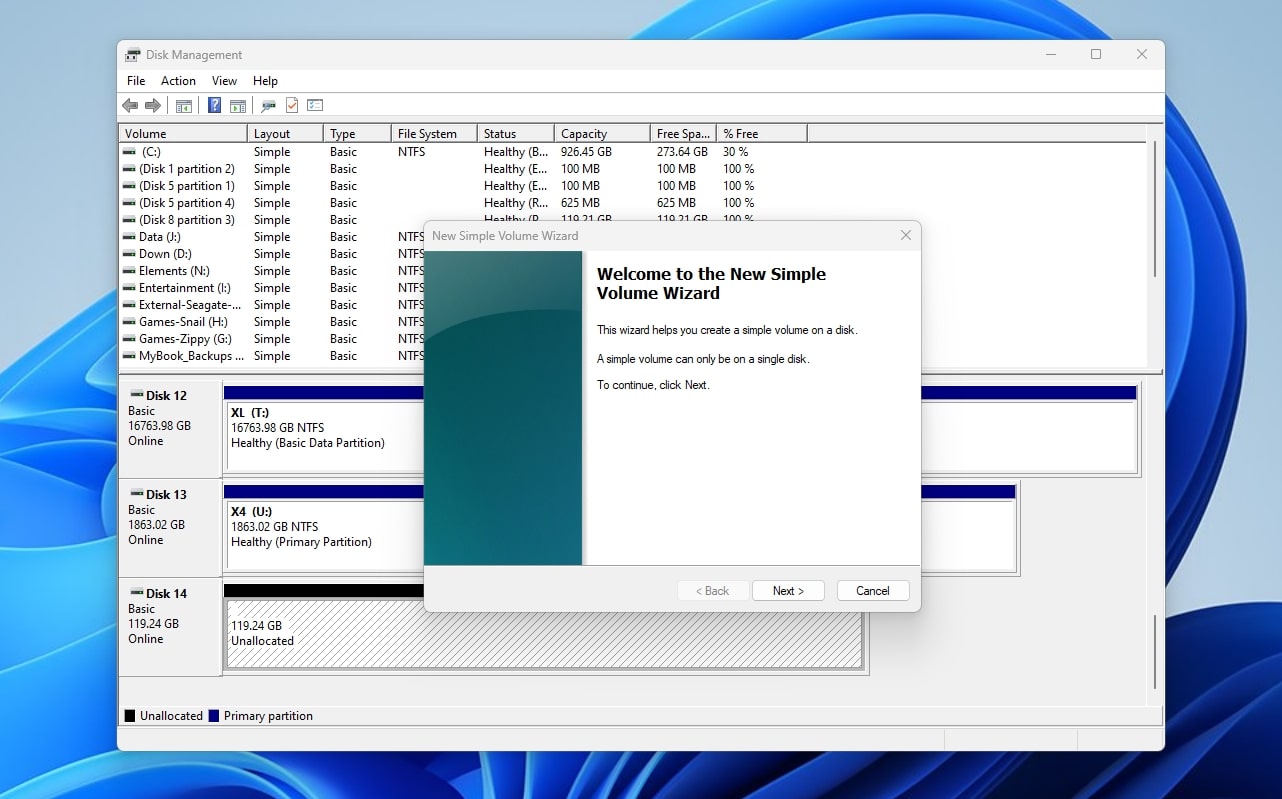
- The New Simple Volume Wizard’s first screen will explain its purpose. Click Next to proceed to the next step.
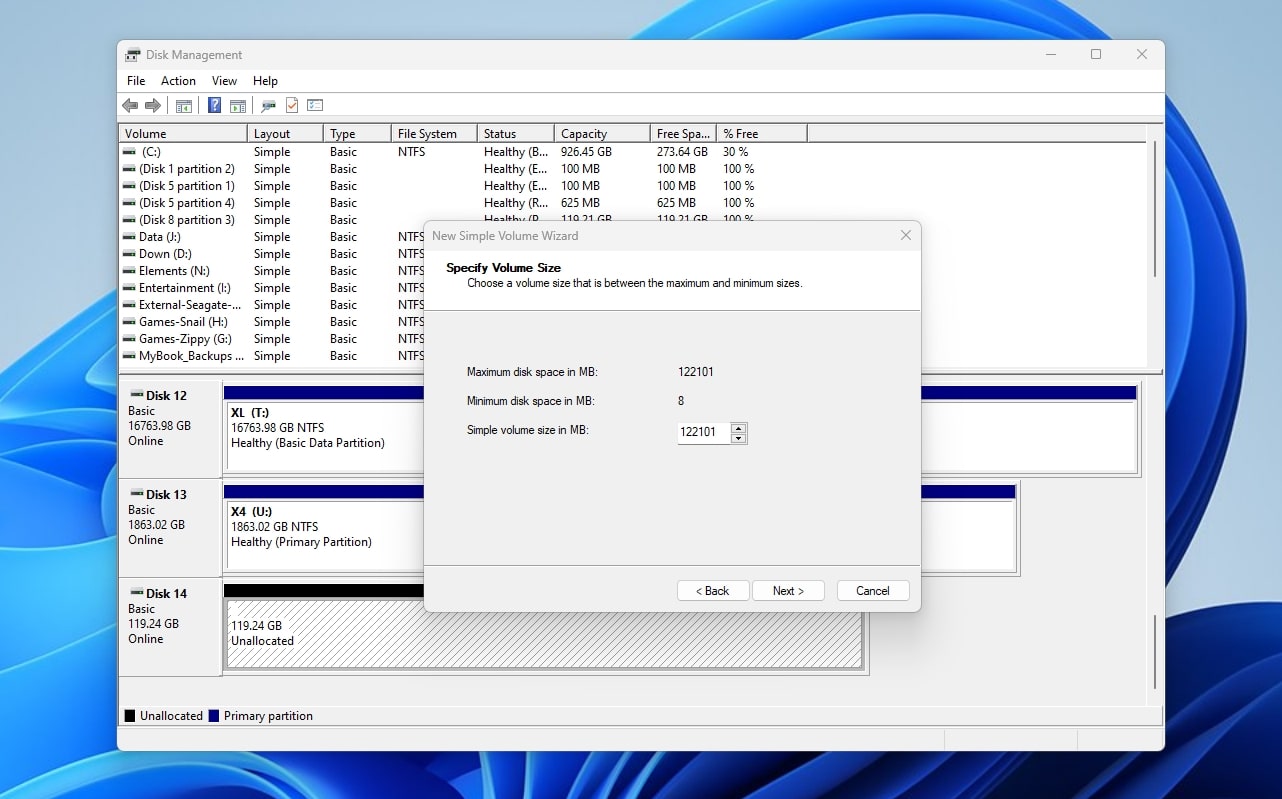
- In the next step, you can change the created volume’s size to a lower value if you want to create more than one partition. Leave it as is if you want to create only a single volume occupying all of your disk’s space.
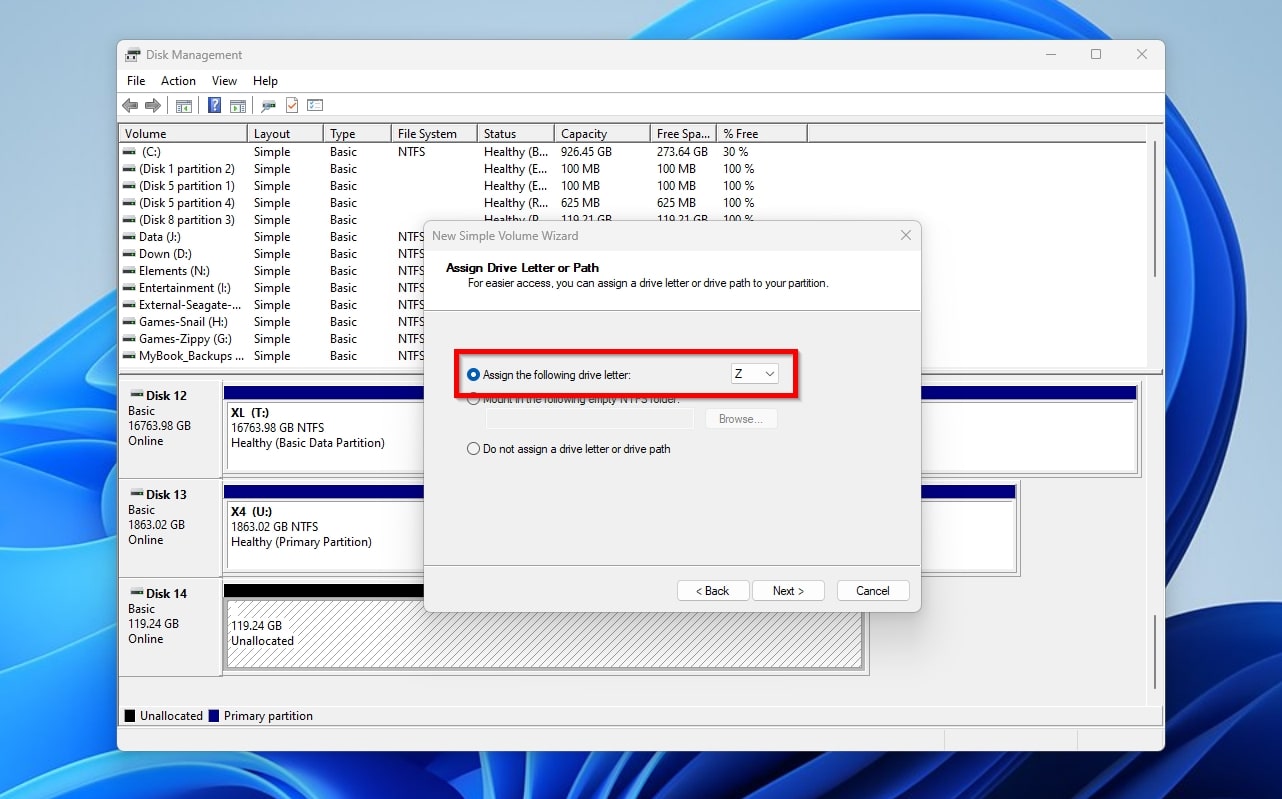
- Continue by selecting the letter you want to assign to the created volume. You also have the somewhat more convoluted option of mapping it to a folder (which Linux fans may like more). The third option, “Do not assign a drive letter or drive path”, will create a volume but leave it inaccessible until you choose one of the other two options.
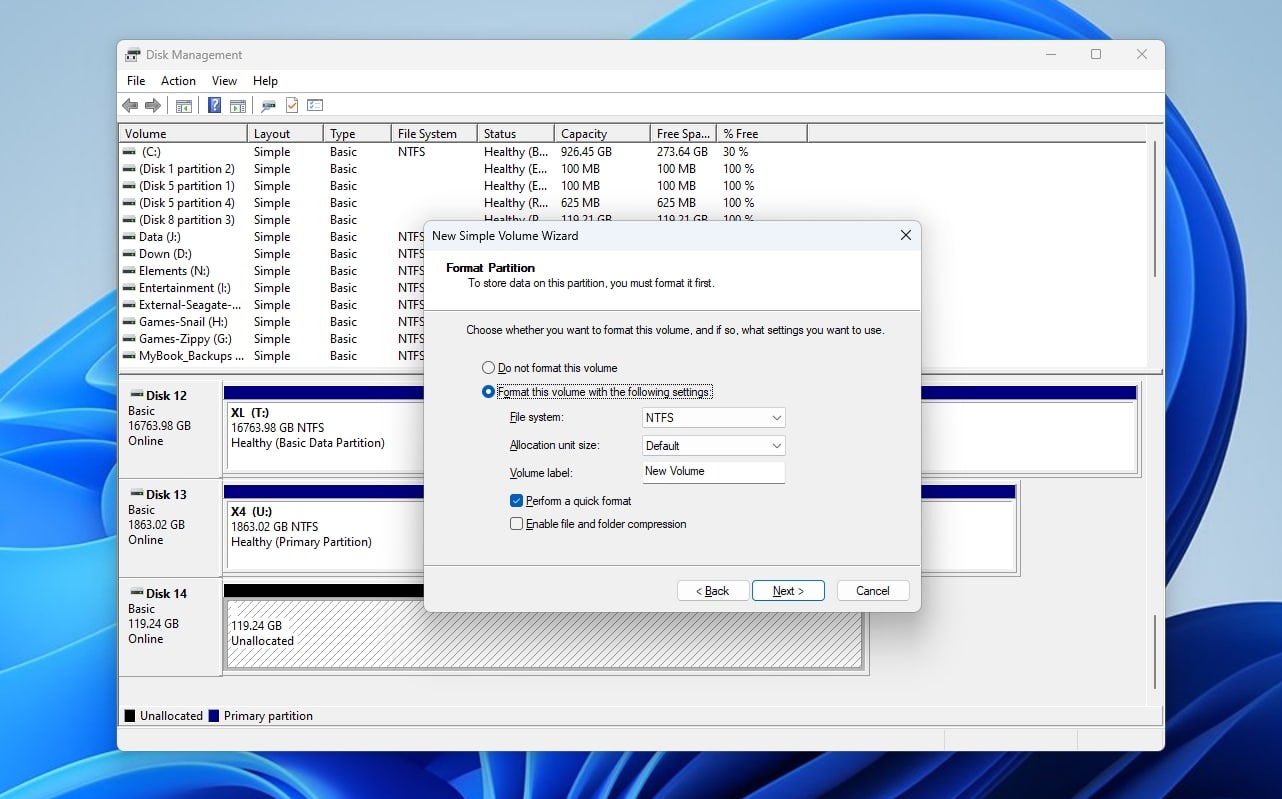
- You can customize the Format Partition options to suit your disk’s characteristics and your preferences. Most users will probably want to leave “Format this volume with the following settings” enabled, and go for an “NTFS” File system, a “Default” Allocation unit size, and “Perform a quick format”, only changing the Volume label to reflect the disk’s “identity” or contents. When ready, click Next.
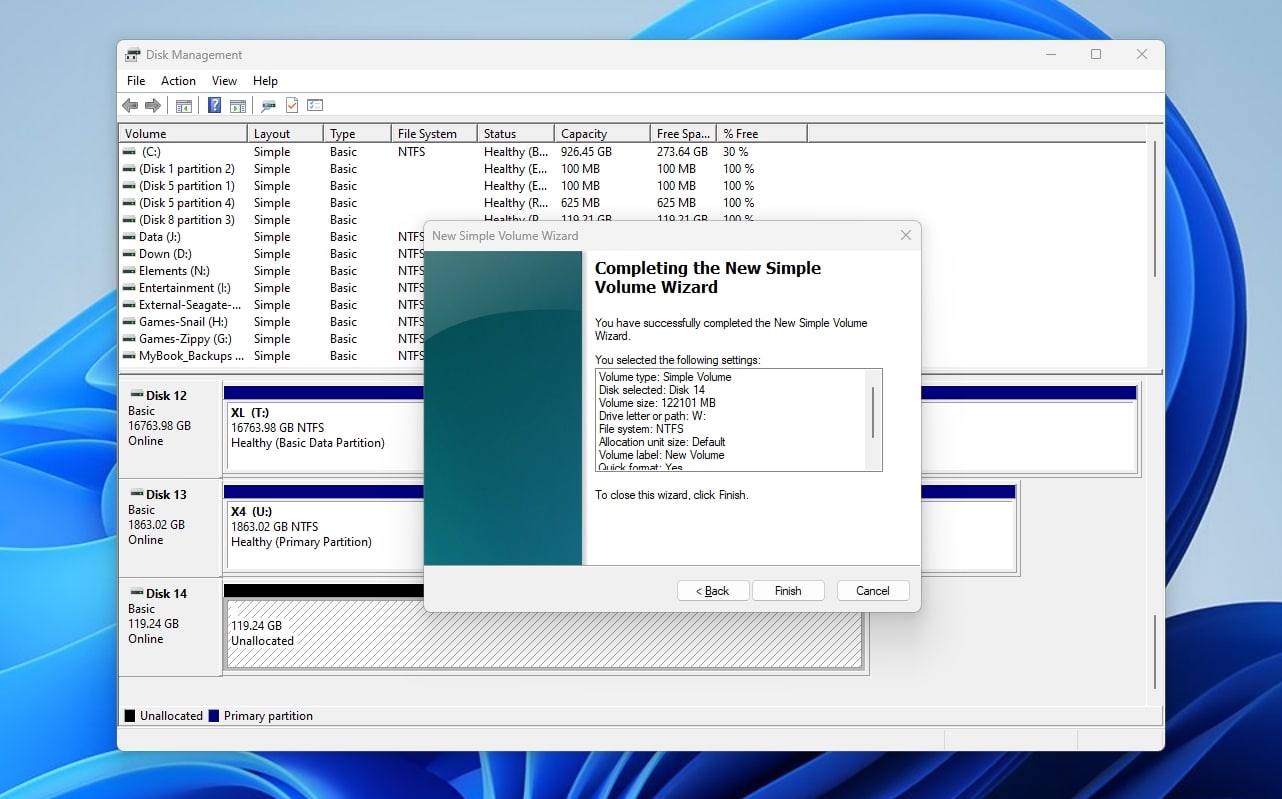
- When the New Simple Volume Wizard completes, it will display the details of the newly created volume. Click Finish to close it, and exit Disk Management.
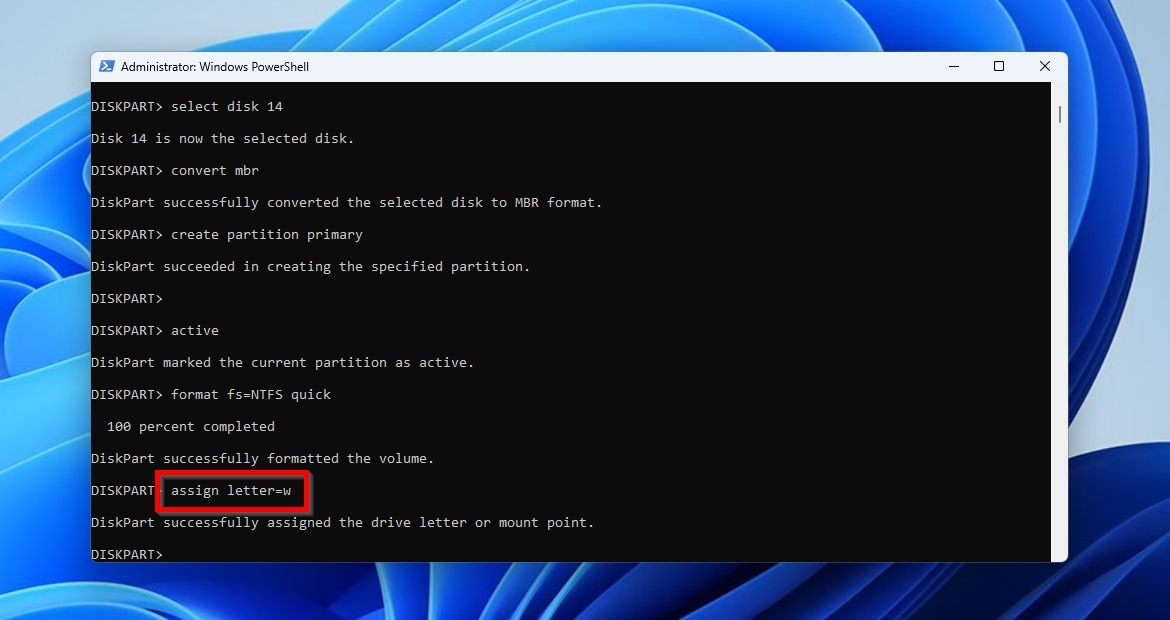
Alternatively, for a more hands-on approach with DiskPart, and continuing from where we left in the previous section, with DiskPart running and the disk selected and initialized, use the following sequence of commands: “create partition primary”, “active”, “format fs=FILE_FORMAT quick” (where FILE_FORMAT can be NTFS or FAT32), and “assign letter=LETTER” (where “LETTER” can be any letter of the alphabet not already mapped to another drive).
Step 5: Move the Recovered Files Back to the Disk
If the reason Windows asked you to initialize your disk stems from serious underlying issues, you could face similar scenarios in the future. To eliminate that chance and make sure you won’t find yourself trying to recover your files from a corrupted drive, you can check its health. You can use standalone S.M.A.R.T. monitoring apps for that, but thankfully Disk Drill also includes such functionality in its S.M.A.R.T. monitoring tool.
To check a disk’s S.M.A.R.T. values using Disk Drill and bring back its contents:
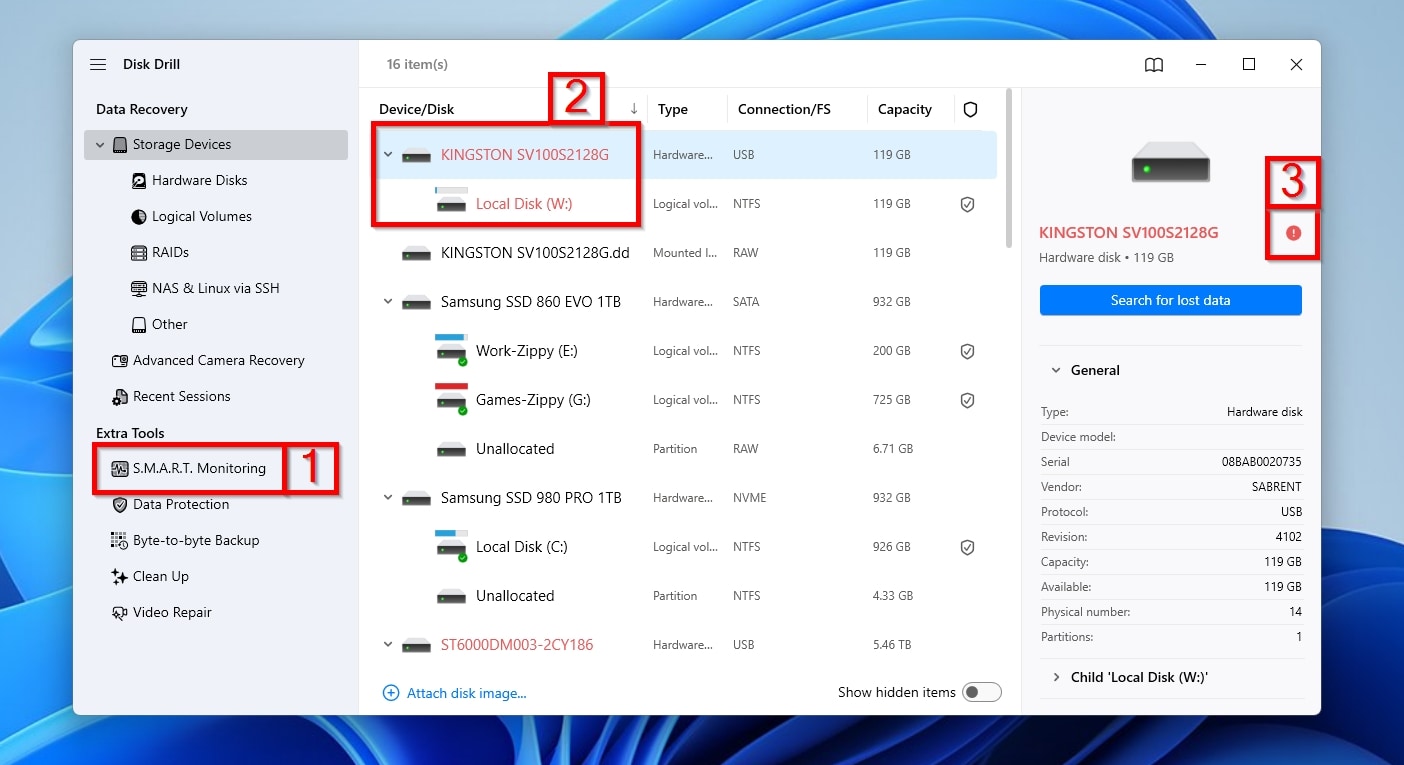
- With Disk Drill running, select S.M.A.R.T. Monitoring (under Extra Tools on the left) (1). Disk Drill also highlights all problematic disks in a different color on both its Device/Disk list (2) and the informational panel on the right. Clicking the little red icon next to the disk’s ID on the informational panel shows more information about the detected issues (3).
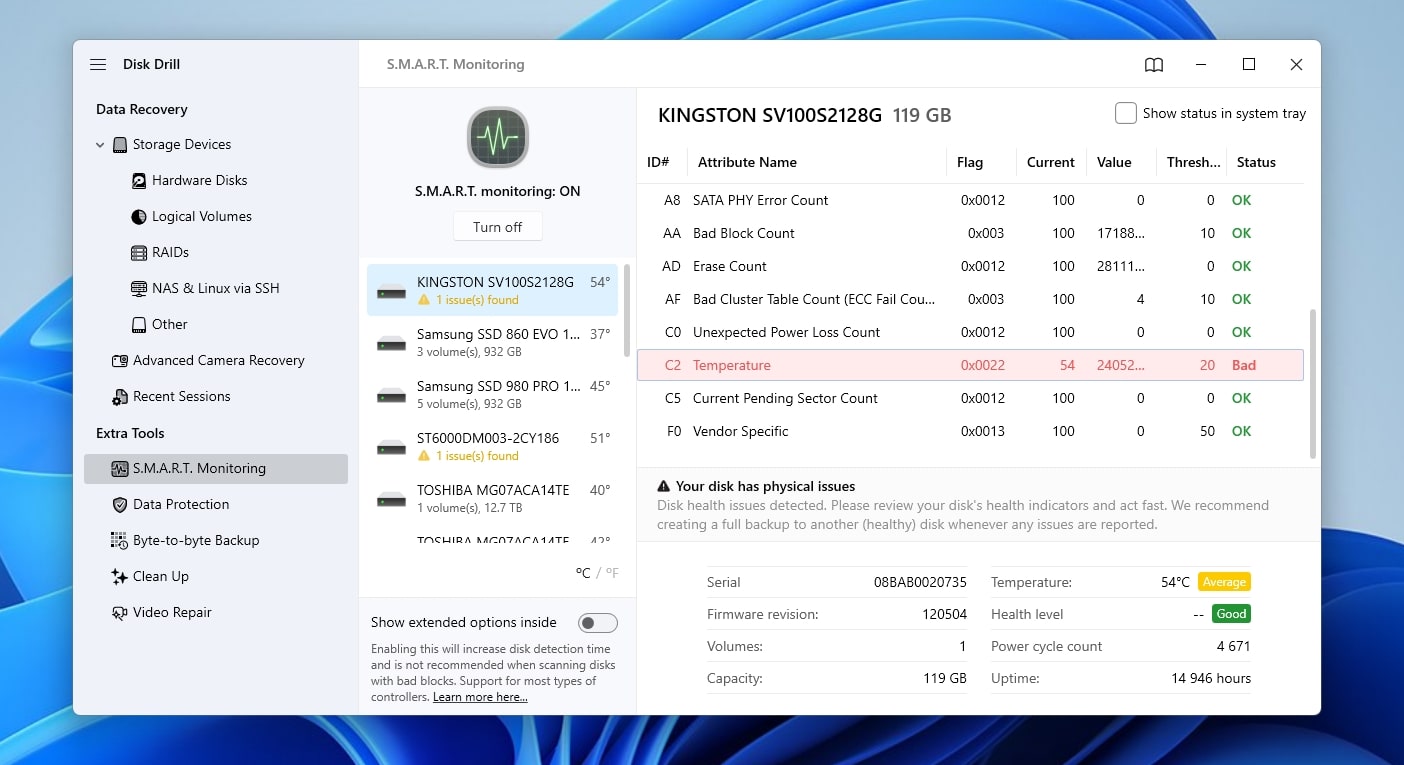
- Disk Drill’s S.M.A.R.T. monitoring page enables you to check out more details about a disk’s status by revealing its most important S.M.A.R.T. values. Go through them and check for any warnings.
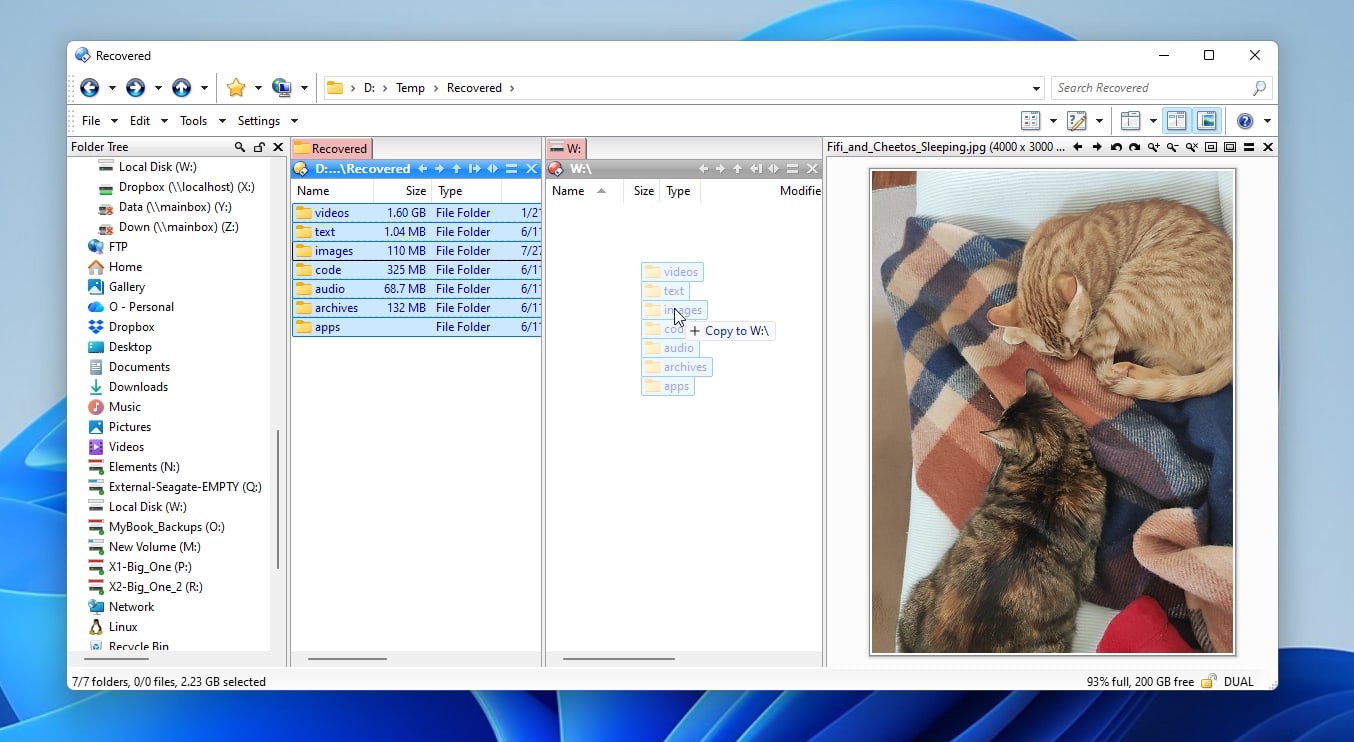
- Does your reinitialized, partitioned, and formatted disk seem to work OK, and its S.M.A.R.T. monitoring values aren’t worth worrying over? Then you can copy your recovered files back to it using a typical file manager, such as Windows File Explorer (Windows Key + E), to restore everything to the way it was.
Wrapping Up
In this guide, we saw the best way to initialize a disk, which, counter-intuitively, isn’t to rush and initialize it as soon as the OS prompts you to do so. Instead, you should…:
- Discard any prompts to initialize the disk and instead take a complete byte-for-byte backup image of it.
- Use a compatible data recovery app to scan the backup image and recover its contents to a secondary storage location.
- After making sure all your files have been recovered and are accessible, initialize the disk.
- Create at least one volume on your disk, format it, and assign it a letter.
- Check the disk’s S.M.A.R.T. status, and if everything’s OK, move the recovered files back to their original location.
If you already initialized your disk before reading this guide, Disk Drill can still scan it and recover files using the exact workflow we saw. However, the recovery chances depend heavily on everything that happened after the disk was initialized:
- Did you keep using the disk?
- Were one or more volumes created on it, were they formatted, and if so, was the formatting quick or complete?
- Was new data written to it? And if yes, how much?
- If it’s not an HDD, but an SSD or NVMe drive, when was it initialized, and has TRIM run since then?
Those factors can reduce the chances of a successful recovery. Still, instead of immediately giving up, it’s worth scanning the disk with an app like Disk Drill to at least check what it can find and recover.
Finally, the following FAQ provides answers to some common follow-up questions that might be lingering in your mind.
FAQ
The initialization process itself only deletes the disk’s Master Boot Record or GUID Partition Table. Everything that follows that enables its use as a storage device, from creating partitions to writing and reading new files, is what can lead to the actual erasure of any data that already exists on it.
The choice between MBR and GPT depends on both the disk’s characteristics and the way you’re planning to use it.
Use MBR when:
- The disk’s capacity is less than 2TB.
- You don’t need more than four primary partitions.
- You want to keep using it with an older operating system.
- You want to maximize its compatibility with multiple operating systems and devices.
Use GPT if:
- The disk offers more than 2TB of storage.
- You prefer increased freedom when creating partitions.
- You are using a modern operating system.
- You don’t mind if you can’t boot an ancient version of Linux from it or access it directly from your old media center or PlayStation 2.
A conflict, incompatibility, or glitch in a driver, other software, or Windows itself can make the OS stop recognizing a disk. Still, a prompt to initialize it can also often be a sign of more serious issues. That’s why you shouldn’t rush into action. Instead, take a backup image of the disk, recover your files from it, and only then proceed to initialize it. Afterward, you can copy all your files back where they were.
There’s no way to undo a disk initialization and revert it to its previous state in a simple way. The closest to it is taking a complete byte-to-byte backup image of the entire disk, then recovering all files to their original locations using an advanced app like Disk Drill.
Initializing and formatting a disk may seem similar, but although related, are actually quite distinct:
- Initializing a disk creates the base structures that define how volumes (and related data) can be stored on it.
- Formatting those volumes with a file system turns them into usable partitioned storage spaces for folders and files.
You can initialize a disk and even create multiple partitions on it without formatting them. However, the disk won’t be usable as actual storage until at least one partition is formatted with a compatible file system and assigned a letter.
