


Want to clean up your iPhone photos? Not only do iPhone photos take up a lot of storage space on your device, but they are notorious for generating a lot of clutter (e.g., duplicates). To further complicate things, some photos and videos don’t get saved in your library–instead, they’re scattered in a bunch of different apps.
After researching dozens of user cases (and investigating our own devices), we found out where most of your photos and videos are, and we came up with the fastest and most comprehensive solutions to fully clean up the photos on your iPhone.
The Fastest Way to Clean Up the Photo Library on iPhone
Hands down, the fastest and easiest way to clean up the photo library on your iPhone is by using a third-party app. Third-party cleaning apps don’t have the same limitations as the native Photos app, and they have way more features that are actually dedicated to cleaning (not just general organization).
There are several from the App Store that you can choose from, but we’ll be featuring Clever Cleaner: AI Cleanup App in this guide. It covers the most important media types, which we’ll briefly run through below, and it’s completely free (and ad-free) as of this writing.
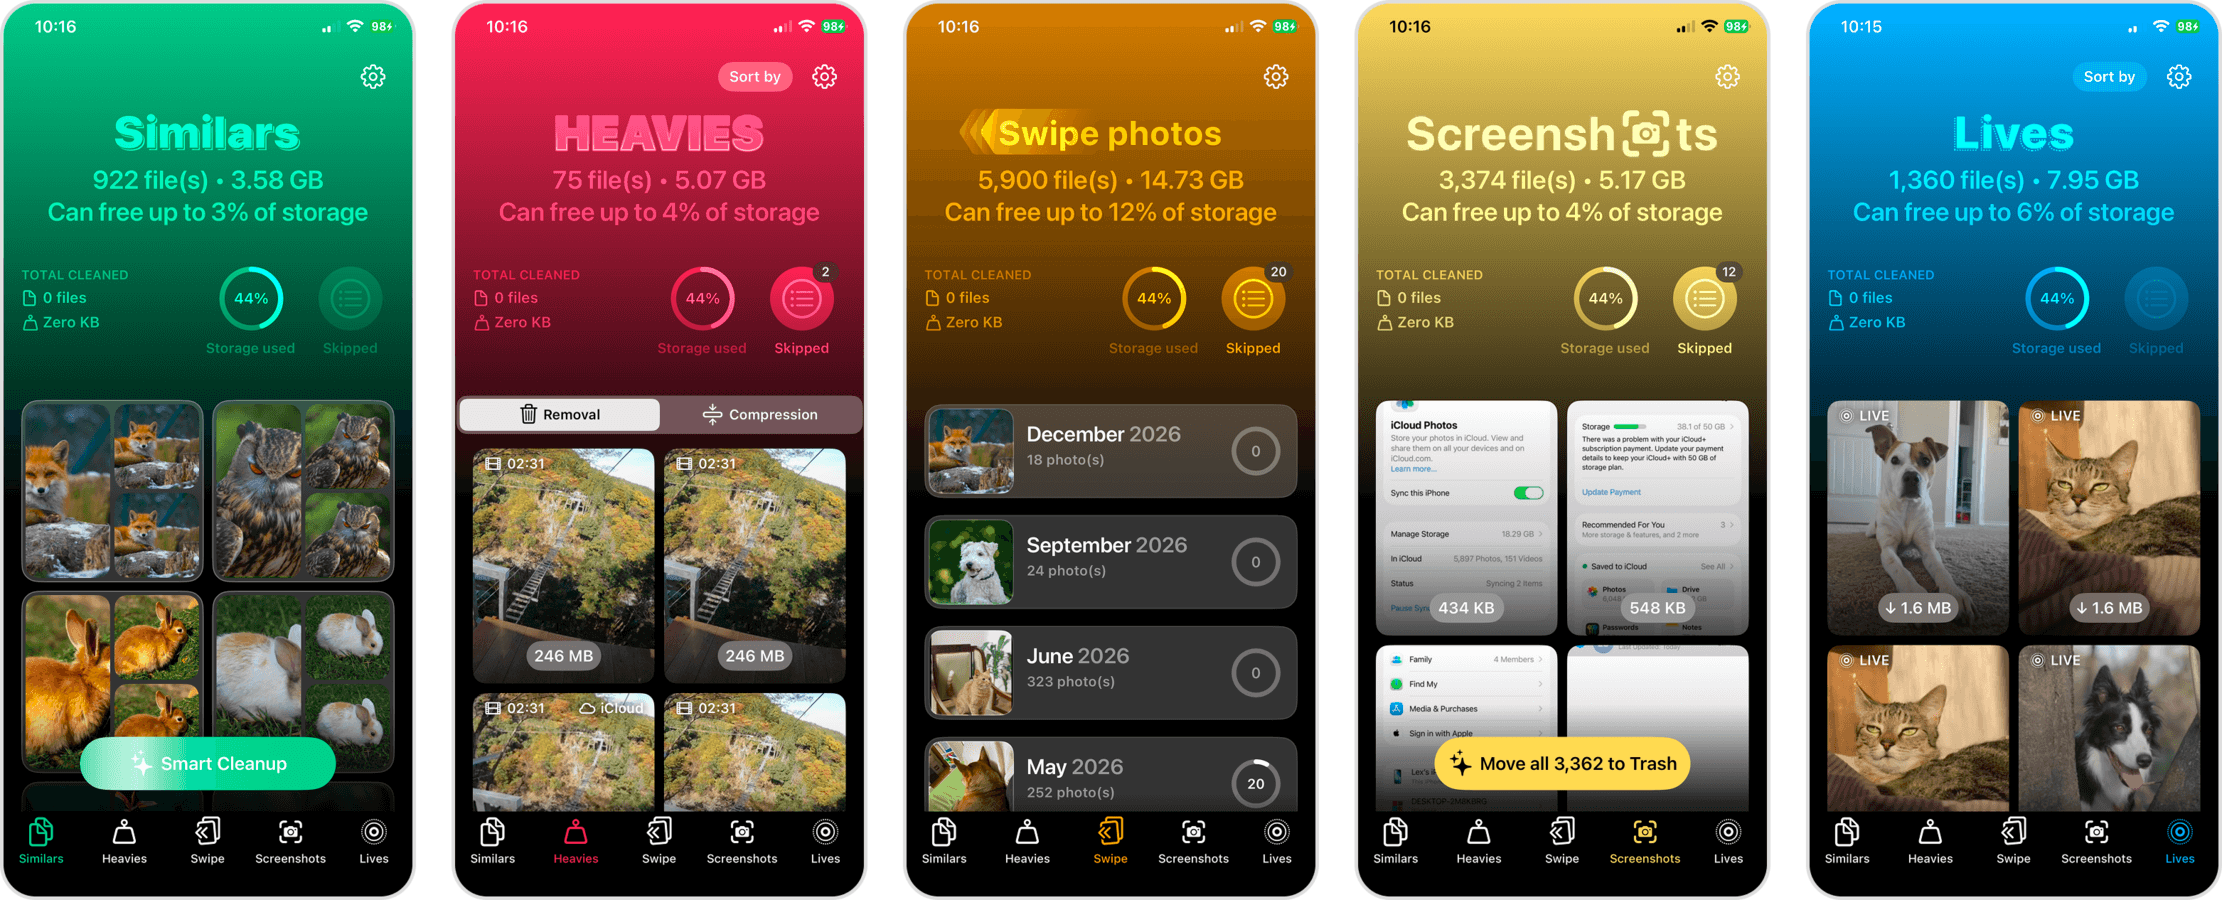
- Similars: Unlike the native Photos app, Clever Cleaner can delete duplicate photos and similar-looking photos. You can review groups of photos or delete all similar and duplicate photos in your library at once.
- Heavies: The Heavies tool allows you to sort your videos by size or date, and you can either delete or compress videos, which reduces their file size at the cost of (minimally) impacting visual quality.
- Swipe: Your photos are categorized into monthly albums, where you can review each photo individually and quickly process them using left and right swipe gestures.
- Screenshots: All screenshots on your device are compiled in the Screenshots tool, where you can see each image’s file size in its thumbnail. You can also delete all of your screenshots at once with a Move all to Trash button.
- Lives: Clever Cleaner can delete Live Photos or convert one, multiple, or all of your Live Photos into still images, drastically reducing their storage usage.
To show you how the app works, here’s a brief demonstration of how to use the Similars tool to delete similar and duplicate photos:
- Download Clever Cleaner: AI Cleanup App from the App Store.
- Run Clever Cleaner. Then, grant it Full Access to your photo library and wait for the app to complete its initial scan.
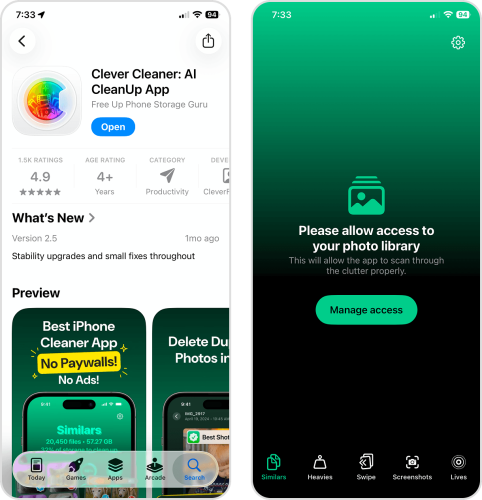
- Once the scan is complete, the Similars tool will be the first page that you’ll get access to. Tap any group of photos to review it. Alternatively, you can tap the Smart Cleanup button to eliminate all similar and duplicate photos from your library at once.
- Clever Cleaner will automatically choose the best version from the group of photos you’re currently reviewing and select the rest to be deleted. You can also select the photos you want to delete yourself. Once you’re satisfied with the selection, tap Move to Trash. The next group of photos will then be made available to you.
- After cleaning up your similars and duplicates, tap the moved to Trash dialog box at the bottom of the screen.
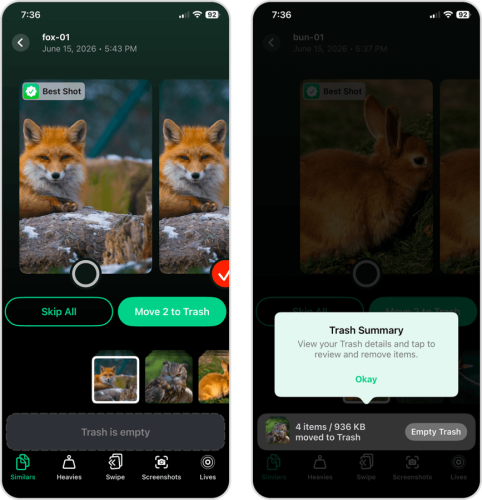
- In the Trash page, use the slider at the bottom to delete the photos again.
- Finally, tap Delete in the pop-up dialog window to confirm the action.
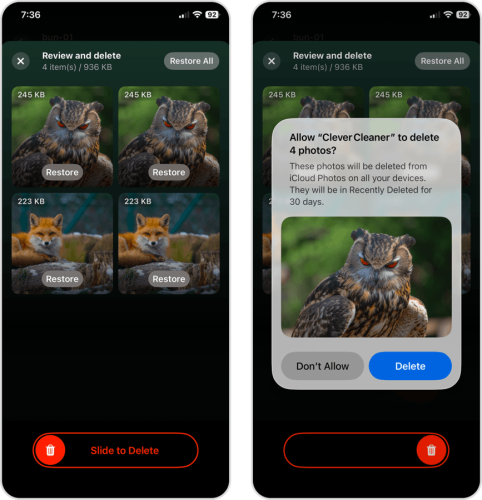
After deleting your photos from Clever Cleaner, don’t forget to delete them one more time in the Recently Deleted album (in the native Photos app). Otherwise, they’ll remain on your device for 30 days before being permanently deleted by iOS.
Clean Up Photos on iPhone Manually
If you don’t want to use a third-party app, or you lack the storage space to download one, the Photos app has a decent set of tools that can still get you pretty far. The key is leveraging its features effectively, which is what we’ll teach you in this section.
1. Delete Photos from Your Library and Albums
The native Photos app, of course, provides a method to delete photos. But iOS has other organization and cleanup features that can help you be more strategic than just browsing your library. Here’s a rundown of common cleanup targets to start with:
- Media Types: Review photos based on their type, such as Selfies, Live Photos, Portrait, Bursts, RAW, and more.
- Utilities: The Photos app has limited but useful organization features; check the Favorites, Hidden, Recently Deleted, Duplicates (covered in the next section), Receipts, and QR Codes utilities to eliminate redundant media.
- Built-in Collections: iOS also generates its own albums and collections that can make it easier to find unwanted photos or videos. Some popular examples include People and Pets, Recent Days, and Trips.
- Custom albums: Check your own albums; if you recently took a trip or worked on a project that resulted in a lot of photos, see if you find any clutter to eliminate.
Each album, collection, and utility has a slightly different interface based on its contents, but the process of photo deletion for all of them is fairly straightforward:
- Open the Photos app.
- Navigate to the Collections page (or the Library page if you want to delete photos straight from your library).
- Choose a Collection containing the photos you want to delete.
- Tap Select in the top right corner of the screen.
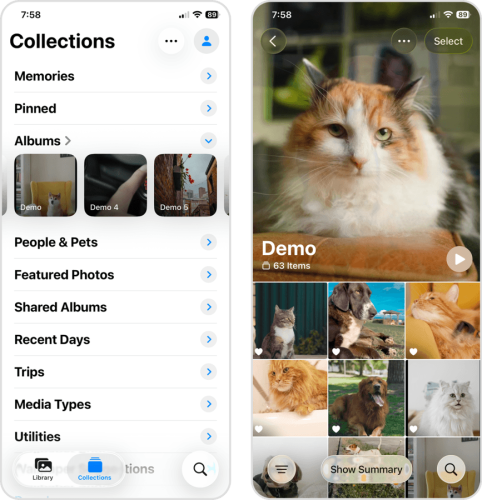
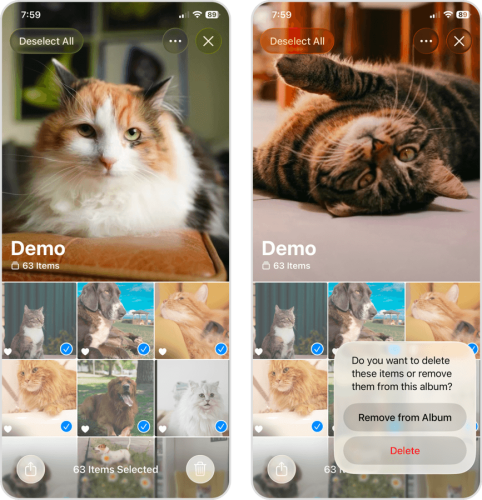
- Choose the photos you want to delete. Then, tap the trash button 🗑️.
- From the content menu that appears, tap Delete. Make sure to tap Delete Items in the dialog box to confirm the action.
2. Use the Duplicates Utility to Merge Copies
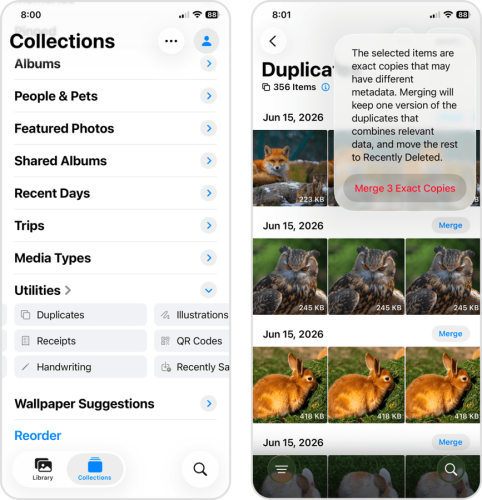
One of the Photos app’s most useful utilities is Duplicates. Instead of looking for duplicate photos in your library manually, the Duplicates utility automatically finds them for you and saves them to its own album.
There, you can Merge the photos, which combines their metadata and saves it to the highest-quality image (while automatically deleting the rest). Alternatively, you can also delete individual photos yourself.
- Open the Photos app.
- At the bottom of the screen, tap Collections. Then, scroll down to Utilities and tap Duplicates.
- Beside the group of duplicates you want to combine, tap the Merge button.
- Finally, tap Merge Exact Copies to confirm the action.
3.
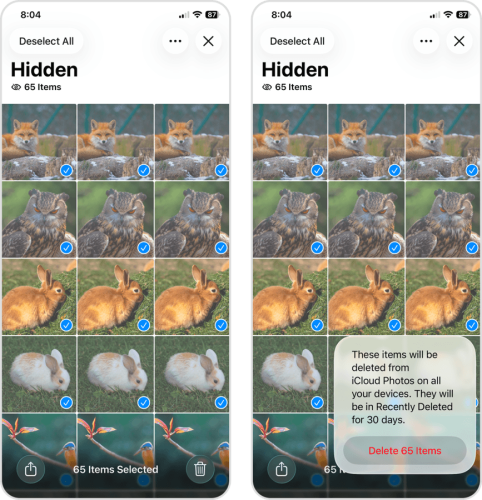
It’s surprisingly common for users to hide photos and videos for privacy reasons, only to end up forgetting about them later. Over time, this can add up to consume gigabytes of storage space (and simply add clutter to your device).
Here’s how to find the Hidden album and delete its contents:
- Open the Photos app.
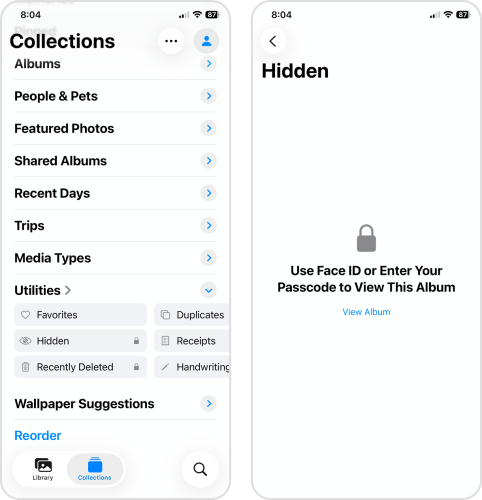
- At the bottom of the screen, tap Collections. Then, scroll down to Utilities and tap Hidden.
- Use your Face ID, Touch ID, or Passcode to open the album.
- In the top right corner of the screen, tap Select.
- Tap the photos you want to delete, then tap the trash button 🗑️.
- Finally, tap Delete Photos in the pop-up dialog to confirm the action.
Aside from the native Hidden album, third-party apps can have their own “hidden” or “vault” feature. These photos and videos don’t appear in the Photos app–they stay in their app of origin, which gets larger in size. Make sure to check any third-party media apps you have.
Clean Up Photos Stored Outside Your Photo Library
Photos and videos aren’t just saved in the Photos app; many of them, like attachments and downloaded files, are scattered across different applications and take up different categories of storage space. In this section, we’ll show you how to find them.
1. Remove Photos Saved in the Files App
The Files app is a common save location for photos and videos that come from a wide variety of sources. For example, it saves images from websites, files downloaded from cloud storage services, images received through messaging apps, exported photo edits, and media that users manually save to it.
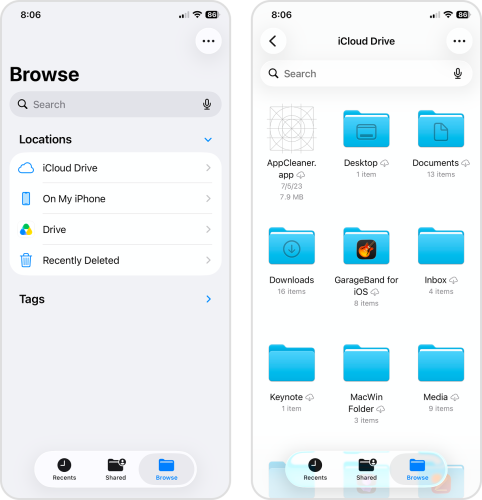
Some of them are saved to the root folder, while most media files are saved in specific folders within the Files app. We’ll show you how to delete photos from the Downloads folder, which is a save location for files downloaded with the Safari browser.
- Open the Files app.
- Depending on how you store your files, tap On my iPhone or iCloud Drive.
- You can start deleting files and folders from this page via the meatball menu > Select > trash button. Alternatively, you can tap a folder to review its contents (we’ll check our Downloads folder for this example).
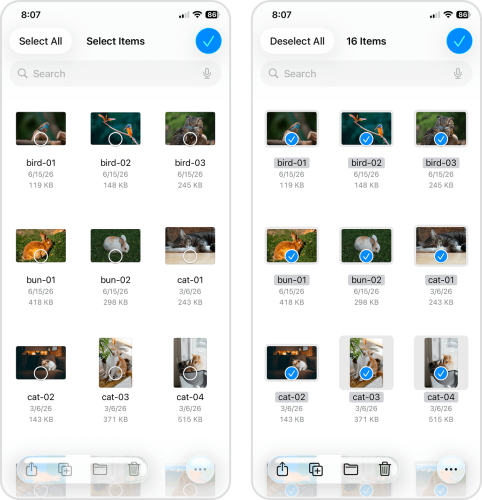
- Tap the meatball menu in the top right corner of the screen. Note the sorting options in the context menu (Name, Kind, Size, etc.), which can help you prioritize your cleanup. To pick the files you want to delete, choose Select. Then, tap the items you want to delete and tap the trash button 🗑️.
2. Delete Photo Attachments from Messages
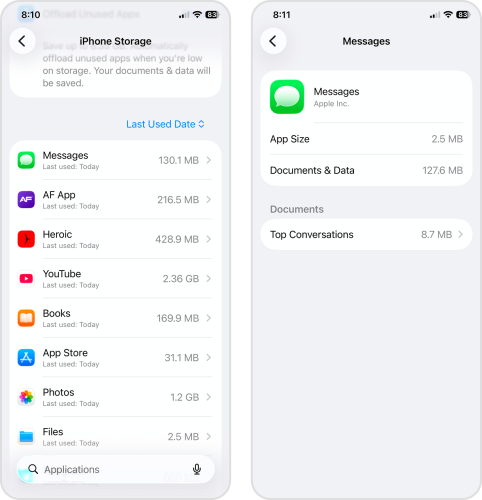
Photos and videos that you receive from your contacts in the Messages app don’t show up in the Photos app, but they are permanently stored on your device until you delete them. We’ll show you the fastest way to eliminate large attachments in your messages using the Settings app, so you don’t have to hunt for them manually.
- Open the Settings app.
- Tap General.
- In the General page, select iPhone Storage.
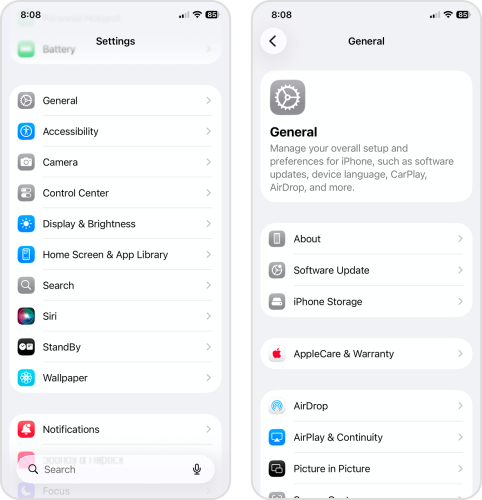
- Scroll down to your list of apps and tap Messages.
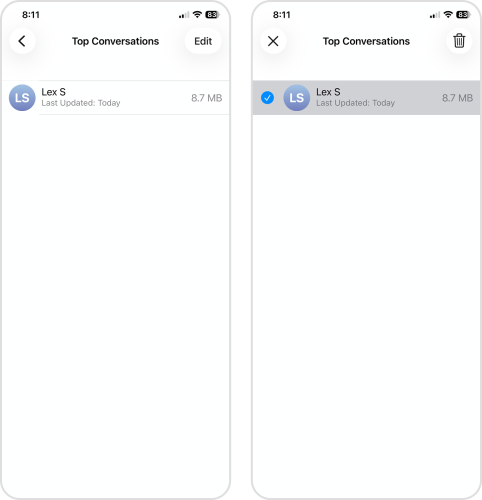
- Tap any option that appears under the shown media types. For example, we’ll open our Top Conversations under the Documents type.
- In the top right corner of the screen, tap Edit.
- Finally, select the items you want to delete and tap the trash button 🗑️.
Clean up iPhone Photos Without Deleting Them
If you want to reclaim more storage space or optimize your library even more, but you don’t have any photos or videos left that you want to delete, there are two more solutions that you can try. Both options still require some compromise, but you can keep what’s left of your library.
1. Optimize iPhone Storage with iCloud
iCloud has a feature called Optimize iPhone Storage that can help you instantly reclaim dozens of gigabytes of storage at once (especially if you have a big library). Nothing gets deleted; instead, iCloud uploads the high-resolution versions of your photos and videos to Apple’s servers, then leaves lower-resolution versions on your device.
These versions of your media have drastically lower file sizes, but don’t worry–iCloud automatically re-downloads their high-resolution versions whenever you try to open or edit any photo (as long as you’re connected to a stable network).
- Open the Settings app.
- Tap your Apple ID.
- Scroll down a bit and tap iCloud.
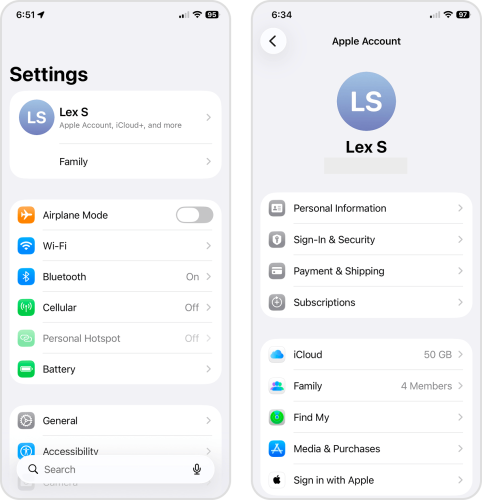
- In the Saved to iCloud section, tap Photos.
- Slide the toggle switch beside Sync this iPhone to the ON position (green). Then, tap the Optimize iPhone Storage option, ensuring it has a check mark beside it.
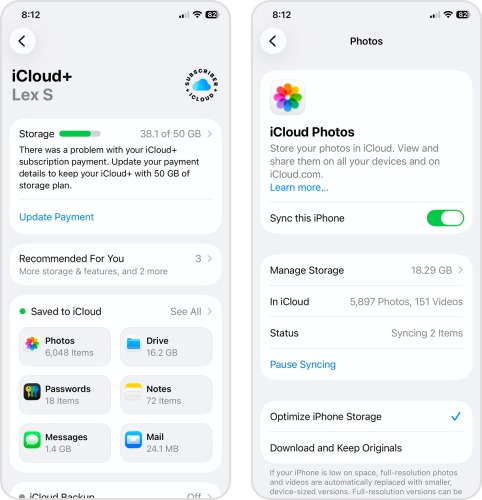
After activating iCloud’s optimization settings, iOS will need time (and a stable network connection) to upload your library to Apple’s servers.
2. Move Photos to External Storage Device
If you want an offline solution, you can invest in an appropriate adapter and use your iPhone with an external storage device–like SSDs, USB flash drives, or SD cards. With this setup, your only limitation is the size of the storage device itself (some of which provide terabytes of space).
However, note that this method only copies your files from your iPhone to the storage drive. To reclaim storage space, you’ll need to manually delete the original files from your iPhone.
- Connect the external storage device to your iPhone.
- Open the Photos app.
- Navigate to your library or to the specific collection you want to copy. Then, tap Select in the top right corner of the screen.
- Tap the photos and videos you want to “move.” Then, tap the share button in the bottom left corner of the screen.
- In the Share menu, select Save to Files.
- Finally, save the files to your external drive, which should appear alongside iCloud Drive and On My iPhone.
Conclusion
Here’s a brief summary of every single photo cleanup and optimization solution we’ve covered in this guide, along with their links:
- The fastest way to clean up your library is by using a dedicated third-party cleaning app, which doesn’t have the same limitations as the native Photos app (and is simply way more efficient).
- If you don’t want to or can’t use a third-party app, leverage the Photos app’s albums, collections, and utilities. You can use the Duplicates album to eliminate exact copies more efficiently; don’t forget to check the Hidden album for forgotten media.
- Aside from the Photos app, don’t forget to clean up the Files app and your message attachments.
- Once you’ve gotten rid of all the clutter, you can reclaim even more storage space by using iCloud’s Optimize iPhone Storage feature or by using an external storage drive.
Unfortunately, it’s impossible to completely stop clutter from building up on your iPhone–especially if you use a lot of media-related apps. Instead, use Clever Cleaner or features from the Photos app to review your library regularly. Frequent, short sessions are much more tolerable than dealing with thousands of files at once.
And if your main goal is to maximize or reclaim storage, check out our guide on freeing up iPhone storage space, which covers much more than just photos and videos.
FAQ
The best way to clean up iPhone photos is to use one of the many third-party cleaning apps on the App Store. They’re designed to make cleanup tasks a lot easier compared to using the native Photos app, and they also have unique features that iOS doesn’t have. We specifically recommend Clever Cleaner: AI Cleanup App, which covers all the major cleanup targets (like duplicate and similar photos, Live Photos, videos, etc.) and is free forever for early users.
There are three ways to clean iCloud photos on your iPhone:
- If iCloud is already enabled for your photos, deleting them from your library will also delete them from iCloud. You can use the native Photos app or a third-party iPhone cleaning app.
- You can also delete iCloud photos by logging into iCloud Web > Photos and deleting them from there.
- For downloaded images, you may find them in the Files app > iCloud Drive; to delete a file, tap and hold and select Delete.
Yes, you can clean up photos on your iPhone by date. Open the Photos app > Library > filter button ᯤ, then select Sort by Recently Added or Sort by Date Captured. You can further customize what appears in your library view by exploring the Filter options.
Here are 3 common reasons why deleted photos keep reappearing on your iPhone, and what to do about them:
- iCloud sync is malfunctioning. iCloud requires a stable connection to successfully run its sync process; if your network is unstable, the changes to your library may not be saved. Connect to a stable network, then try again.
- Auto-save is enabled. Certain apps, especially messenger apps and social media platforms, have an auto-save feature that downloads certain media whenever you’re connected to the internet. Check the apps’ settings pages and turn off the feature.
- iOS is experiencing bugs. iOS bugs can affect anything from your photo library to the indexing of your data; restart your iPhone and make sure you’re updated to the latest iOS version for your device.
You can significantly reduce photo storage usage on your iPhone (while keeping your high-resolution photos and videos in iCloud) by using iCloud’s optimization feature. This setting only keeps the lower-resolution versions of your photos in your local storage. Open the Settings app > your Apple ID > iCloud > Photos > enable Sync this iPhone and Optimize iPhone Storage.
