


Running out of space on your iPad? No surprise there. You’re probably generating more and more new data every single day, whether it’s downloading new apps, receiving attachments, or using your device’s camera.
The problem is that it’s so spread out that it’s impossible to keep track of–then, one day, your storage is inexplicably full. Let’s fix that. After researching dozens of user stories and observing our own iPad usage behavior, we found the 9 most effective ways to free up iPad storage and compiled them in this guide.
What Is Taking Up Space on Your iPad
Before trying to free up space on your iPad, the first thing you should do is analyze how your device’s storage is currently being allocated. That way, you’ll know what clean-up targets to prioritize when you start applying the methods in this guide.
Navigate to the iPad Storage menu by opening the Settings app > General > iPad Storage. At the top of this page, you’ll see exactly what data types are present in your local storage, and how much they actually use.
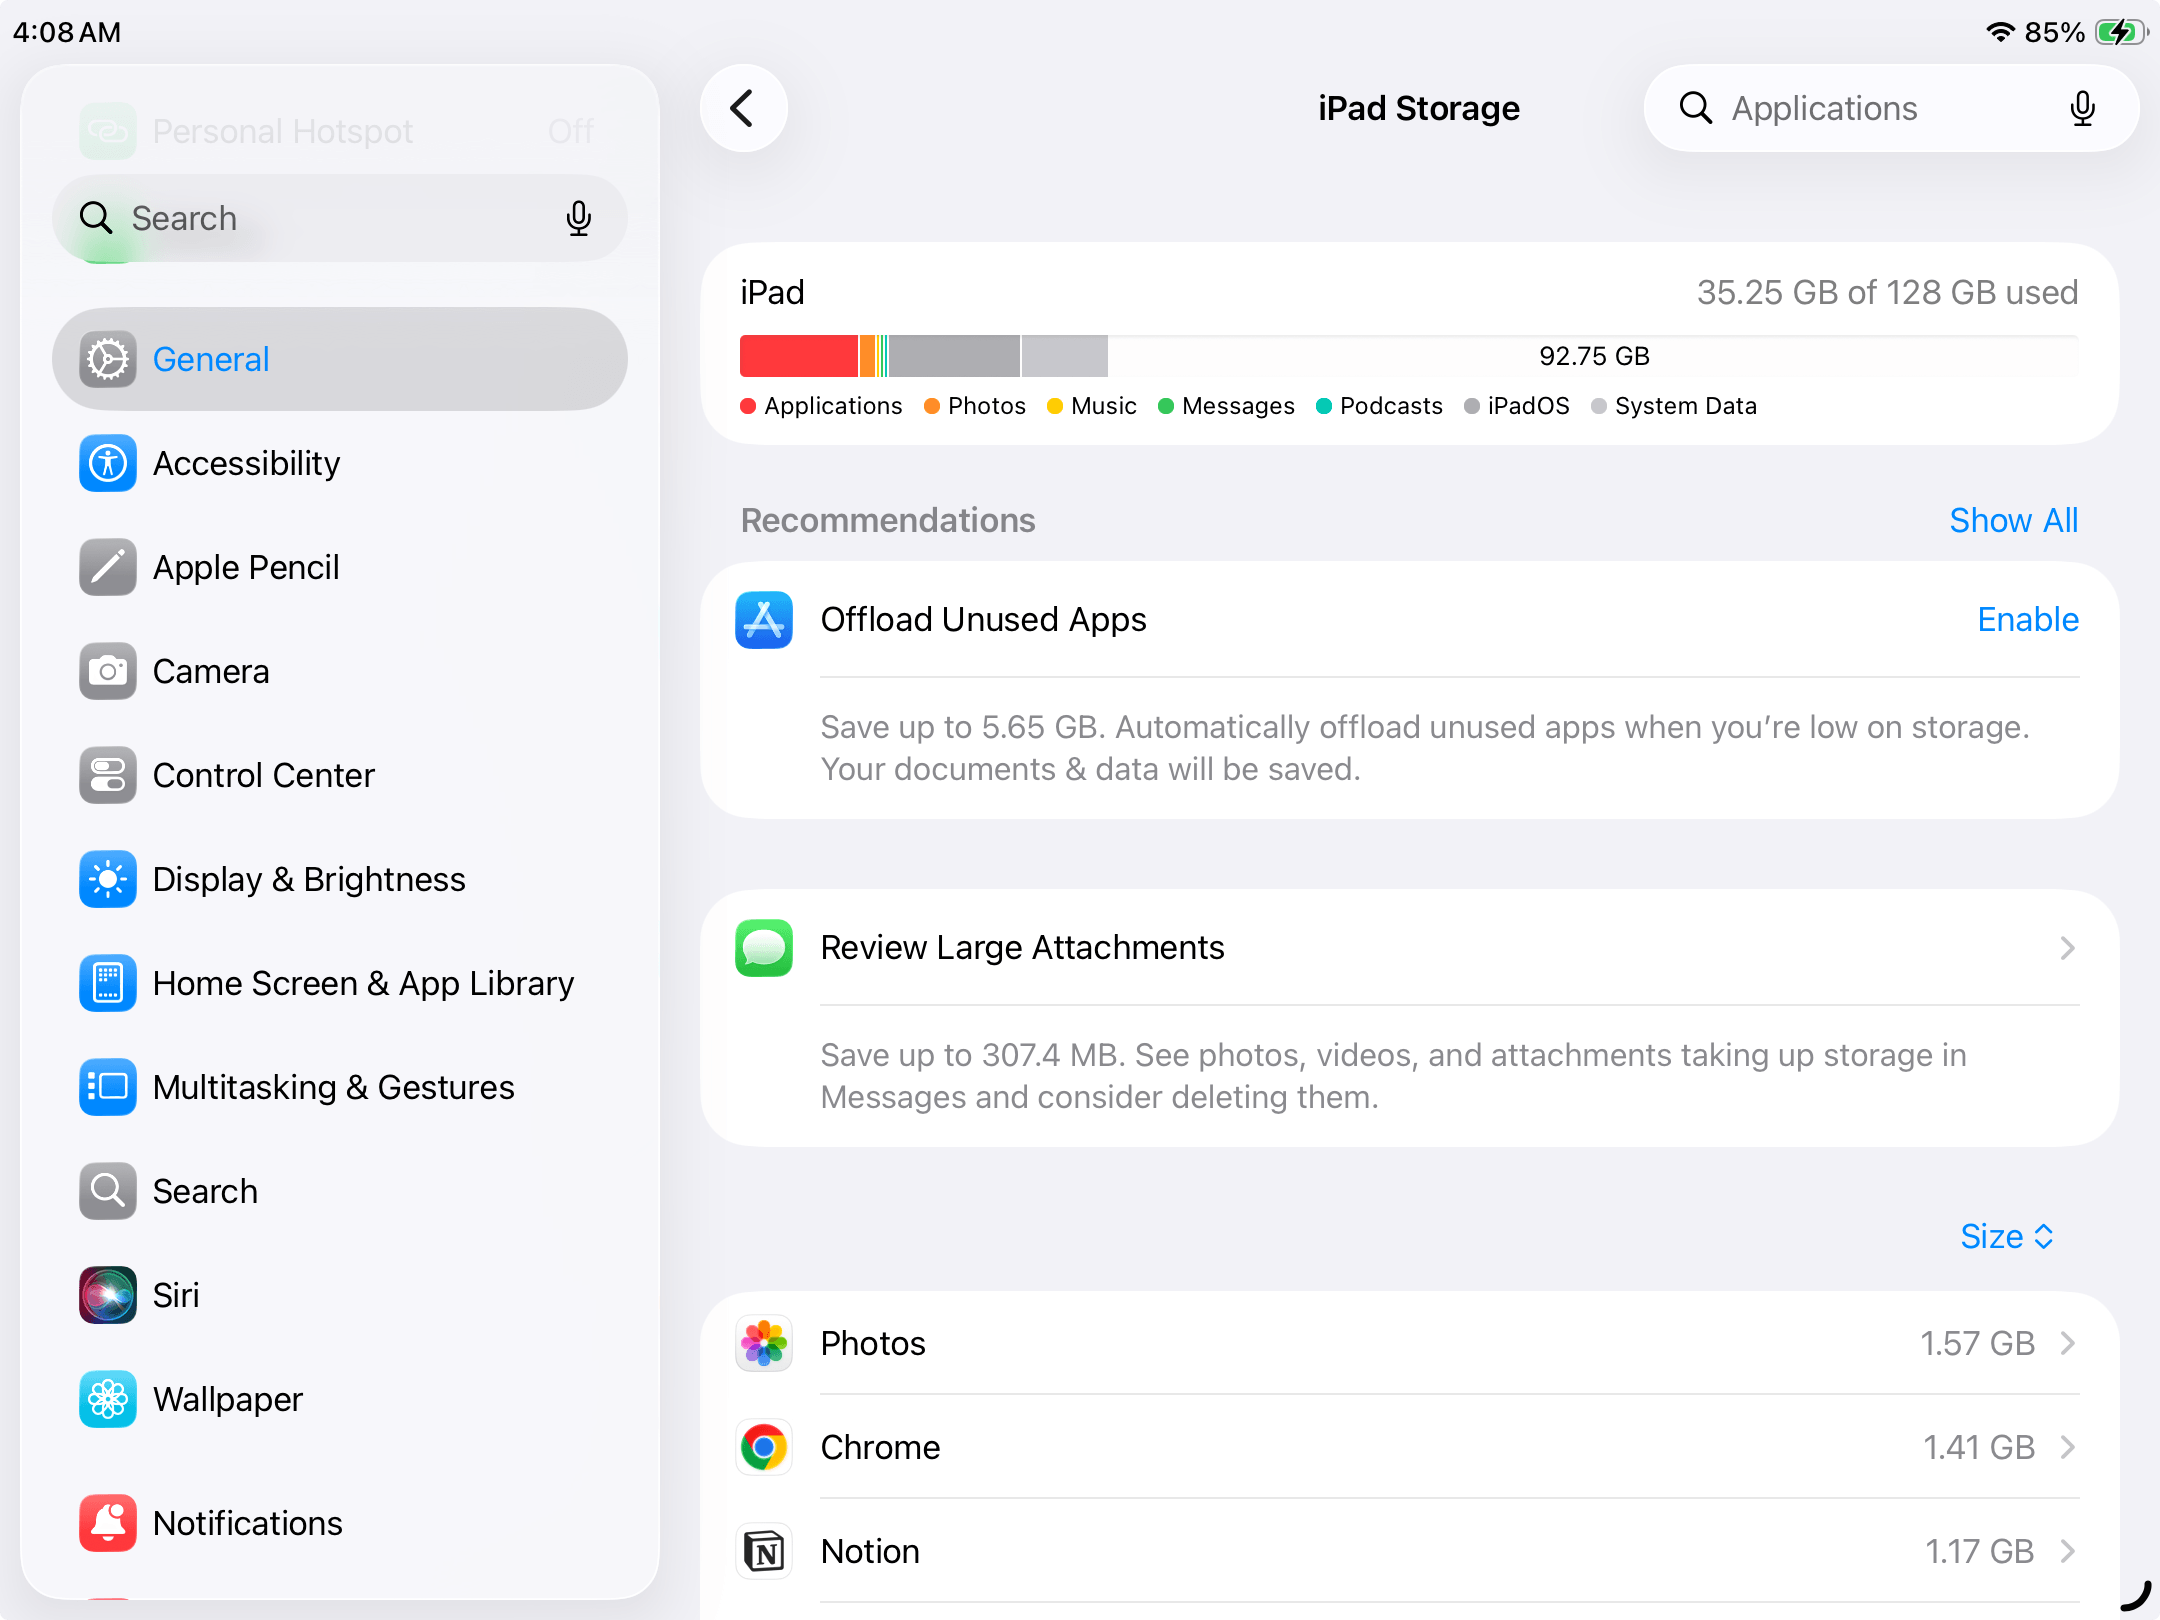
Have a general idea of where to start? Here are a few examples of how our guide handles these different data types, along with links to the appropriate sections:
- Apps: Apps take up more storage than most users notice (many grow more than twice their original size); you can reclaim a lot of space by removing unwanted apps, managing cache data, and cleaning up offline content.
- Photos: iPad photos and videos take up a lot of space, especially when used with special modes like Live Photos and HDR. Cleaning up your library can easily free up gigabytes’ worth of storage, especially if you have a lot of videos.
- Messages & attachments: Do you like sending photos, videos, GIFs, and other attachments to your friends? Much of that data gets locally stored on your iPad, so you’ll need to purge unwanted attachments every once in a while.
- Downloaded files: Files that you download from websites or receive through AirDrop also get stored locally and can quickly add up if you don’t regularly clean the Files app.
How to Free Up iPad Storage
In this section, we’ll cover known places where iPad data tends to build up, then recommend the fastest and most convenient methods to clean them up safely. When deciding on the order of methods, we prioritized the fixes that free up visible storage the fastest–so start at the top, then work your way down.
Method 1: Delete Apps You Don’t Use
Apps usually take up the largest amount of storage space on iPads–one app can easily be several gigabytes in package size. So the fastest way to reclaim storage space on your iPad is to eliminate any apps you no longer use (or don’t use very often).
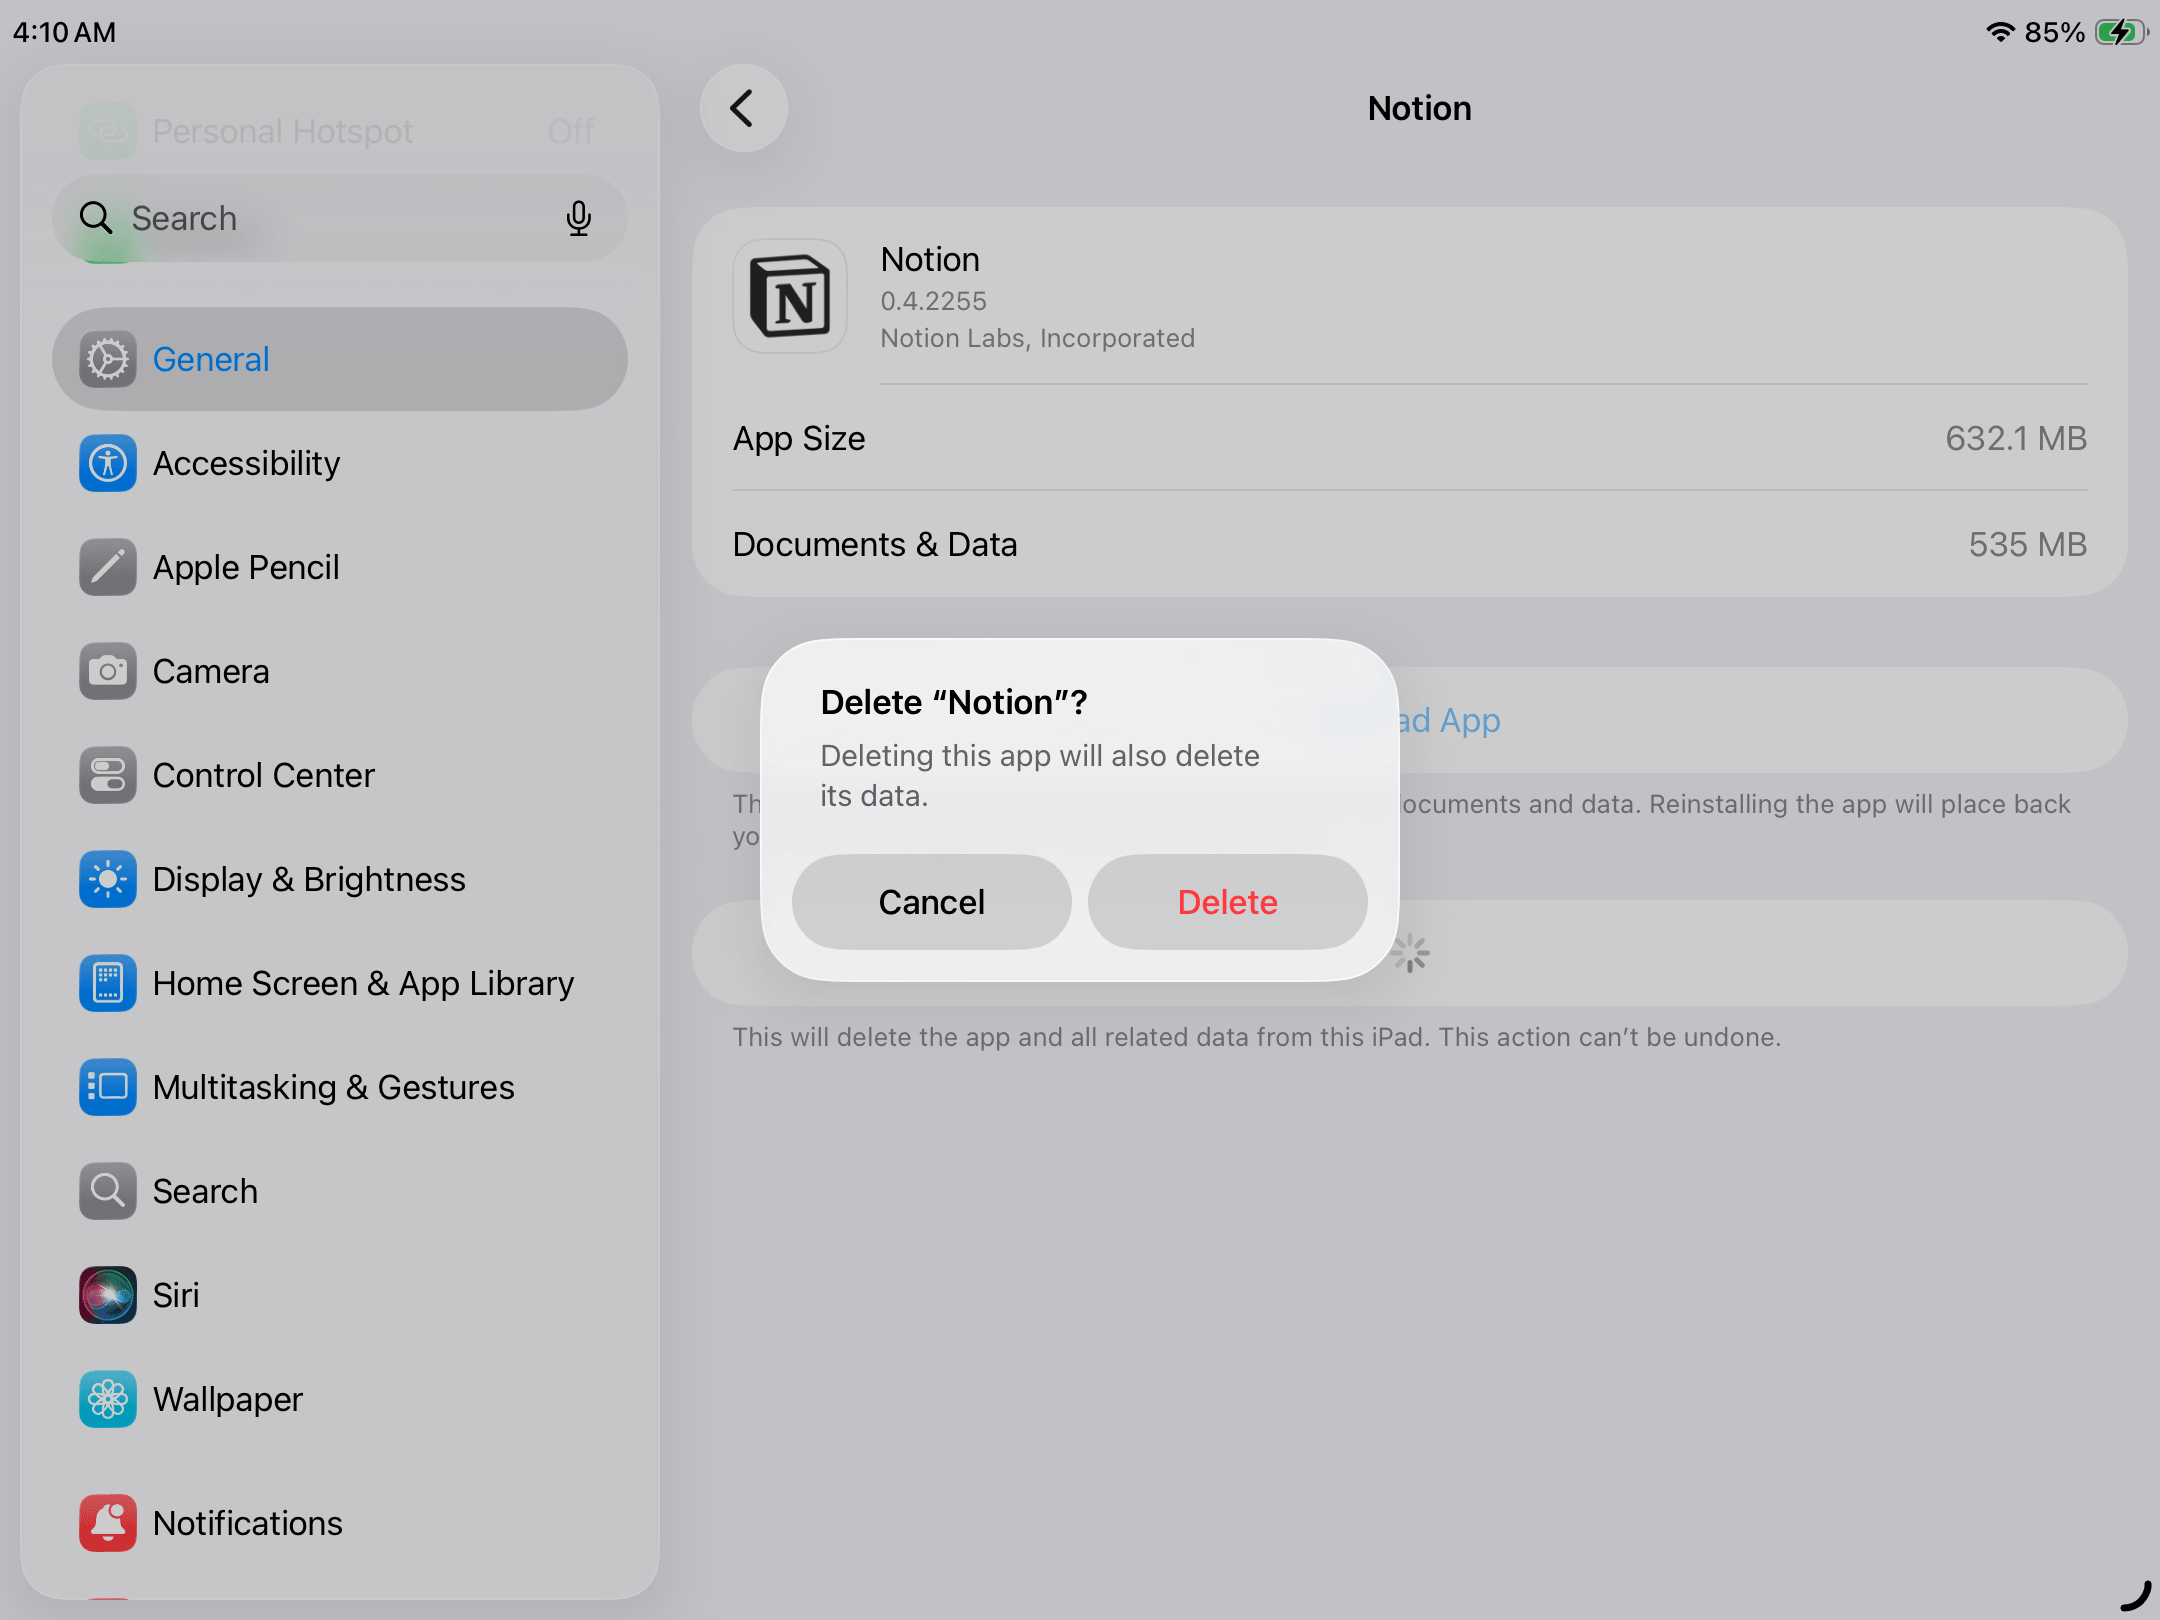
You have two options: (1) deleting an app or (2) offloading it. Deletion removes every single file associated with an app, which is perfect if you don’t need it anymore. Offloading an app removes the binary, but preserves local documents and data–so if you ever need to download that app again, you can pick up right where you left off.
- Open the Settings App.
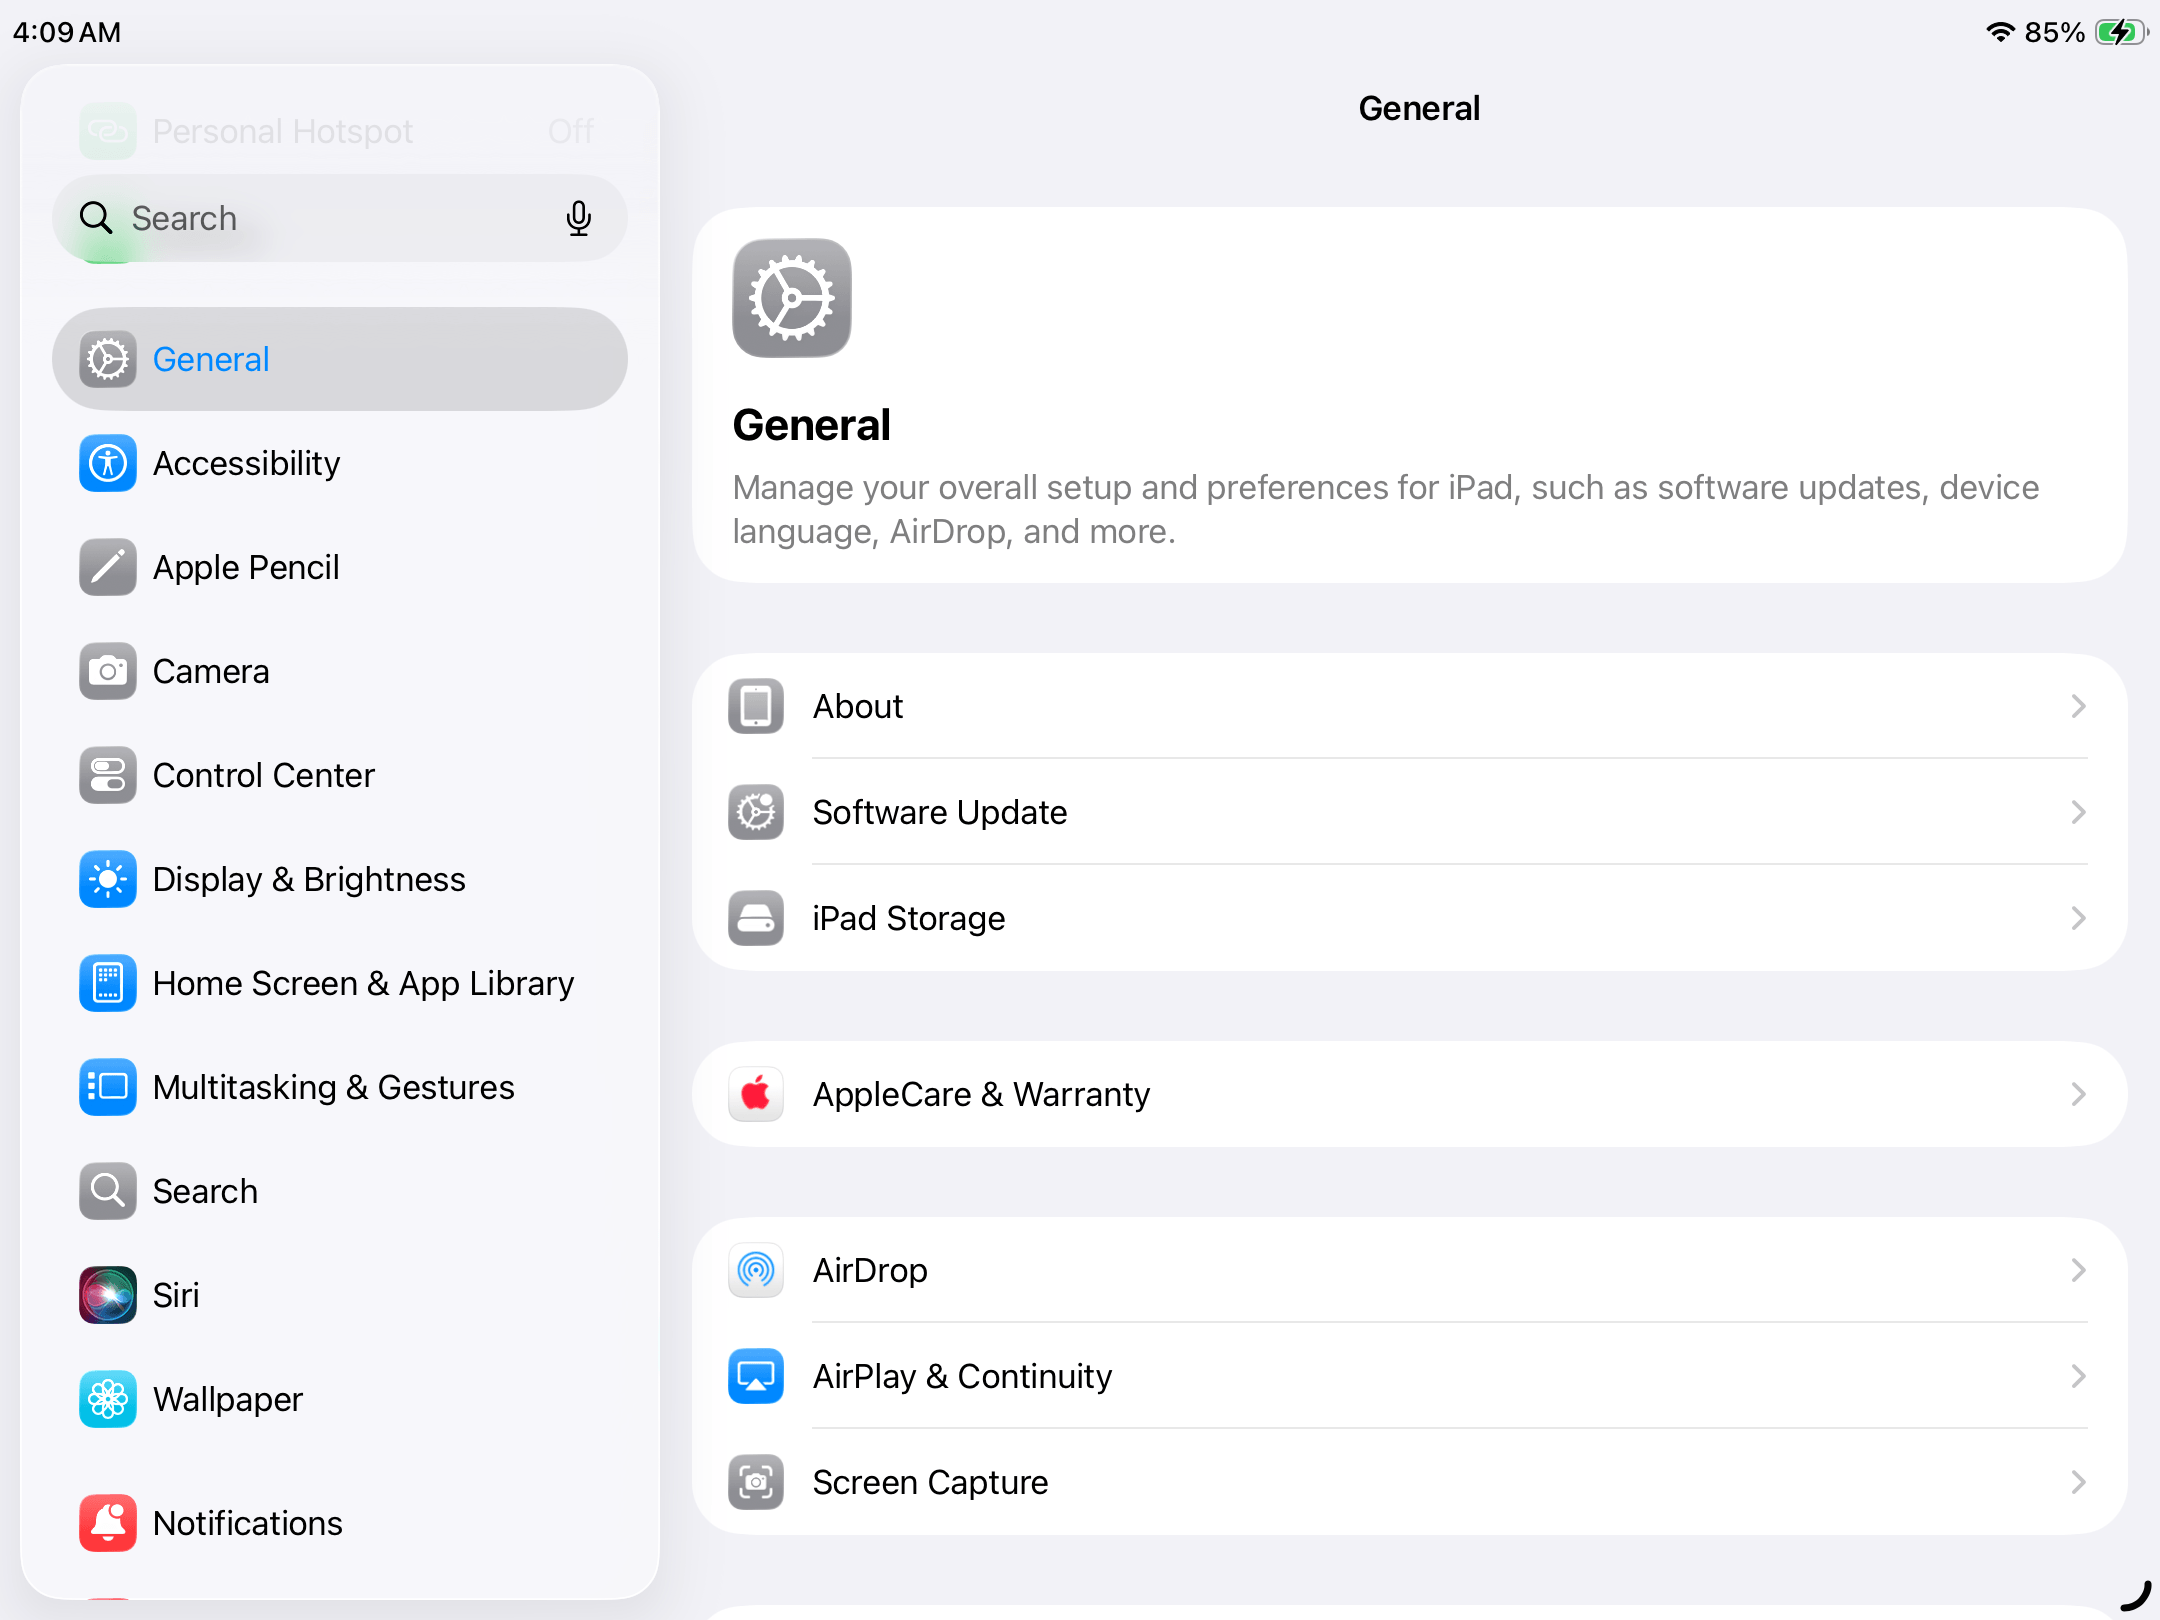
- Tap General, then select iPad Storage from the right pane.
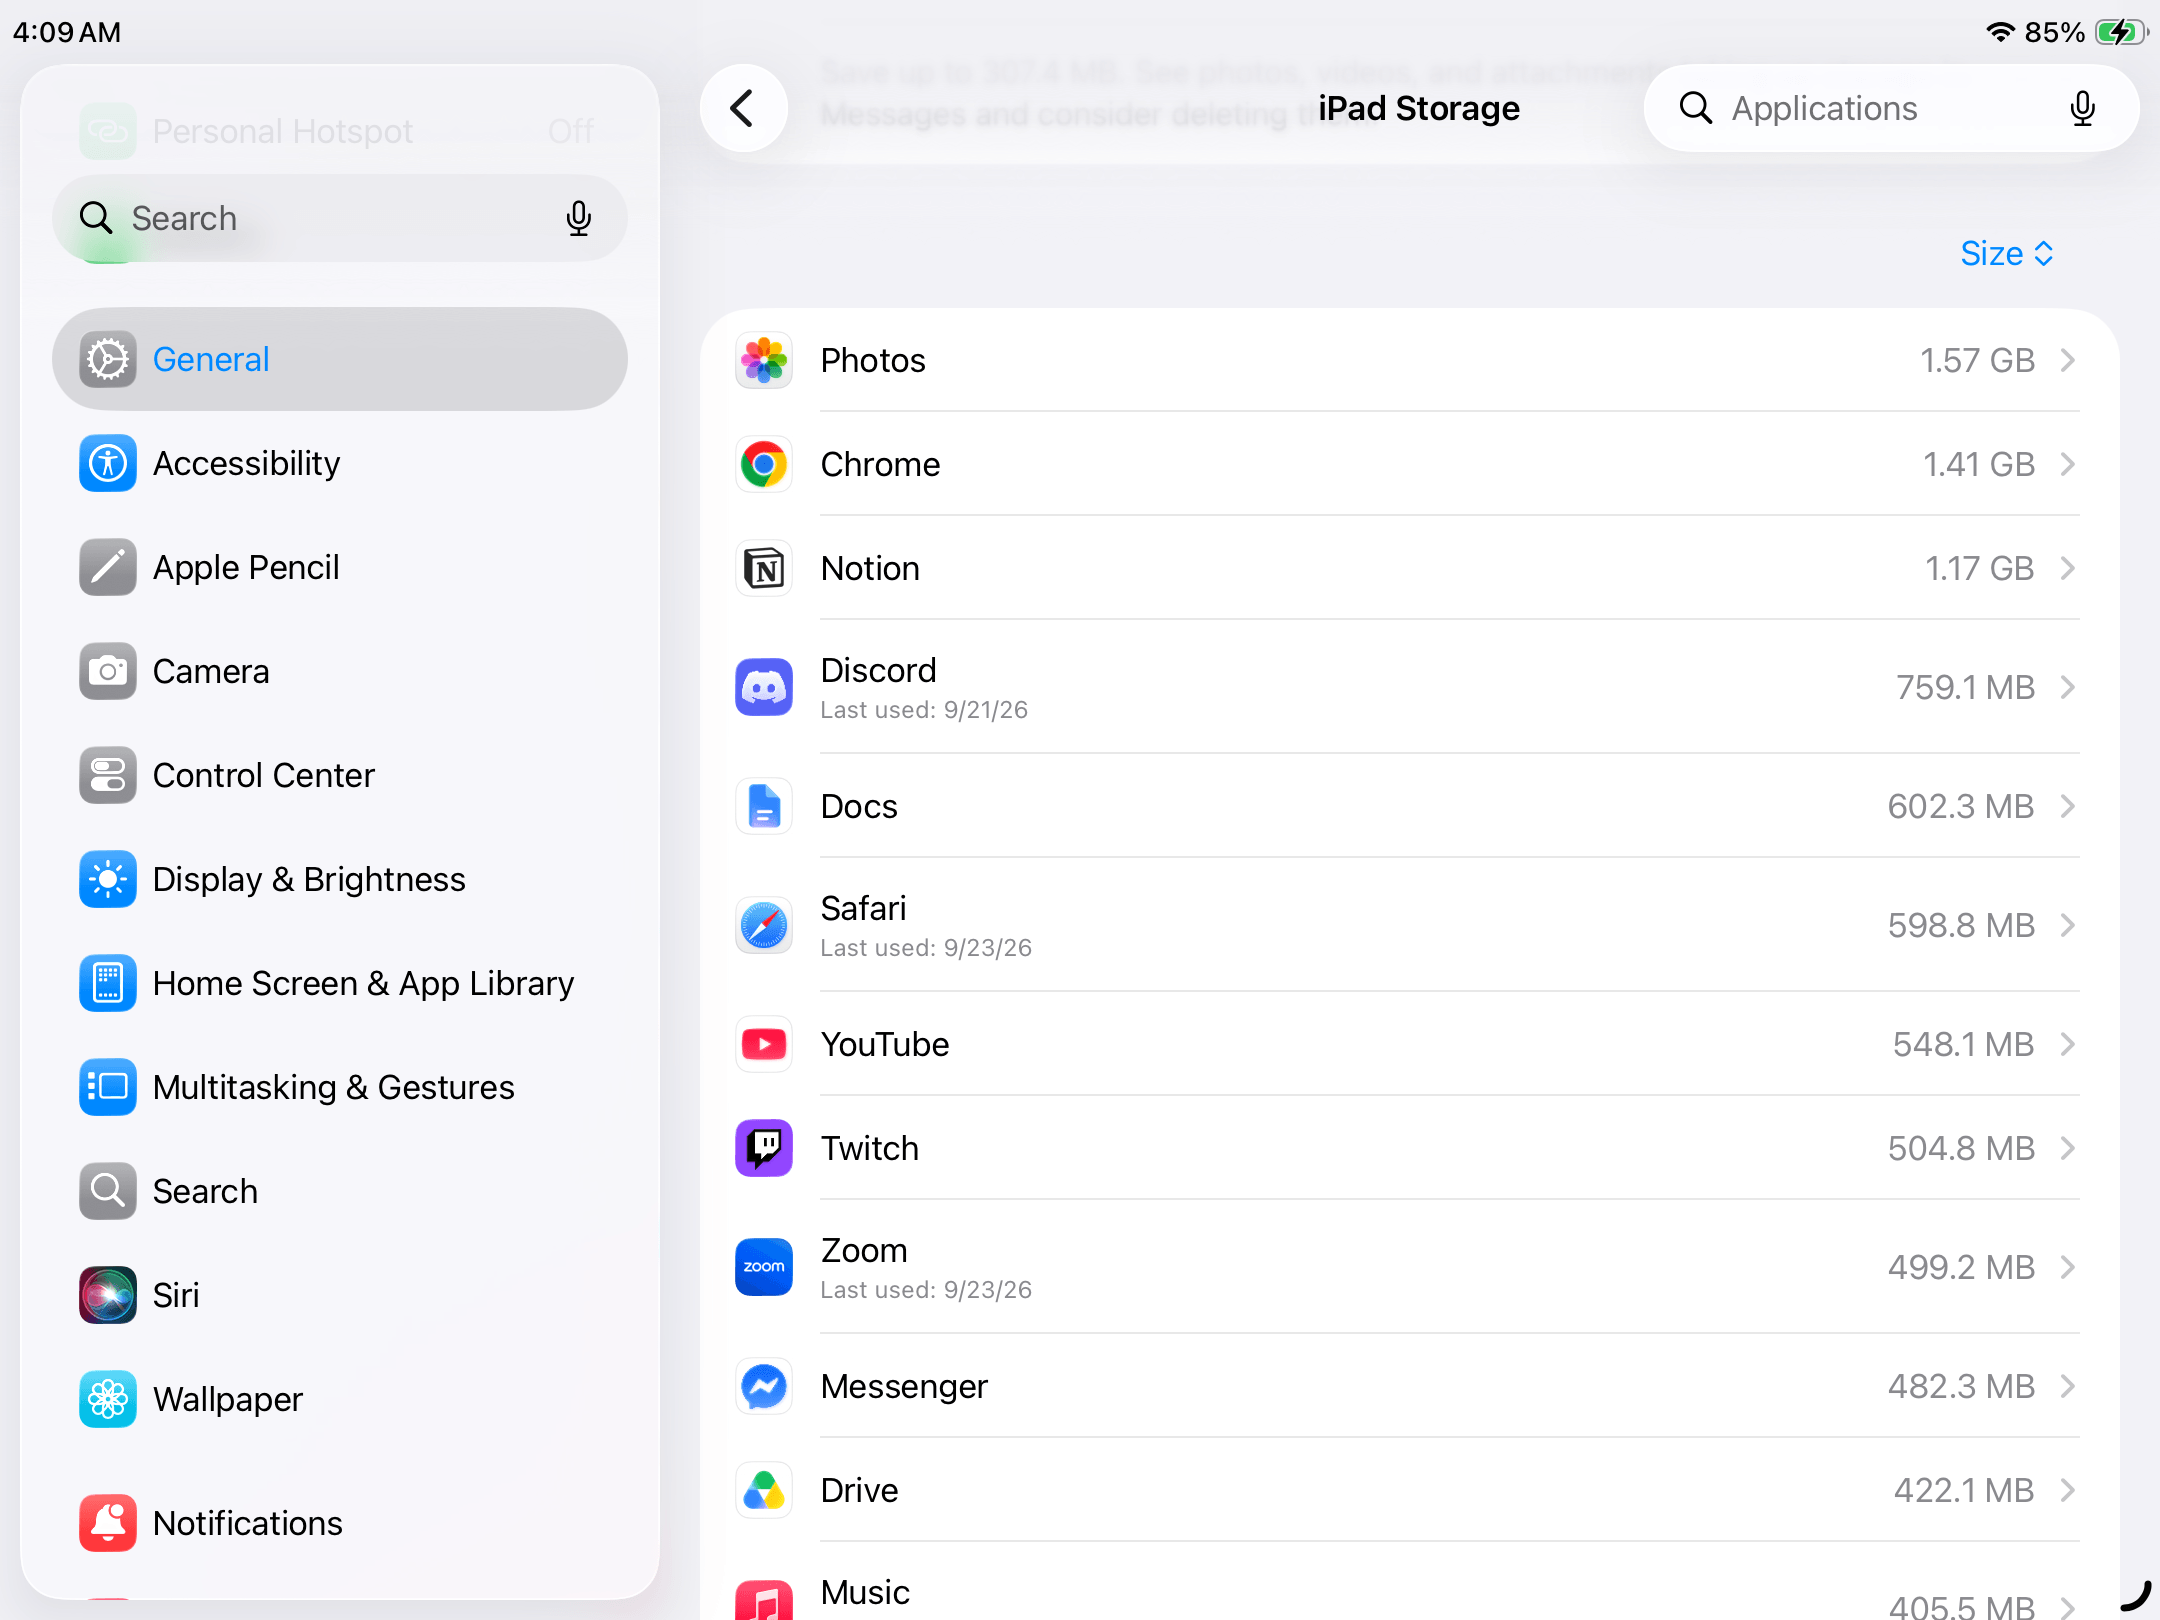
- Scroll down to your list of iPad apps, then sort them by size or date last used. Tap any app you want to delete or offload.
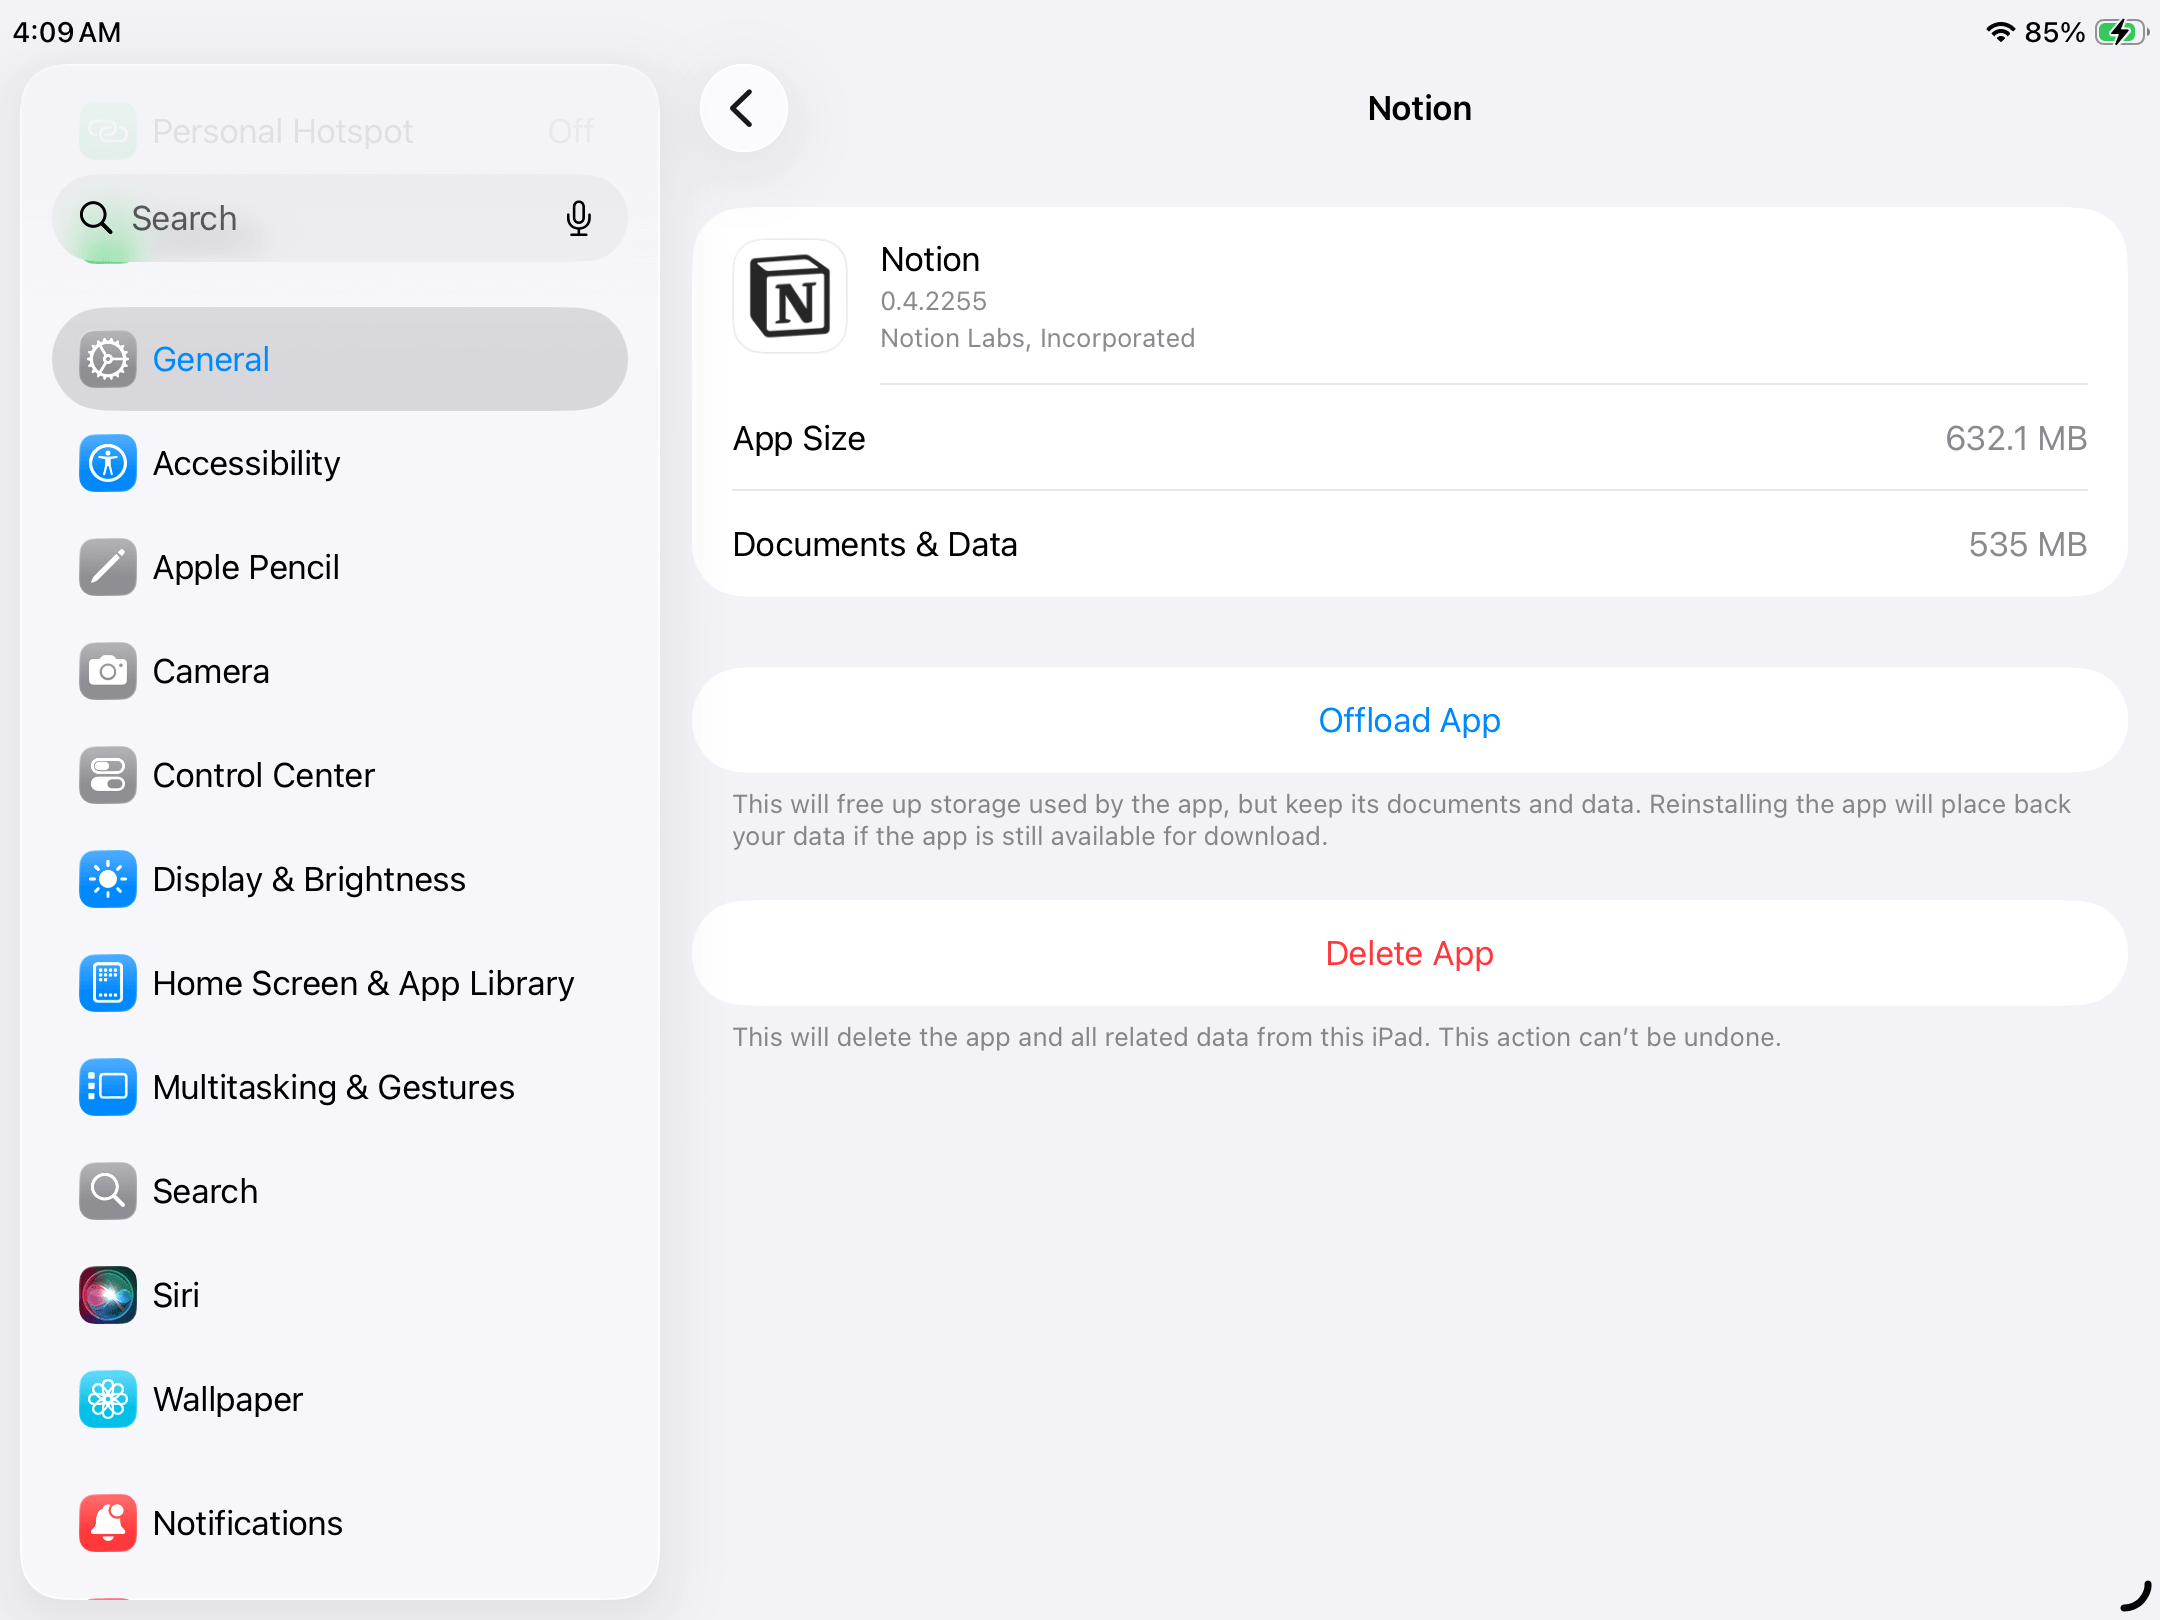
- If you want to preserve local data, tap Offload App. To uninstall an app and clear its related data, tap Delete App.
- Confirm your choice in the dialog box when prompted.
Method 2: Clean Up Your Photo Library
Did you review your iPad storage as we demonstrated before diving into the cleanup guide? If you noticed that the Photos category is taking up a lot of storage space, take it as a signal to clean up your library.
The iPad’s built-in Photos app has several tools that can help, like the Duplicates utility, media-type filters, screenshots, videos, and even manual album review. But all of these features still require you to go through your library manually.
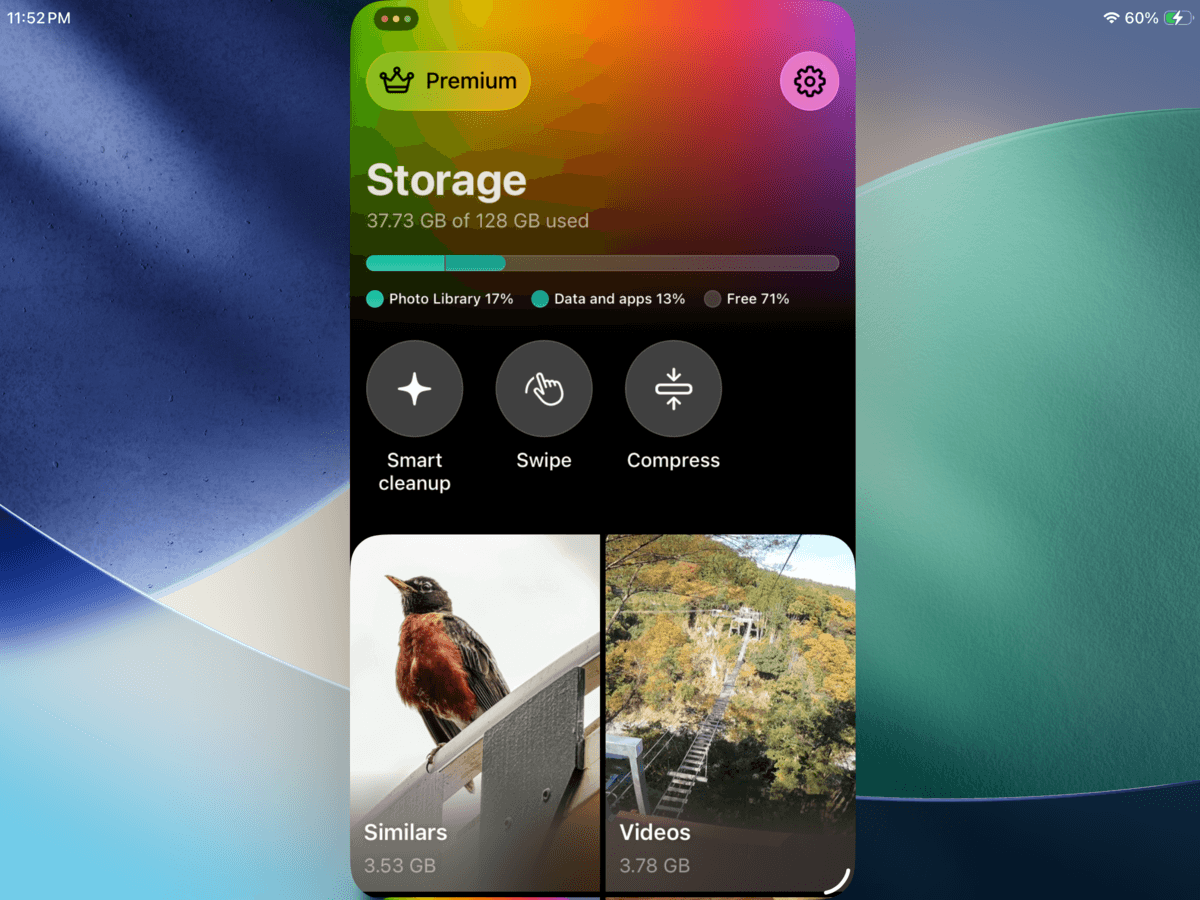
For an iPad with a few dozen, or even hundreds, of photos and videos, those can work. But if your media is in the thousands (or you just don’t feel like doing it manually), consider using a third-party cleaner from the App Store. Clever Cleaner is a good example we’ll be featuring specifically for this guide, since it’s free to download and use, and it doesn’t flood you with ads.
Here’s a high-level overview of Clever Cleaner’s capabilities:
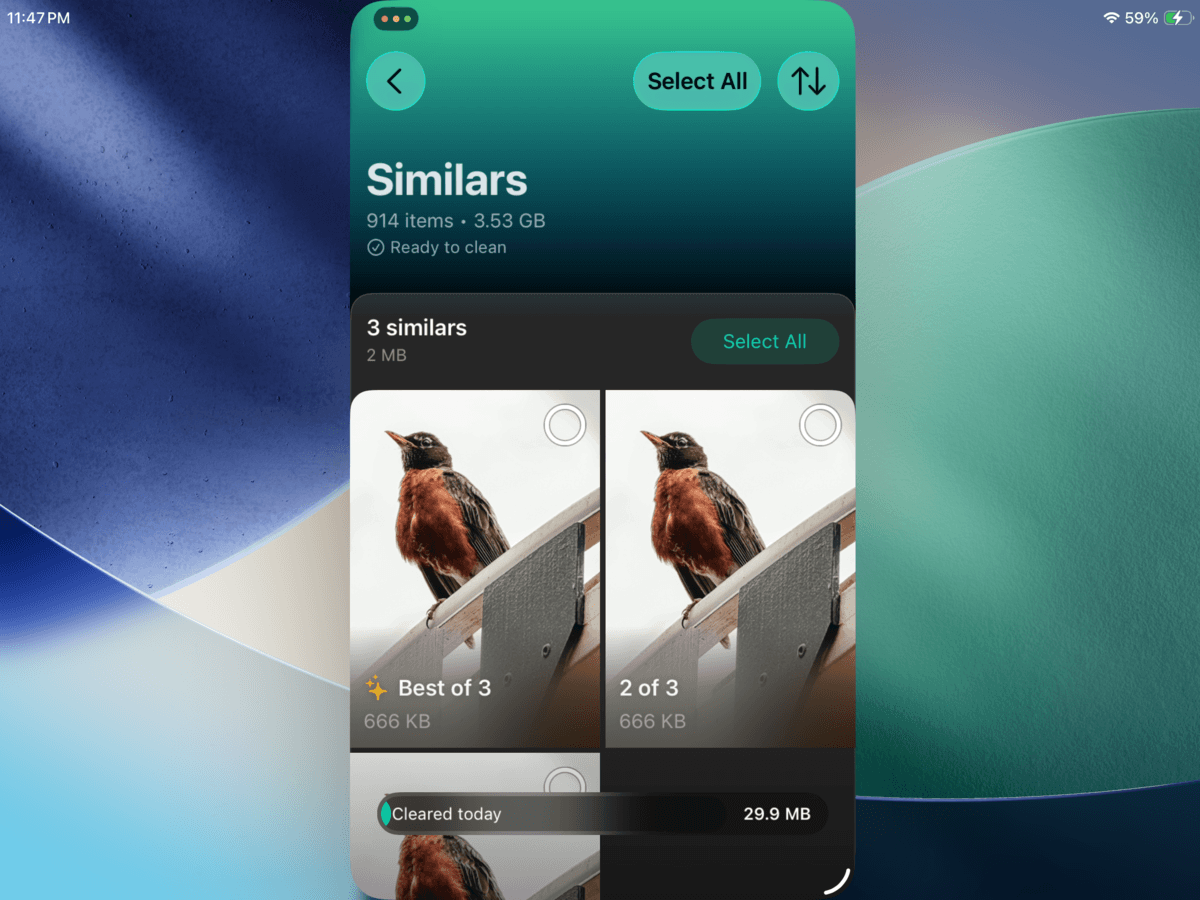
- Library cleaning tools: Clever Cleaner has several tools that can help remove “clutter” from your library. For example, the Similars feature helps you delete similar and duplicate photos (leaving behind one “best” copy).
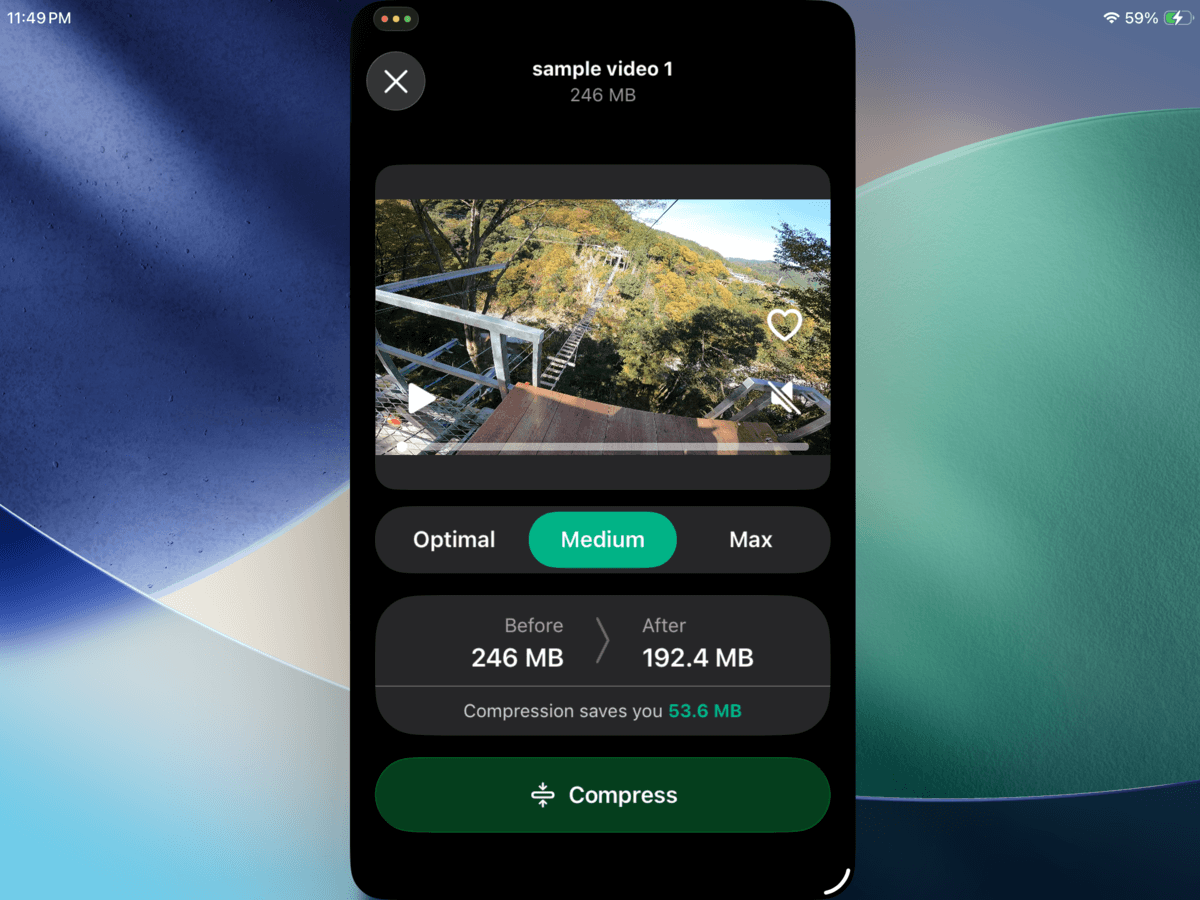
- Media compression: For photos and videos you don’t want to delete, you can compress them instead. Compression can reduce the size of media at a small to moderate cost to visual quality. Most apps can only compress videos, so this is pretty cool.
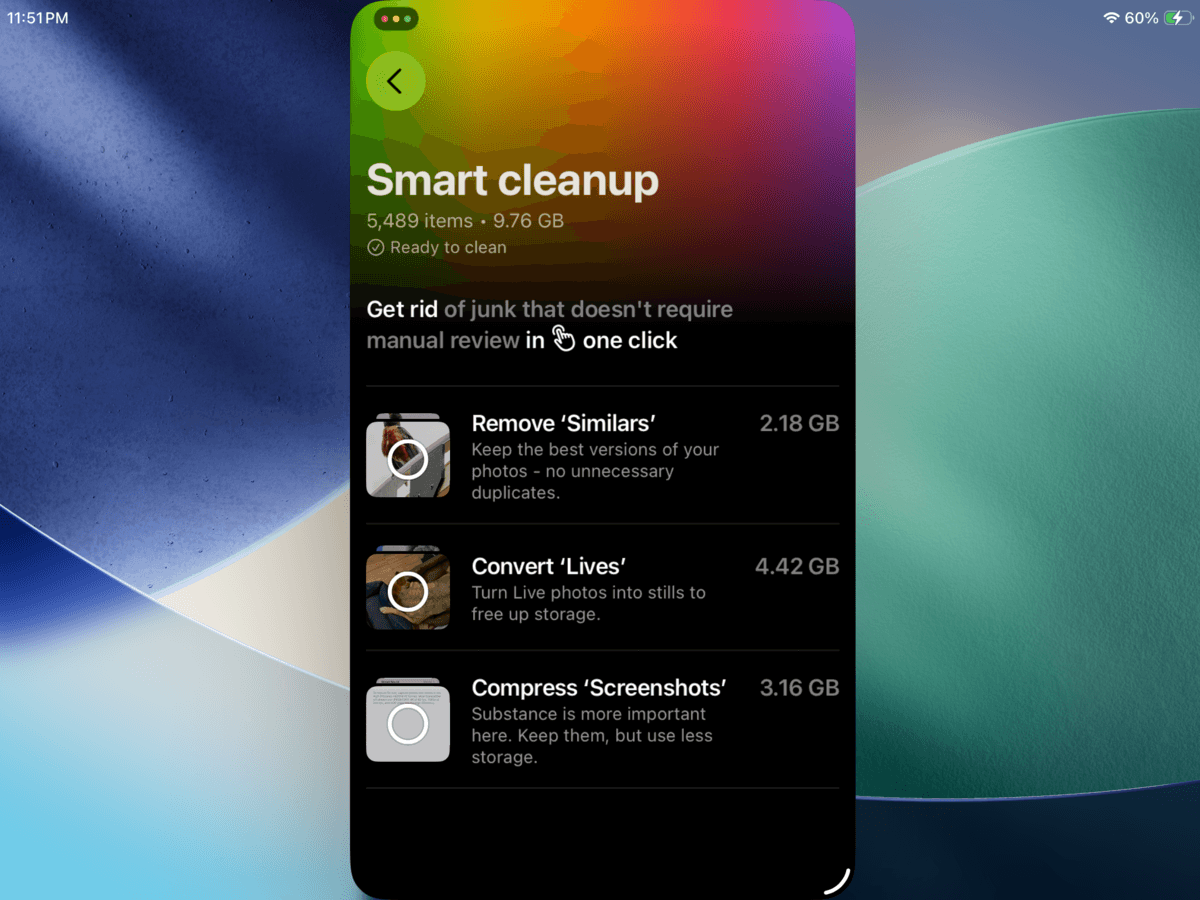
- Smart Cleanup: If you don’t want to go through your library manually, the Smart Cleanup feature simultaneously runs several cleanup operations automatically: removing all similar and duplicate photos, converting all Live Photos to still images, and compressing all screenshots.
To demonstrate exactly how this app works, we’ll use Clever Cleaner’s Similars tool on our own iPad and walk you through the process:
- Download Clever Cleaner: AI Cleanup App from the App Store.
- Run Clever Cleaner and wait for it to finish scanning your iPad. Then, tap Similars.
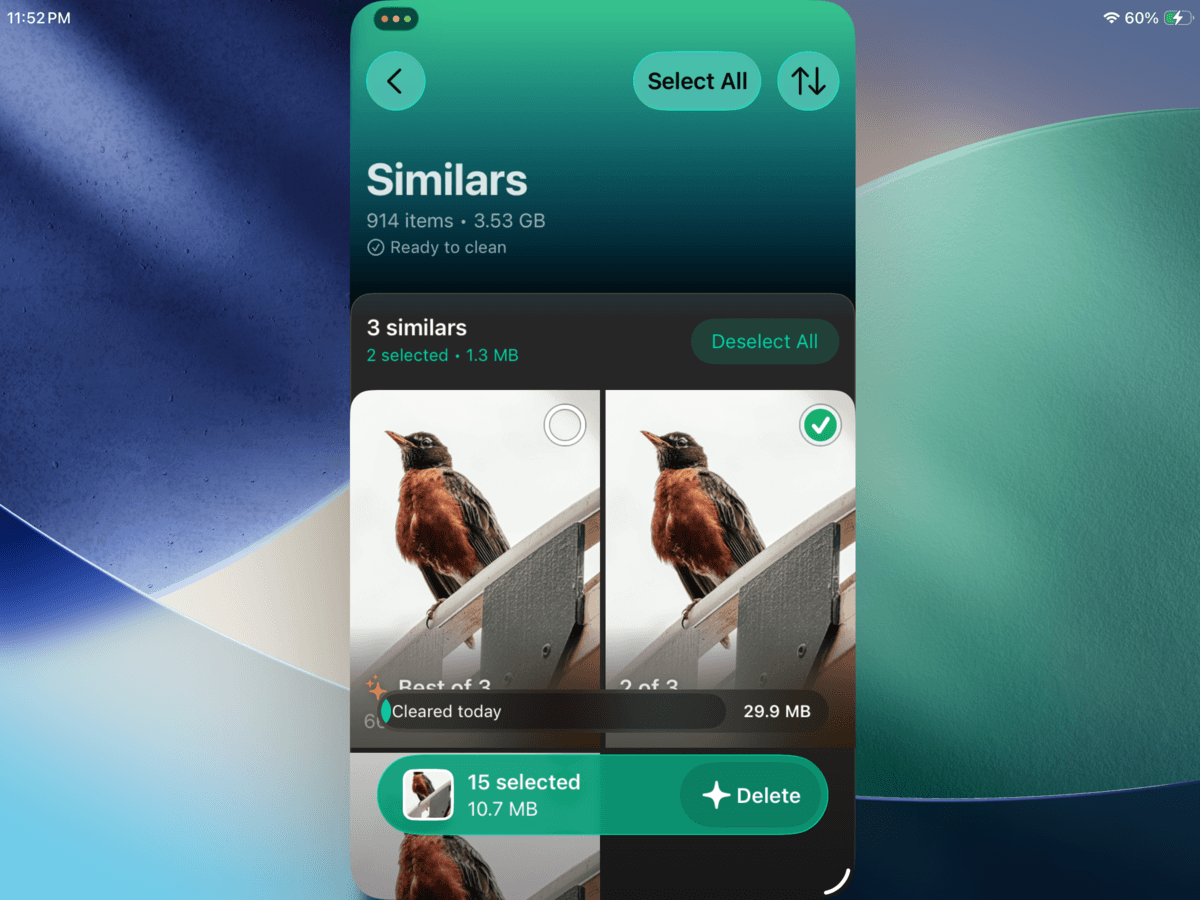
- You can manually select which photos per group you want to delete, or use the Select All button to allow Clever Cleaner to do it for you. Once you’ve made your selection, tap Delete.
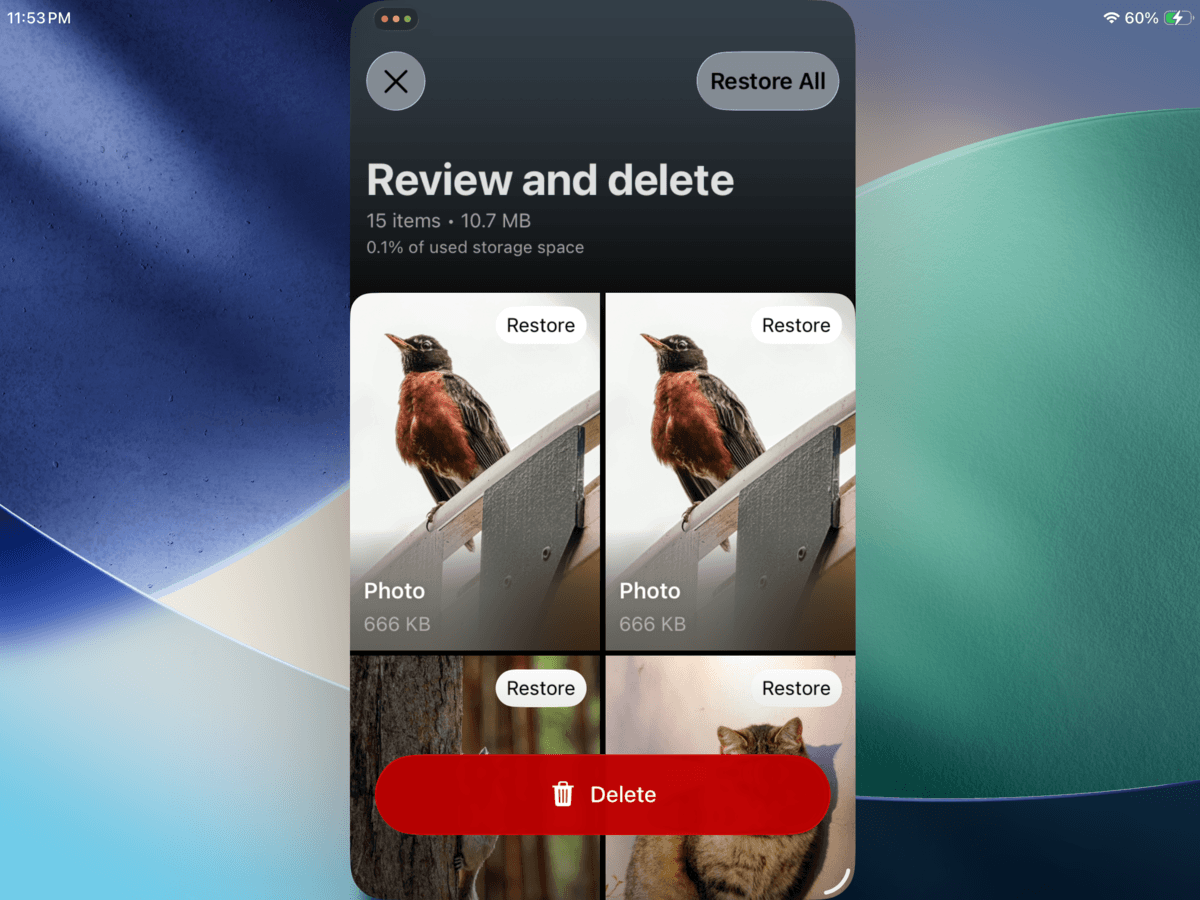
- The Review and delete page will appear. Make sure there’s nothing important, then tap the Delete button.
Method 3: Remove App Data and Cache
While Method 1 encourages you to remove apps you don’t need anymore, this method considers apps you do need but can potentially be cleaned up. Many apps bloat in size not because of their installer, but because of an overwhelming accumulation of cache data, temporary files, and other app data.
Popular examples include Telegram, WhatsApp, Lightroom, Procreate, and browsers like Safari and Chrome. Fortunately, several of these apps provide their own cache management tool in the Settings app or in their in-app settings pages. We’ll show you how it works in Lightroom.
- Open Adobe Lightroom (or any app on your iPad that you want to clean).
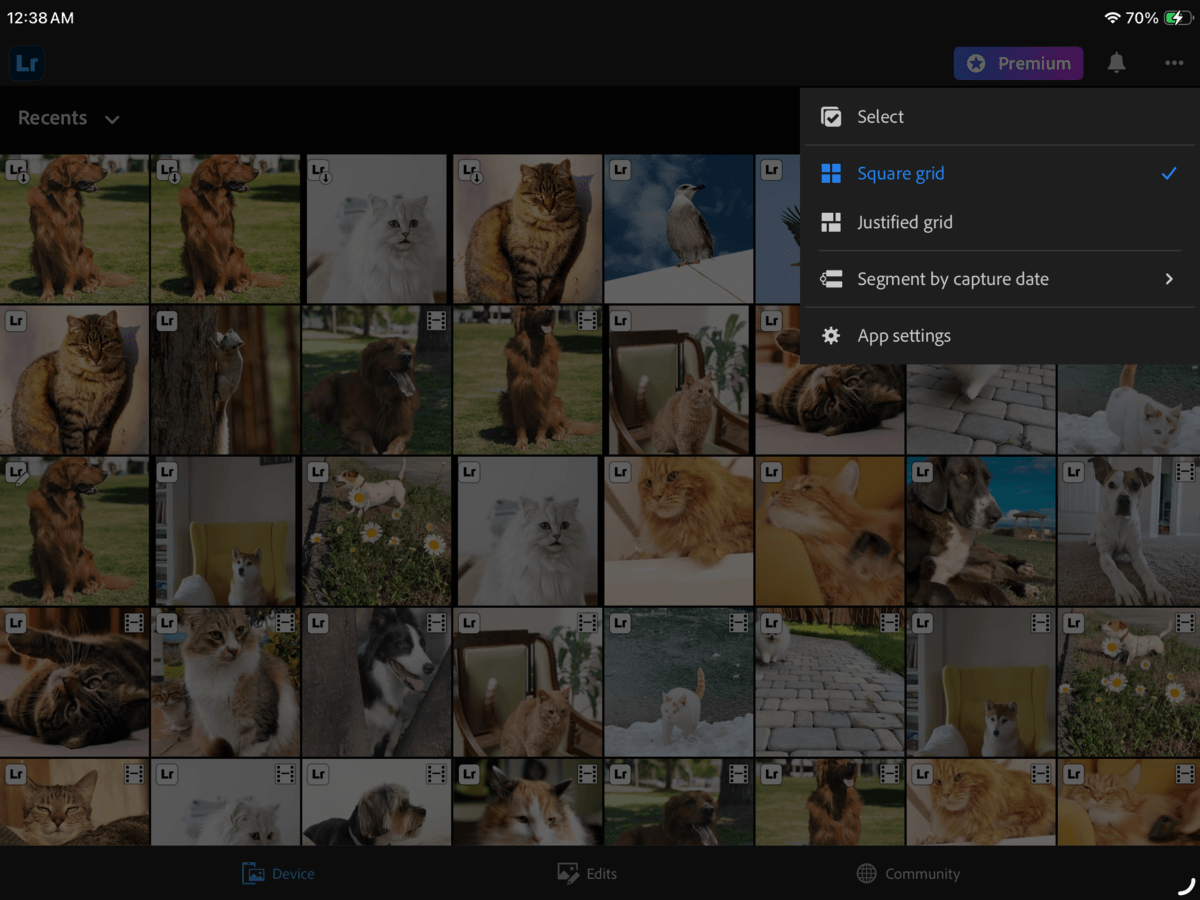
- Navigate to the main library view. Then, tap the meatball menu button ⋯ in the top right corner of the screen.
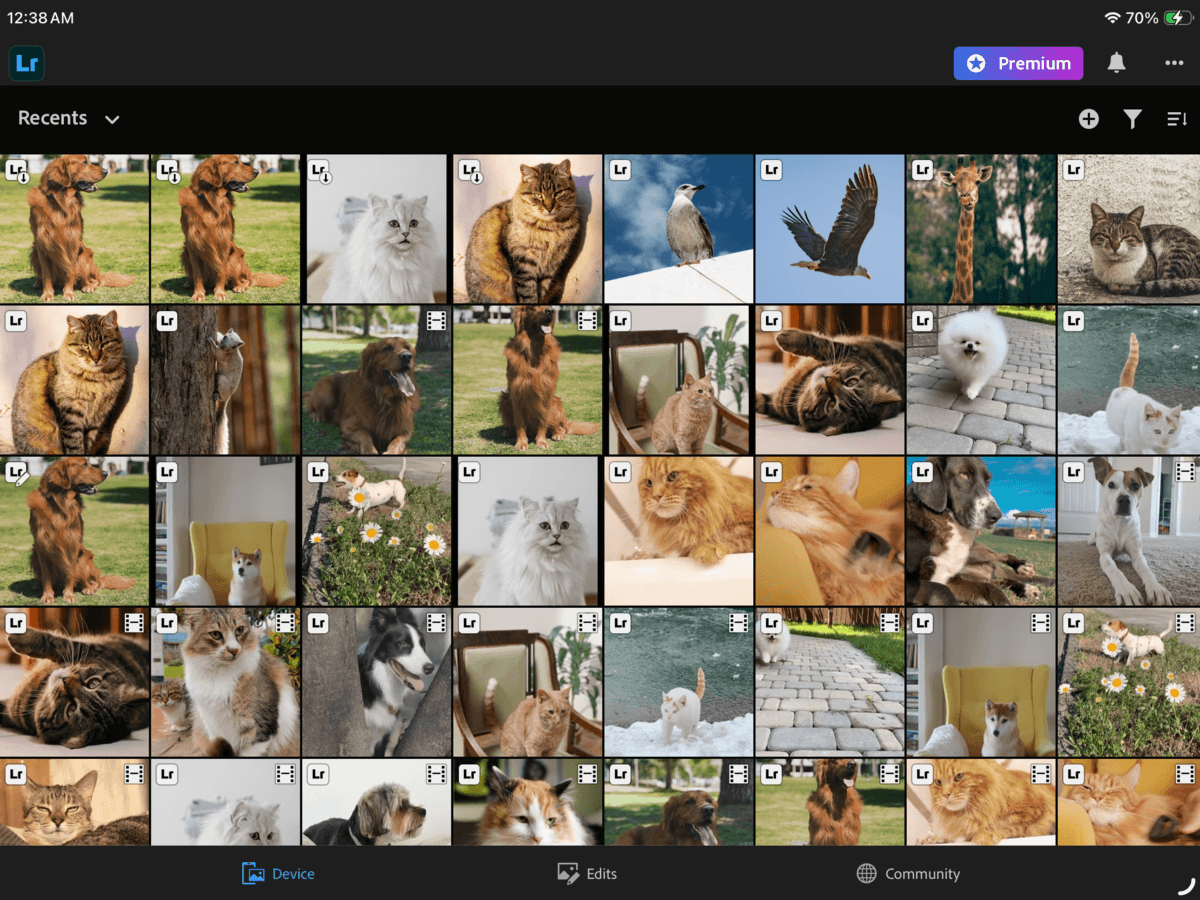
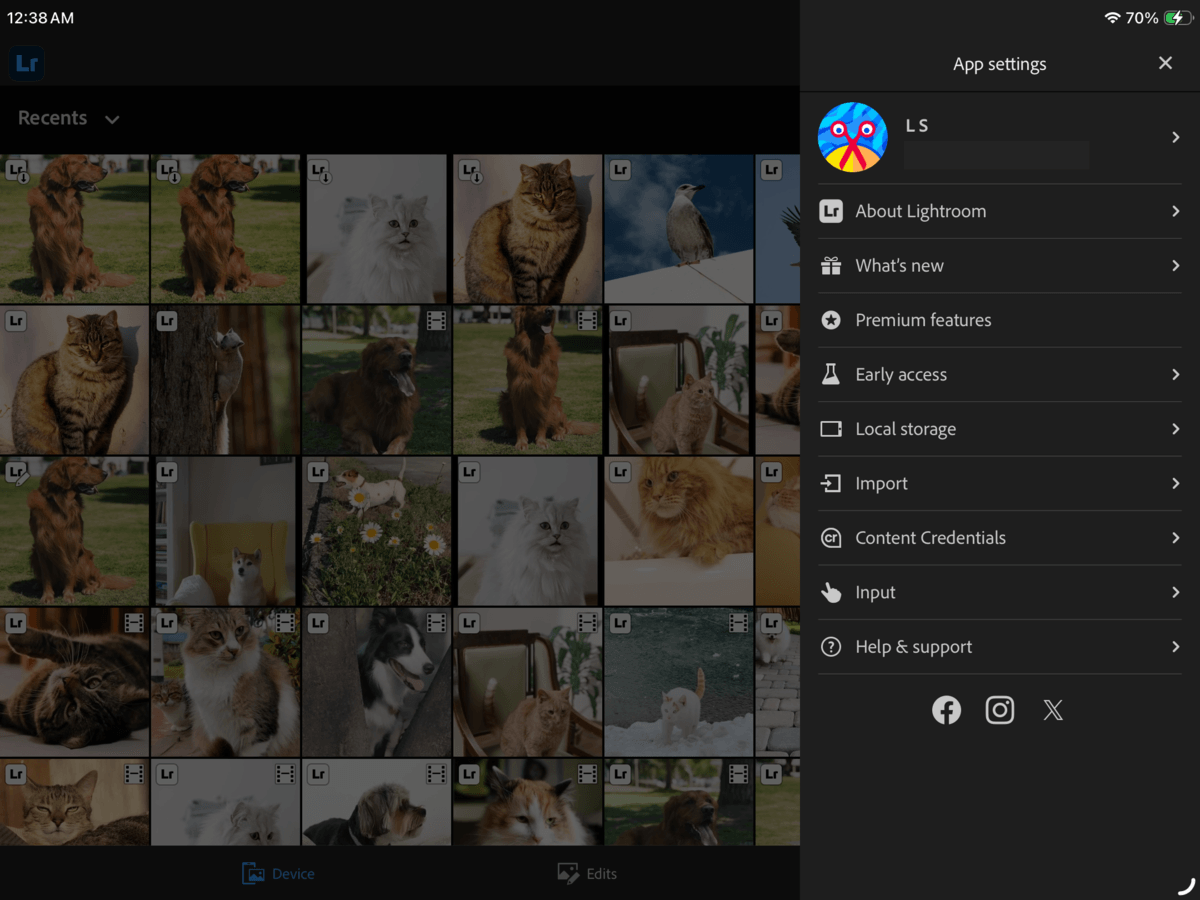
- Select App settings.
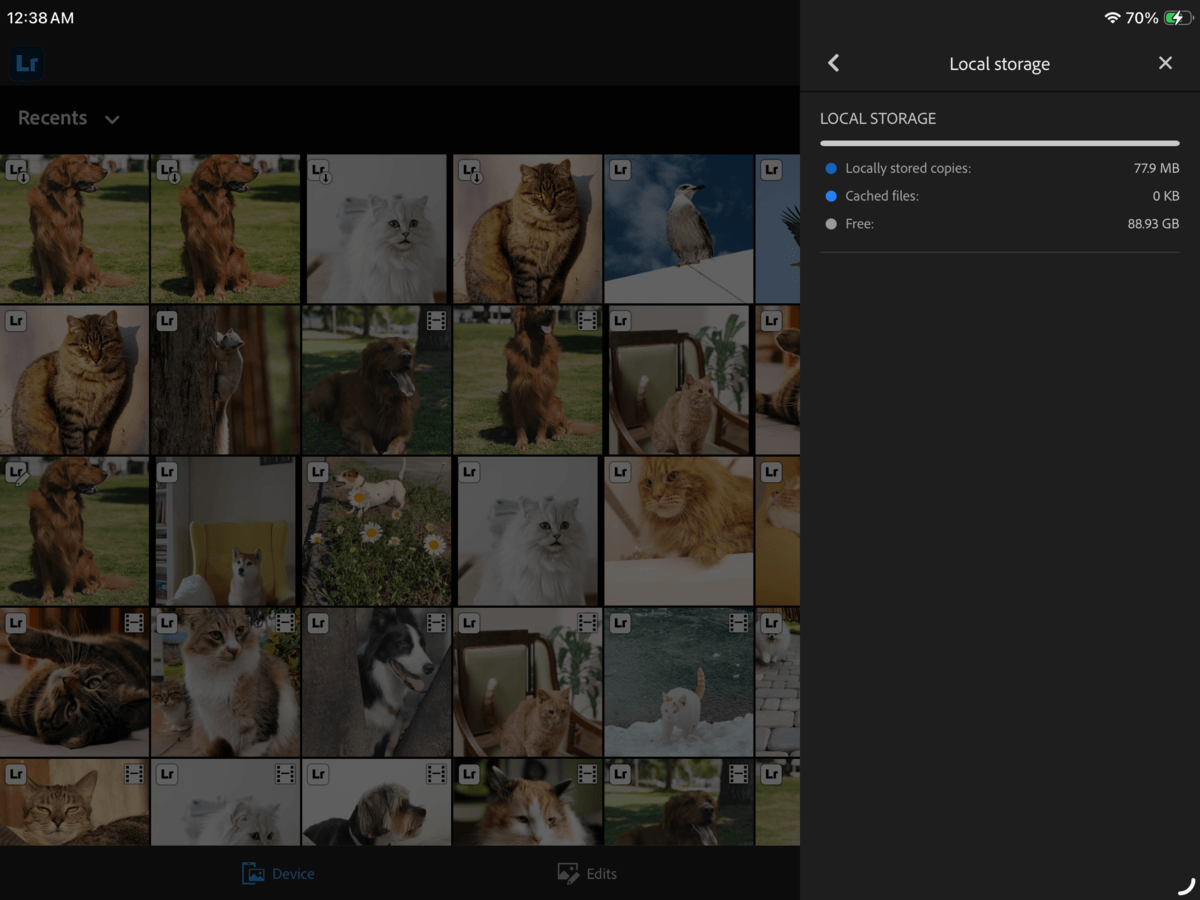
- Choose Local Storage.
- Finally, tap Clear Cache.
Method 4: Reduce YouTube Storage on iPad
YouTube has its own method in this guide, because a lot of users end up with a bloated YouTube app consuming gigabytes of storage space (way more than when it was first installed). This almost always occurs if you have a YouTube Premium subscription or trial activated, which gives you the ability to download videos (that get locally stored on your iPad).
Maybe you accidentally tapped the Download button, or you knowingly downloaded a bunch of videos and forgot. Either way, we’ll show you how to remove individual downloads, as well as a convenient method to remove all downloads at once.
To delete individual downloads:
- Open the YouTube app.
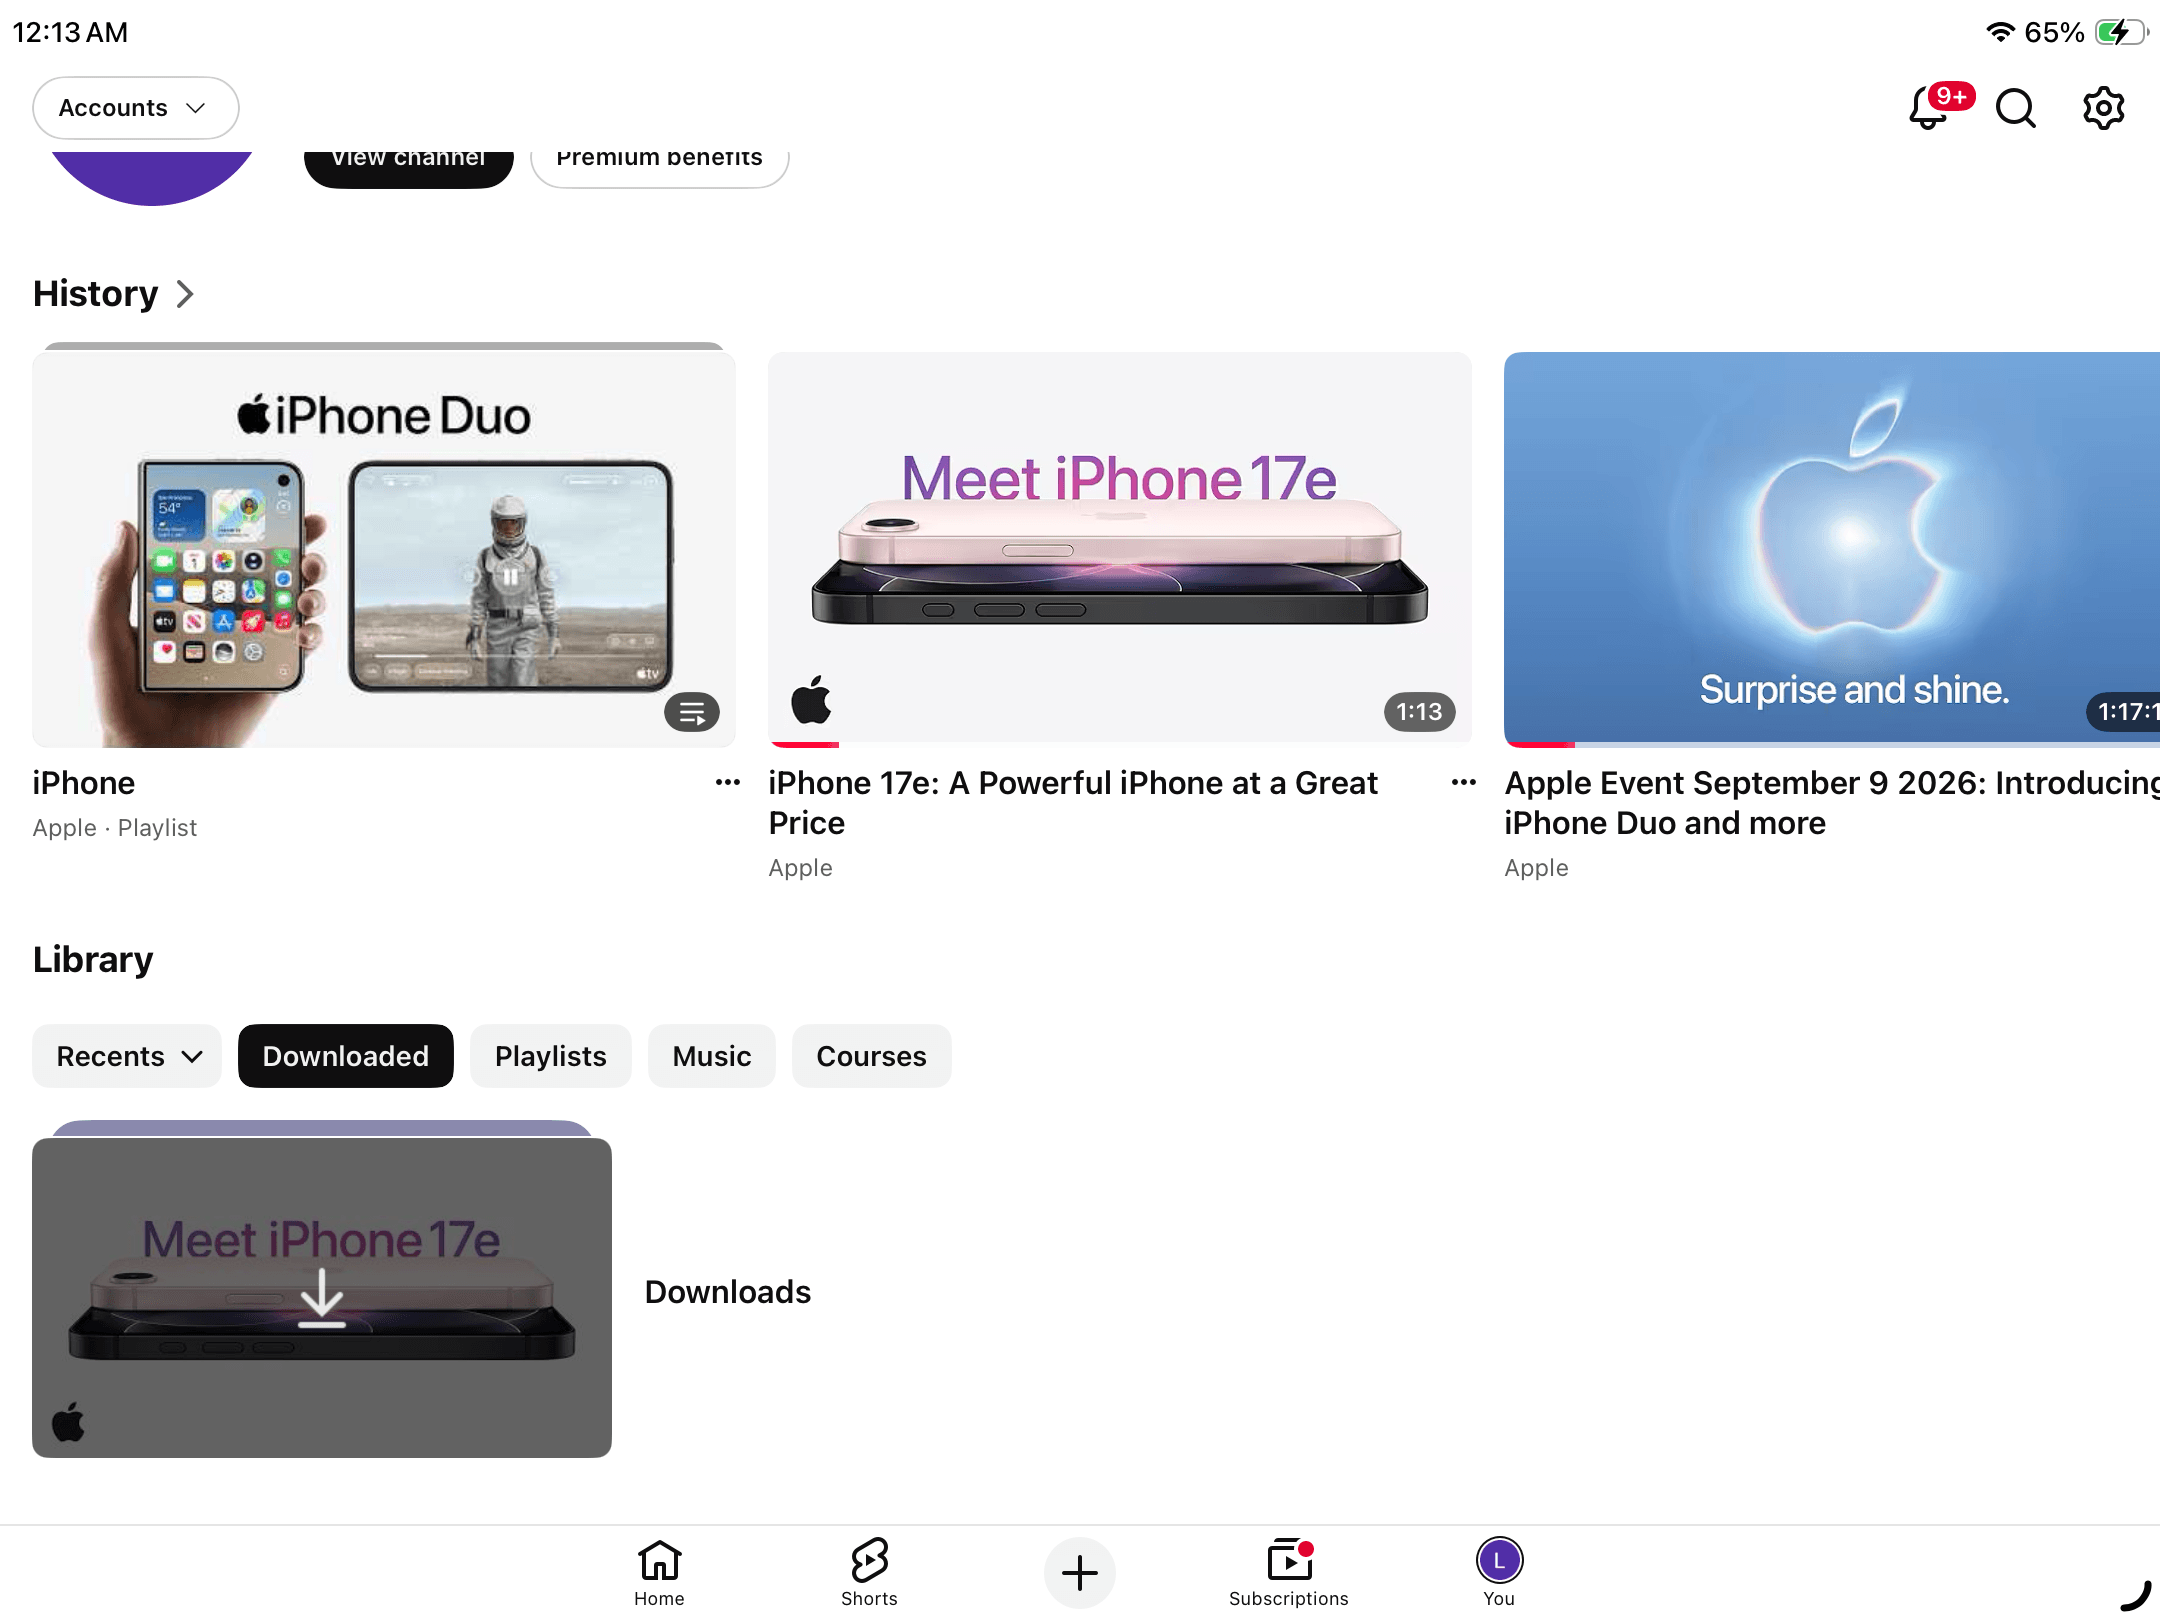
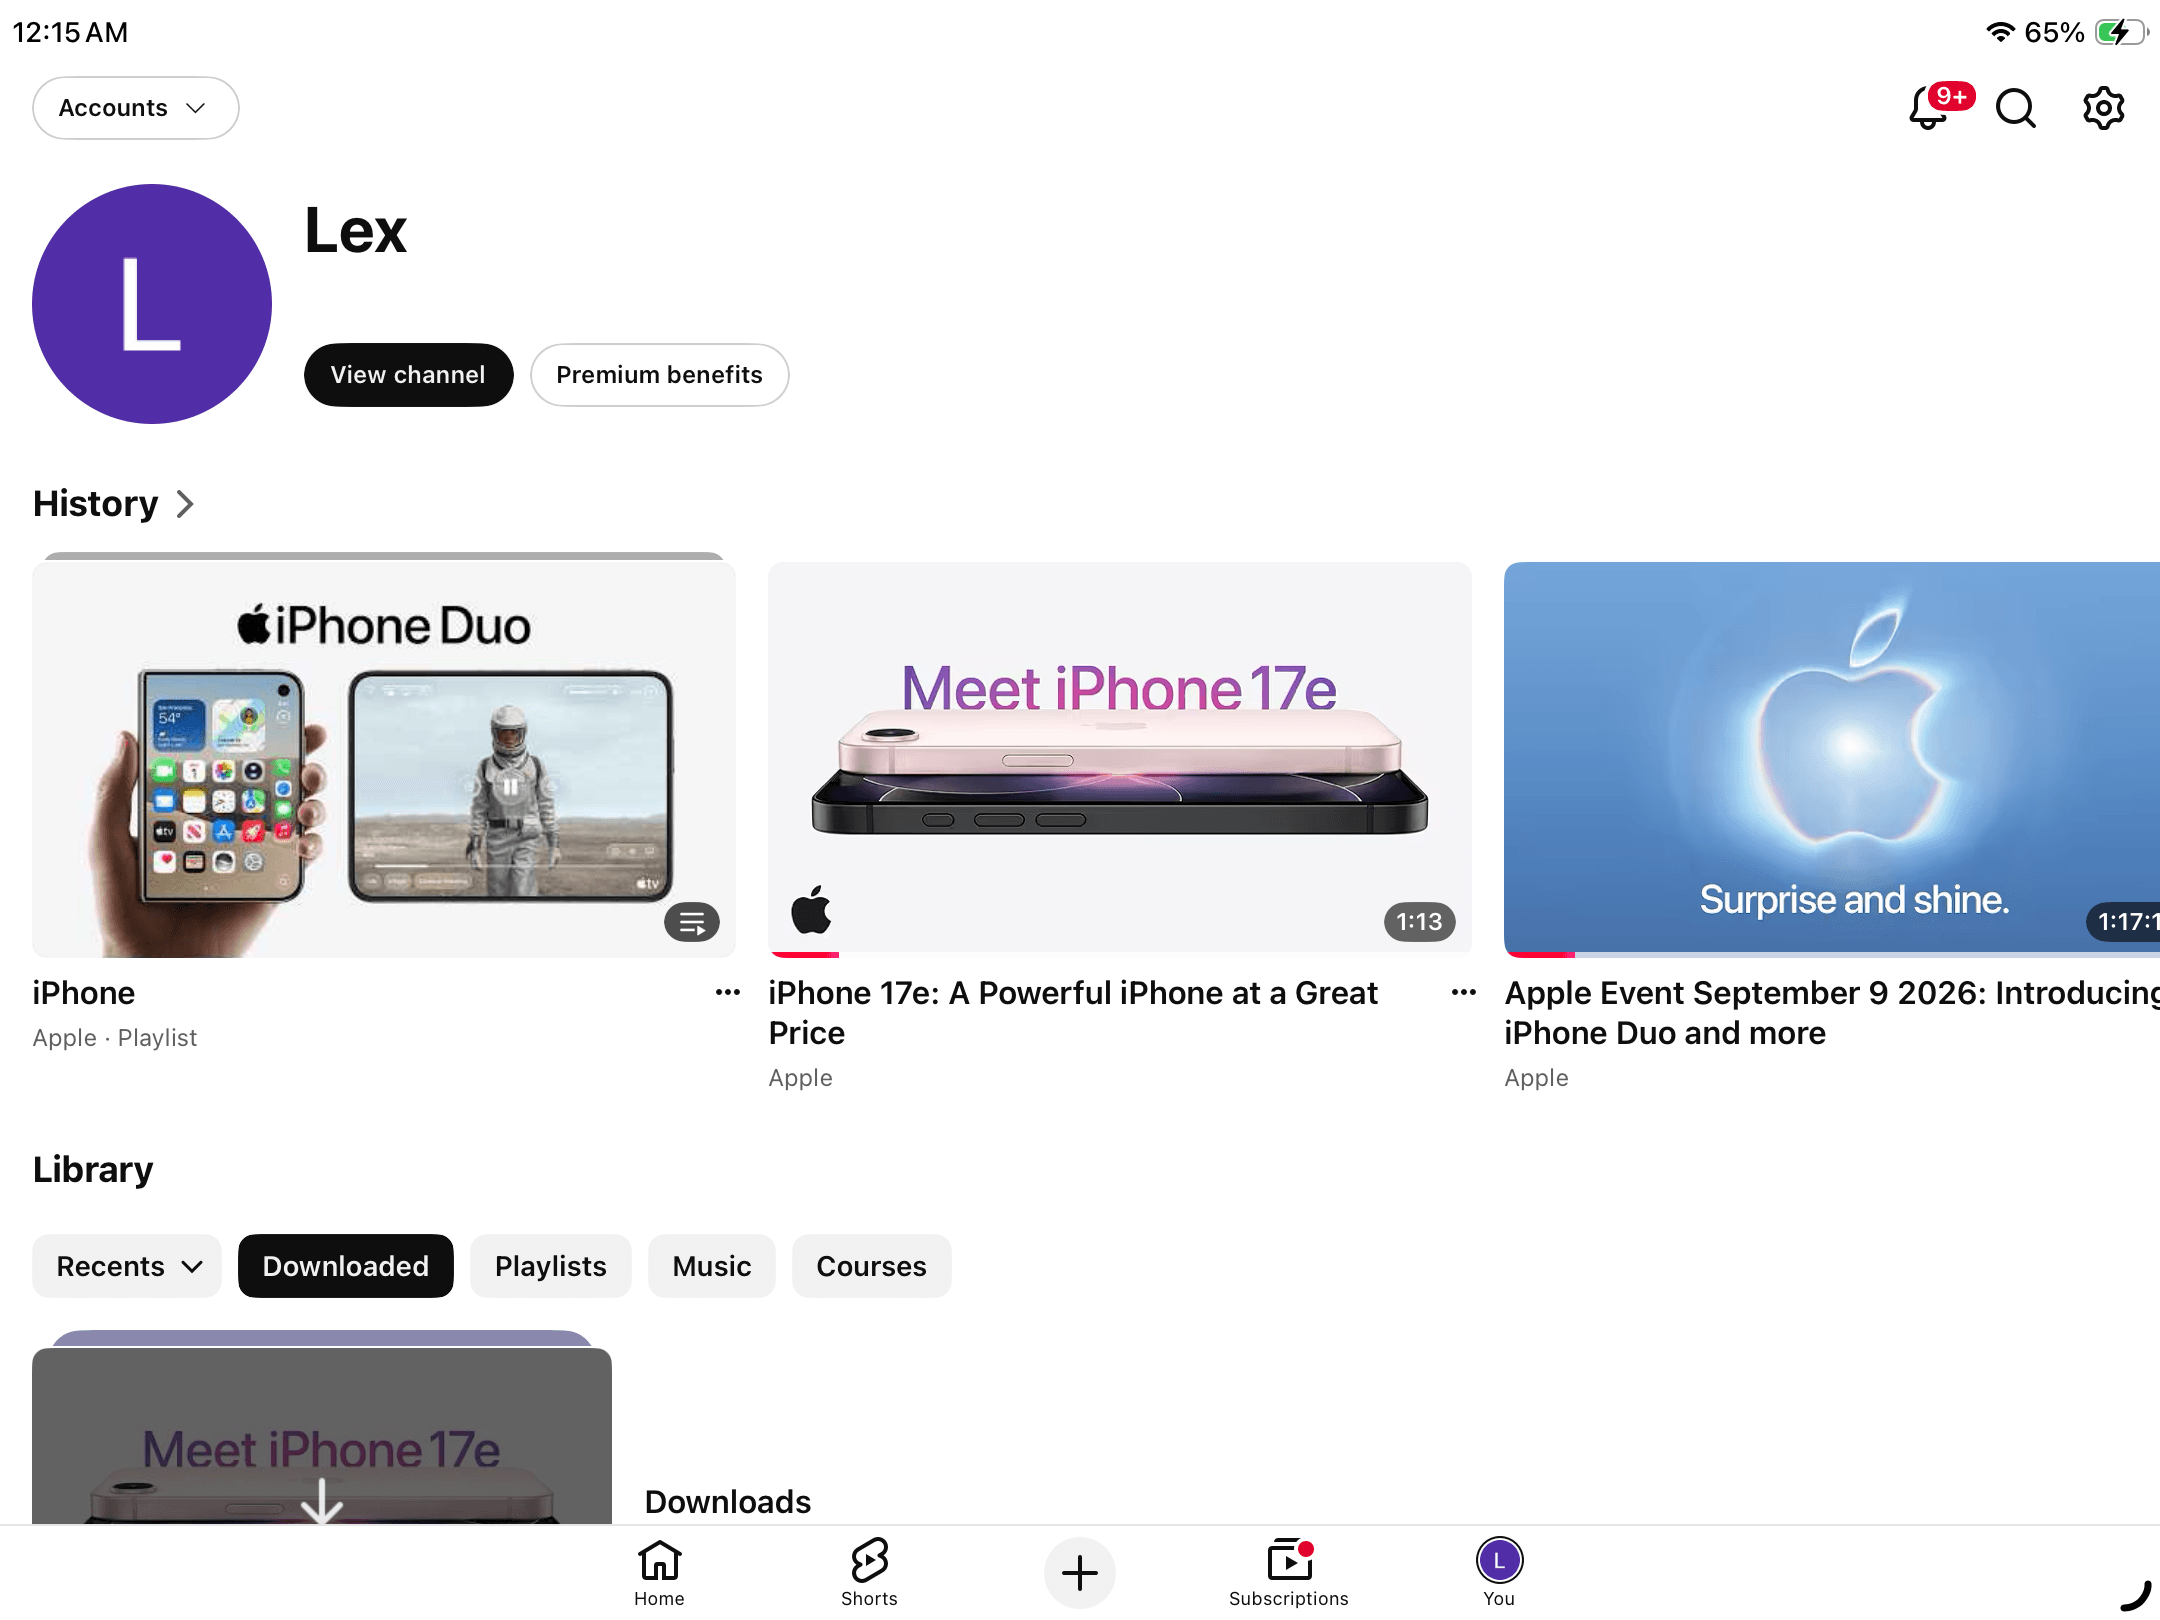
- Tap the You button from the bottom menu. Then, scroll down to the Library section and select the Downloads category. A stack of your downloaded content will appear–tap it.
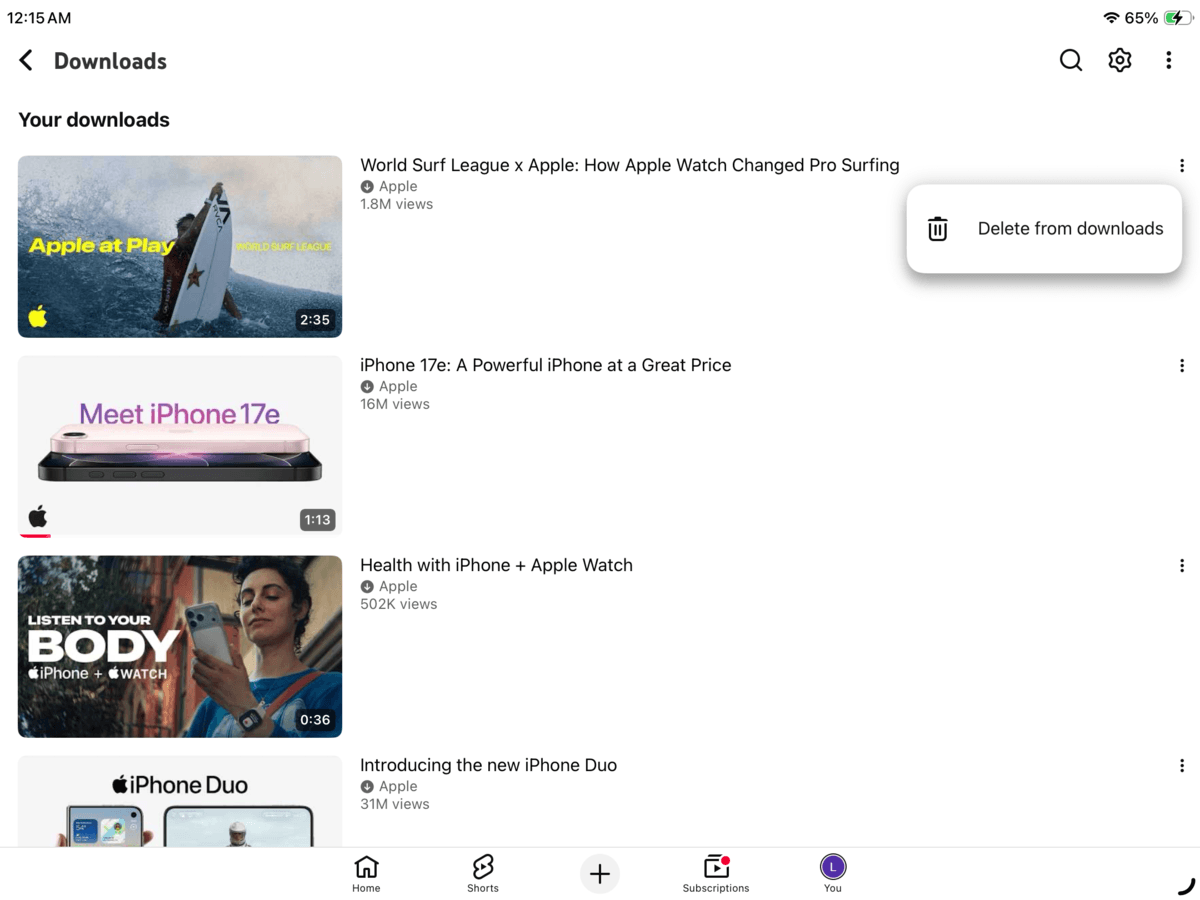
- Beside each downloaded video you want to delete, tap the meatball menu button ⋯.
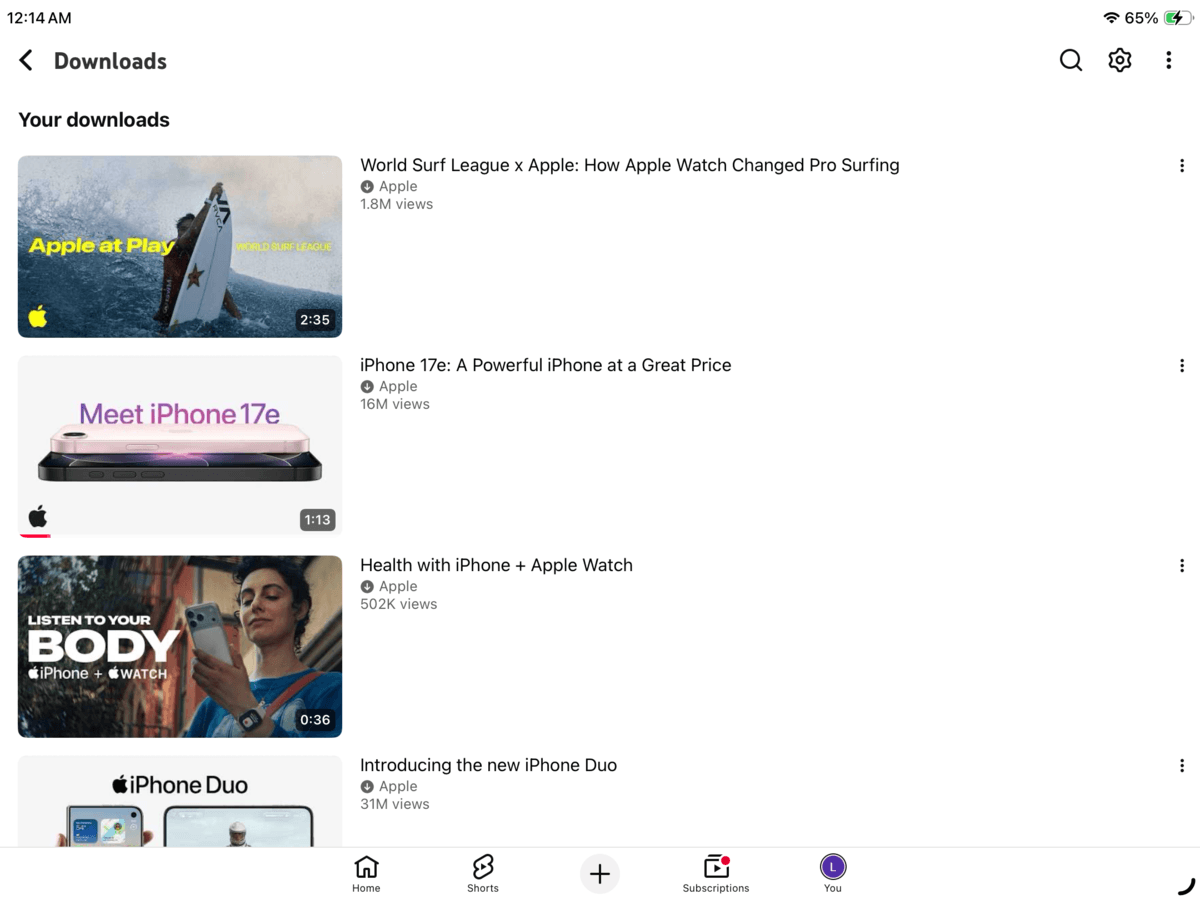
- In the pop-up menu that appears, select Delete from downloads.
To remove all downloaded YouTube videos at once:
- Open the YouTube app.
- Tap the You button from the bottom menu. Then, tap the gear icon ⚙️ in the top right corner of the screen to open YouTube’s settings page.
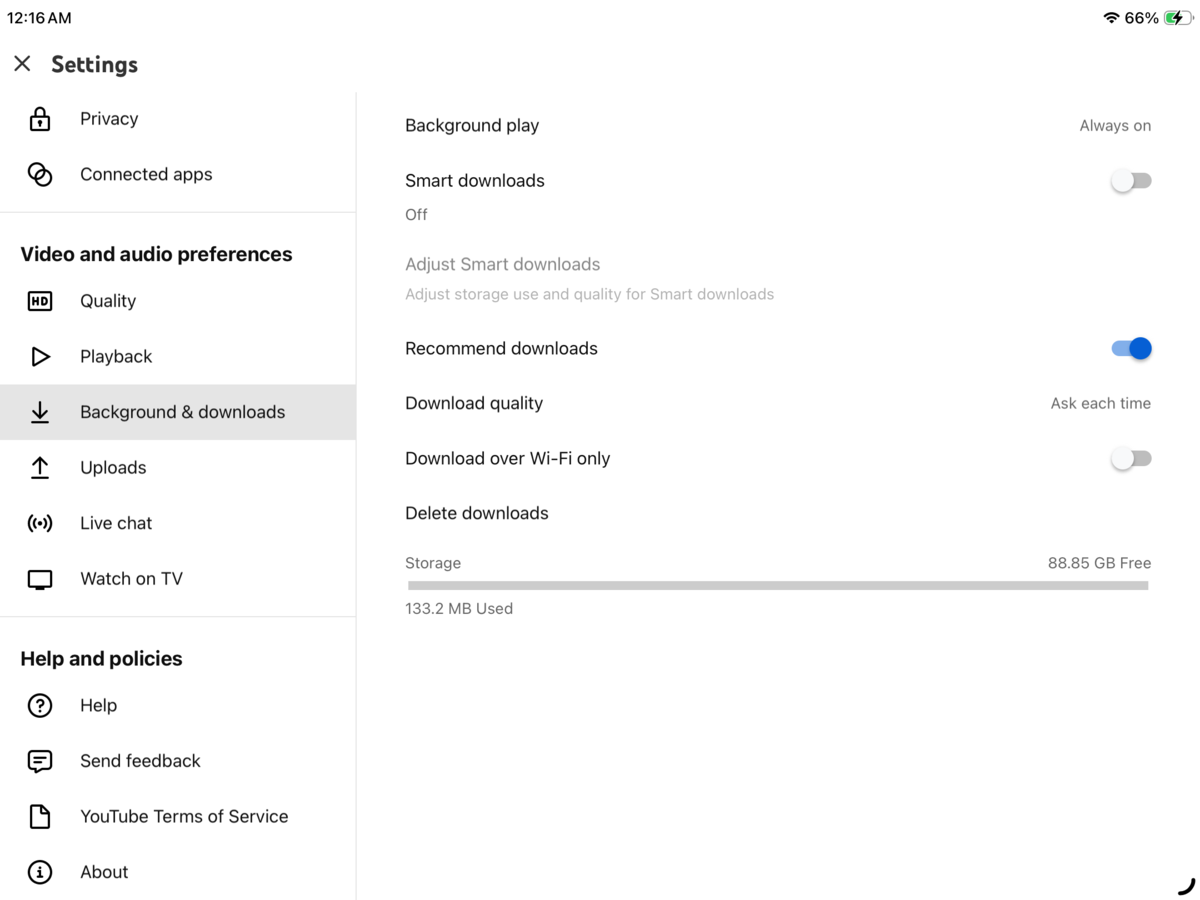
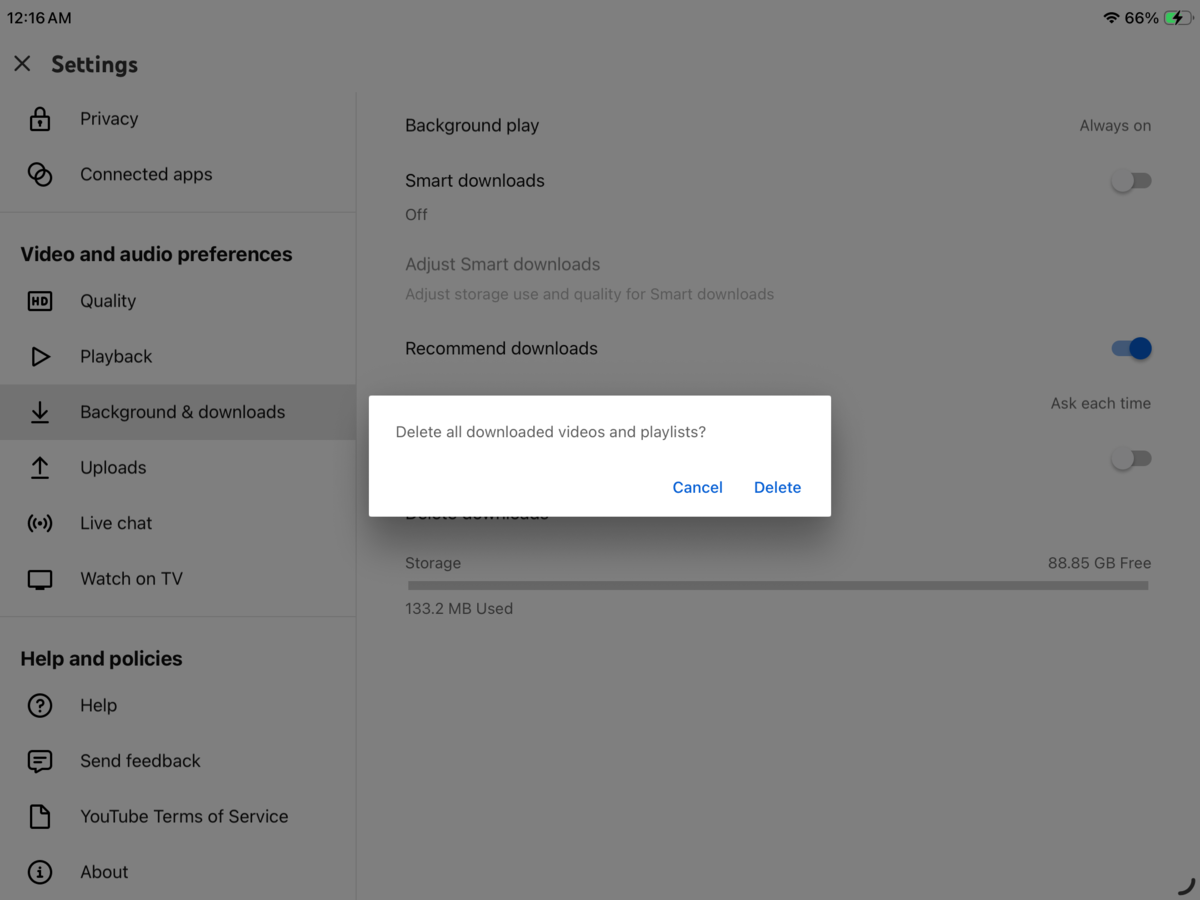
- Scroll down to the Video and audio preferences section, then select Background & downloads. Tap Delete downloads.
- In the pop-up dialog that appears, tap Delete to confirm the action.
Method 5: Delete Large Messages and Attachments
The issue of messages taking up space on iPad is usually attributed to attachments. The Messages app can build up a large amount of local data when conversations contain photos, videos, GIFs, voice messages, and other multimedia files.
We’ll show you the most direct way to remove downloaded attachments from specific conversations, which is especially useful if you already have an idea where most of the attachments are coming from.
- Open the Messages app.
- Find and open the conversation with the attachments you want to delete. Then, tap your contact’s profile icon right above your messages.
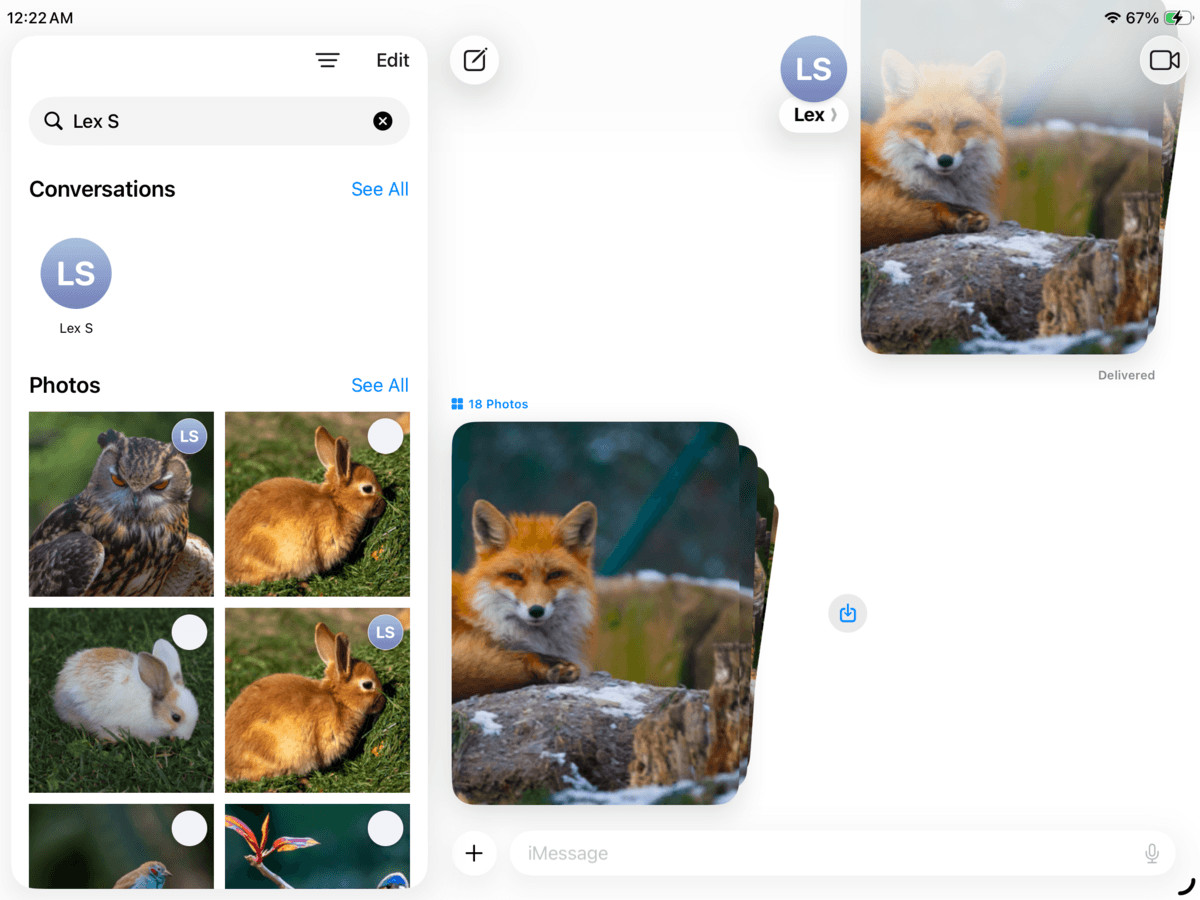
- On your contact’s page, tap the Photos category. Then, tap Edit in the top right corner of the screen.
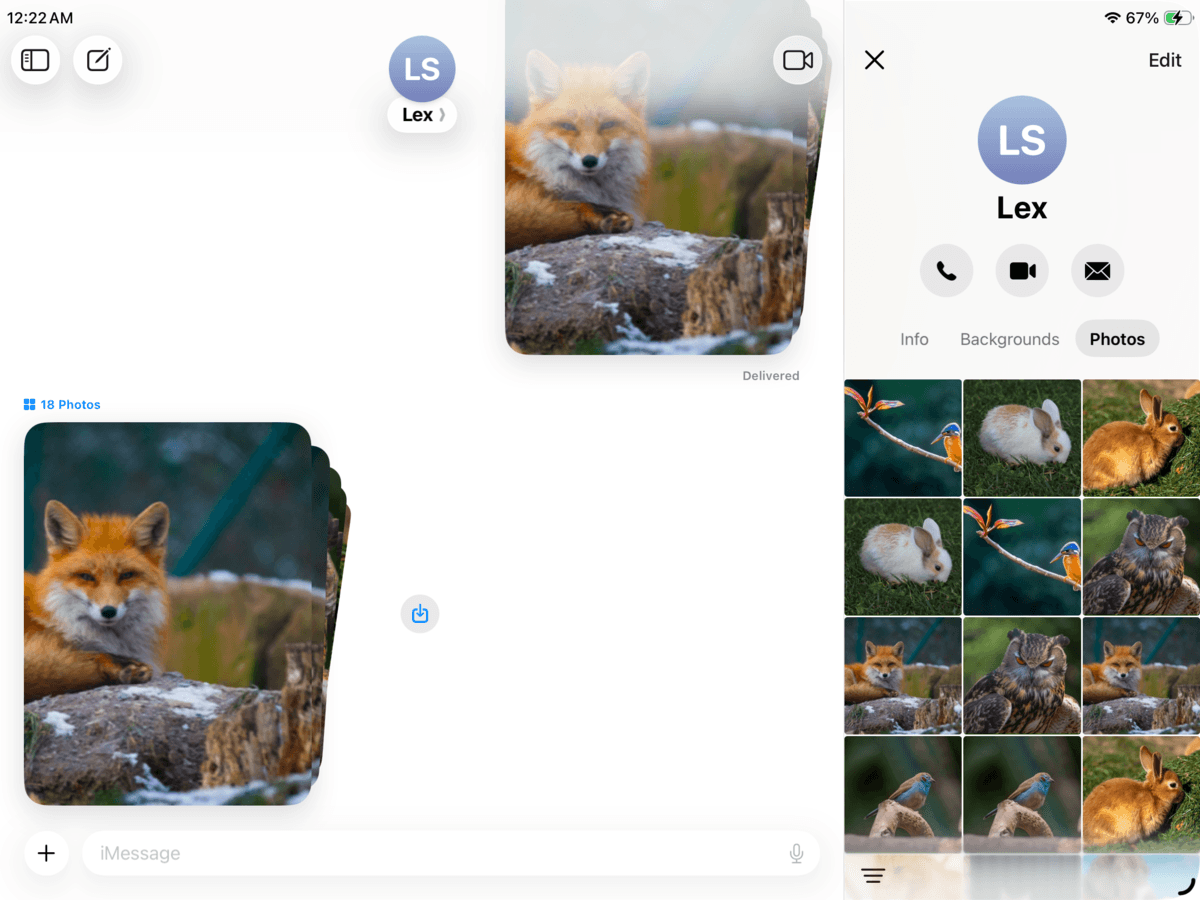
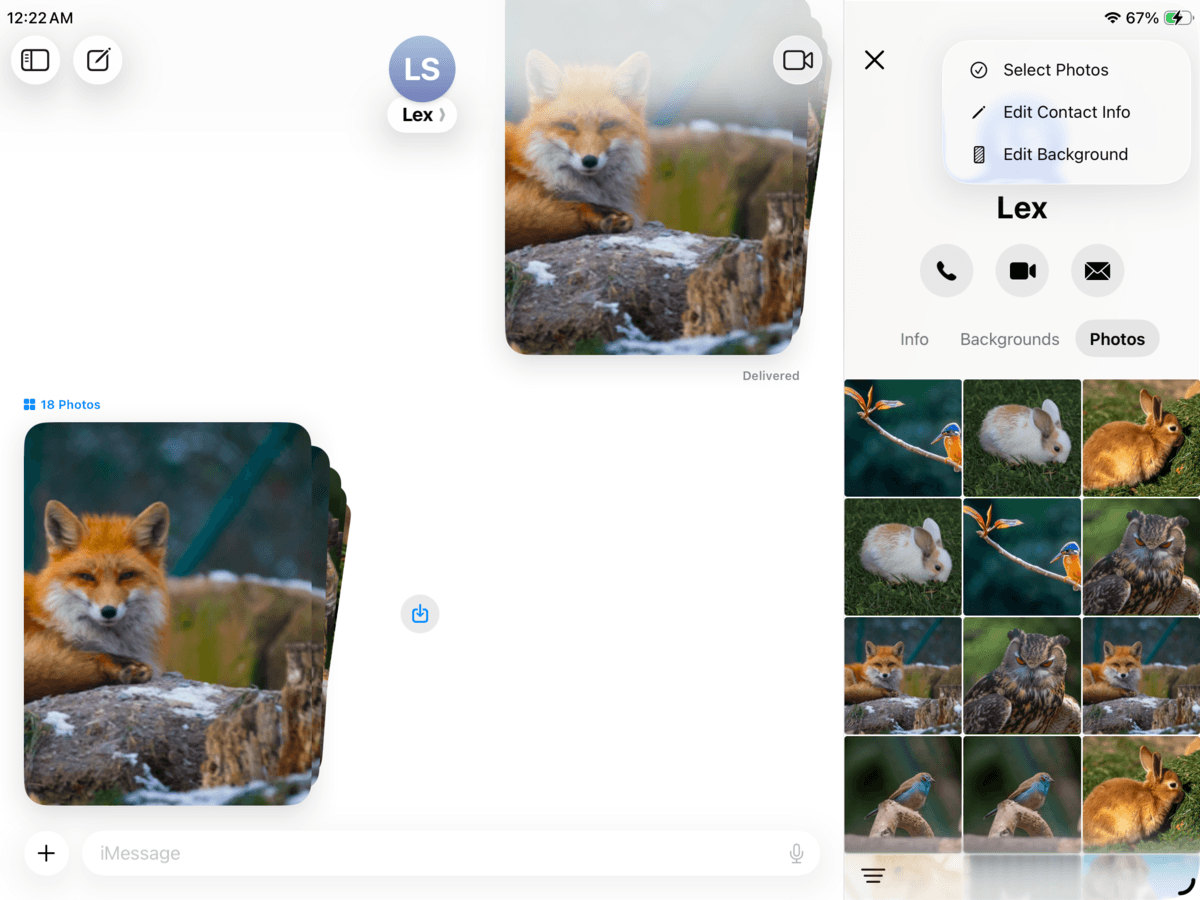
- Choose Select Photos in the pop-up that appears.
- Tap the photo and video attachments you want to remove. Then, tap the trash button 🗑️ in the bottom right corner of the screen.
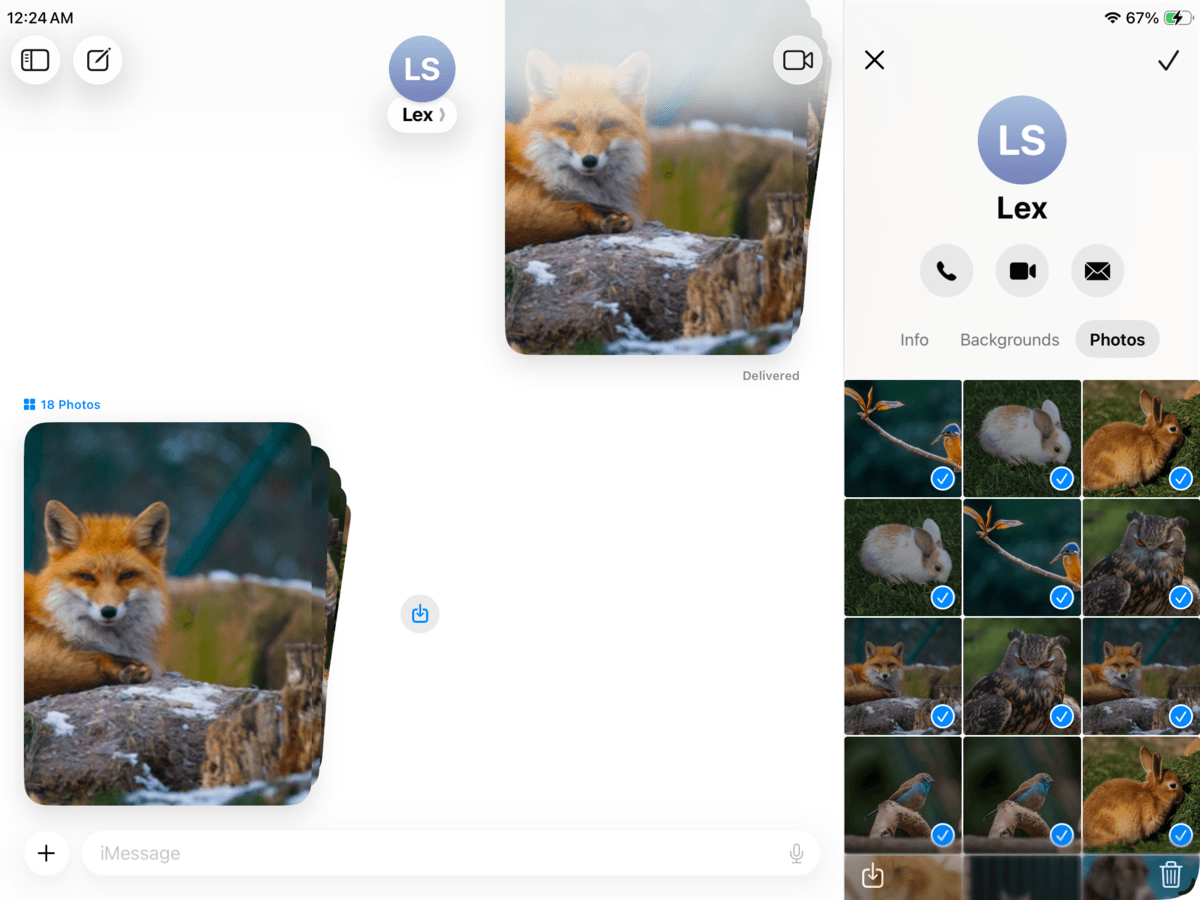
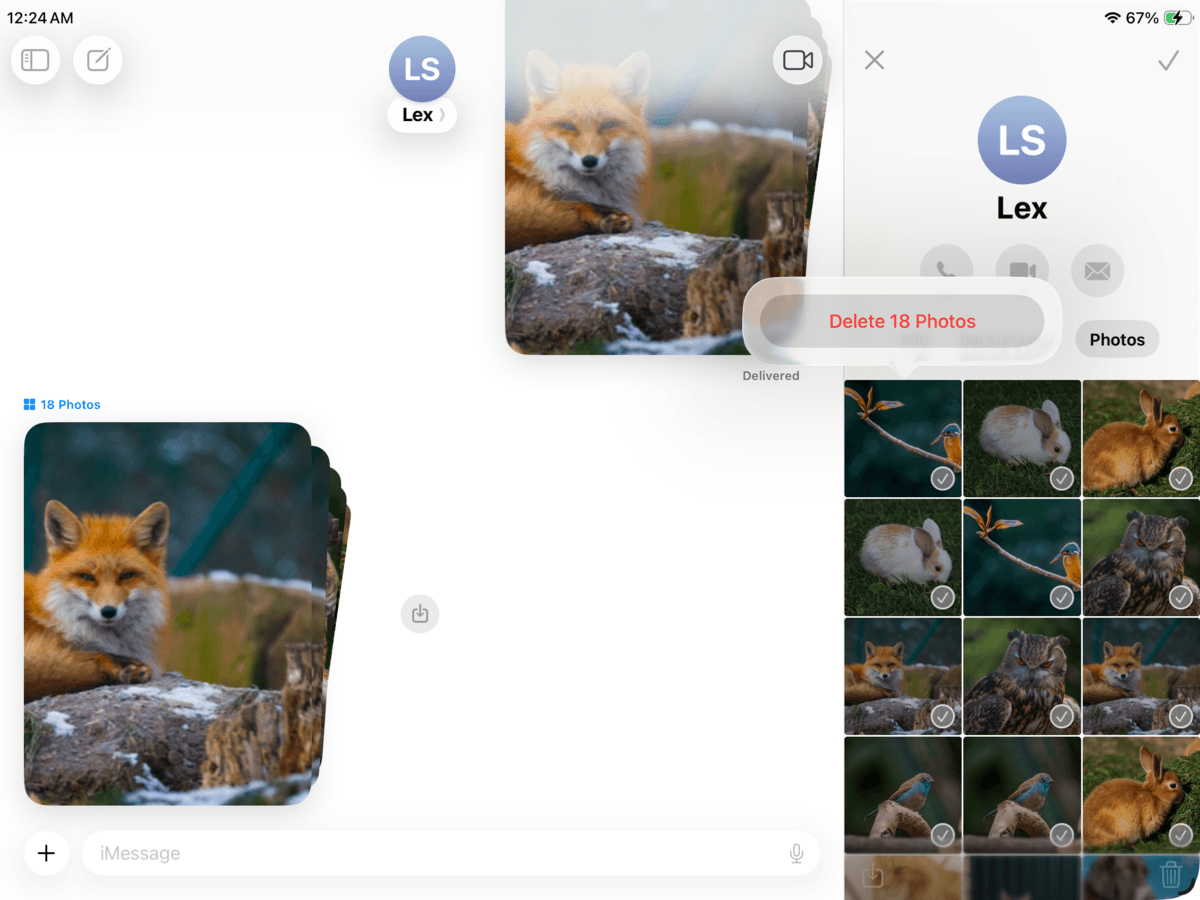
- Finally, tap Delete Photos to confirm the action.
Method 6: Clean Up Downloads and the Files App
Most users treat their iPad more like a computer than a phone, so the Files app often accumulates PDFs, ZIP archives, videos, exported projects, email attachments, browser downloads, and other work-related files.
In this section, we’ll show you how to clean up the Files app on your iPad and where to look for downloaded files and folders.
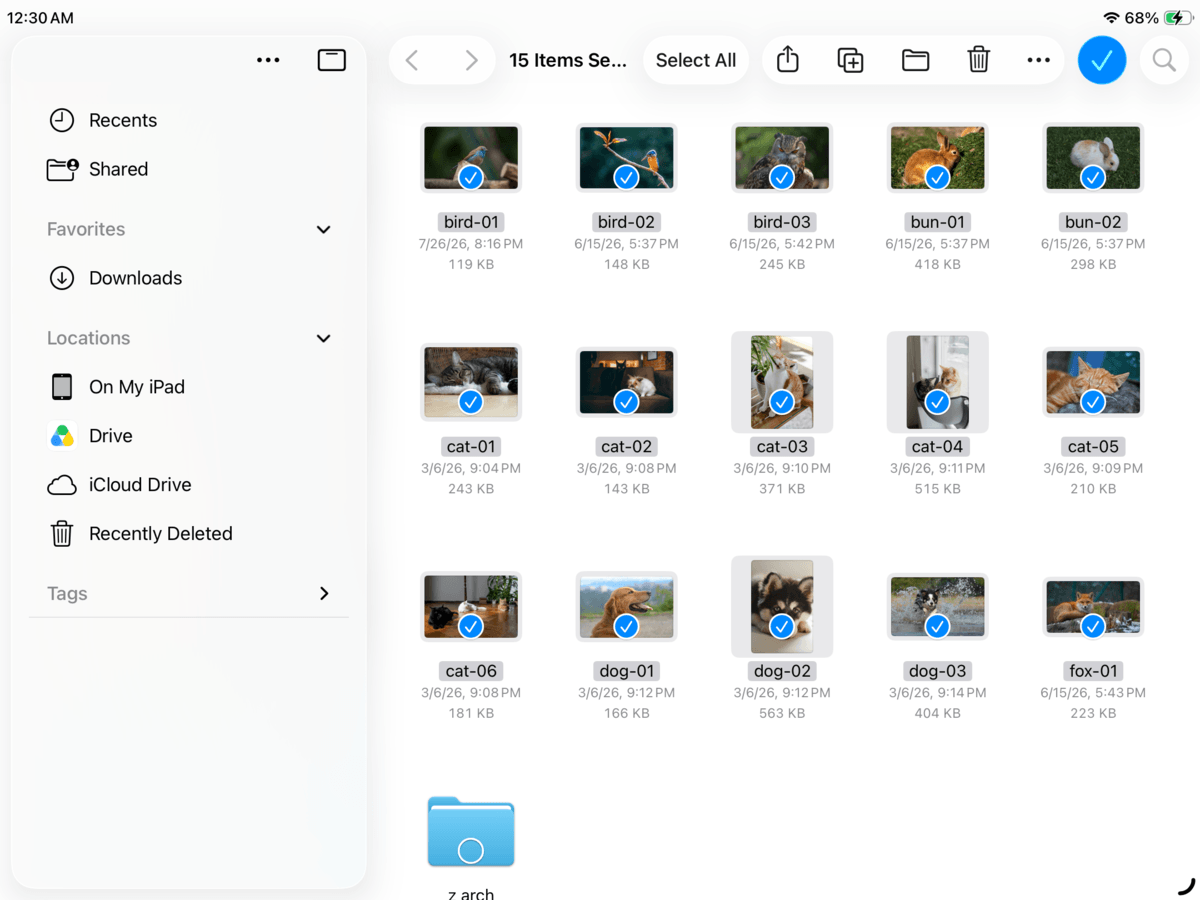
- Open the Files app.
- In the left sidebar under the Locations section, tap On My iPad. Then, locate and select the Downloads folder. Alternatively, check any large app folders or individual files and folders you may have forgotten about.
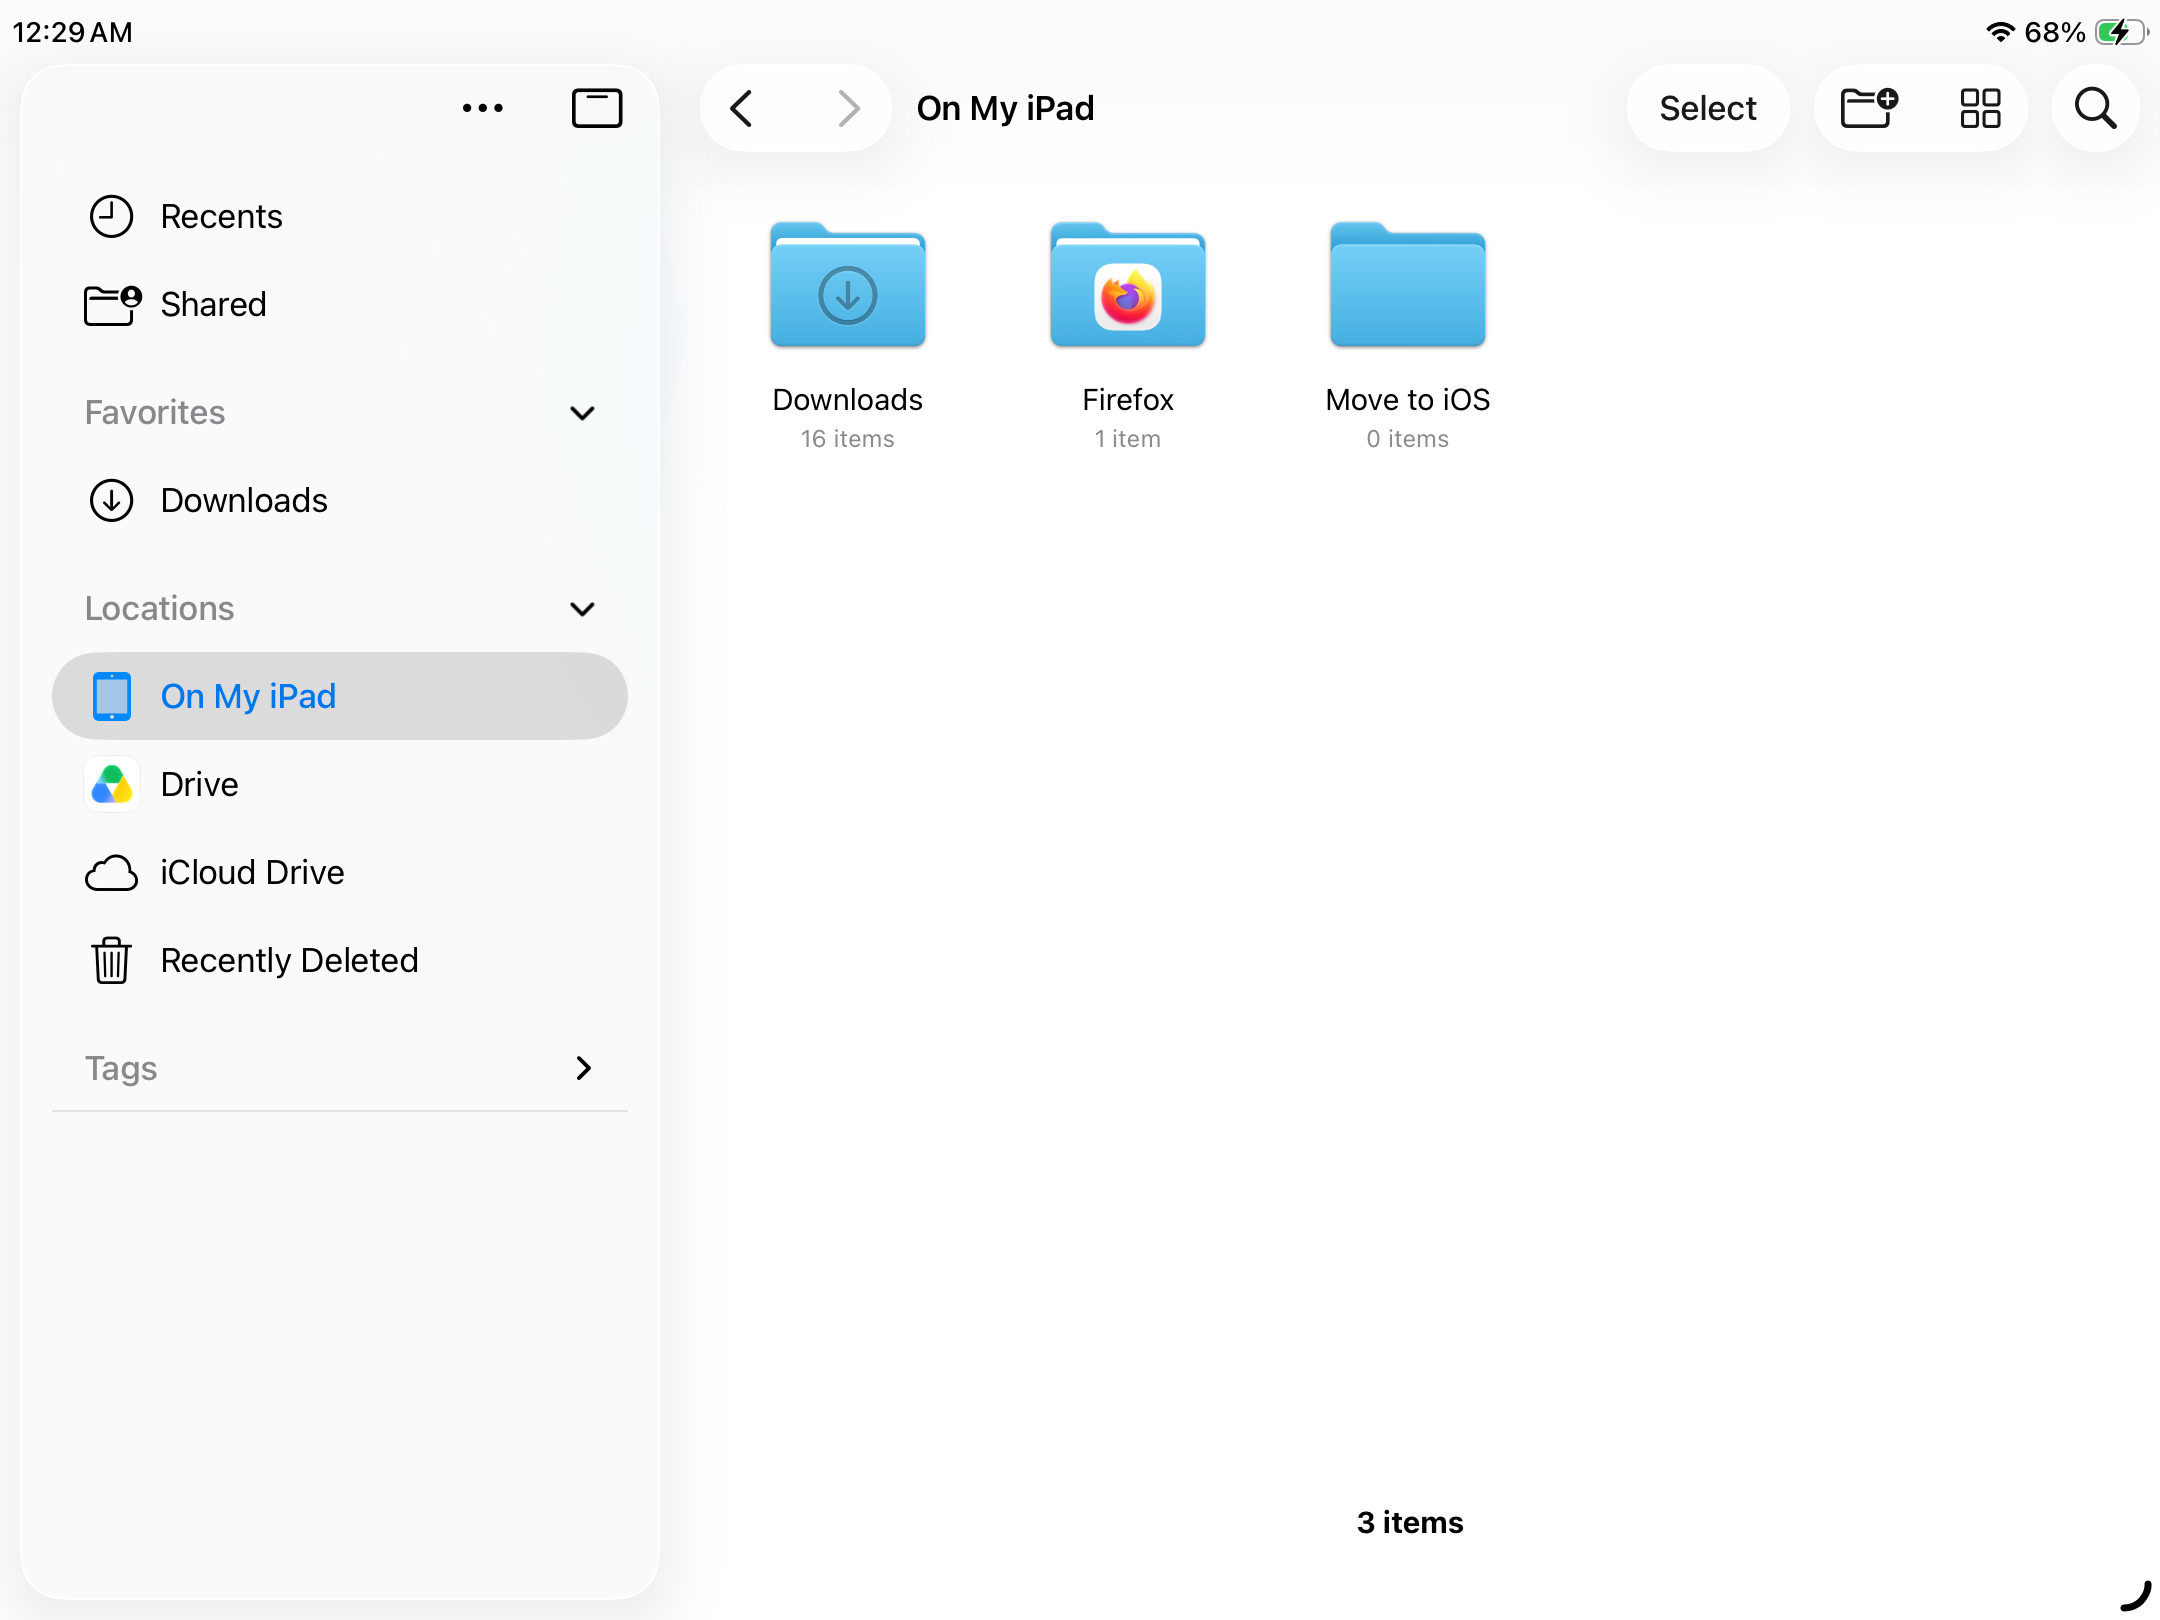
- Tap Select in the top right corner of the screen.
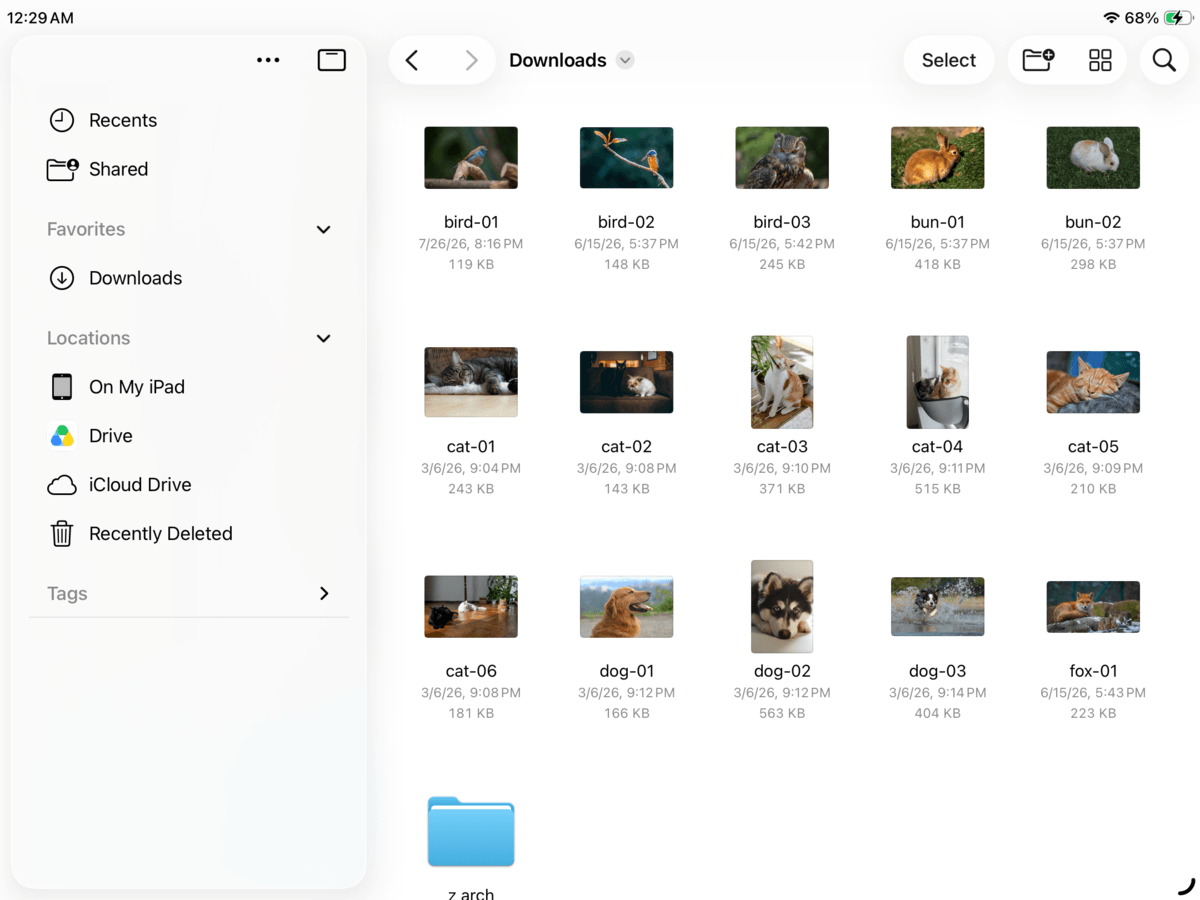
- Select the files you want to delete. Then, tap the trash button 🗑️in the top right corner of the screen.
Method 7: Remove Downloaded Movies, Music, Podcasts
Offline media is one of the easiest data types to get overlooked, yet it can be devastating for your storage space. Picture this: you downloaded 20 gigabytes worth of music playlists, Netflix episodes, and podcasts to prepare for a 14-hour flight. Then, after your trip, you’ve completely forgotten about your digital haul.
These downloads were saved to your iPad’s local storage, so you can access them without a network connection. You’ll find this feature in most content streaming apps (e.g., Apple Music, Disney+, Prime Video, etc.); while useful, it’s a quick way to run out of space. We’ll show you how to remove downloaded content from the Podcasts app, but the steps should look similar for other apps as well.
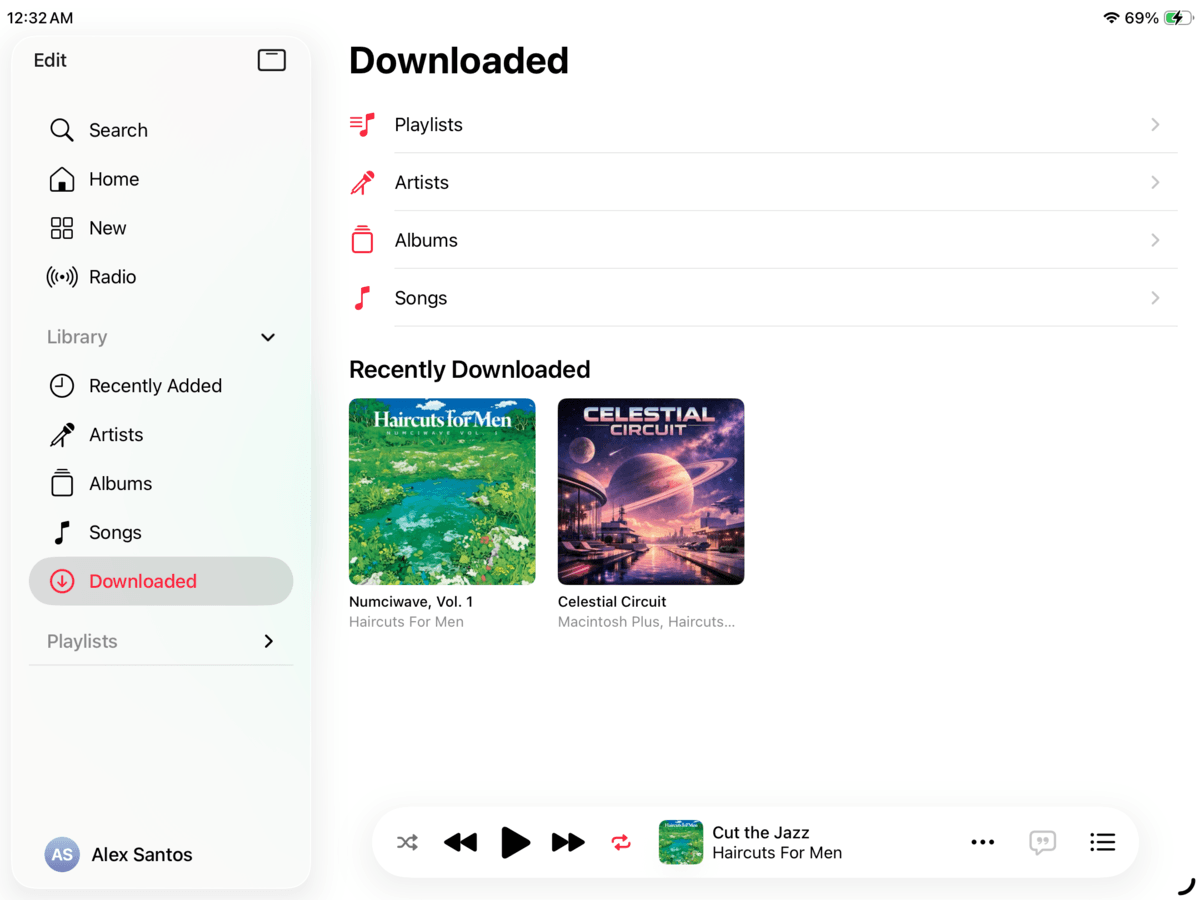
- Open the Music app.
- In the left sidebar, select Downloaded. Then, tap Songs.
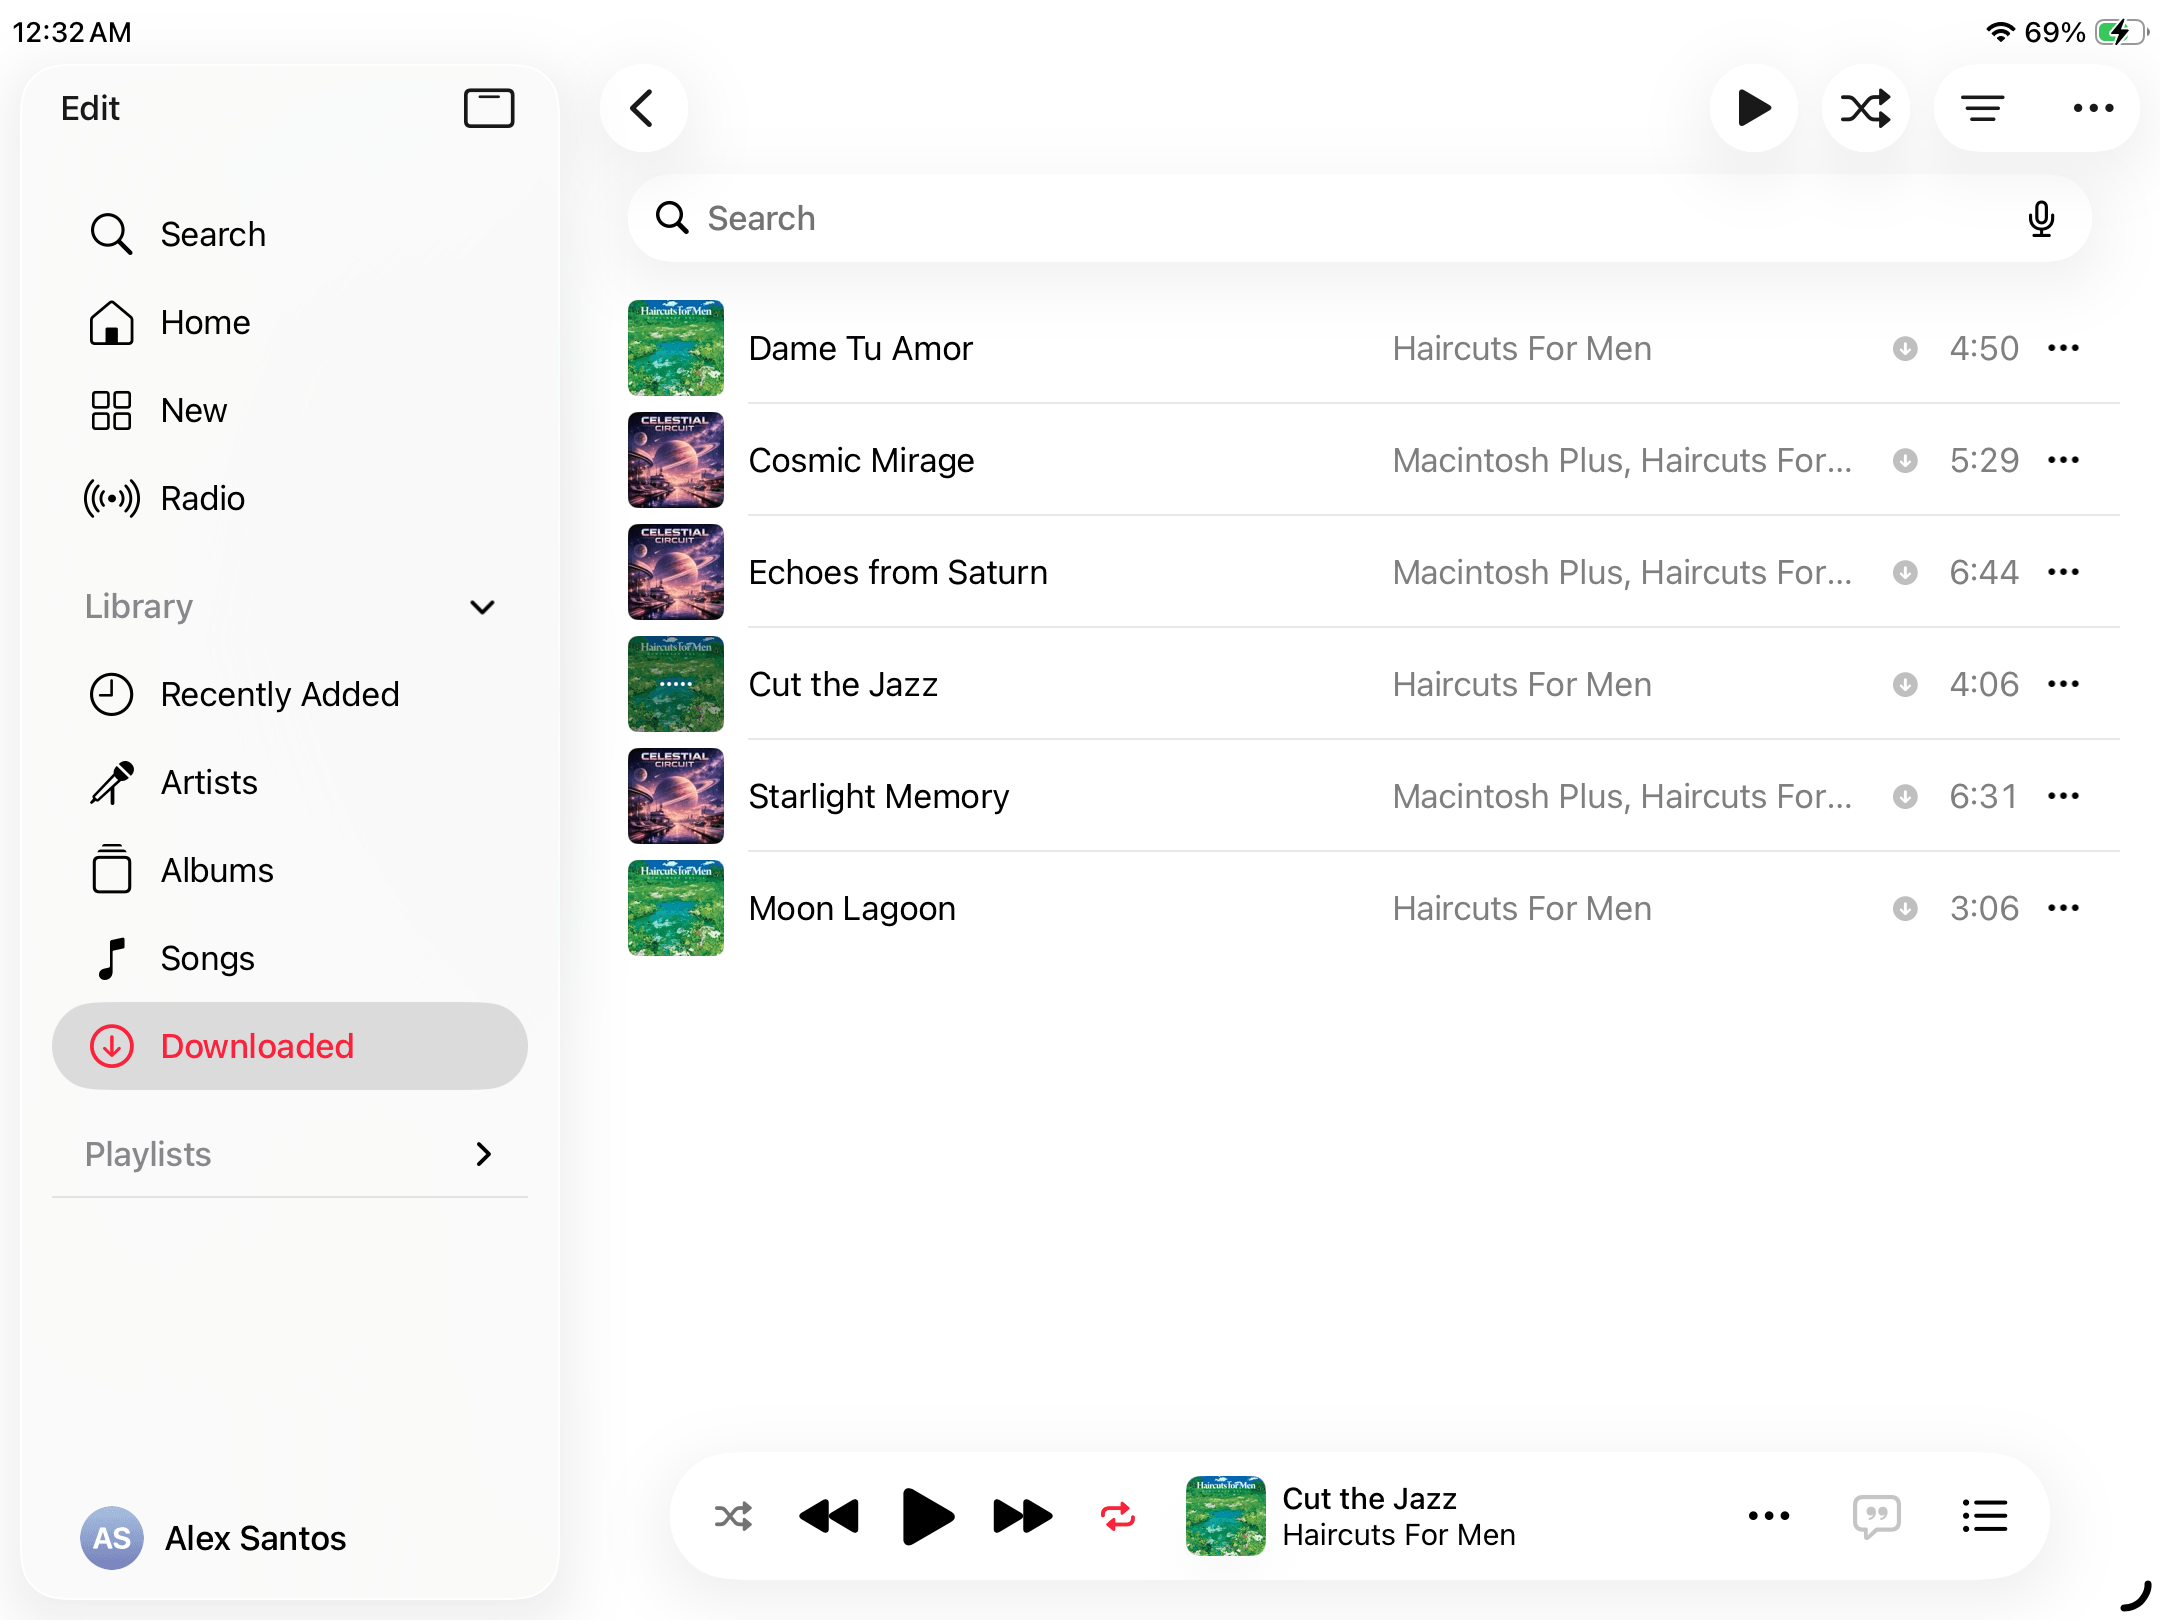
- Beside each downloaded song you want to remove from your local storage, tap the meatball menu button ⋯.
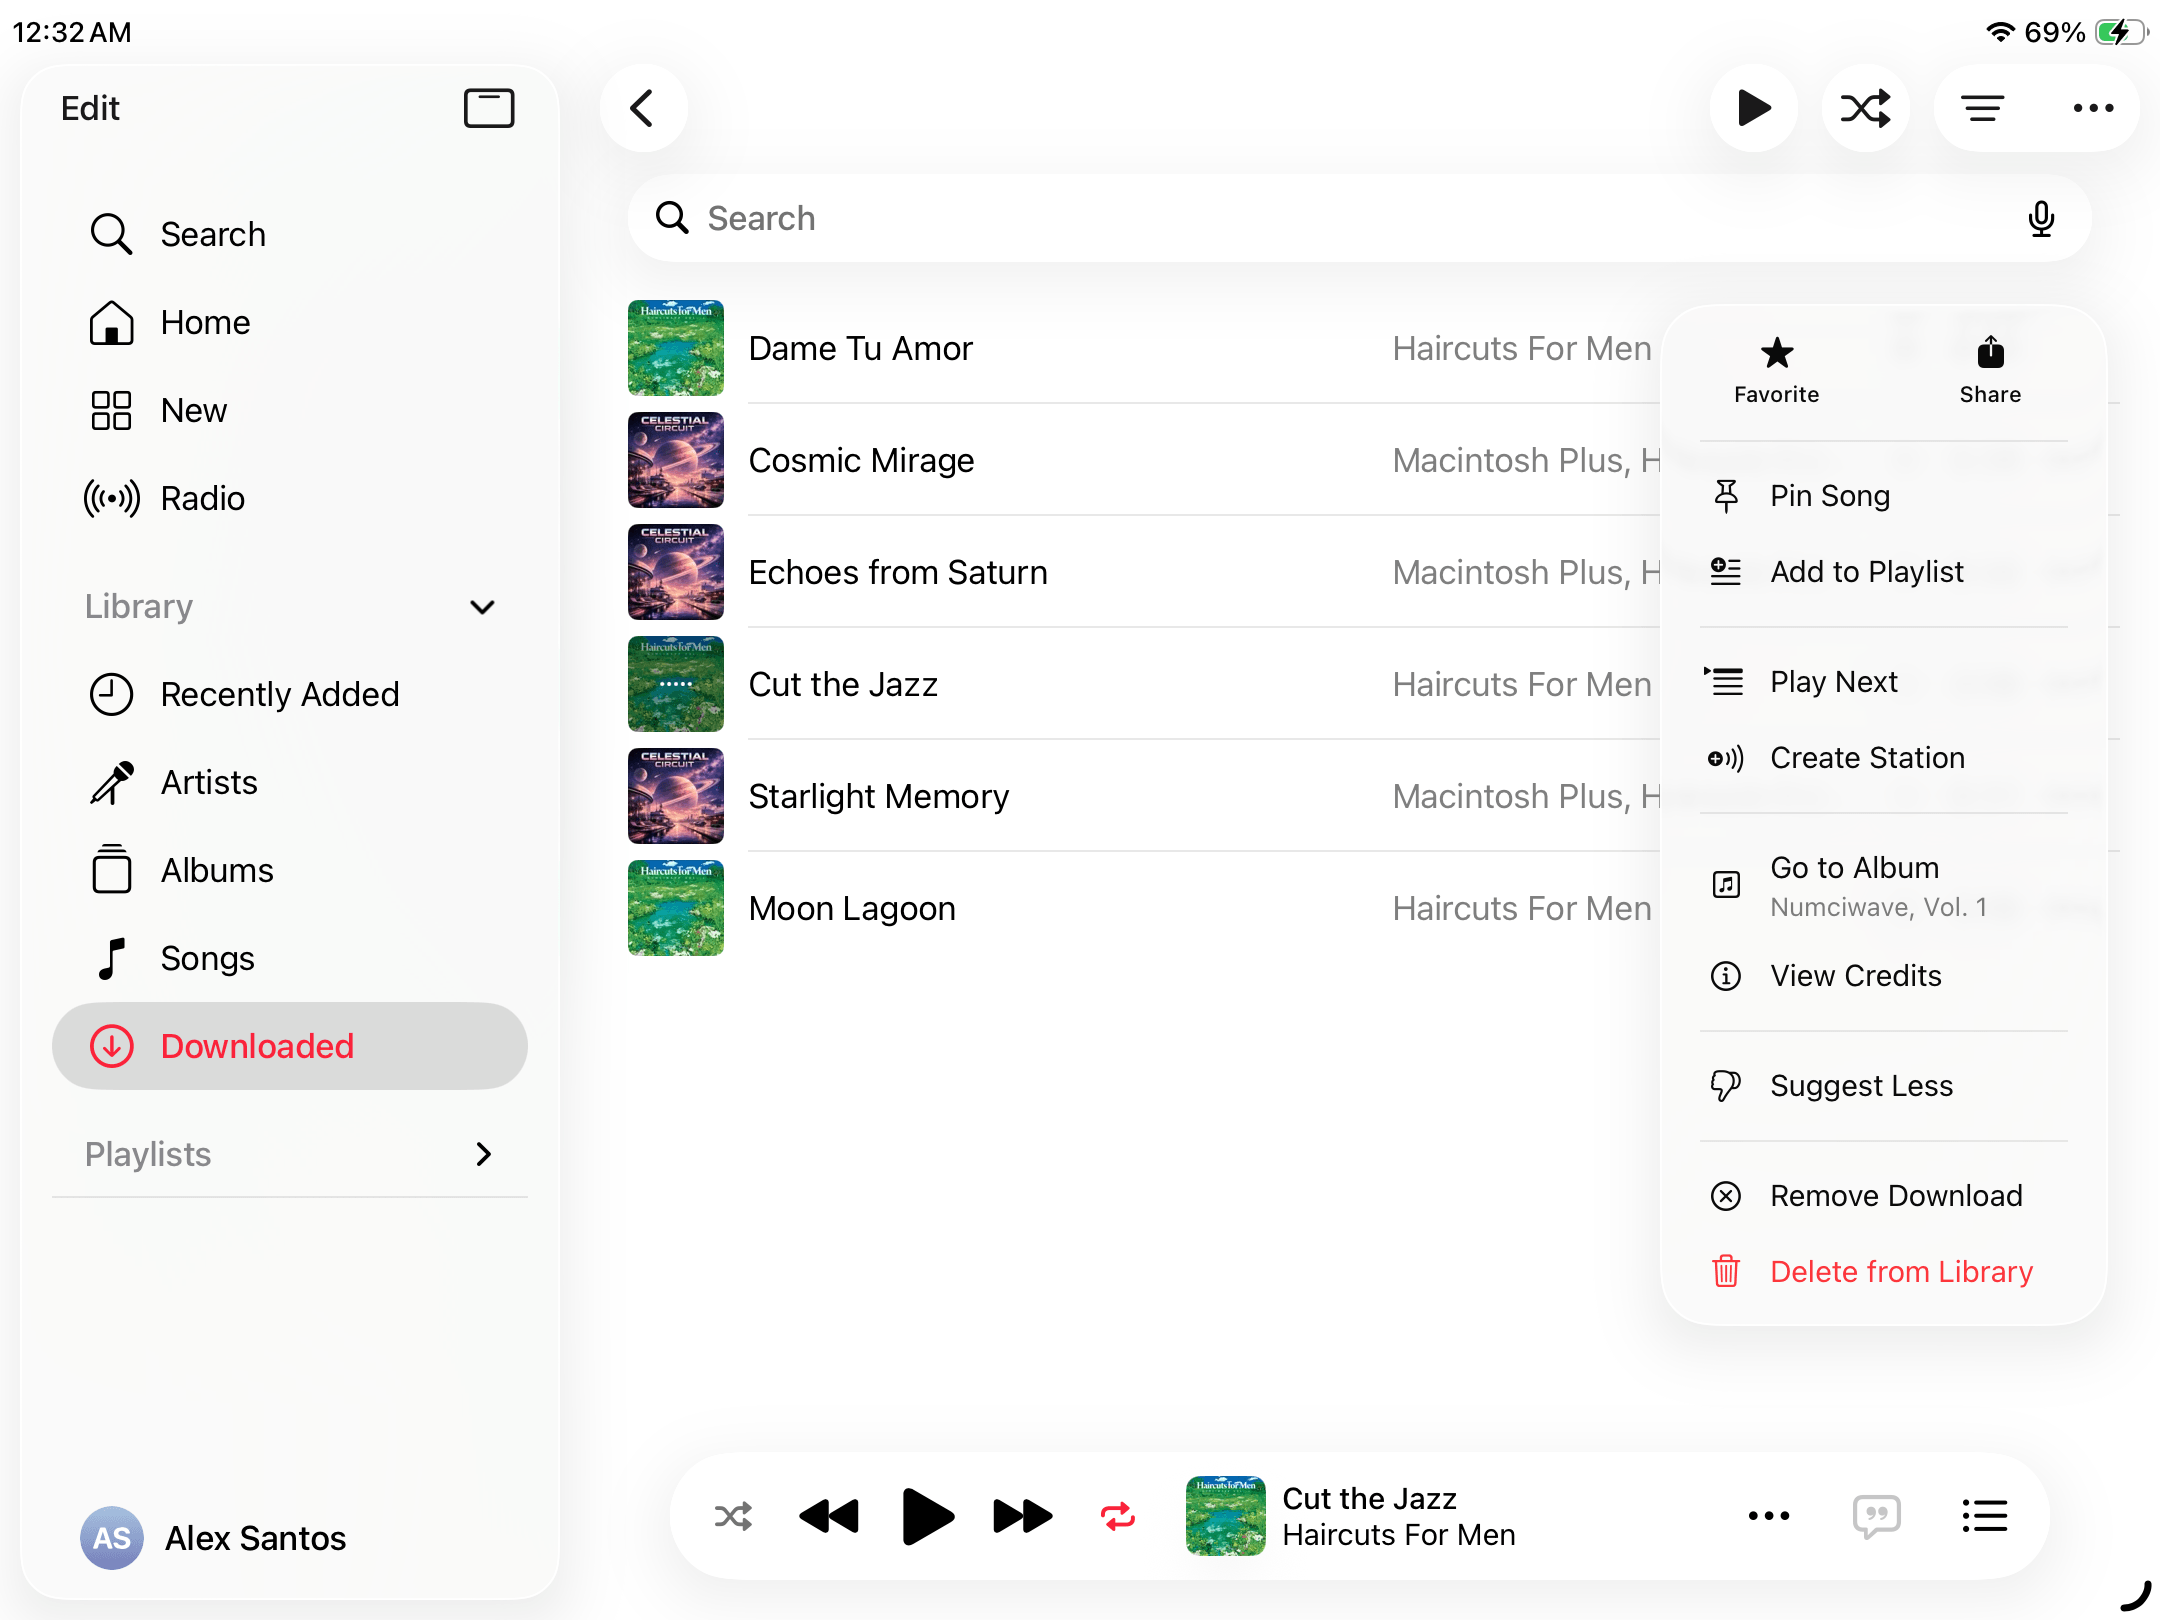
- In the pop-up menu that appears, tap Remove Download.
Method 8: Keep Files in iCloud Without Keeping Local Copies
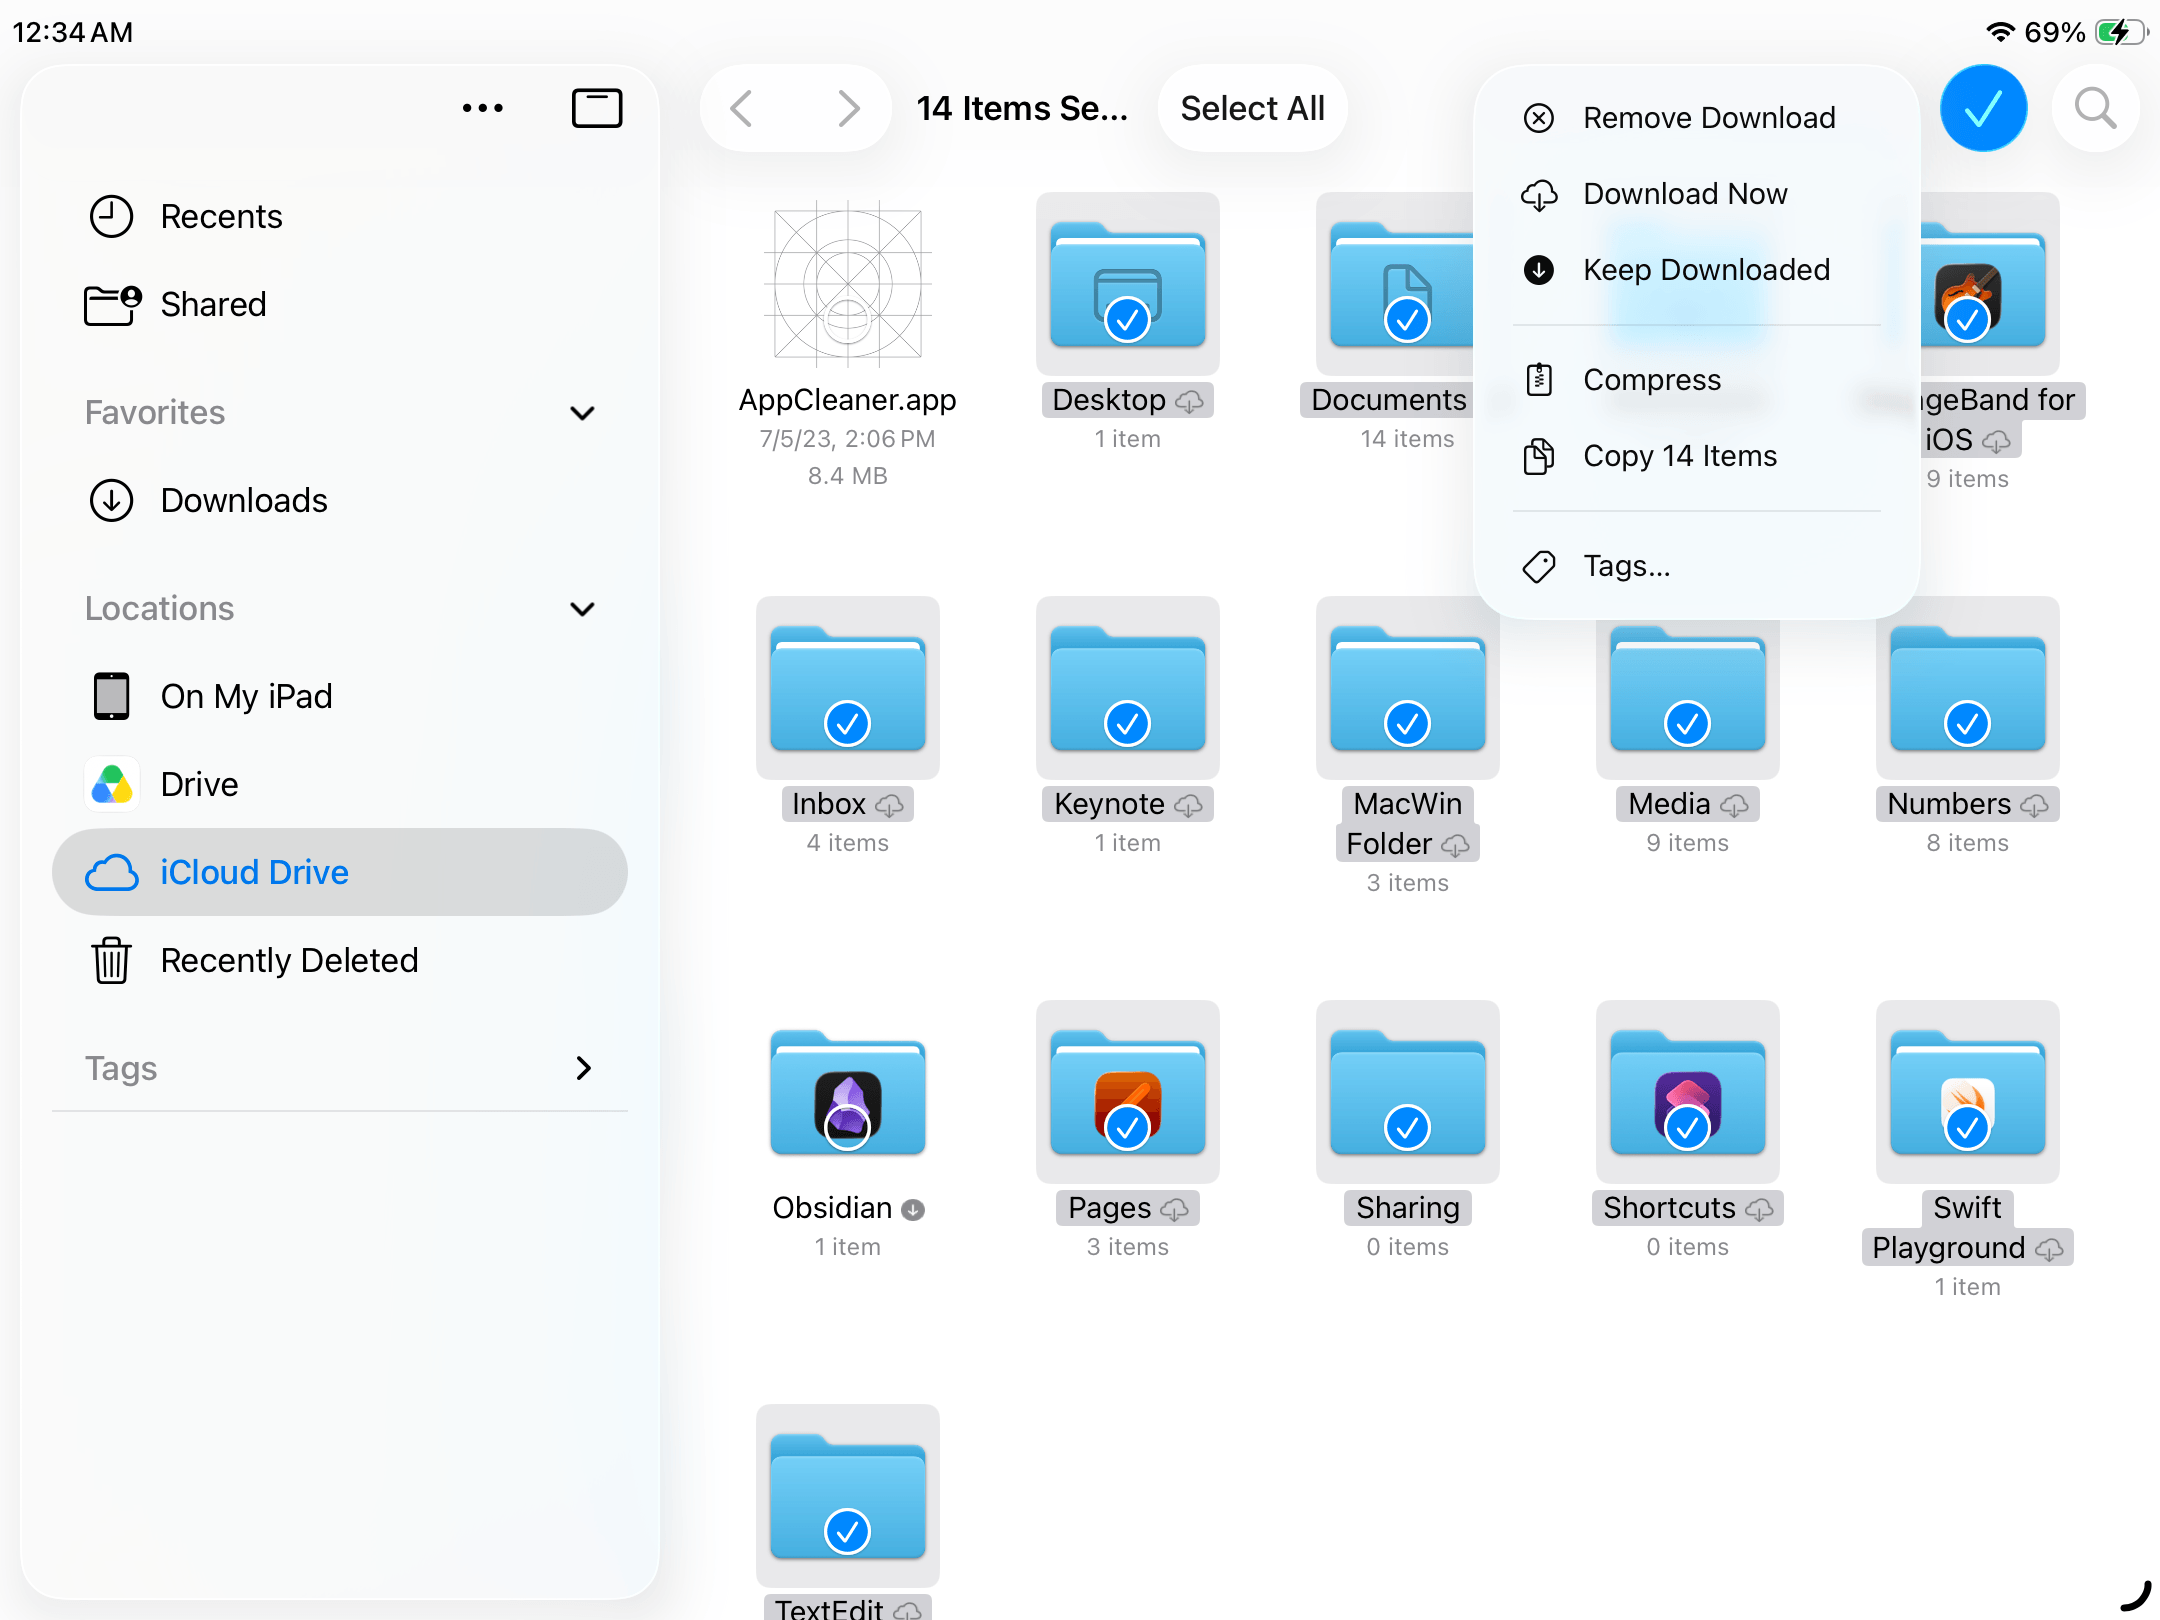
If iCloud Drive is enabled on your iPad, a great option to free up local storage space is to remove downloaded copies of iCloud files. This option keeps a file in the same folder location and safe in iCloud’s servers, while its footprint is removed from your device’s storage.
The file only gets re-downloaded to your iPad if you try to view, edit, or share it. This is particularly useful for large PDFs, videos, project files, archives, and documents you don’t need to access offline.
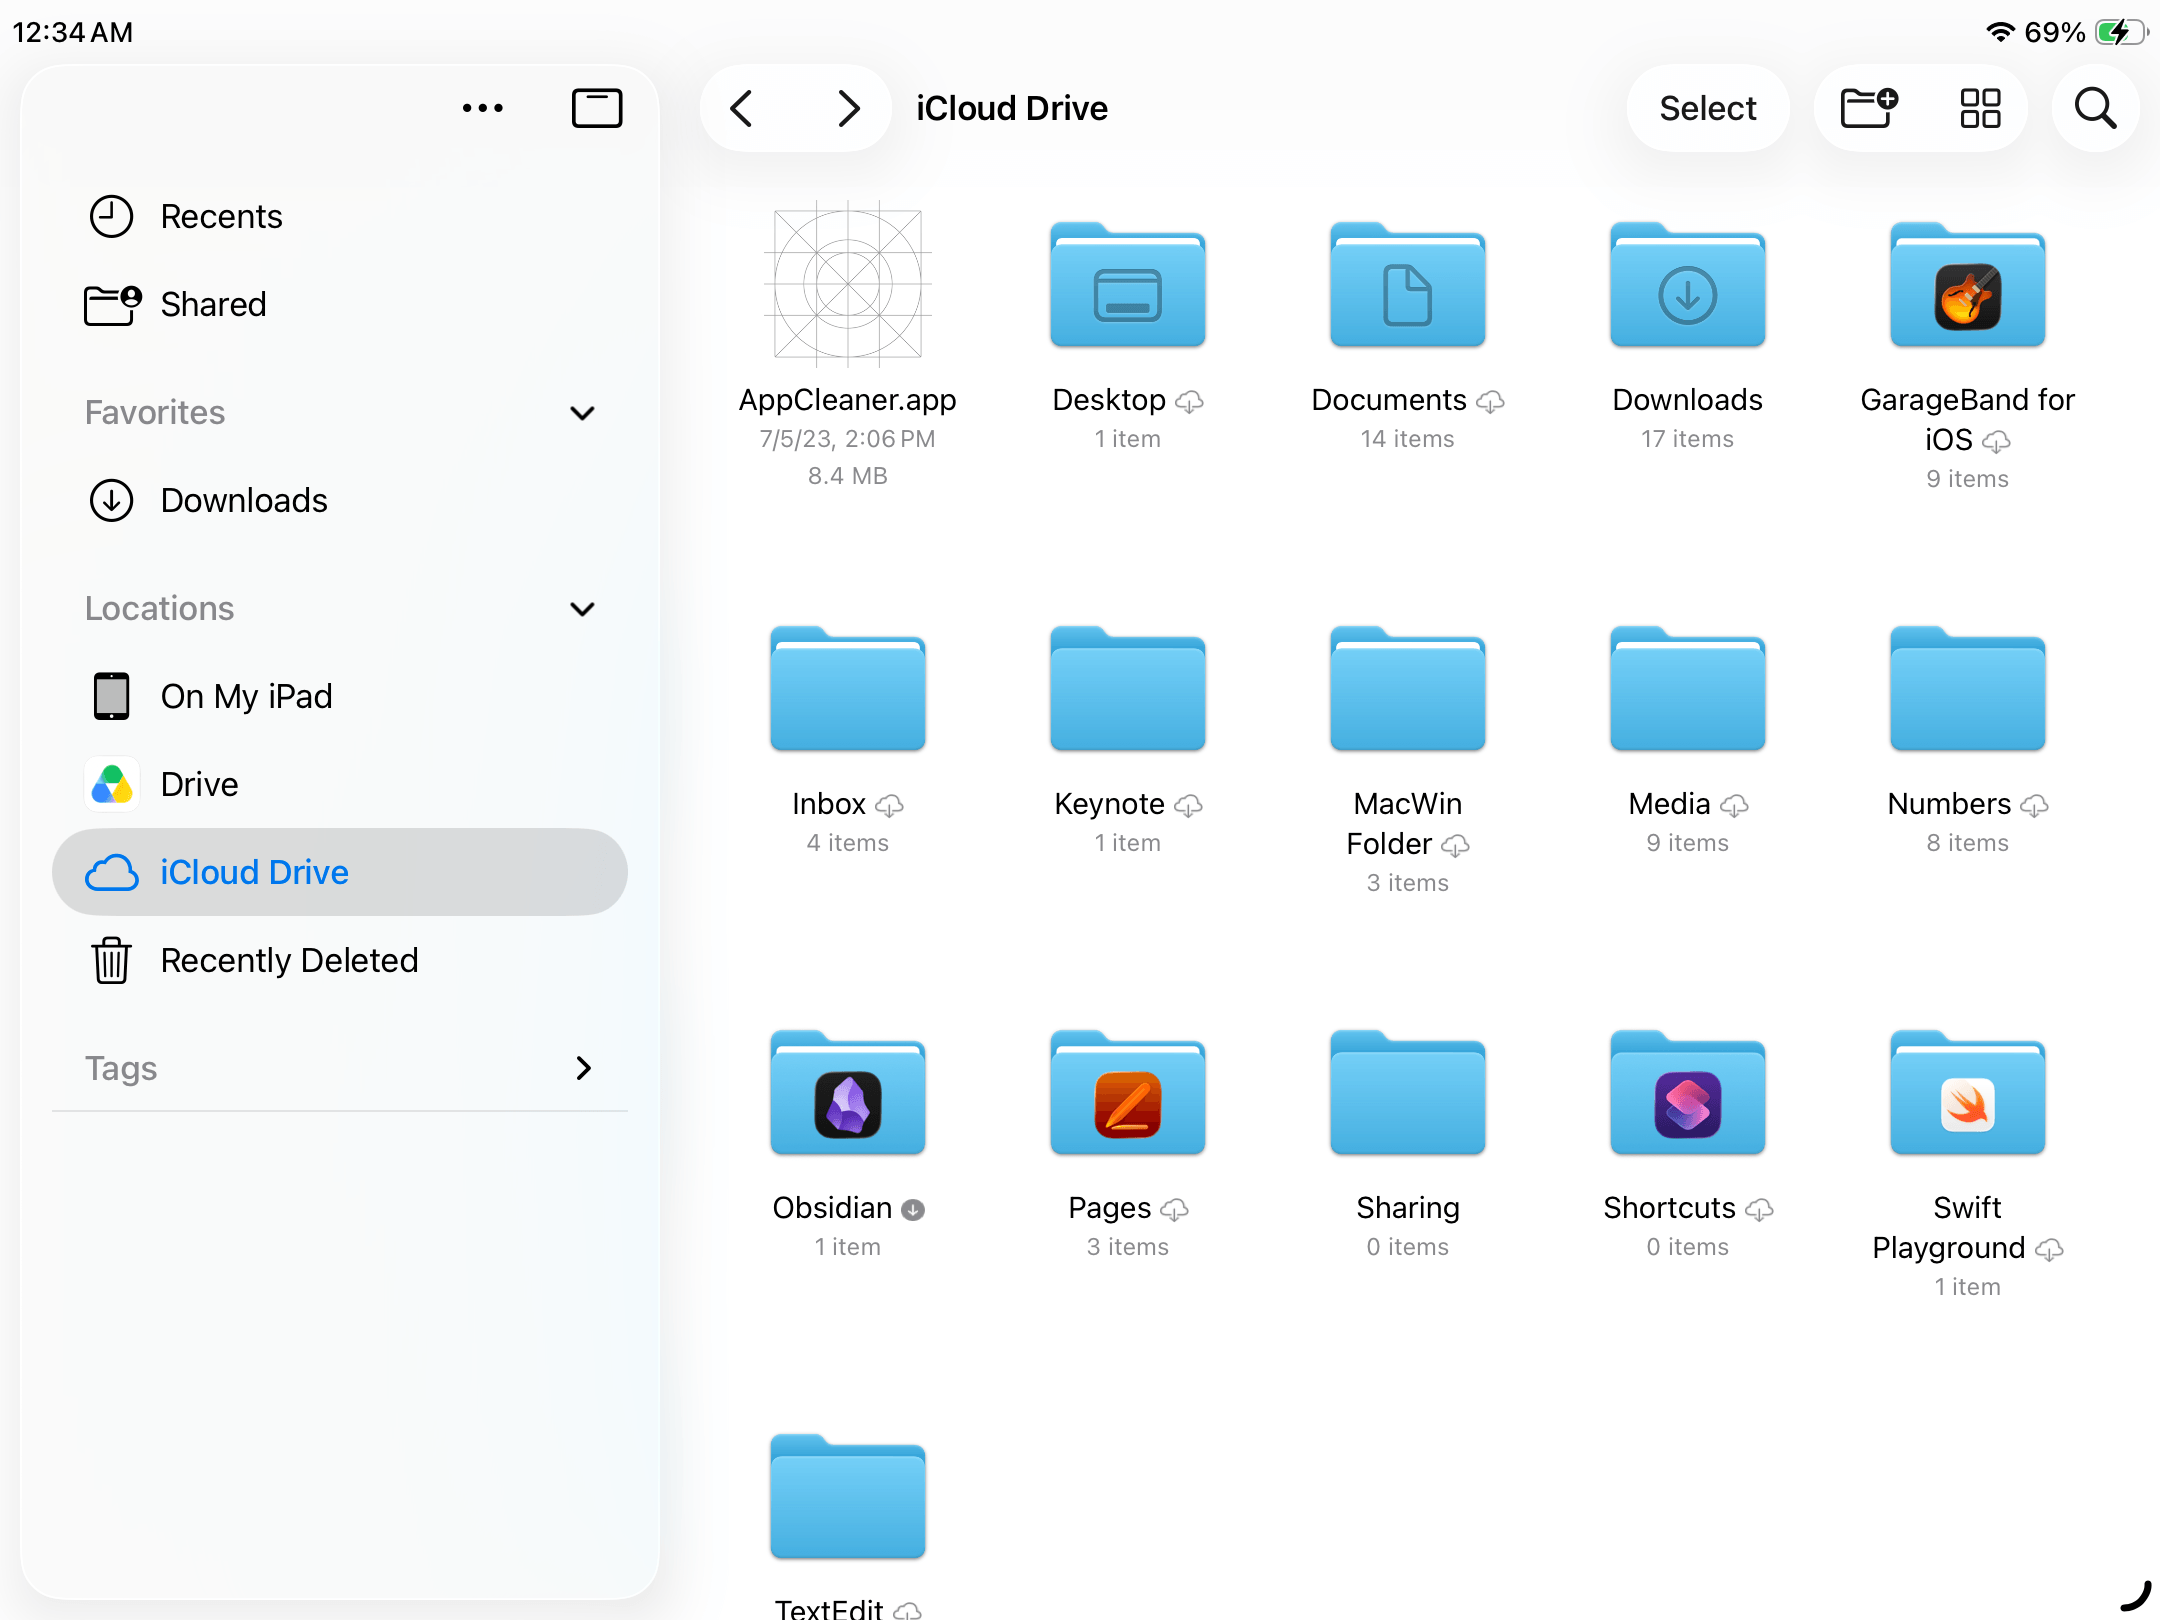
- Open the Files app.
- In the left sidebar, tap iCloud Drive. Locate the files and folders you want to remove from your local storage. Then, tap Select in the top right corner of the screen.
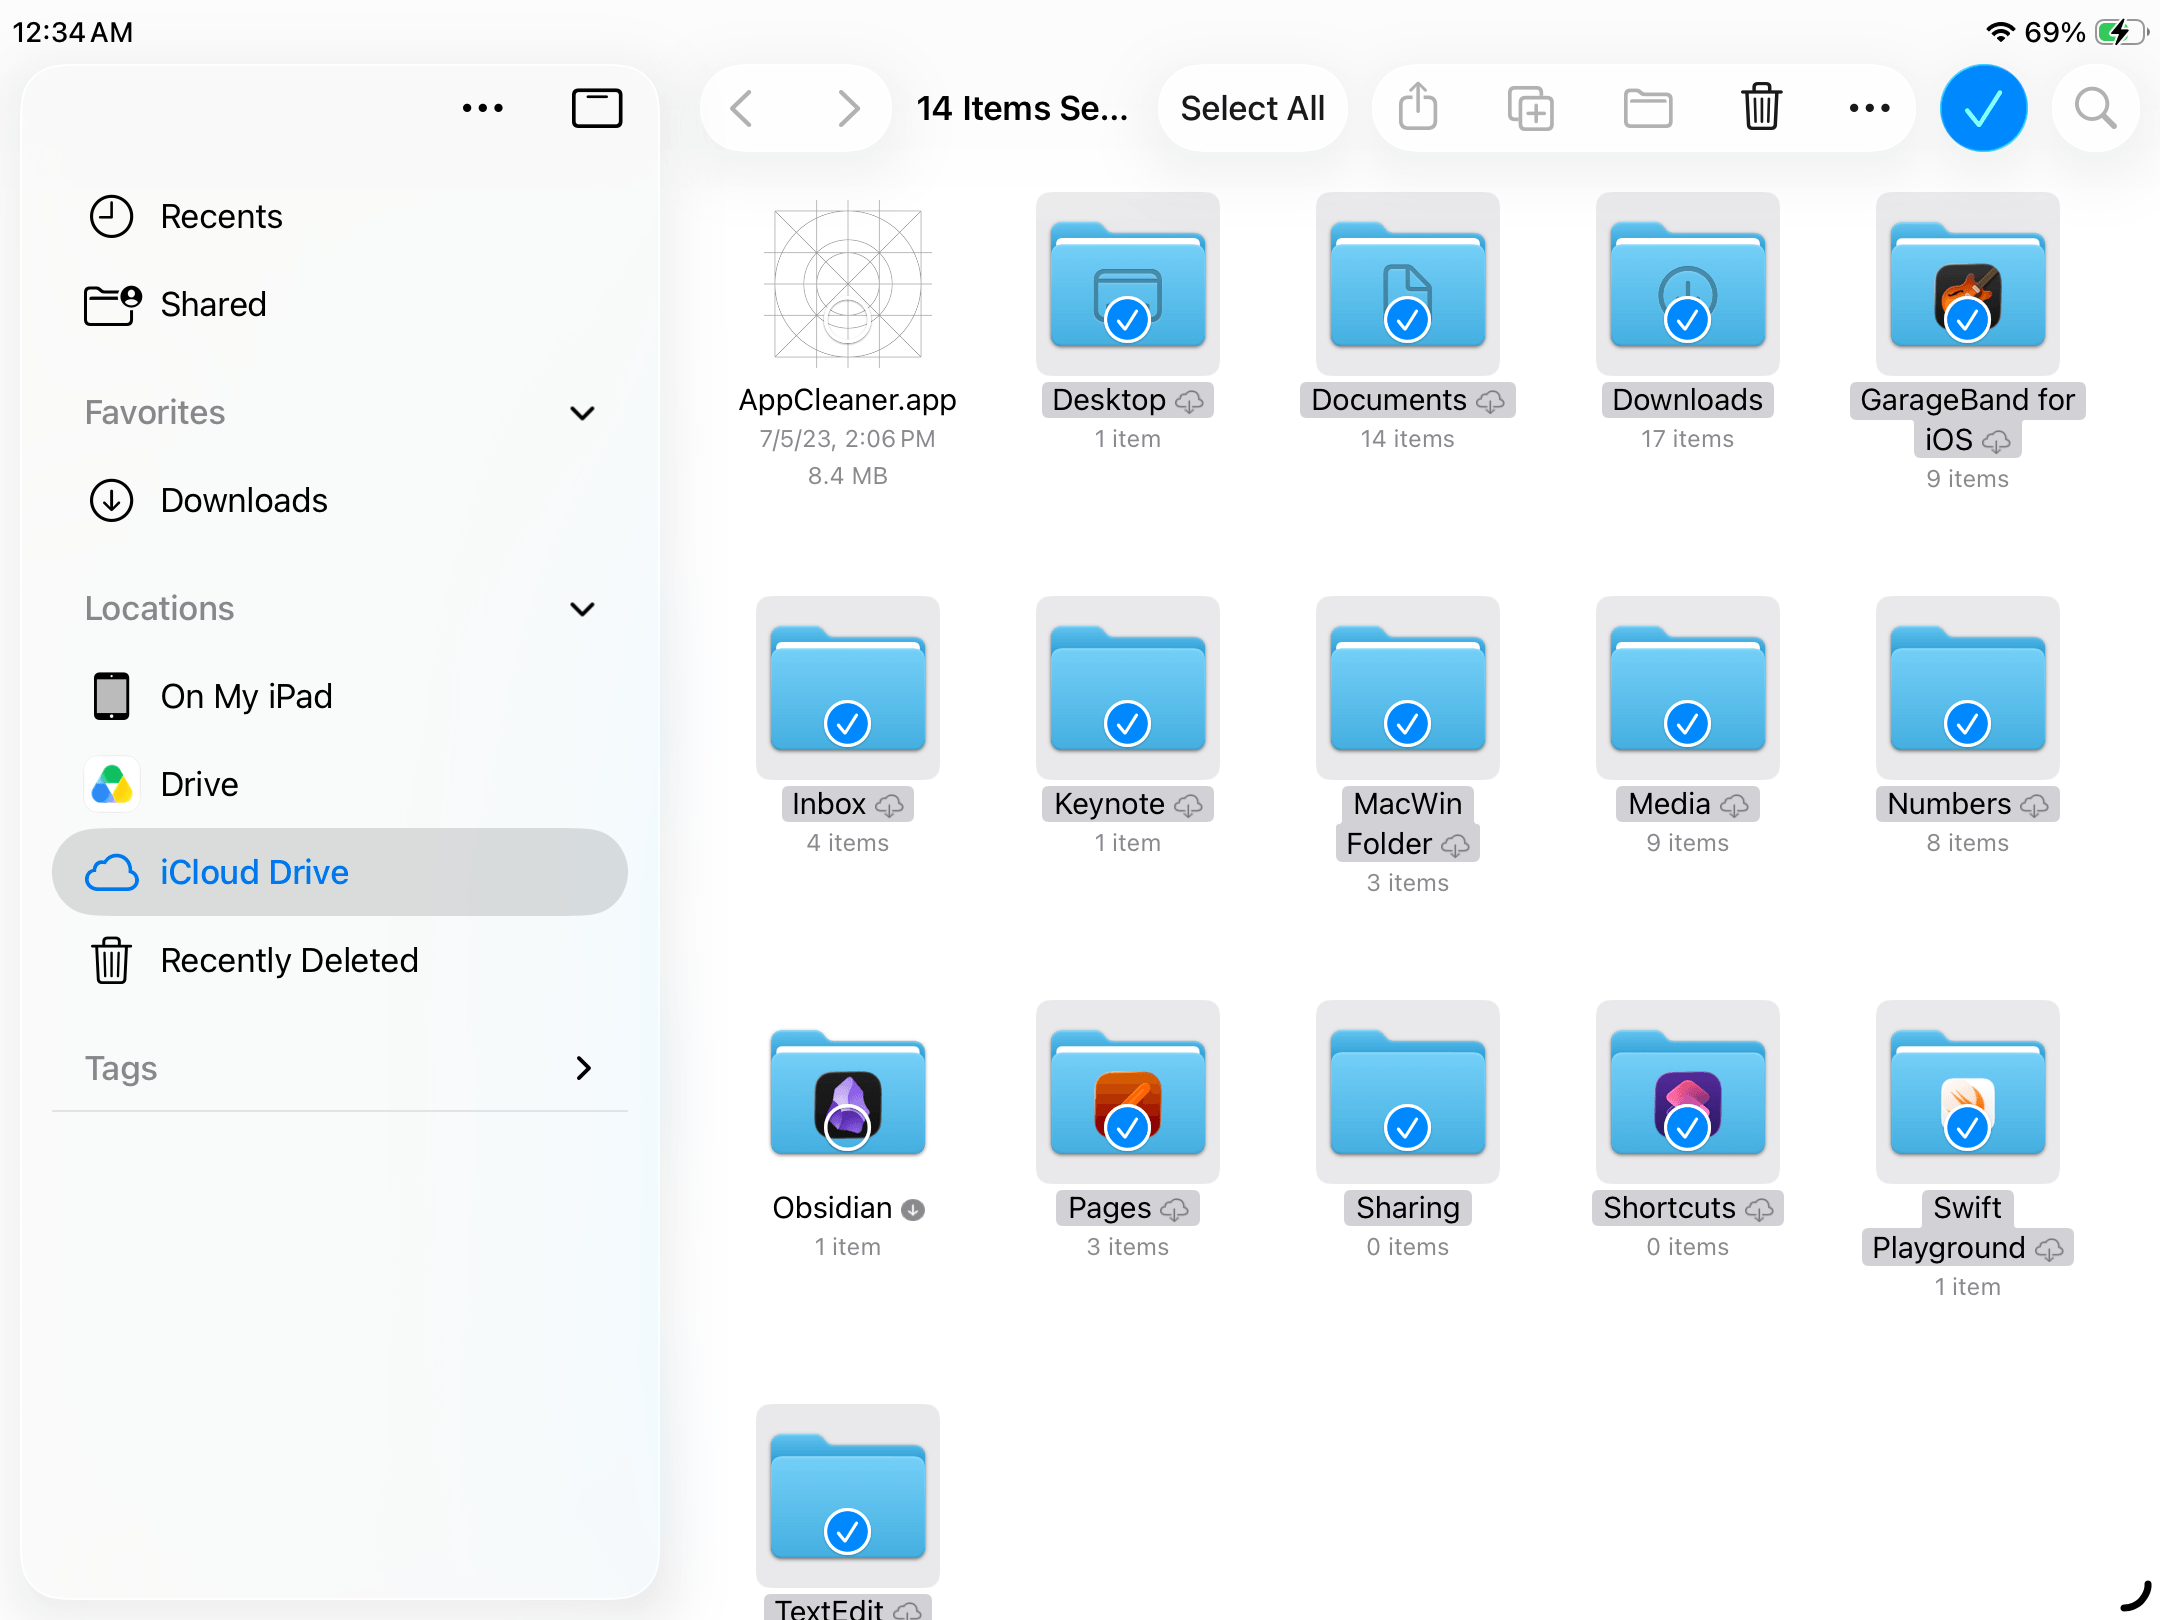
- Tap items to make your selection. Then, tap the meatball menu button ⋯ (not the trash button!).
- In the pop-up menu that appears, select Remove Download.
What to Do So Your iPad Storage Doesn’t Fill Up Again
After freeing up space on your iPad, there’s more you can do to make storage management a bit easier. iPadOS provides several convenient ways to manage and optimize your data, so your files permanently take up less space on your device. In this section, we’ll show you how to access and use these features.
Automatically Offload Unused Apps
Do you install a lot of apps on your iPad, only to completely forget about them later? I do. For people like us, the Automatically Offload Unused Apps feature can help reclaim storage space being wasted on apps we won’t want or need to use right now.
Unlike uninstalling an app, offloading it preserves local documents and data; if you ever need to use the app again, you can immediately pick up where you left off. This section will show you how to automate this process, so you don’t need to manually hunt down and offload apps you don’t use.
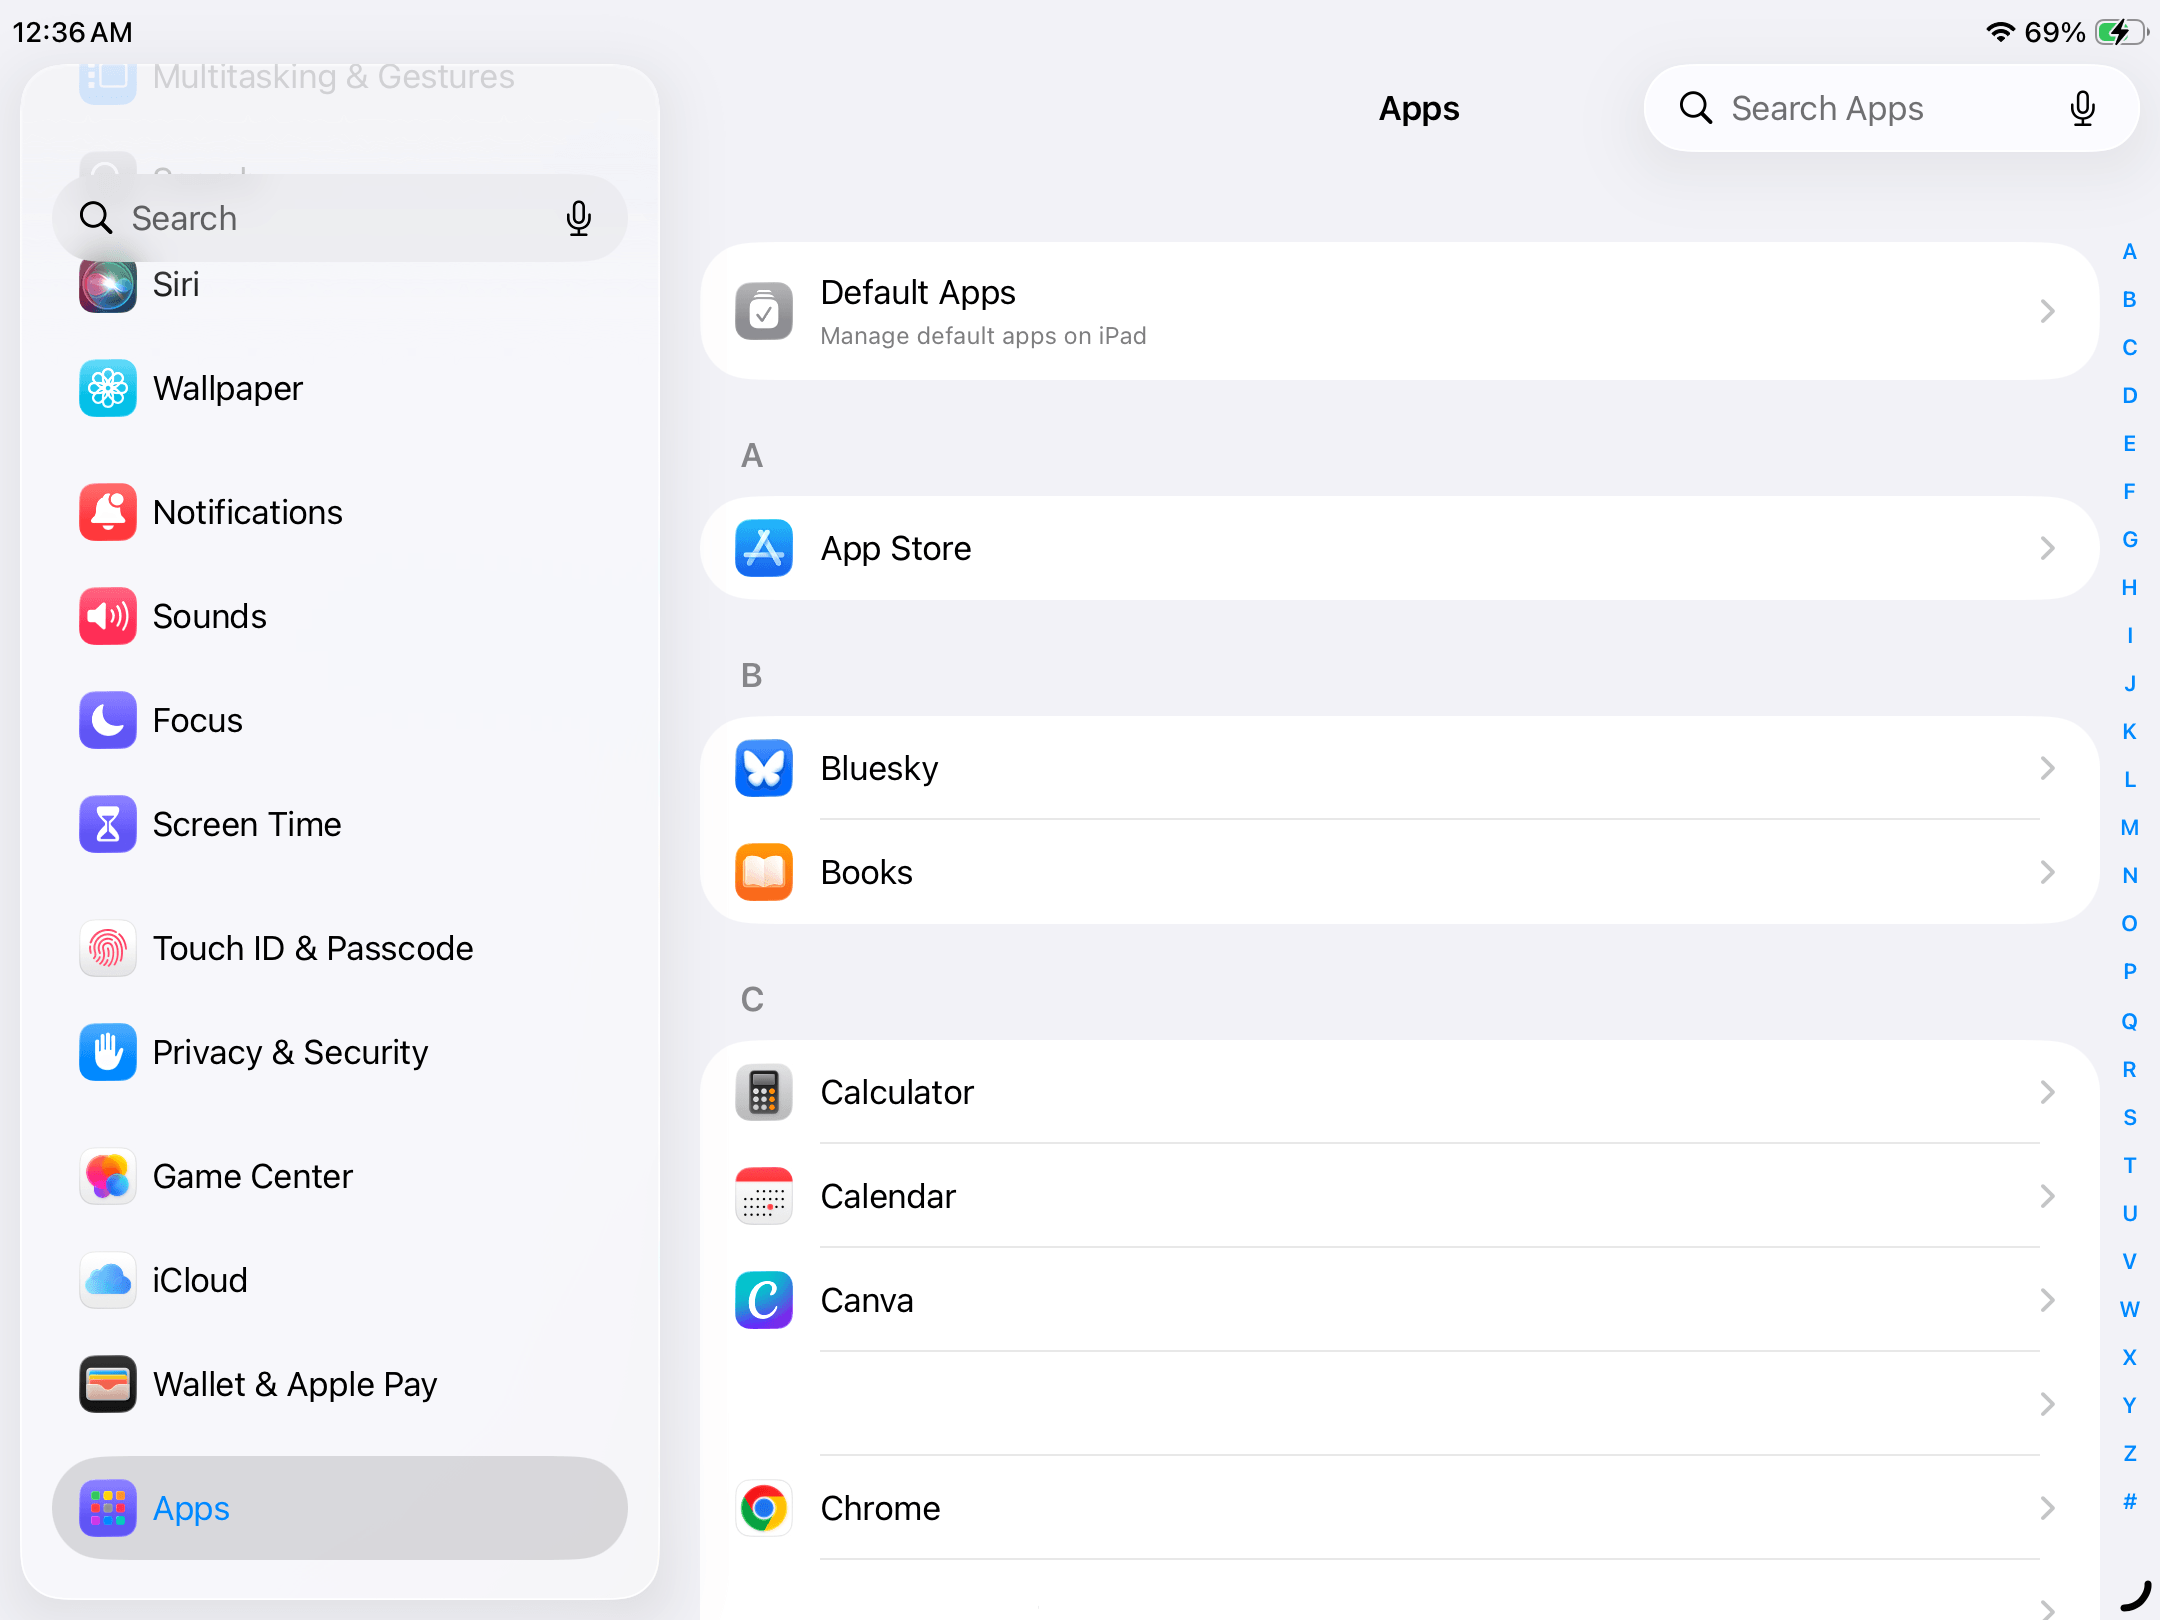
- Open the Settings app.
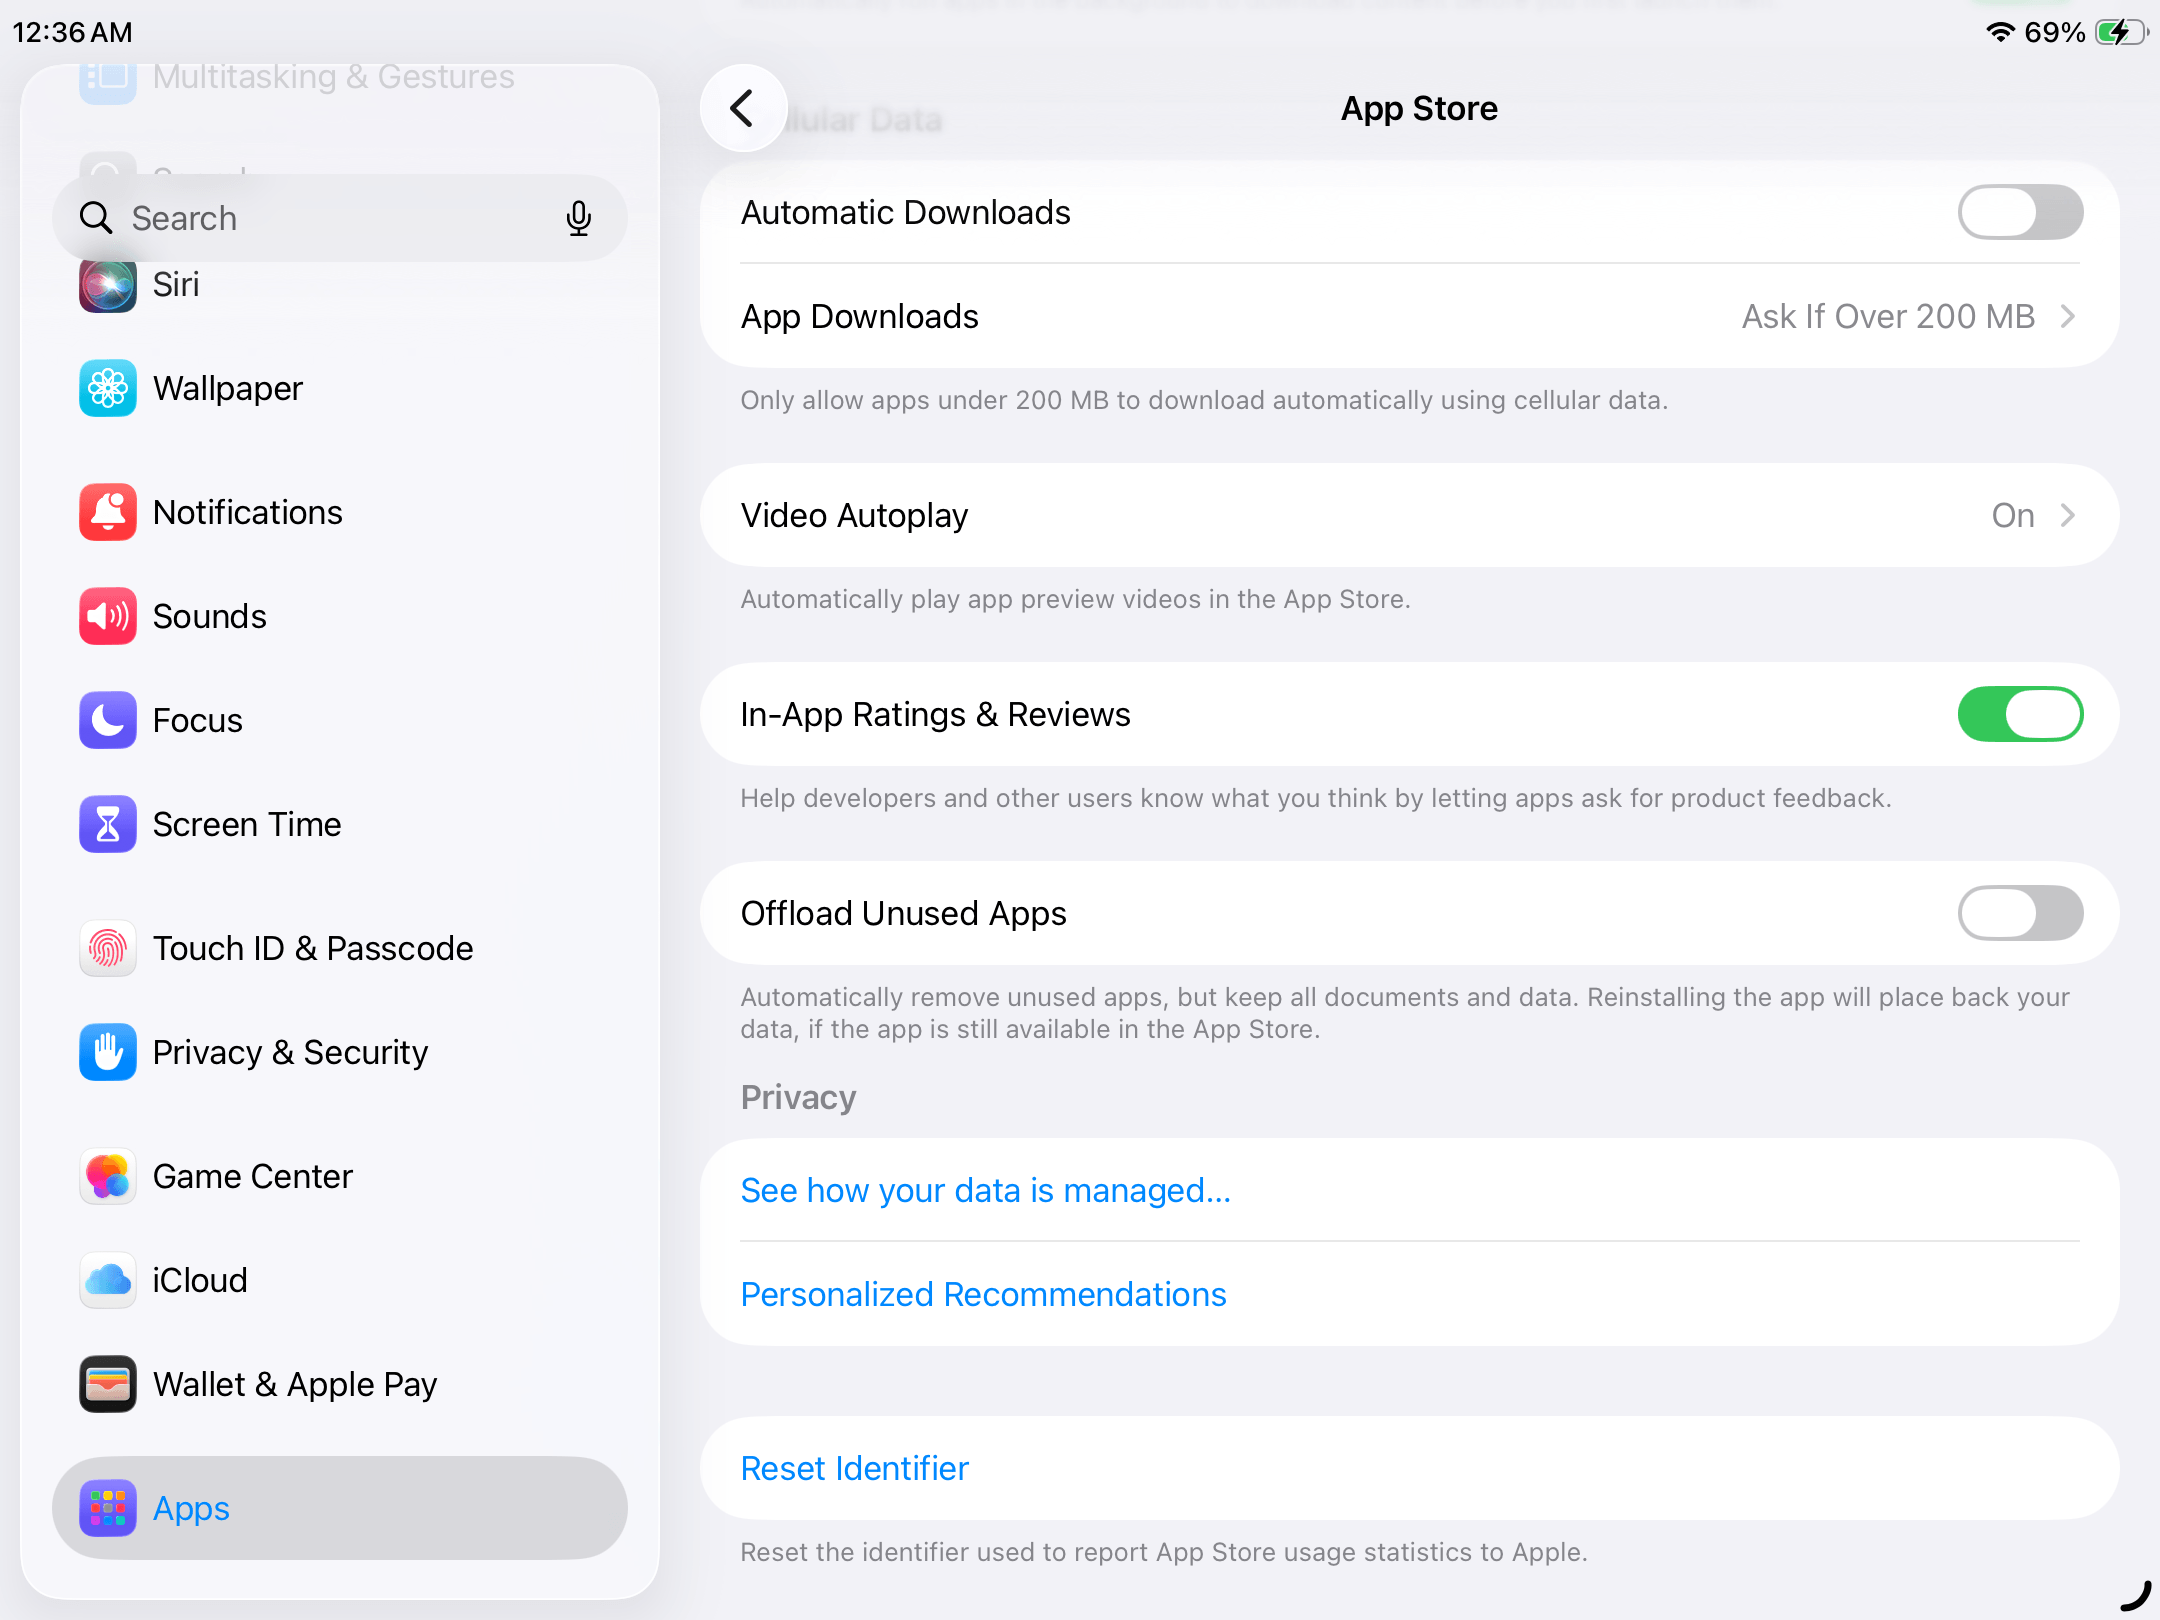
- Scroll down to the very bottom of the left sidebar and select Apps. Then, select the App Store, which is usually at the very top of the list.
- On the App Store settings page, scroll down to the bottom and locate the Offload Unused Apps setting. Slide the toggle switch to the ON position (it should turn green).
Optimize Photo Storage With iCloud
If you have a big library, one of the most powerful and convenient ways to manage its storage footprint is to activate the Optimize iPad Storage feature for iCloud Photos. When you enable this setting, iPadOS starts uploading the original, high-resolution copies of your photos and videos to iCloud’s servers.
Then, space-saving copies are retained on your device; this means that your library will normally take up much less storage space than it originally did. Don’t worry–the original, high-resolution versions of your media are redownloaded whenever you try to view, edit, or share them.
- Open the Settings app.
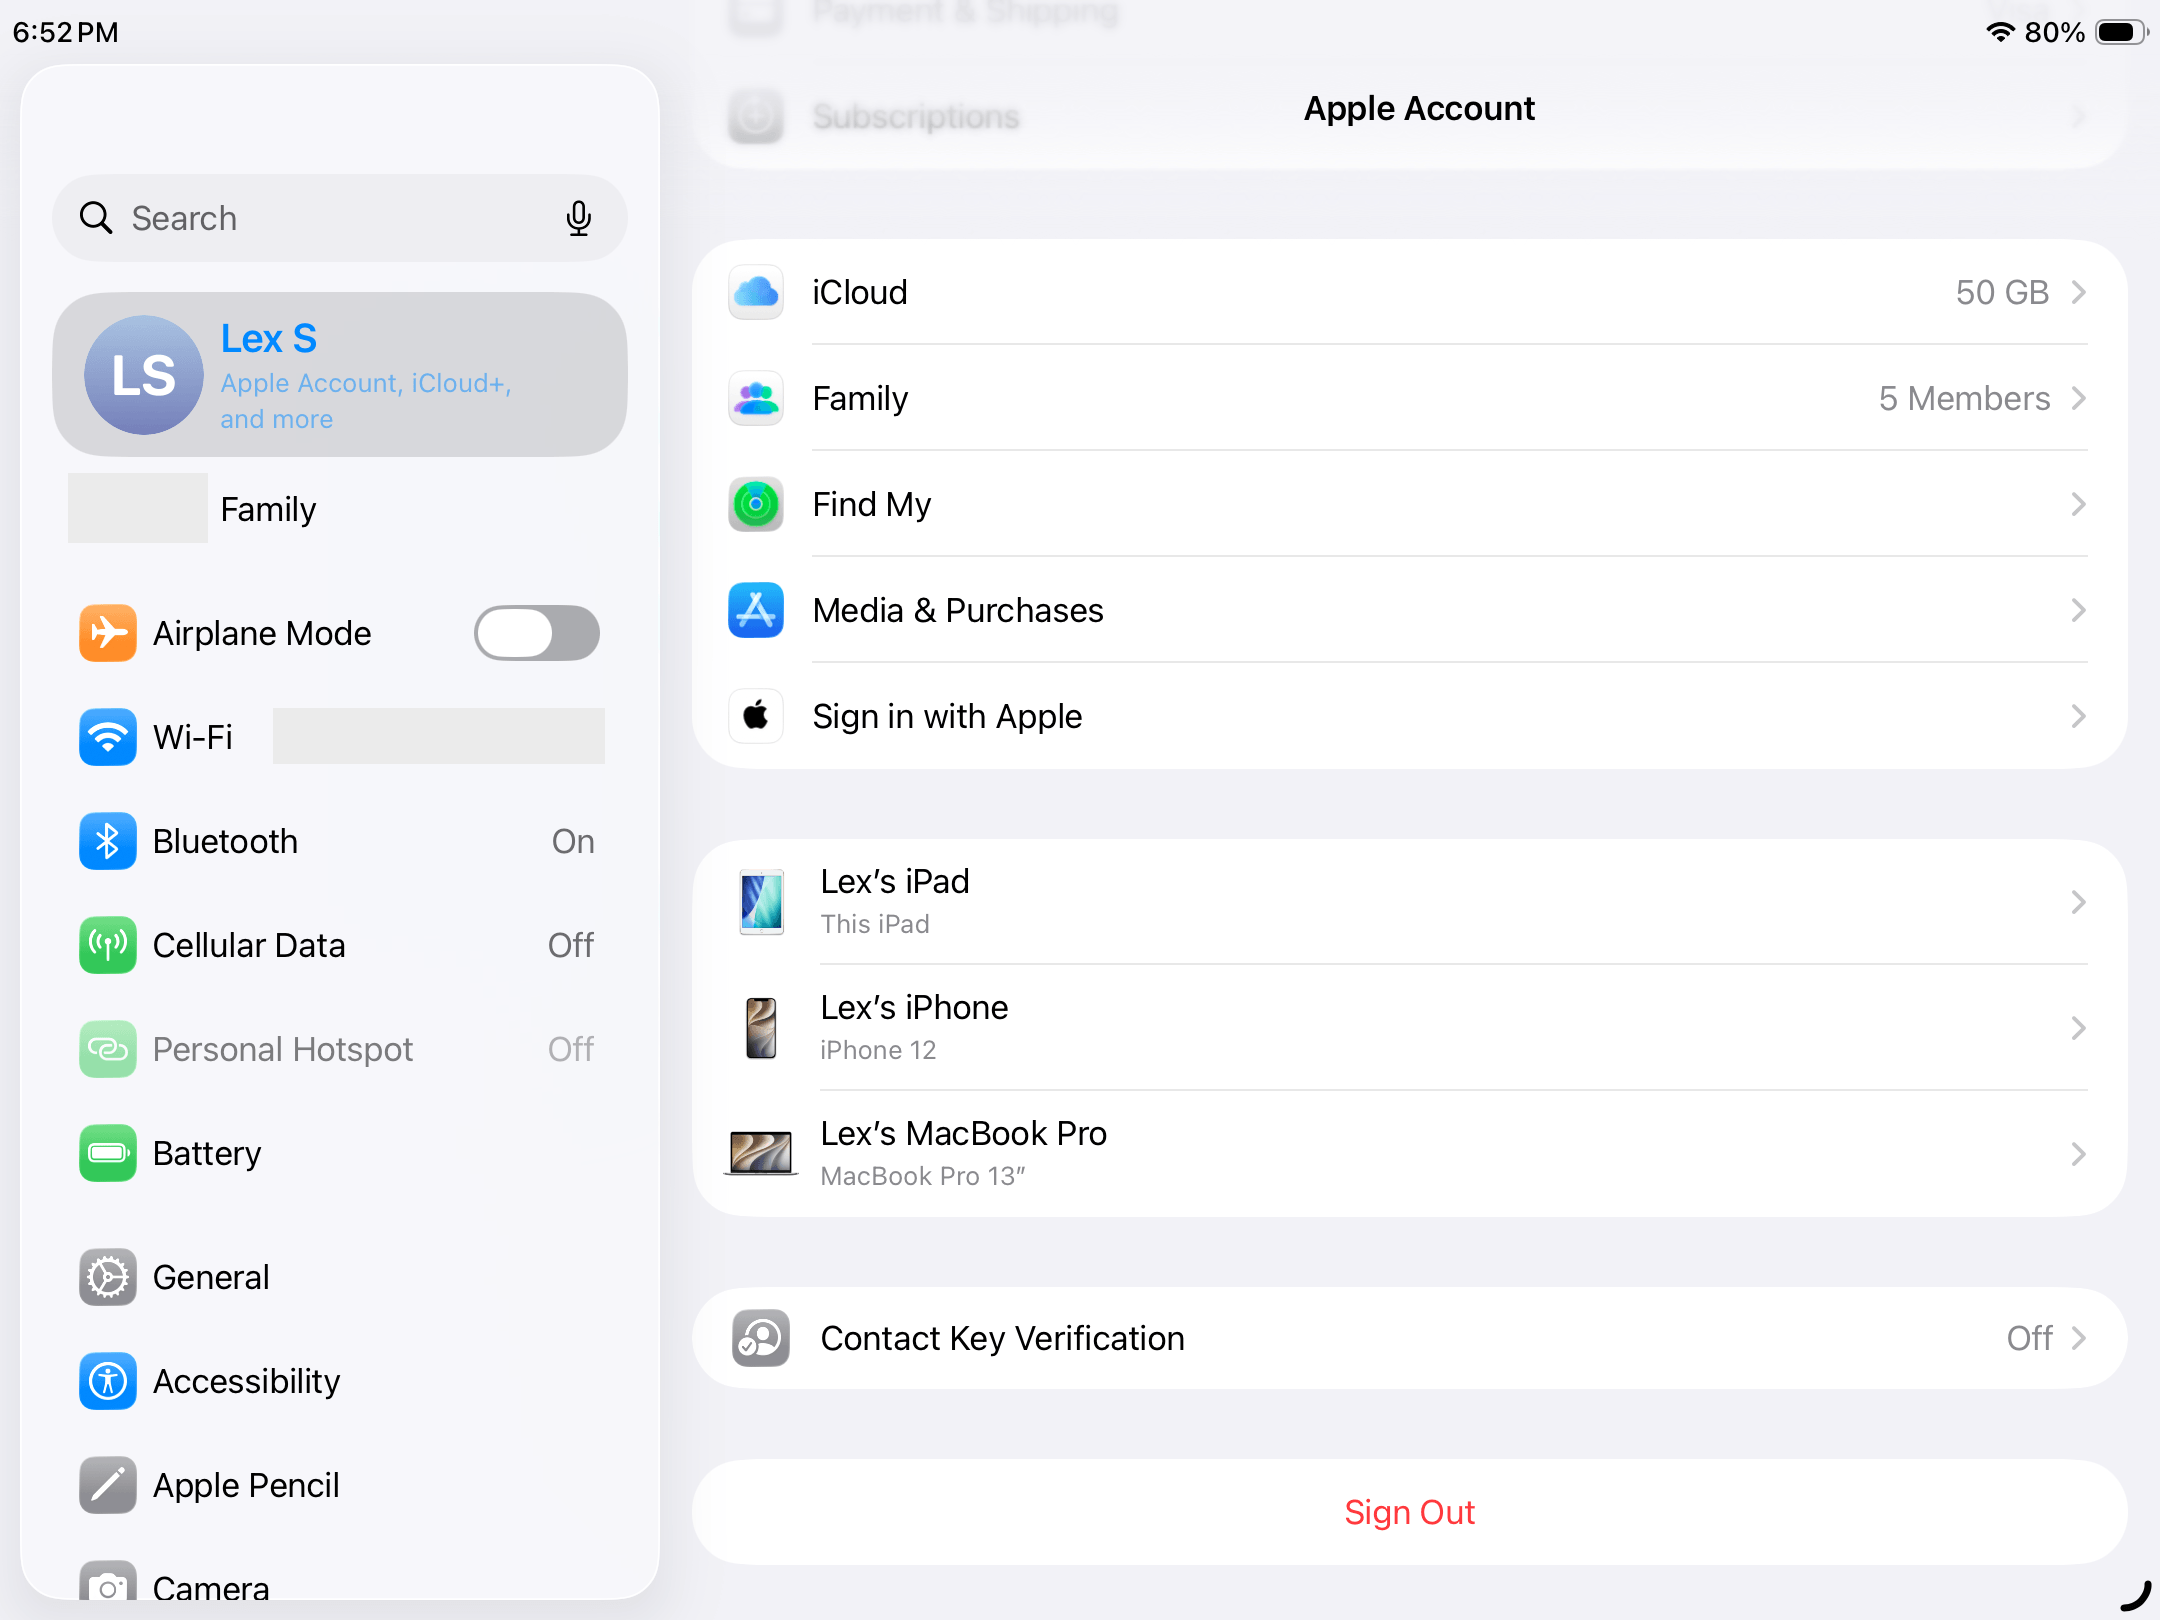
- In the left sidebar, tap your Apple ID. Then, scroll down the Apple Account page and select iCloud.
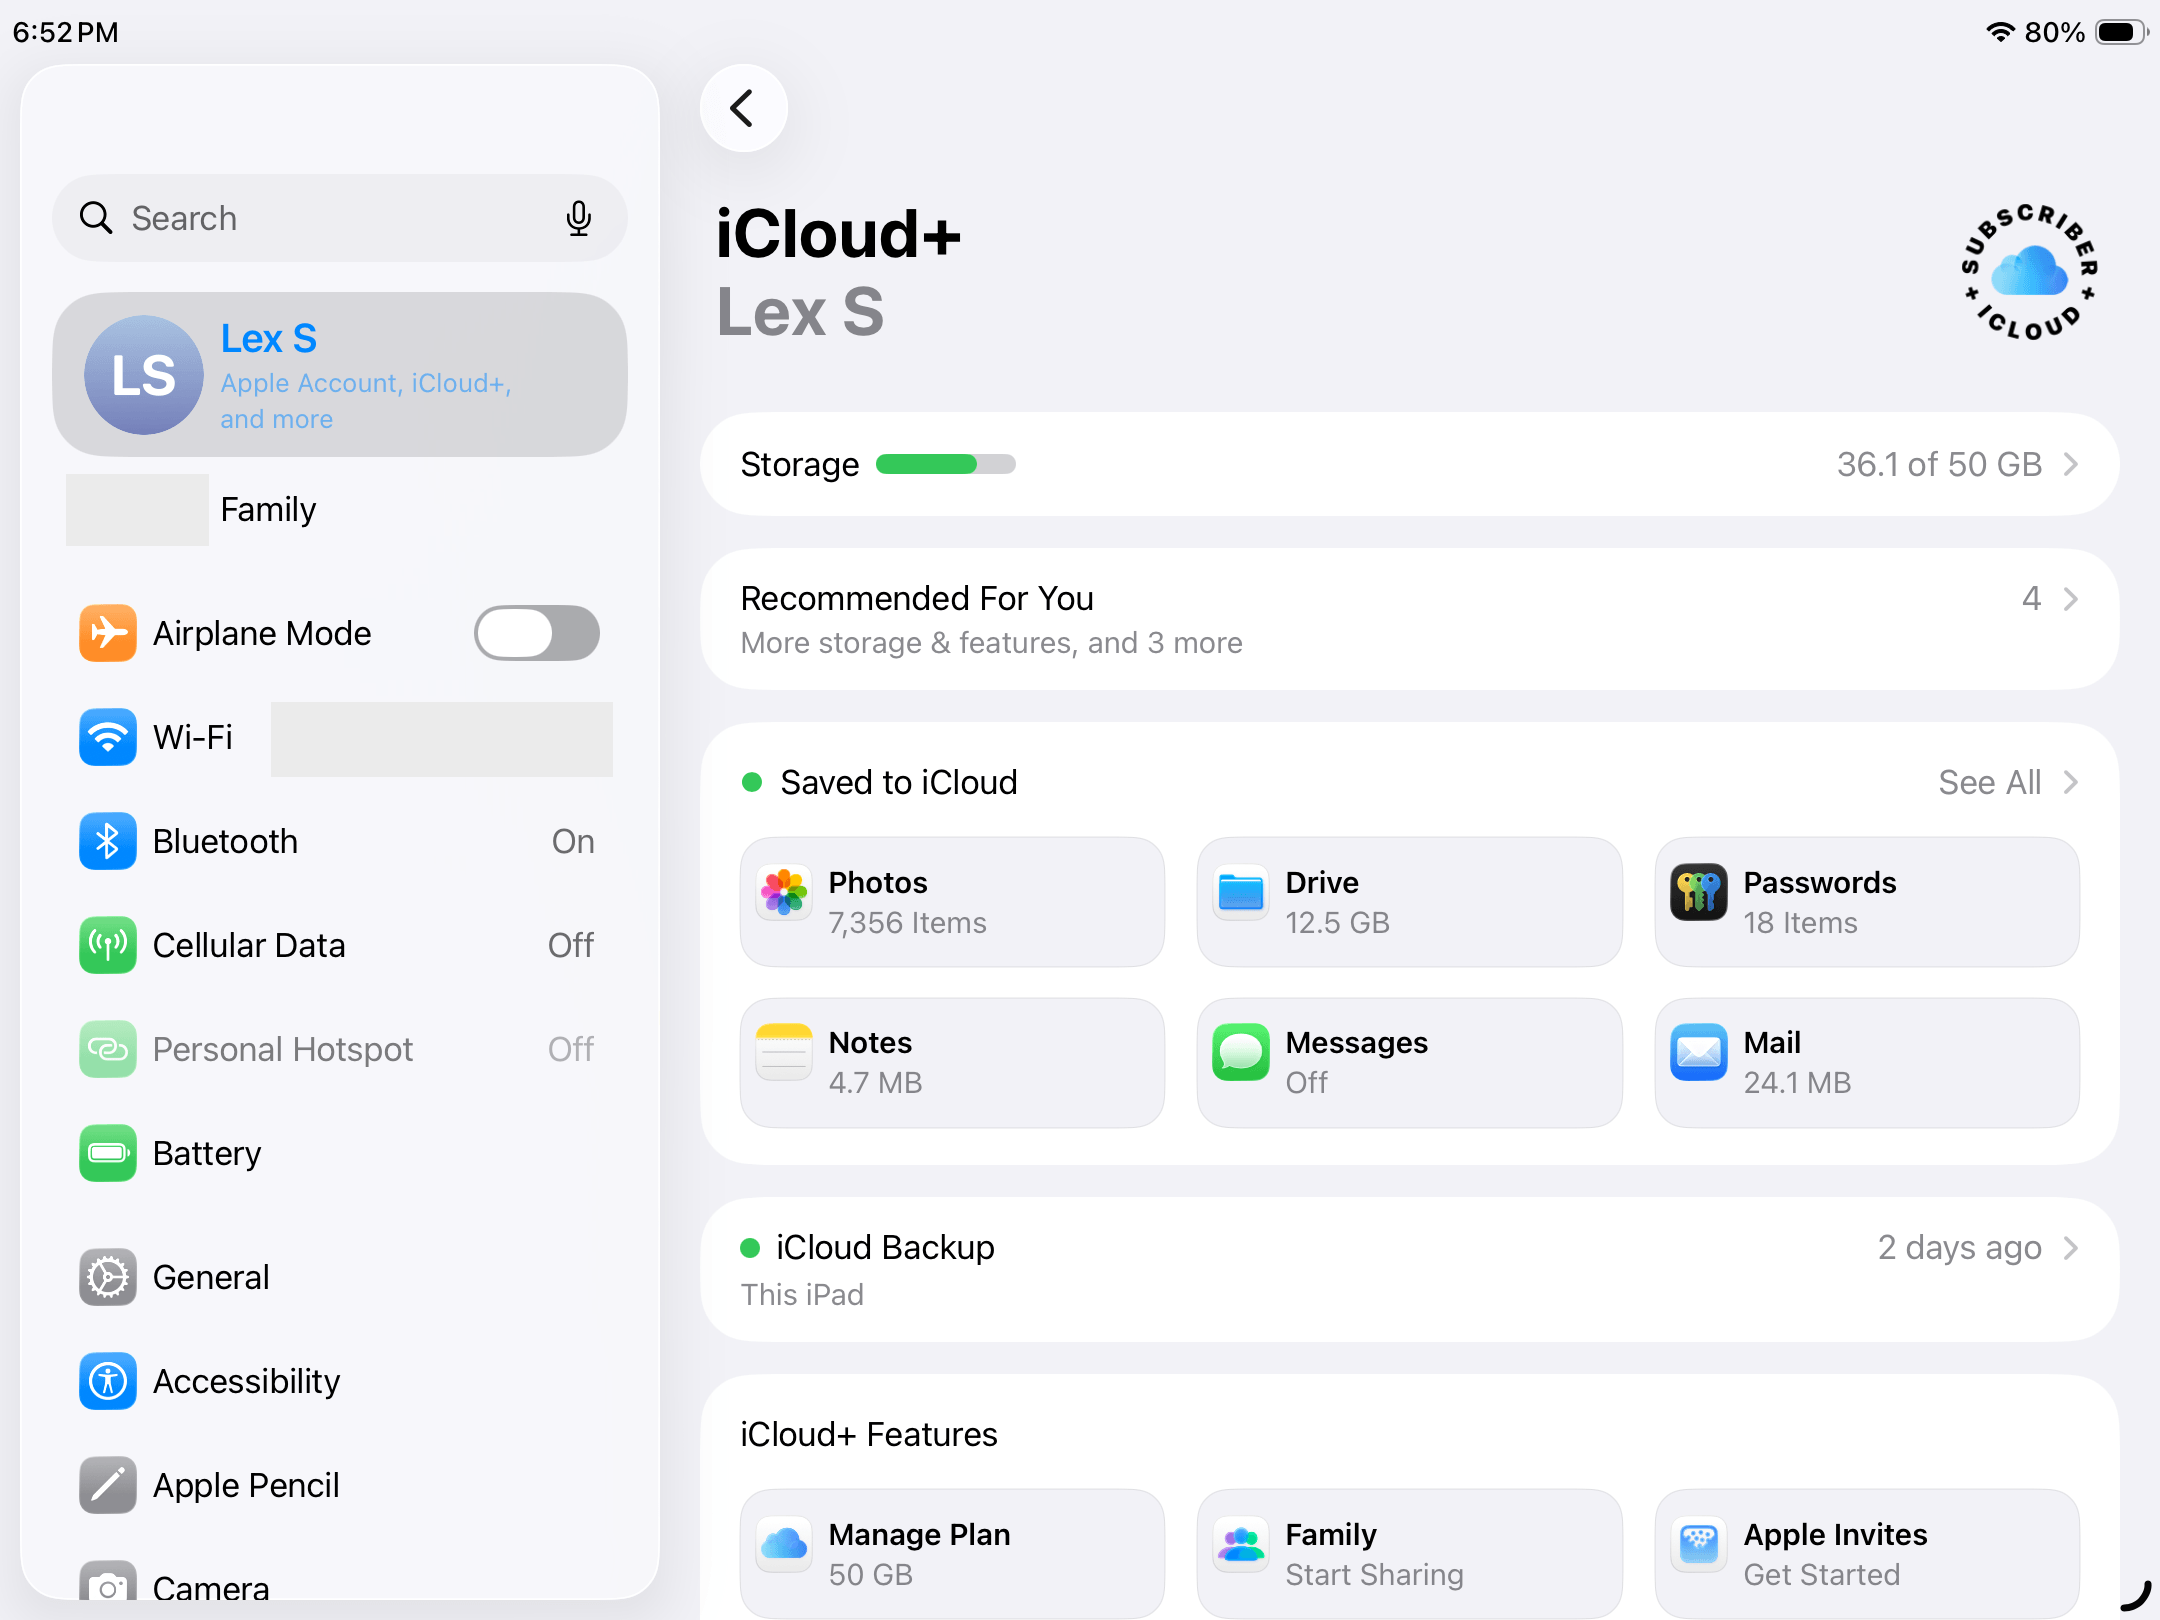
- In the Saved to iCloud section, tap Photos.
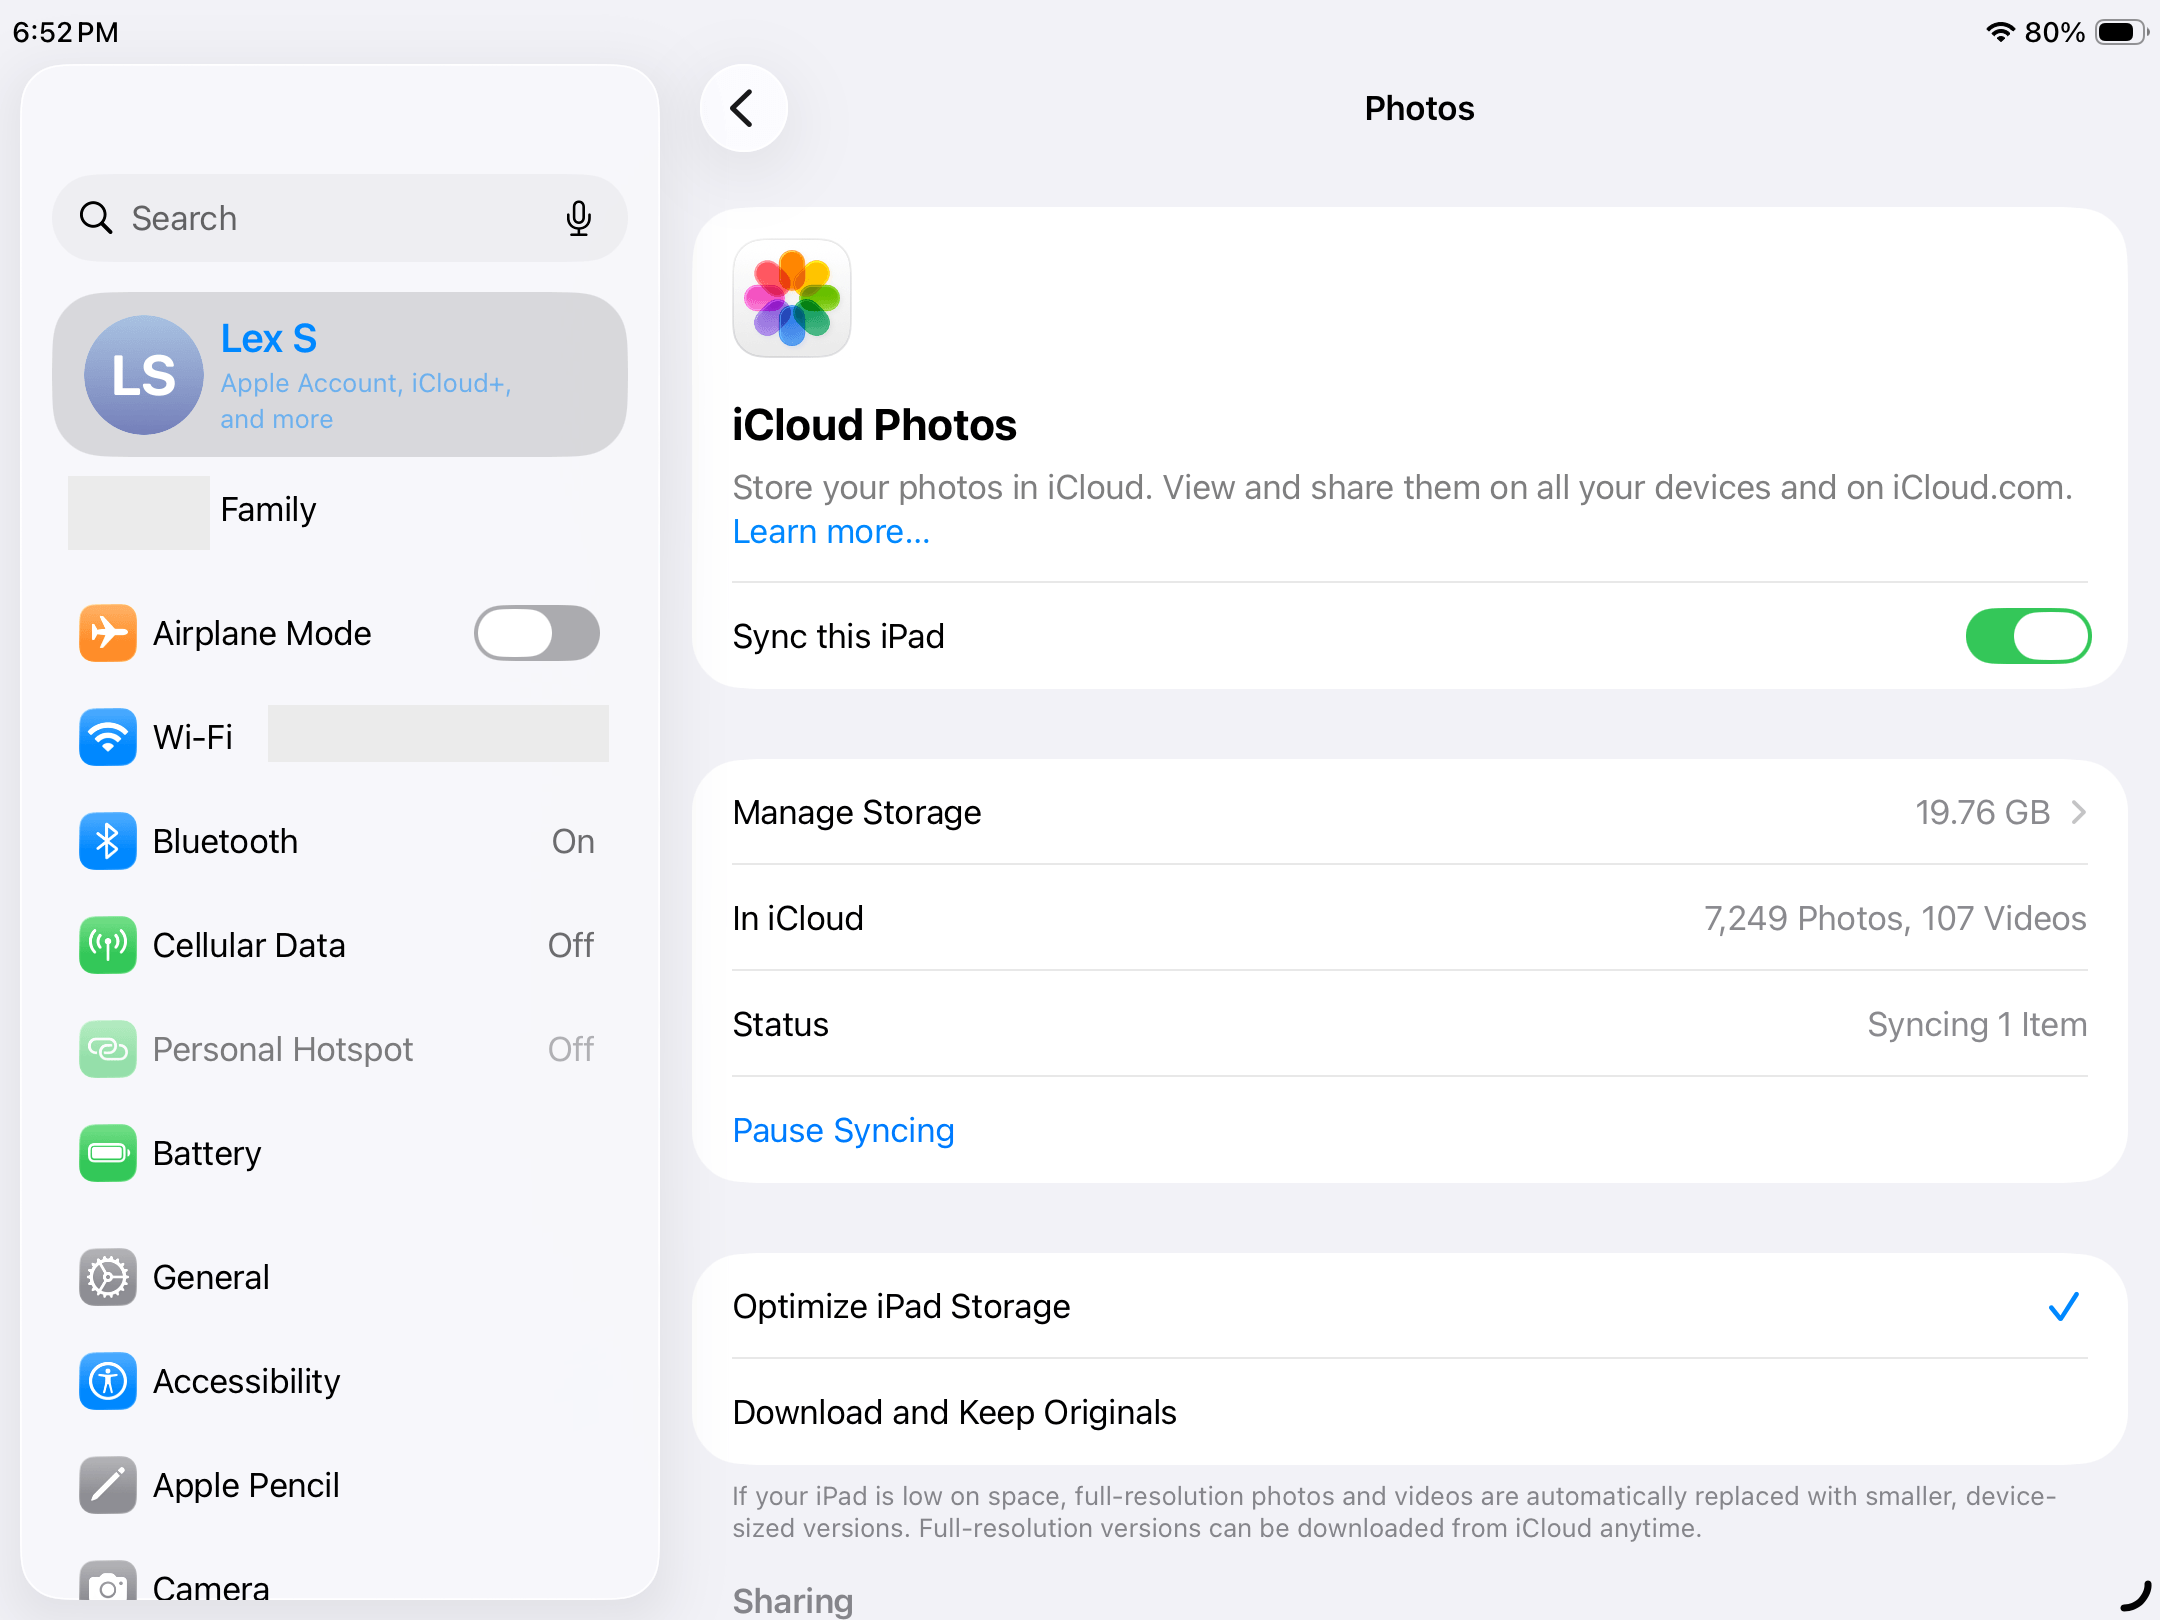
- Beside the Sync this iPad setting, slide the toggle switch to the ON position (it should turn green). Then, tap the Optimize iPad Storage option, which should result in a check mark ✔️ appearing beside it.
Limit Automatic and Offline Downloads
Many of the streaming apps that let you download offline content add an automation functionality. If you find a setting that sounds like “Smart Downloads” or “Automatic Downloads”, it lets you authorize the app to save content on your behalf, based on its recommendation system (e.g., Podcasts auto-downloads 5 episodes of a show).
Often, an auto-delete feature is not included. You’ll have to manually remove downloaded content you no longer want or have already consumed. We’ll show you how to disable this feature in the Podcasts app, but the process should look similar for any other streaming app.
- Open the Settings app.
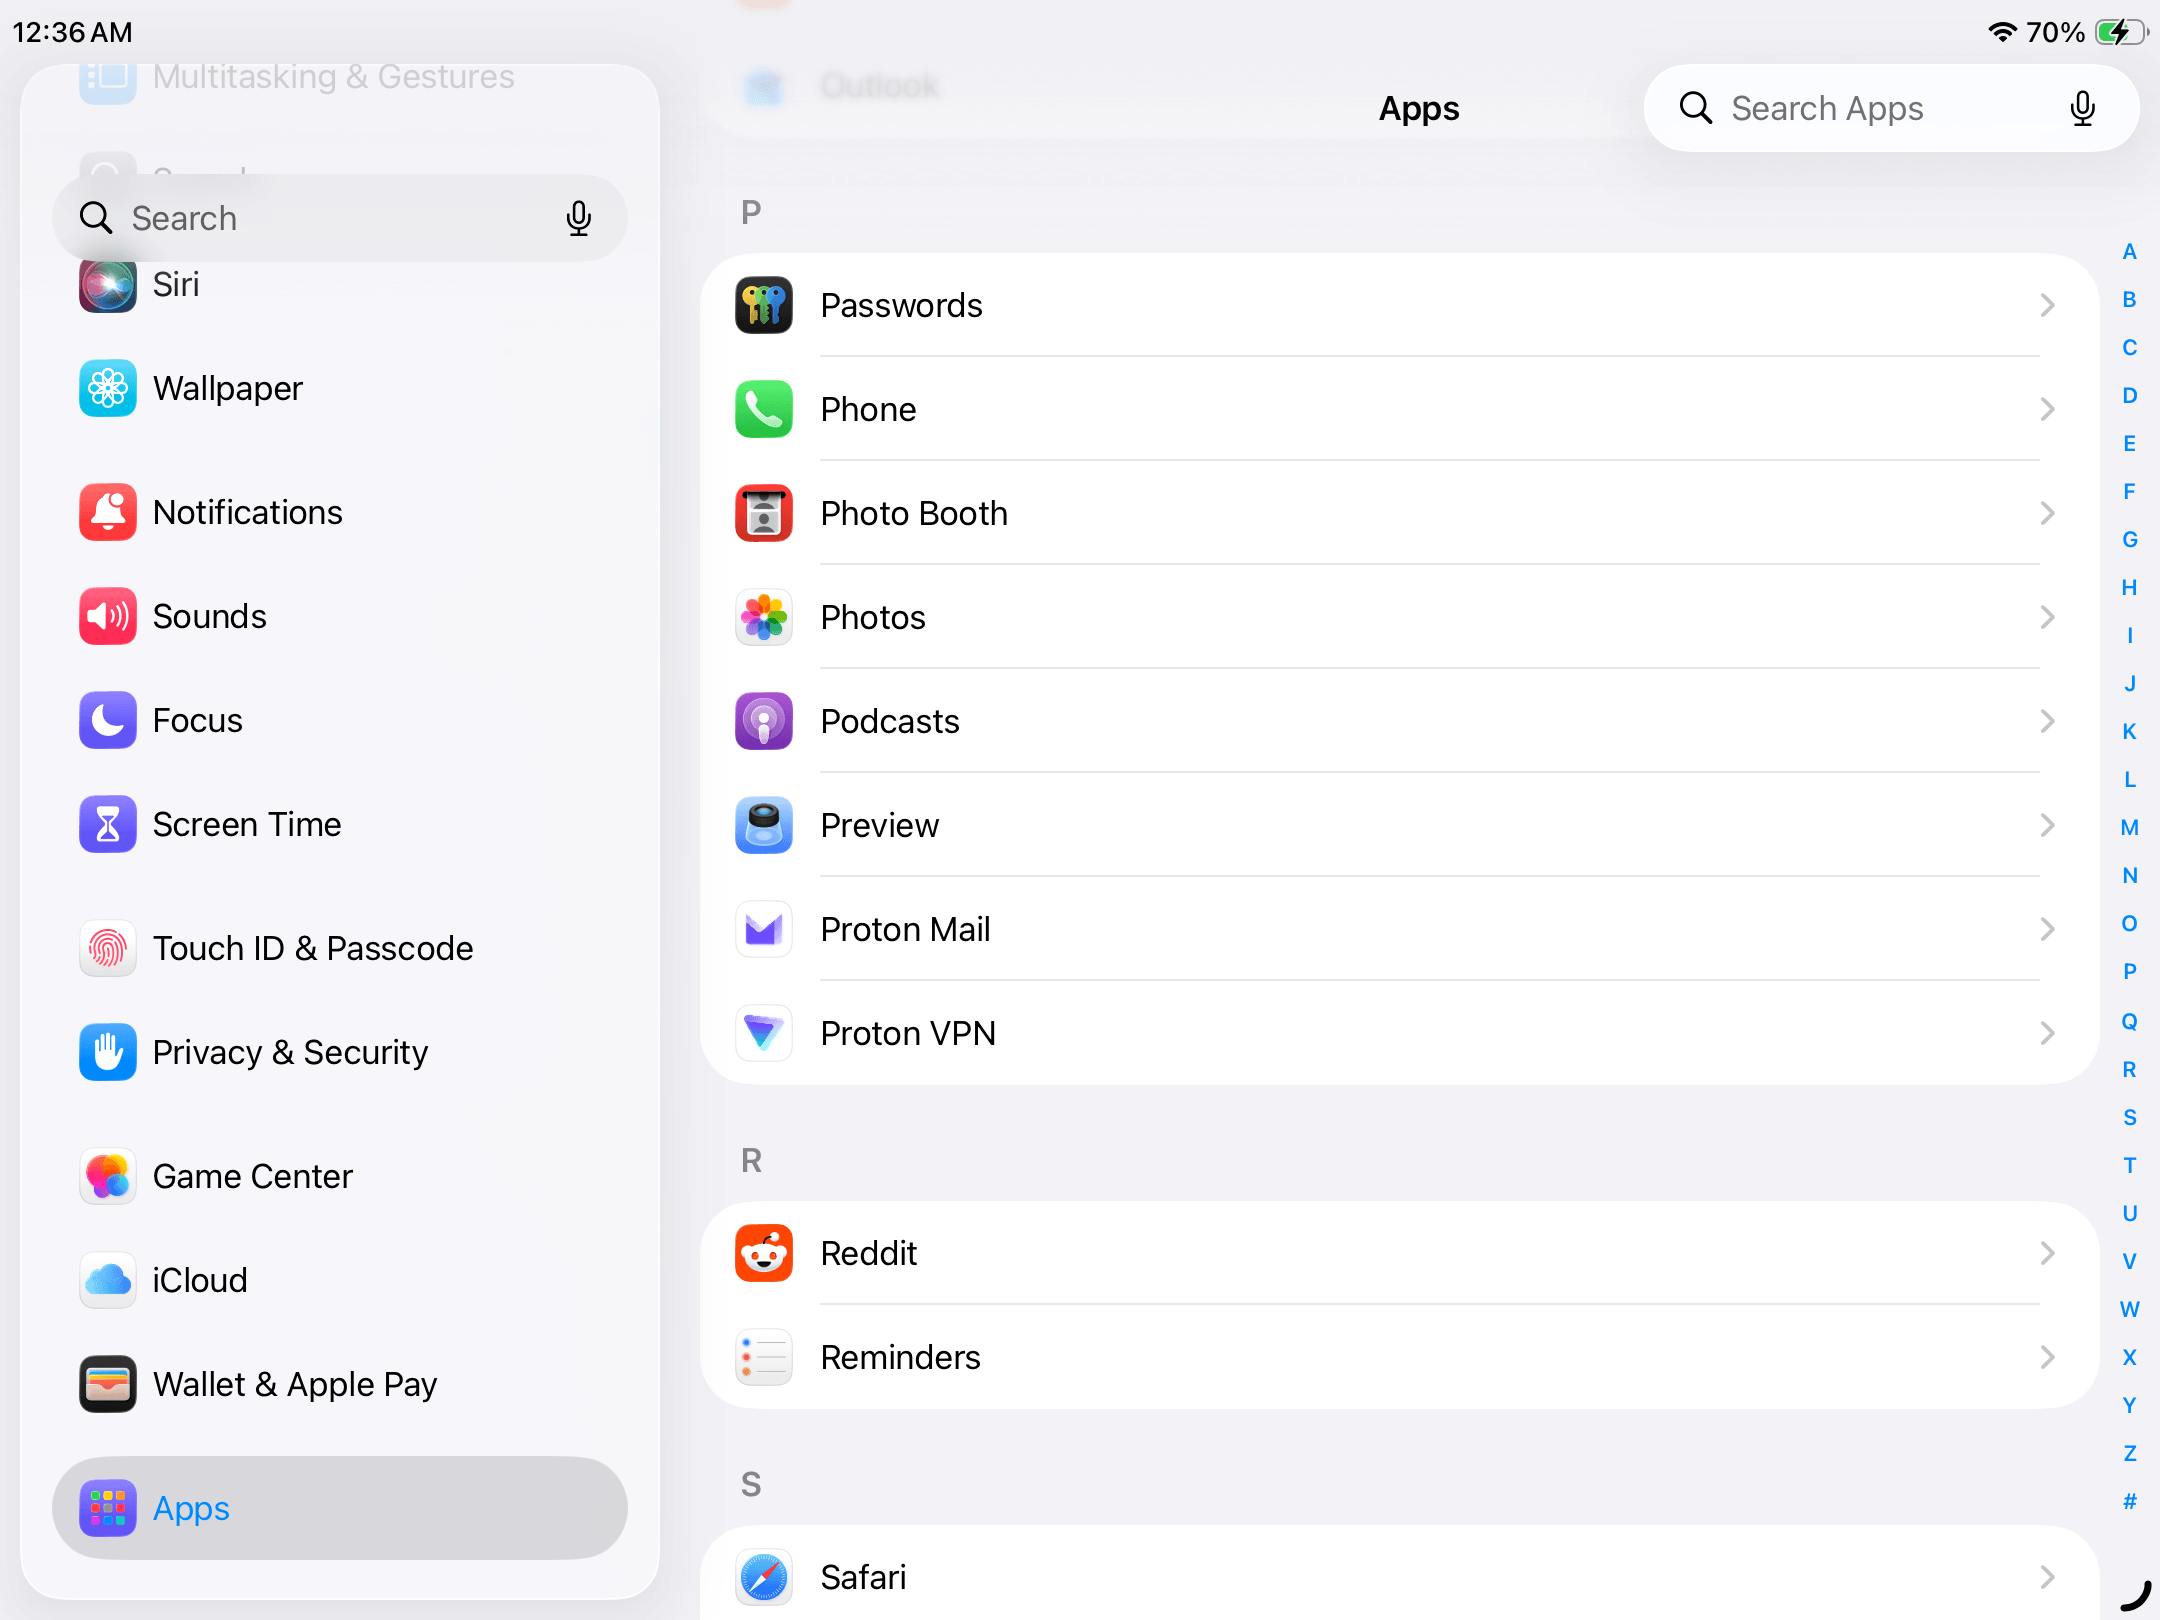
- Scroll down to the bottom of the left sidebar and select Apps. Then, locate and select Podcasts (or whichever app you want to modify the settings for).
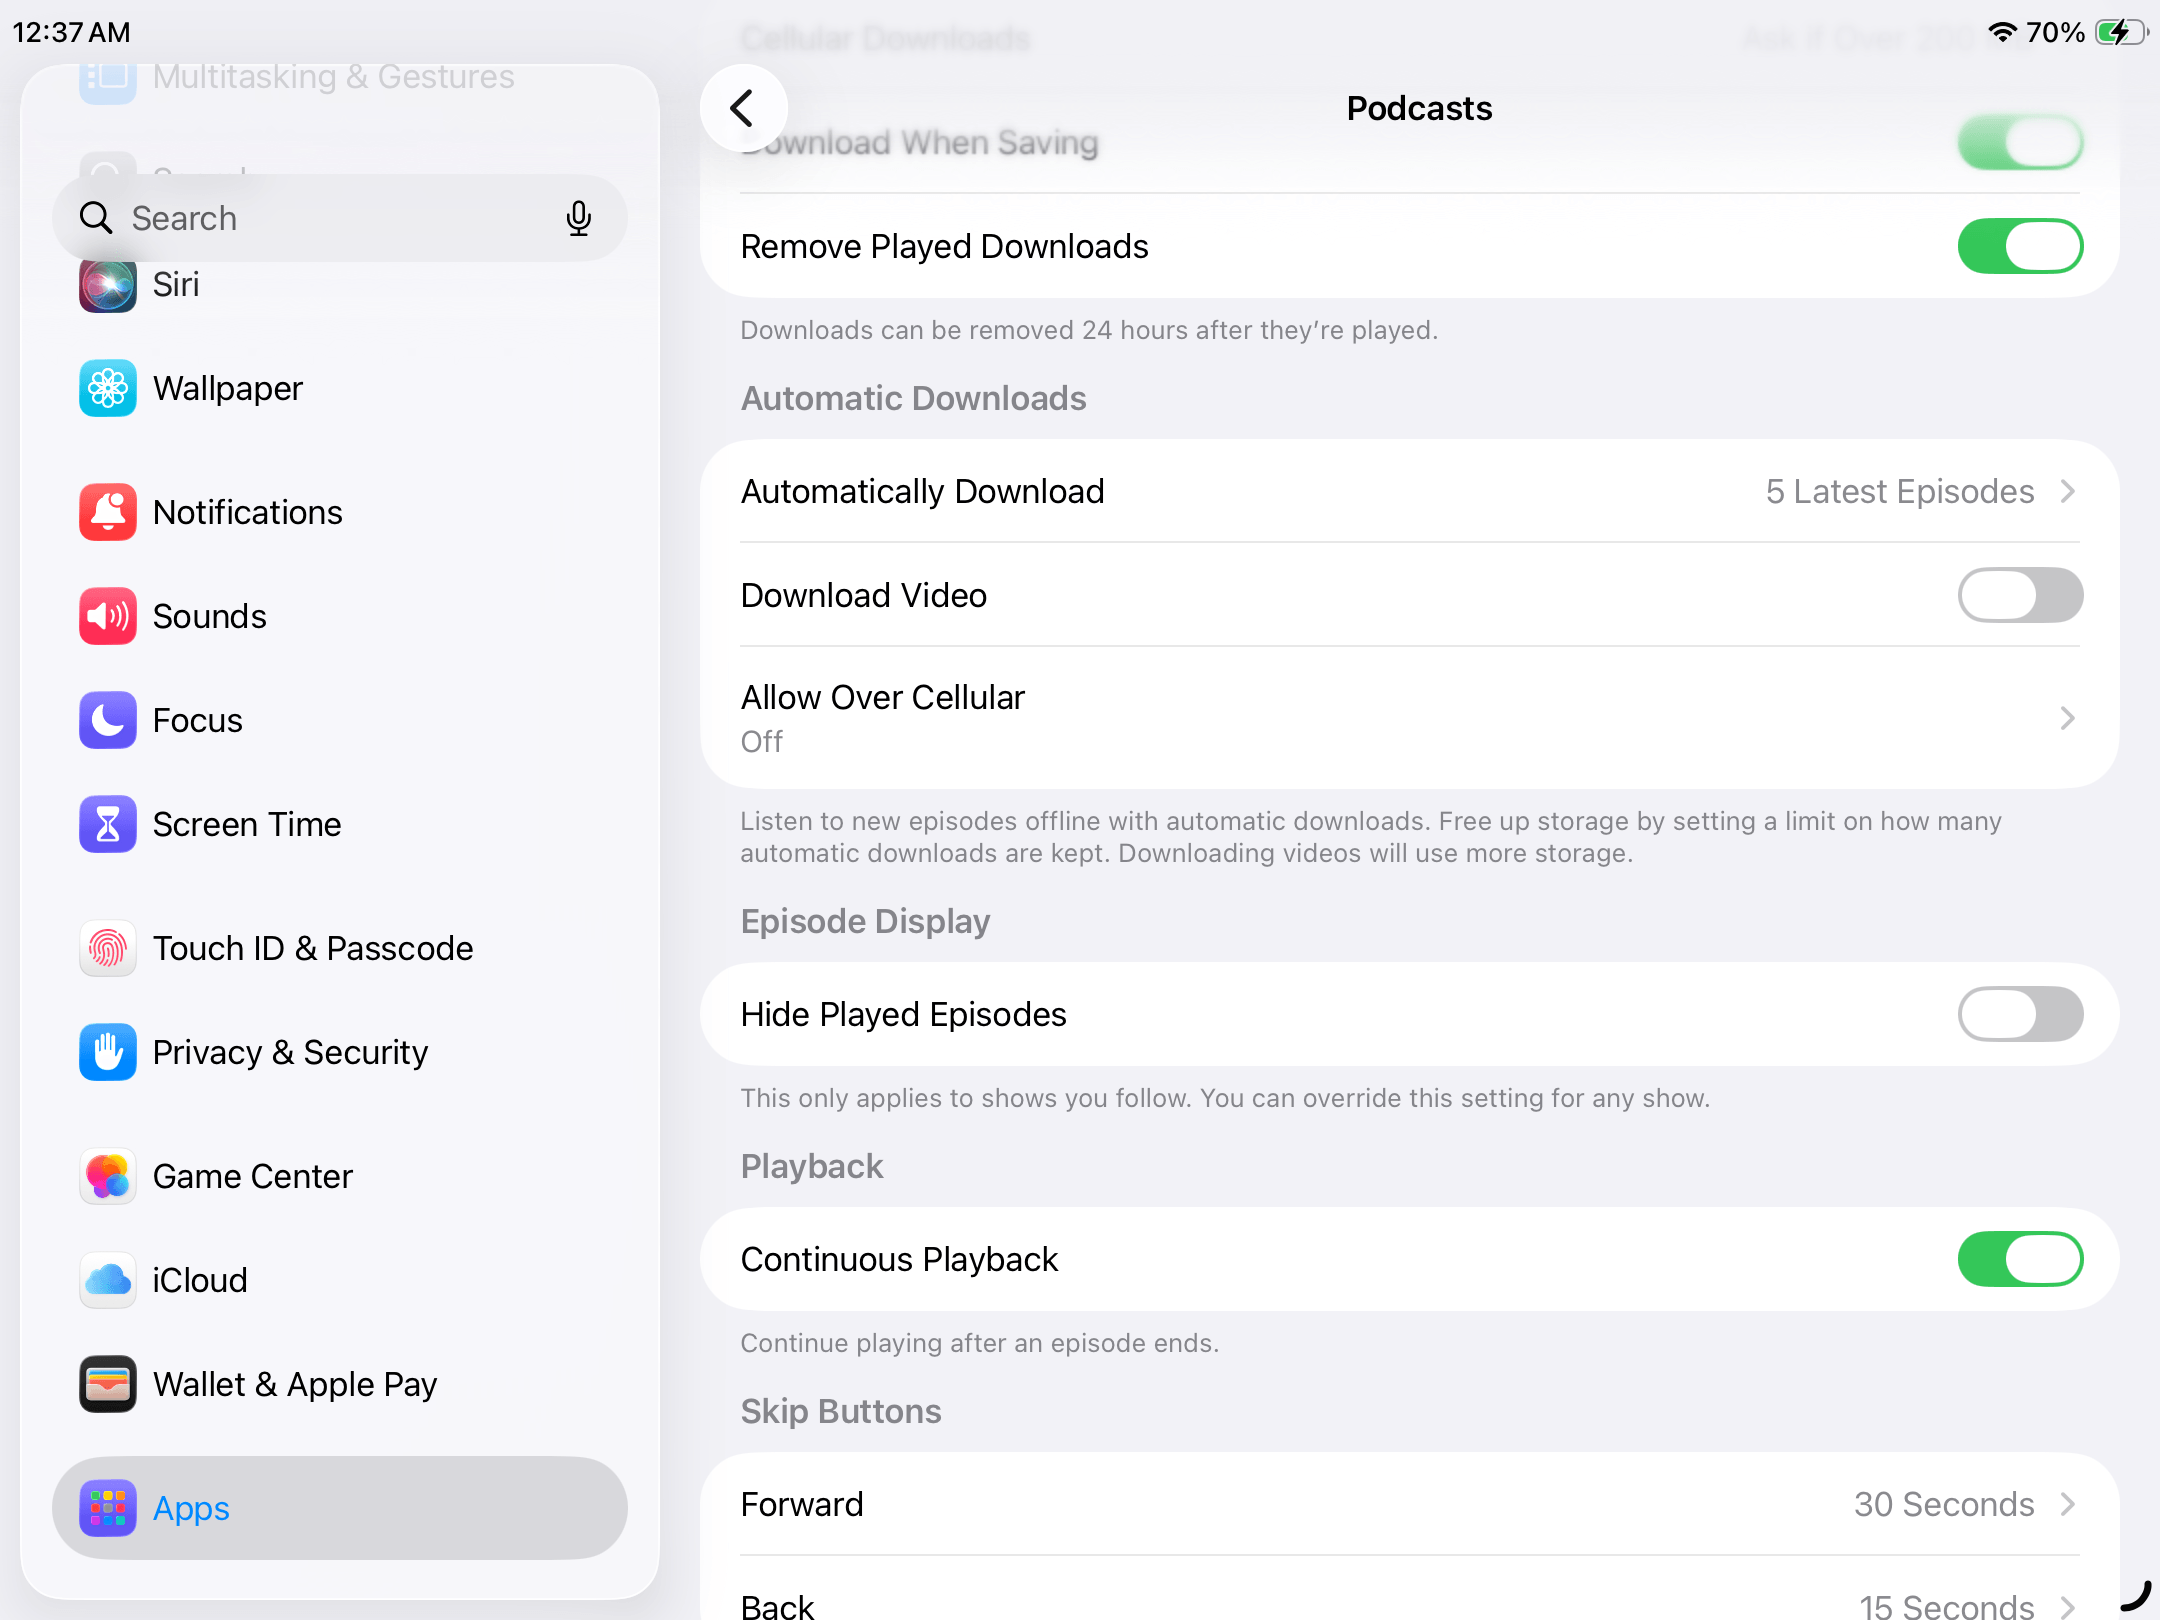
- On the app’s settings page, scroll down to the Automatic Downloads section and tap Automatically Download.
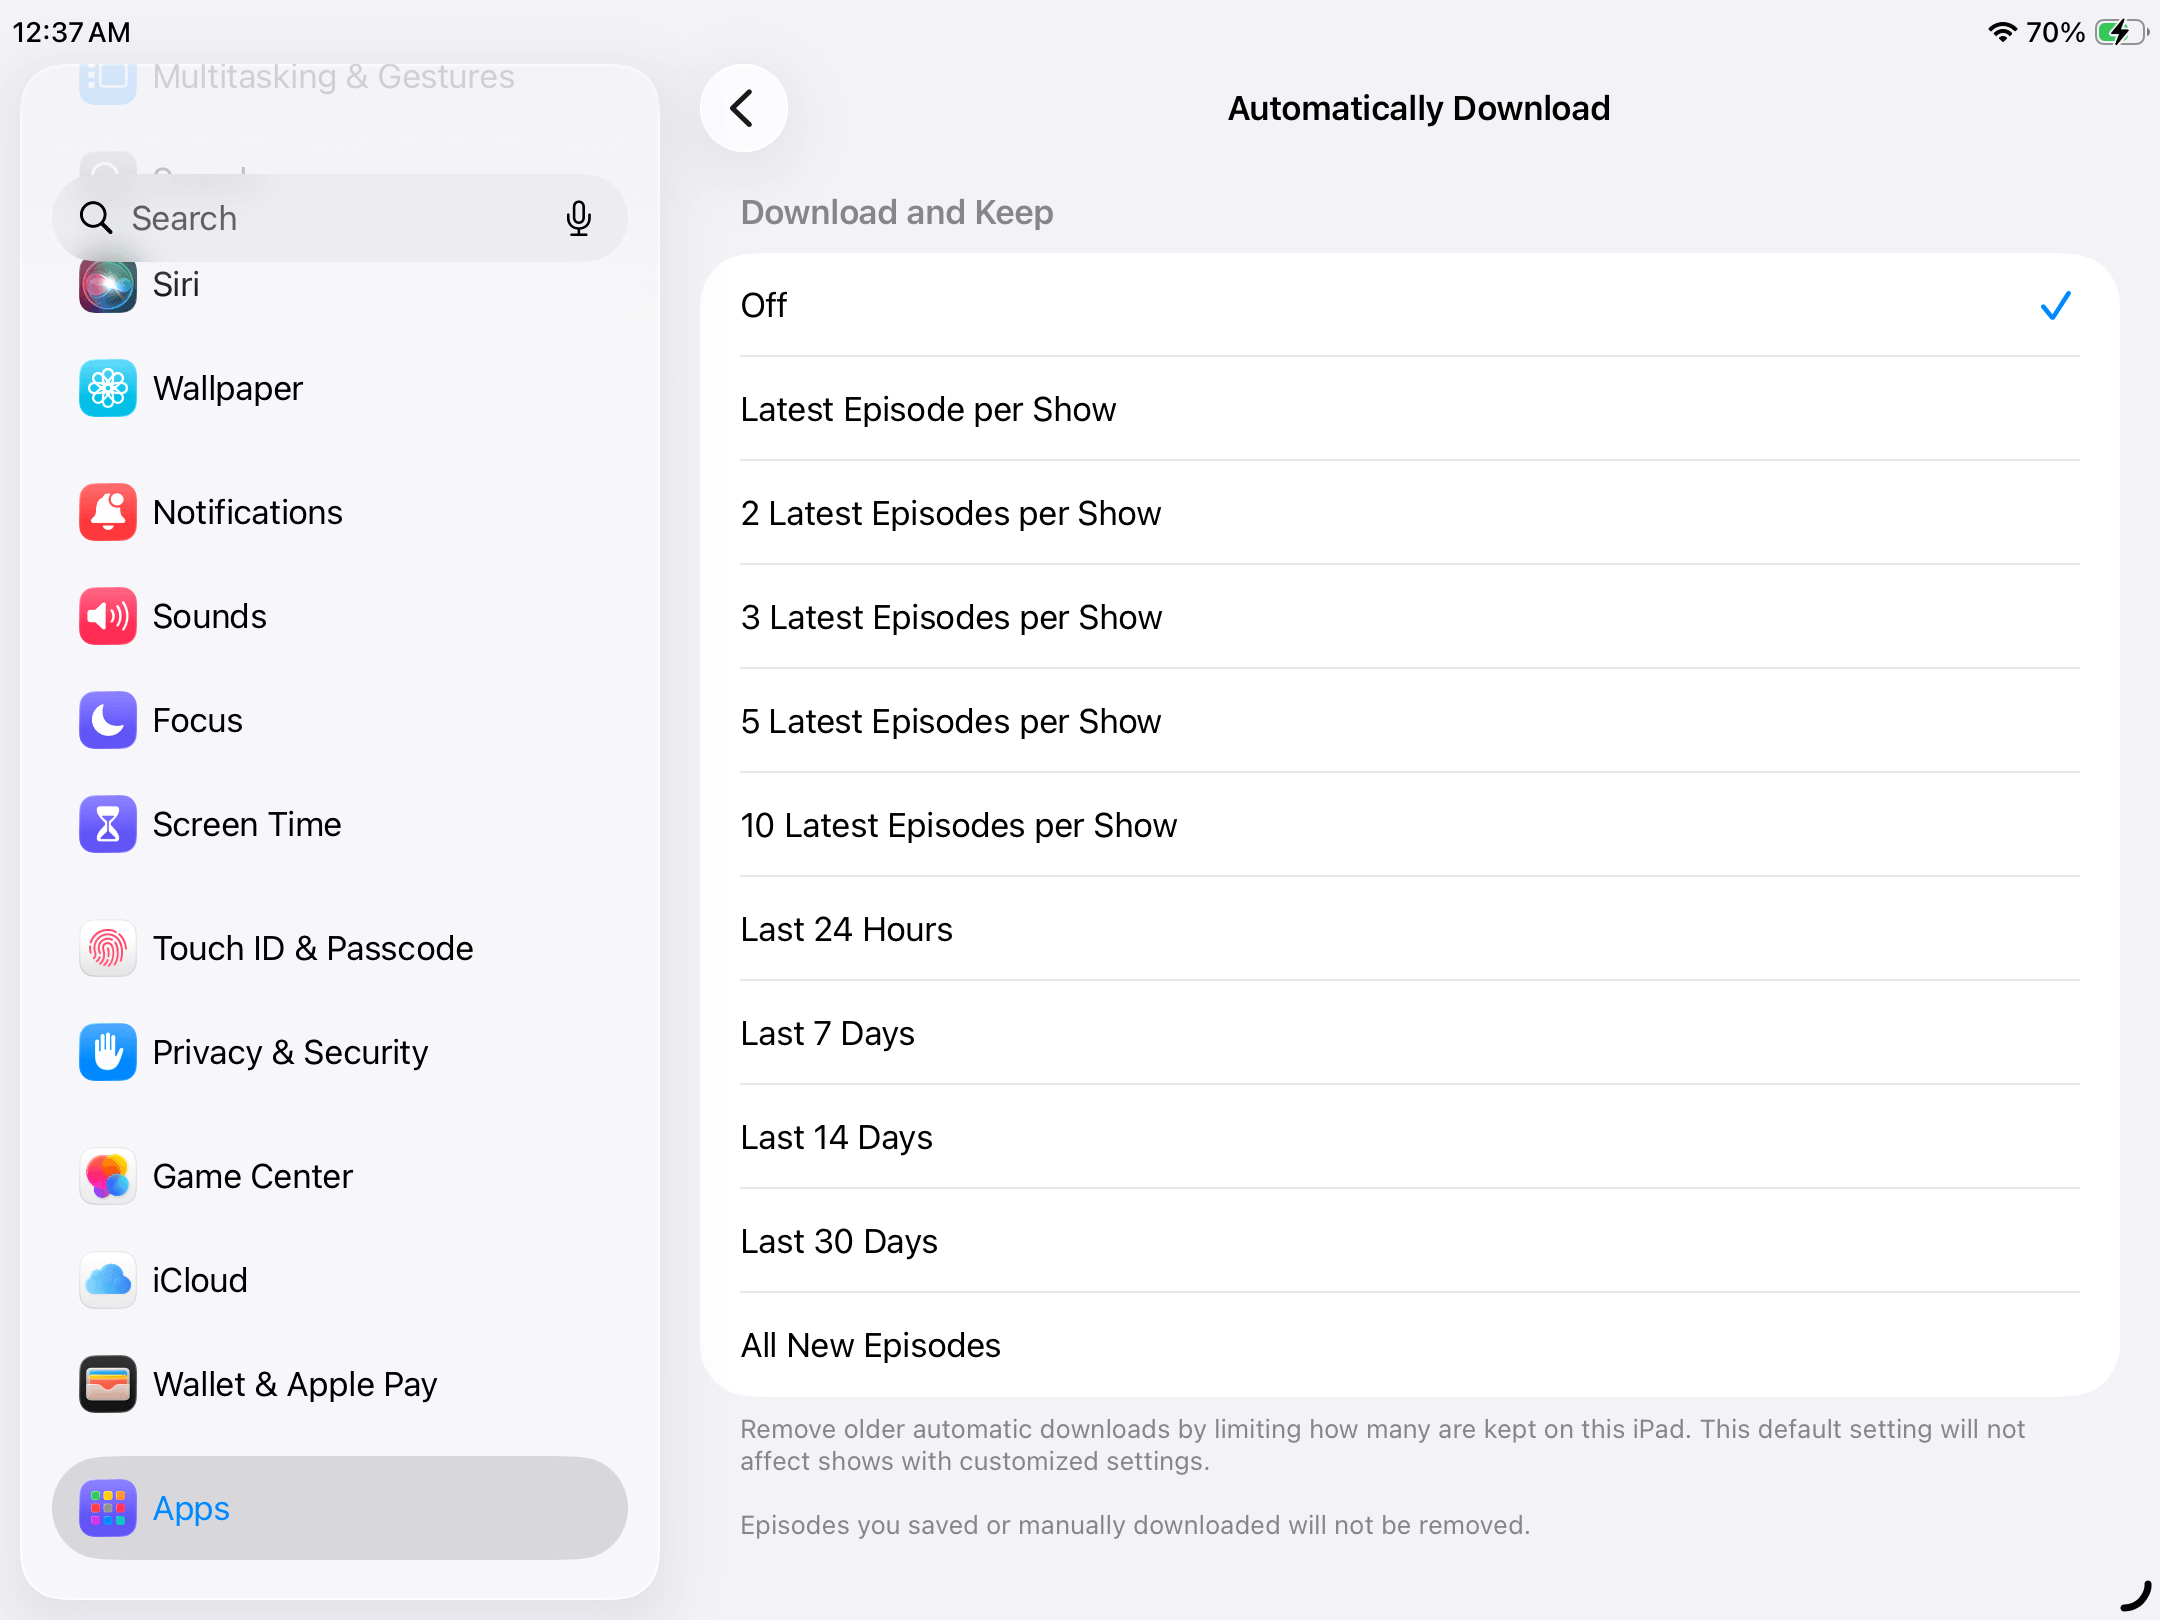
- Tap Off.
Check iPad Storage Periodically
The most straightforward way to keep your iPad storage under control is to simply be proactive about keeping it clean. And when you run low, the worst offenders are usually apps or your photo library—so keep an eye on the iPad Storage page (covered in this section) and regularly clean up your photos and videos.
Conclusion
We covered a lot of iPad cleanup strategies. So, here’s a short summary of each method we demonstrated, as well as their links, so you can easily jump back in later:
- Start with deleting old or unwanted apps.
- Next, clean up your photo library.
- For apps you do want to keep, try cleaning their caches.
- Got YouTube installed? If it looks bigger than usual, it may be due for a cleanup.
- If you send and receive a lot of attachments, it’s definitely worth cleaning up your messages.
- Downloaded files are easily forgotten. Check the Files app for anything you can delete. If you don’t want to delete anything, consider removing their local copies instead.
- Finally, check your remaining apps for any offline content you don’t need.
FAQ
Depending on what type of data takes up the most storage space on your iPad, there are two ways to instantly free up a lot of storage space:
- If you have a big library: Users with a massive number of photos and videos usually collect a lot of junk media along the way.
- If you have a lot of heavy apps: Uninstall or offload unused apps by opening the Settings app > General > iPad Storage. Sort your apps by size or date, then select any app and choose whether you want to uninstall it (removes all app files) or offload it (retains local data).
There are several possible reasons why your iPad storage is full, despite having few files:
- The files you do have on your iPad are large in size. For example, a single Apple ProRes video can consume hundreds of gigabytes, depending on its duration. Delete any unwanted videos, then compress the ones you want to keep.
- If you just deleted data or uninstalled apps, iPadOS may not have reindexed your files and recalculated storage use yet. Charge your iPad and leave it alone for an hour to give iPadOS more time and resources to perform these operations.
- A software bug is affecting file indexing or preventing accurate storage calculation; check if iPadOS has an available update, then install it.
- Some apps can grow much larger than when they were initially installed due to content updates and cache build-up. Consider reinstalling or offloading these apps.
Yes, deleting an app removes all of its data from your iPad’s local storage. If you want to keep app-related documents & data, offload the app instead.
The YouTube app on your iPad probably grew in size due to downloaded content. YouTube lets you download videos to watch offline, which are saved on your device’s local storage. Open the YouTube app > tap your profile icon > open the Downloads page, then remove any content you don’t want.
If your Messages are taking up a lot of space on your iPad, it’s likely due to attachments. The Messages app lets you send and receive various file attachments, like high-res photos or video clips, as long as they’re 100 MB or less. They automatically get saved to your local storage for offline access; you can remove their downloaded copies via the Messages app > open any conversation > tap your contact’s profile icon > navigate to the Photos category.
Yes, here are real methods (that we tested) to free up iPad storage without deleting files or, at least, affecting user data:
- Compress large photos and videos, then convert Live Photos to still images. Use an app like Clever Cleaner to get it done faster.
- Activate the Optimize iPad Storage feature for iCloud Photos (Settings app > Apple ID > iCloud > Photos).
- Remove local copies of your synced iCloud files (Files app > iCloud Drive > tap and hold a file or folder > Remove Download).
- Clear your browser and app caches, which only deletes non-user files like thumbnails and site cookies. If an app you want to clean doesn’t have a cache management feature, you can delete and reinstall it for the same effect.
- Offload unused apps, which removes the app’s binary but keeps its documents and data in your iPad’s local storage.
