Disk Drill is a data recovery tool with only one “forensics” feature so far: it returns the layout information for recovered files in a machine-readable format for further processing (CSV, SQLite database or DFXML). This allows for their forensic analysis for the purposes of identifying, preserving and retrieving sensitive data. DFXML export is available for hard drives, SSD, memory cards and other media storage devices that can be accessed directly. It’s not available for iOS and Android, as well as Time Machine, recovery, as there’s no direct access to the data storage layer.
To take advantage of this feature, you must have the Enterprise Edition of Disk Drill (or Expert if available at that time). This version can be purchased from the CleverFiles website. If you already have the PRO version, contact us about upgrading to Enterprise.
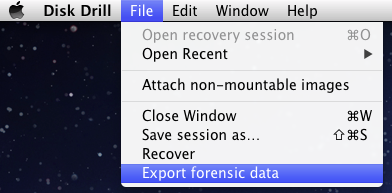
How to Export Forensic Data
Samples
The exported DFXML file (in XML format) will have the following format: XML sample #1, and XML sample #2.
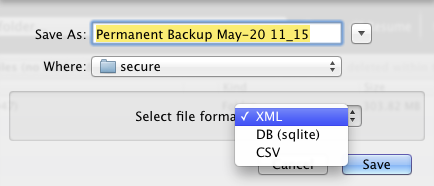
If you choose DB (sqlite) as your export format, the database will consist of two tables, which are the SQL-representations for Digital Forensic XML. The structure of the tables looks like this:
create table fileobject(
    fileid integer primary key,
    filename text,
    family text,
    filesize integer,
    mtime integer
);

create table run(
    fileid integer references fileobject(fileid),
    file_offset integer,
    img_offset integer,
    len integer
);
If you export forensic data into CSV, the data fields will be stored in this sequence:
filename, family, filesize, mtime, file_offset1, img_offset1, len1, …,
file_offset8, img_offset8, len8
Here are two samples of the CSV files generated by Disk Drill: CSV sample #1, and CSV sample #2.
Please note: Disk Drill can create and read plain non-compressed byte-to-byte disk images. This feature is used to save data from going-to-fail disks (like the ones that have bad sectors, etc.). One may also use it as a “forensics” feature, but there is no hashsum “signature” like in EWF to state that the image is a genuine unedited copy of the original disk.
We might consider adding support for reading and/or creation of EWF, split EWF, split RAW disk images in the future. Stay tuned.
Good news for all Disk Drill, CnW Recovery and GoPro Recovery fans and users, and…
Disk Drill 5.4 is a minor update, but it brings a lot to the table…
Disk Drill 5.4 is a minor update with a list of improvements worthy of a…
Download Disk Drill's new minor release - fully supports now publicly available macOS Sonoma (ver.…
New faster Disk Drill for macOS with improved support for RAID arrays, multiple interface enhancements,…
Disk Drill 5.3 has been released offering lots of improvements and fixes along with enhanced…