Thank you for choosing Disk Drill Data Recovery app from the Mac App Store. You are minutes away from restoring your data, but first we would like to walk you through the data recovery process. We ask that you join us in this guide to ensure that you get the most out of Disk Drill Data Recovery and do not experience any issues with file recovery.
One common issue users run into is that Disk Drill Data Recovery runs in a sandboxed environment, which means it can’t access your drives directly. Fortunately, this limitation is easy to fix with a few simple steps.
This tutorial will not only discuss solutions to the above issue, but will also show you how to get your data back in just a few simple clicks. If you still have questions after completing this tutorial or need additional help, please, feel free to contact us, the CleverFiles team is always on standby and happy to help.
Option #1: The Easiest Way — Enable SSH for Disk Drill Data Recovery
If you want to recover lost files quickly without creating an uncompressed disk image, the fastest approach is enabling SSH (Secure Shell) on the Mac you’re recovering data from. SSH is a secure network protocol that lets you access a Mac remotely over an encrypted connection. This method lets Disk Drill Data Recovery connect to your Mac over the local network so you can scan and backup connected drives with minimal setup.
1. Enable Remote Login in macOS
To connect to your Mac through SSH, you’ll first need to turn on Remote Login:
- Open System Settings (or System Preferences on older macOS versions).
- Go to:
- macOS 13+: General → Sharing;
- macOS 12 and earlier: Sharing.
- Turn on Remote Login.
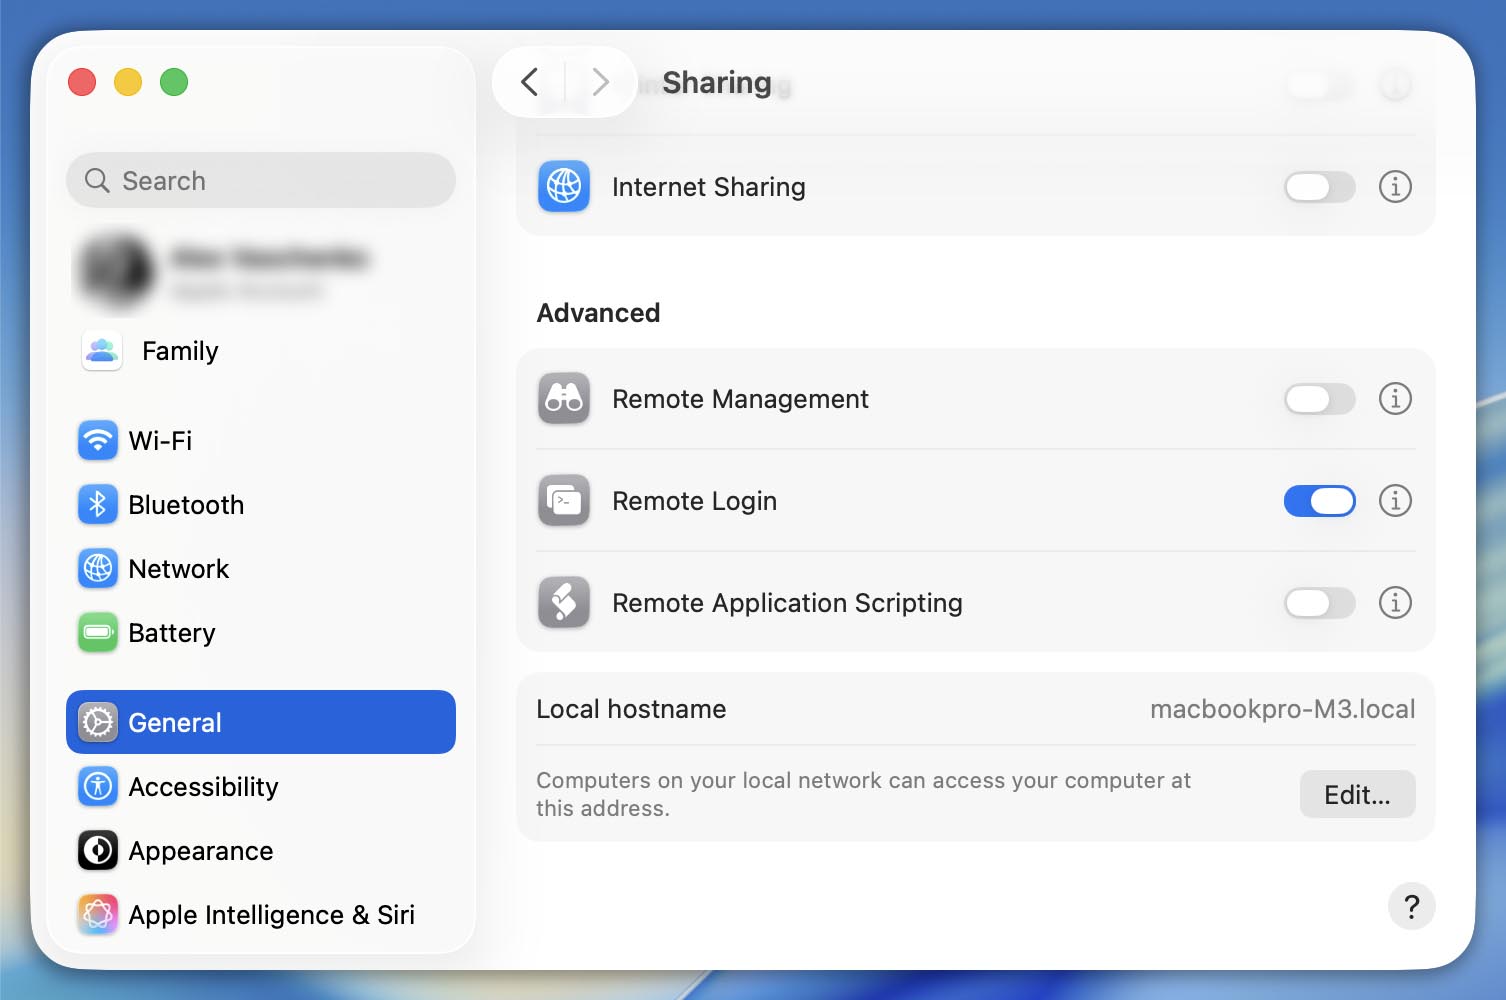
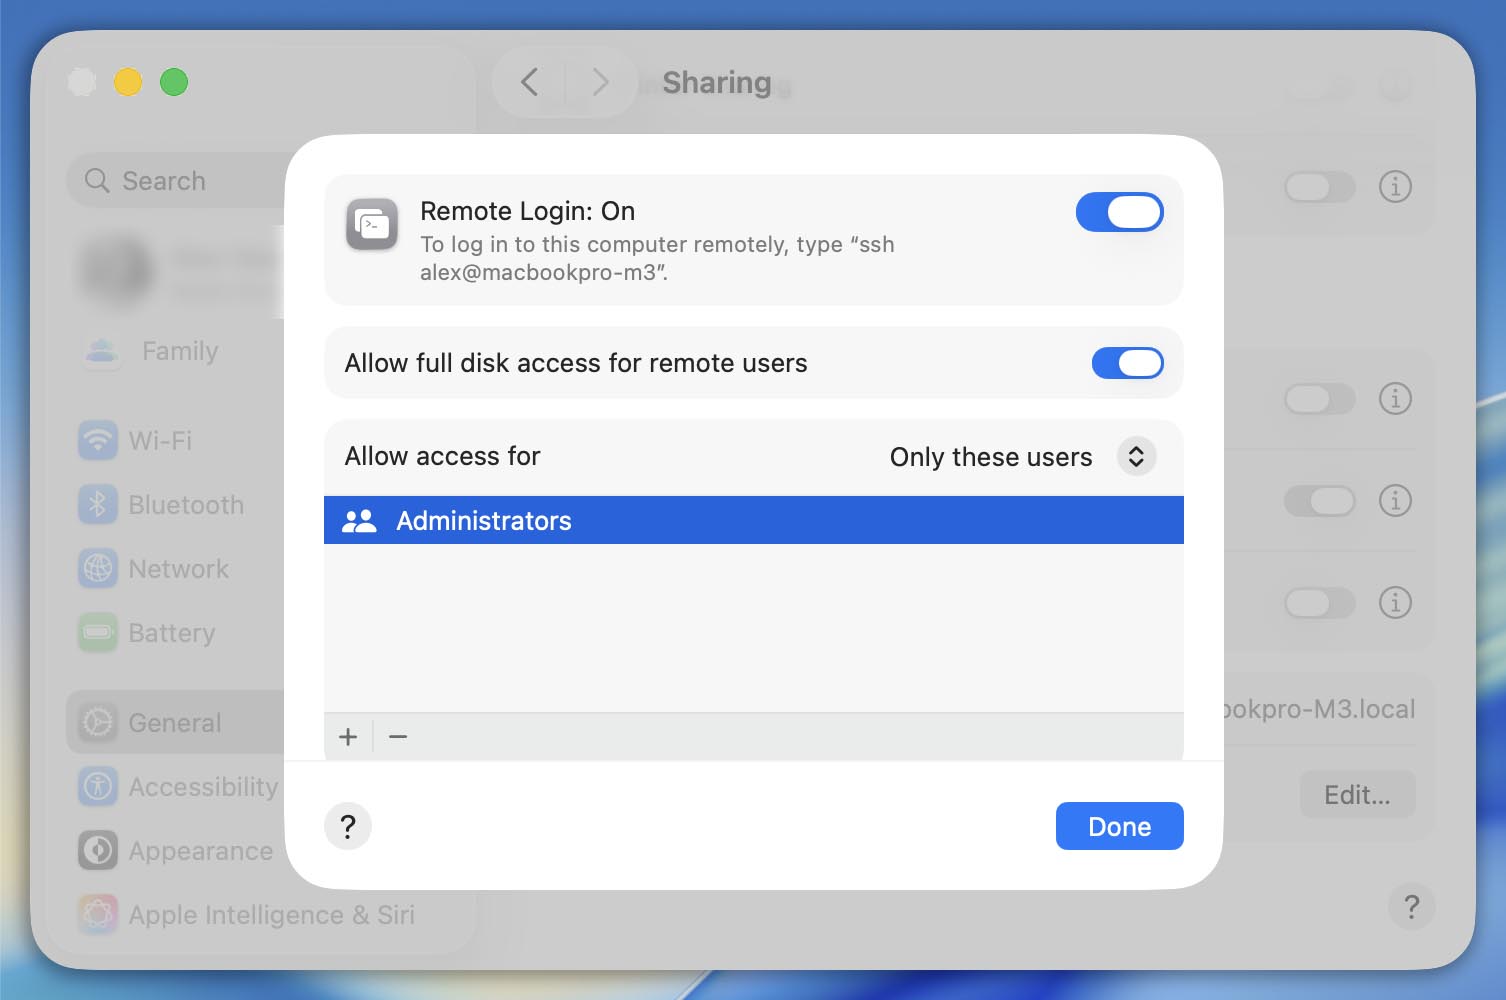
2. Allow Full Disk Access for Remote Users
This setting is required — without it, you won’t be able to view or scan connected disks over SSH.
macOS 13+
- Click the info/question icon next to Remote Login (you’ll see it right where you enabled Remote Login in Step 3 of the section above);
- Enable Allow full disk access for remote users.
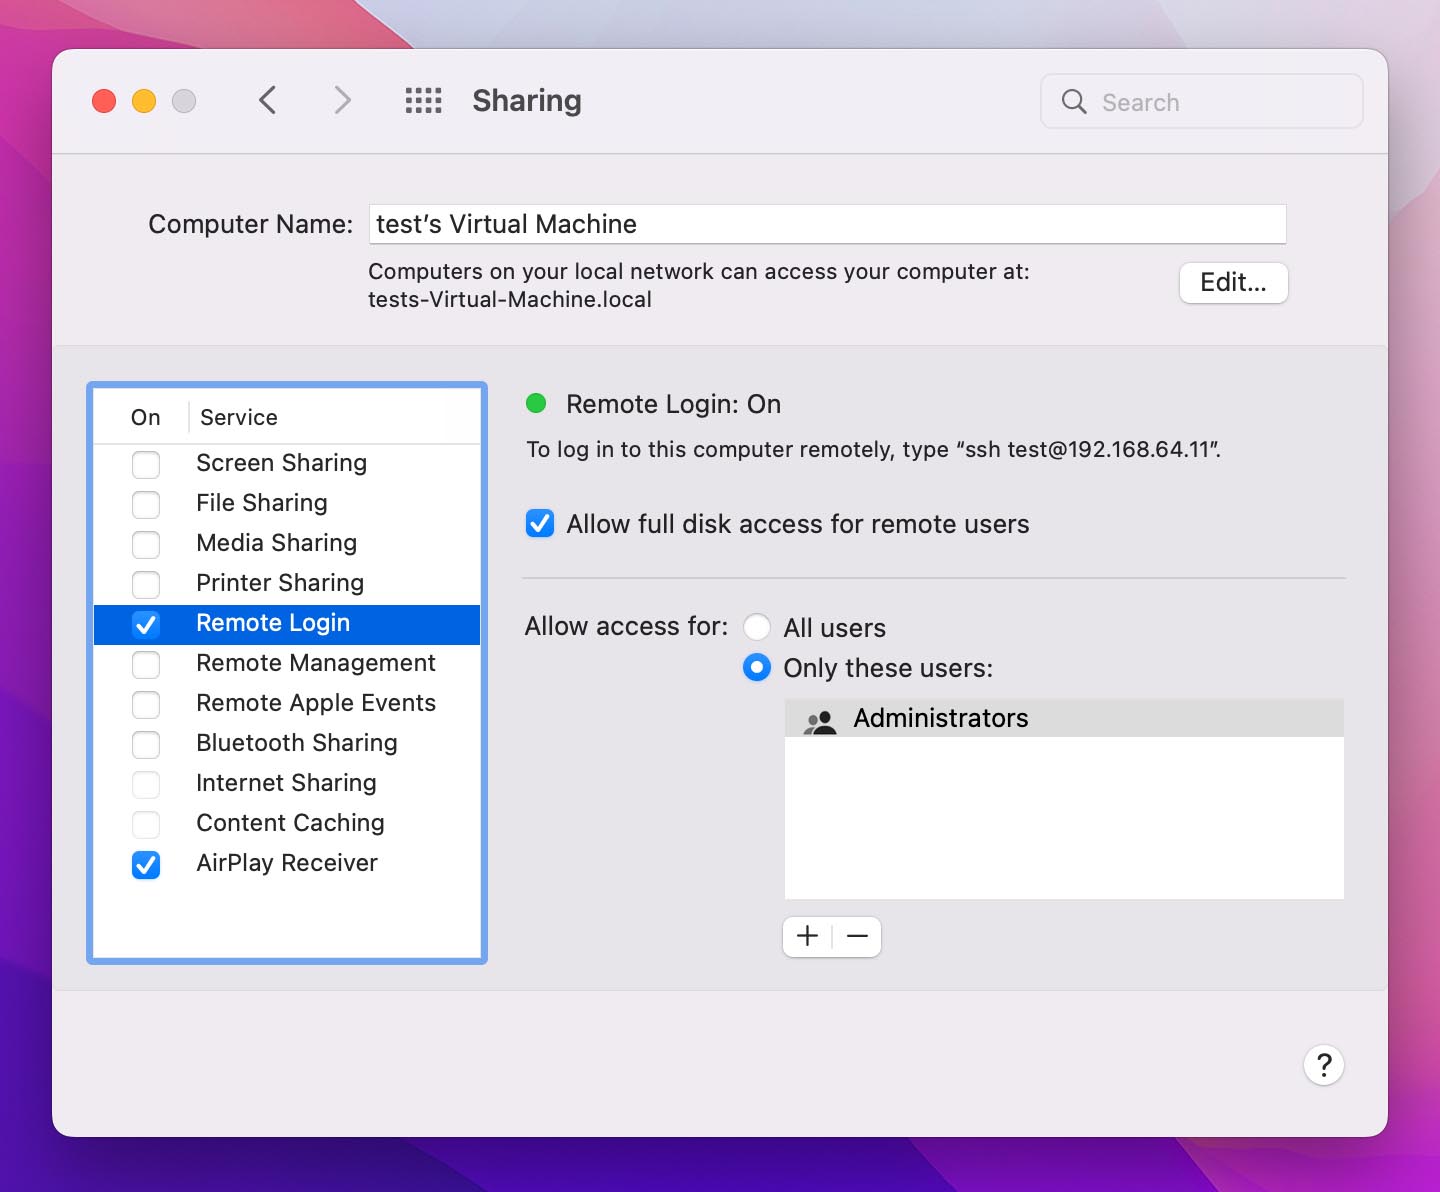
macOS 11 and macOS 12
- In the Remote Login section, check Allow full disk access for remote users.
3. Grant Network Access to Disk Drill Data Recovery (macOS 15+)
After Remote Login is enabled, you may also need to allow the app to discover devices on your local network.
On first launch, Disk Drill Data Recovery may display a prompt asking to allow local network access so it can find SSH-enabled Macs automatically. Click Allow.
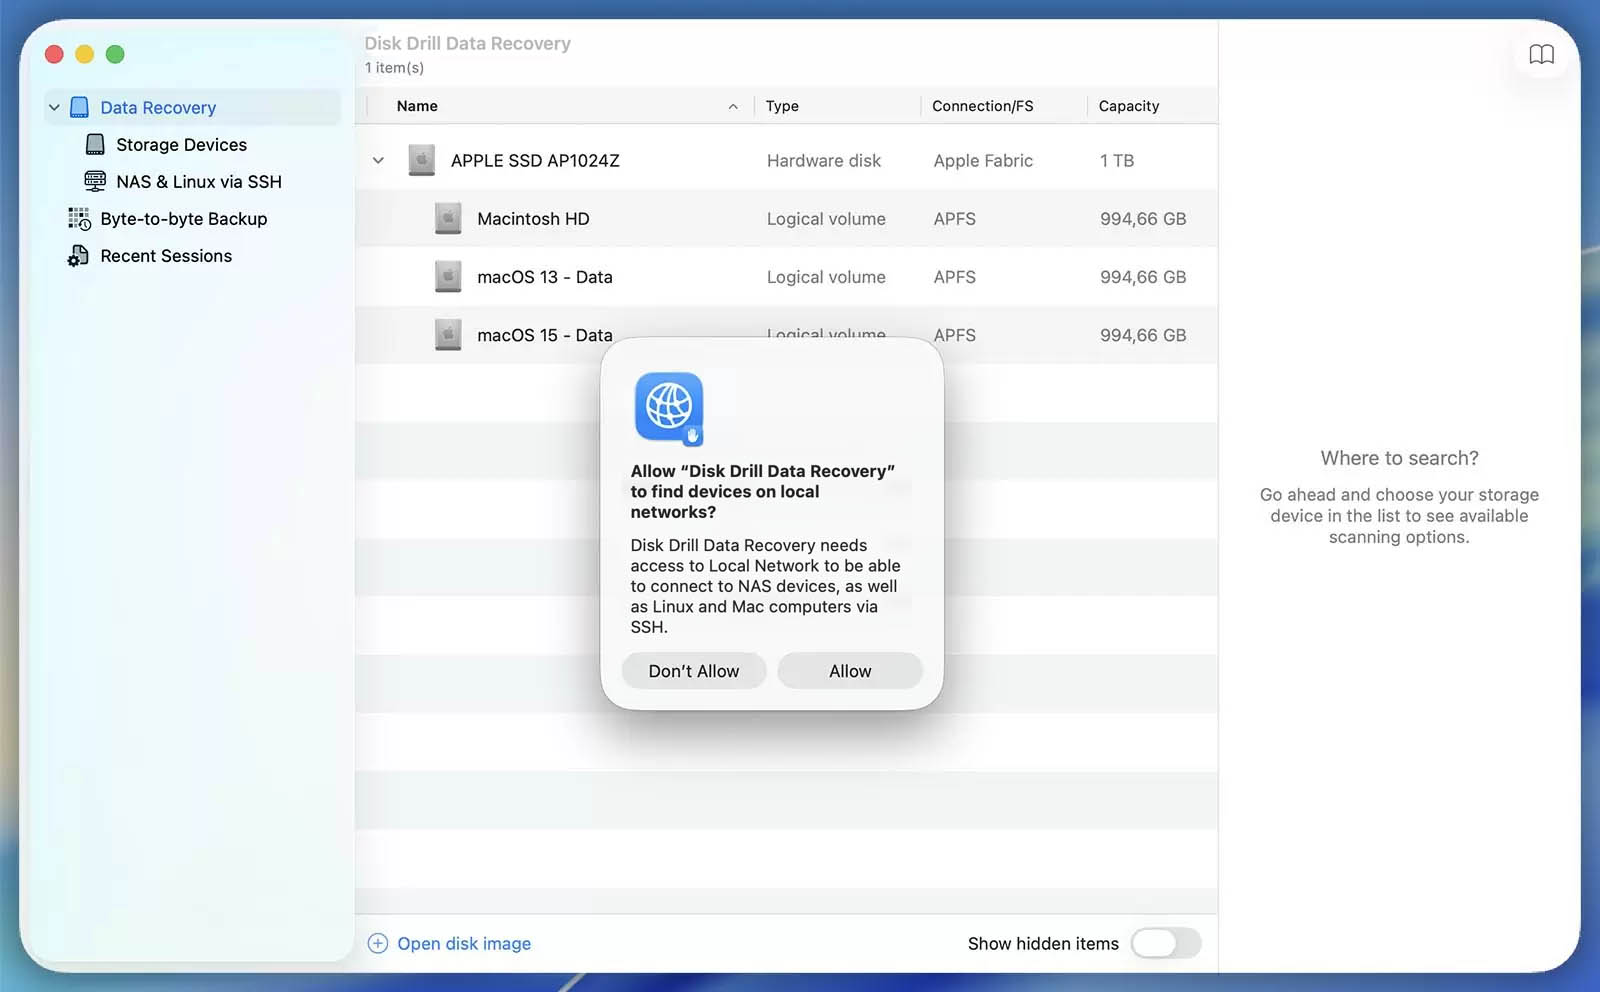
If you accidentally clicked “Don’t Allow” (or skipped the prompt), you can enable it again here:
- System Settings → Privacy & Security → Local Network;
- Turn on the toggle for Disk Drill Data Recovery.
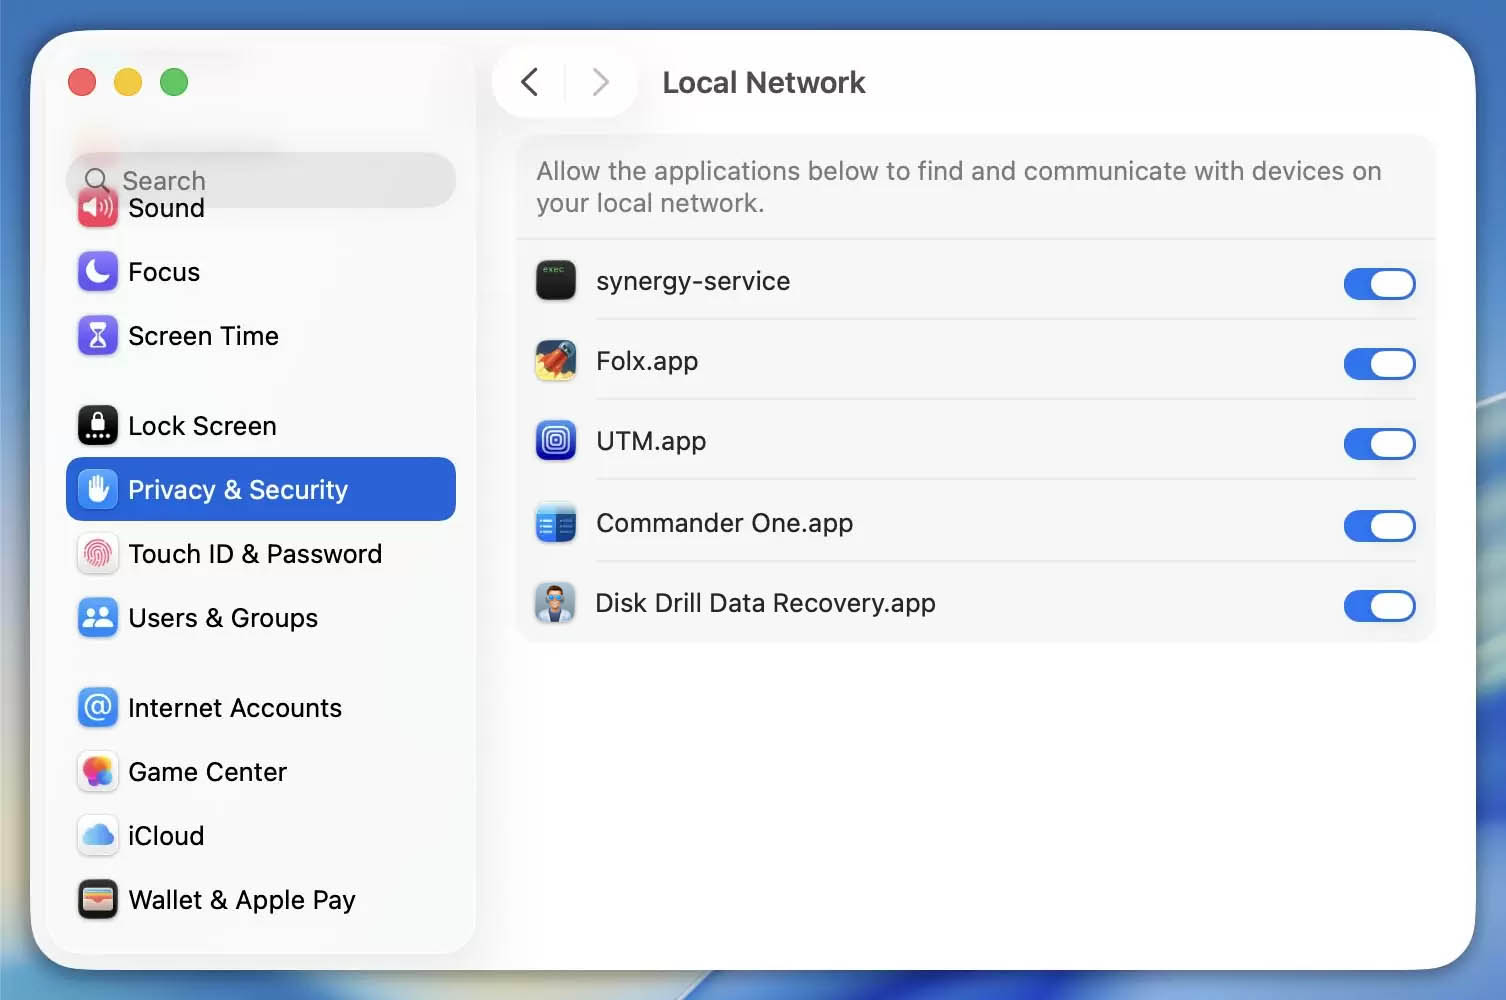
This ensures Disk Drill Data Recovery can detect your Mac for SSH-based data recovery.
4. Connect to Your Mac Locally in Disk Drill Data Recovery
Once everything above is enabled:
- Open Disk Drill Data Recovery and look for your Mac in the disk/device list (it should appear as a new device named after your Mac).
- Select it, then click Connect Now.
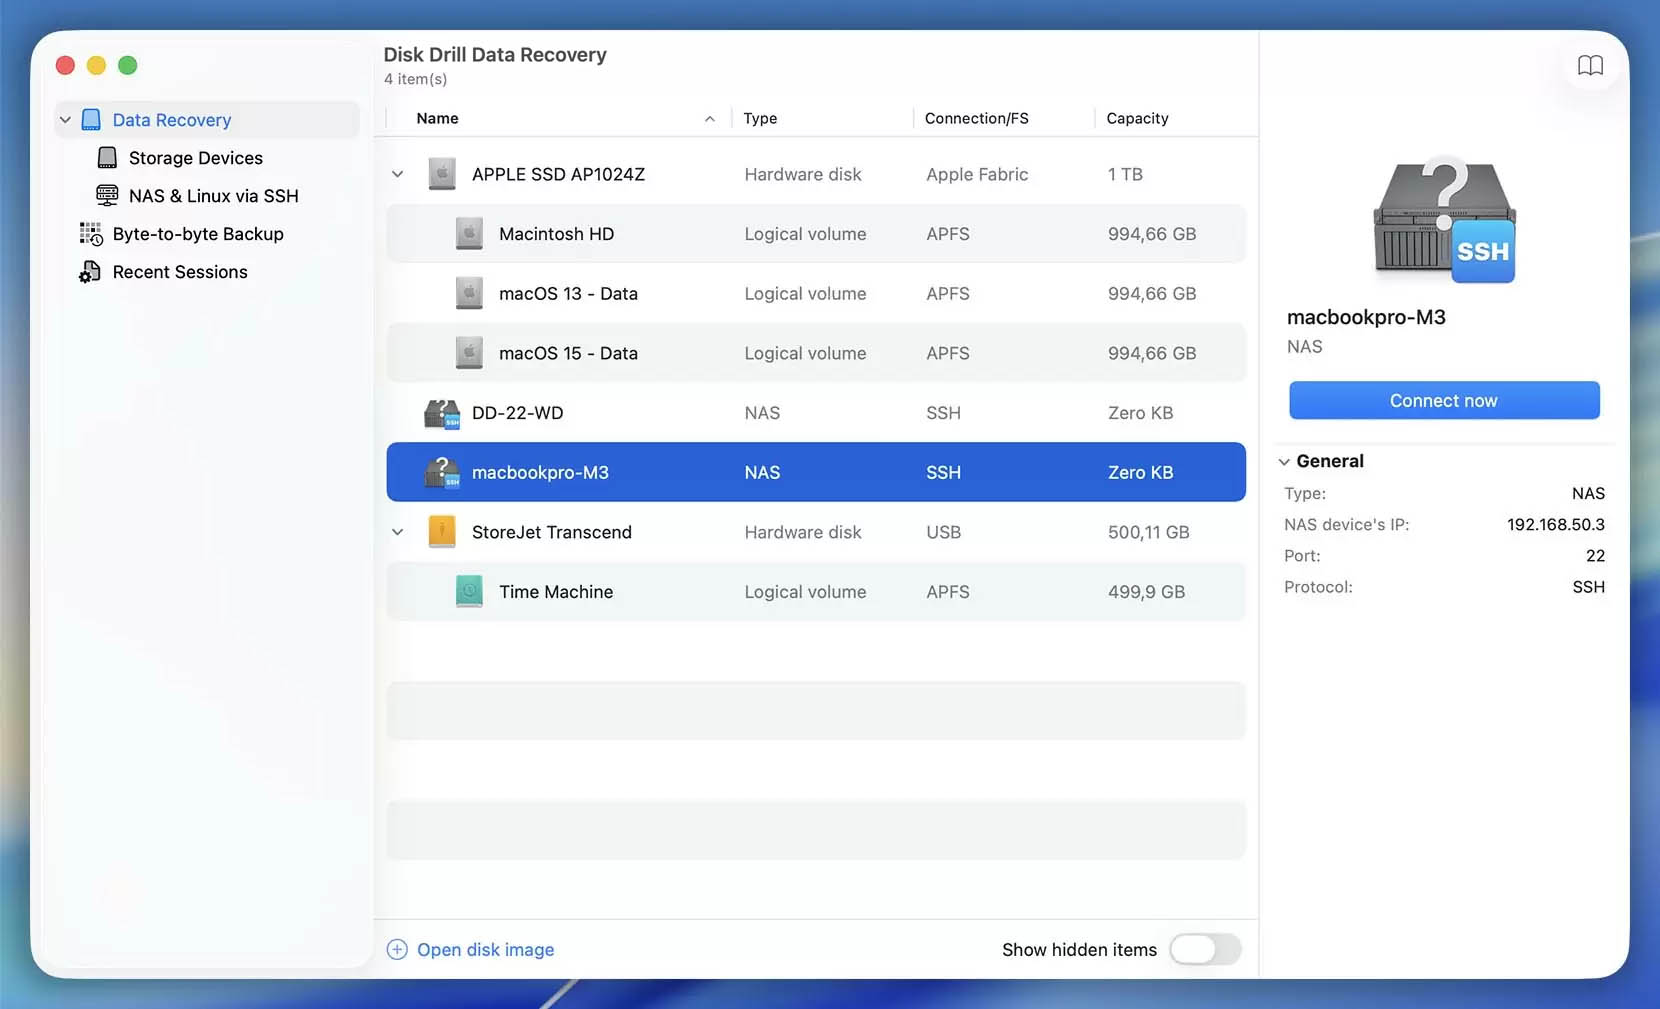
- Enter the username and password for a macOS account with admin privileges.
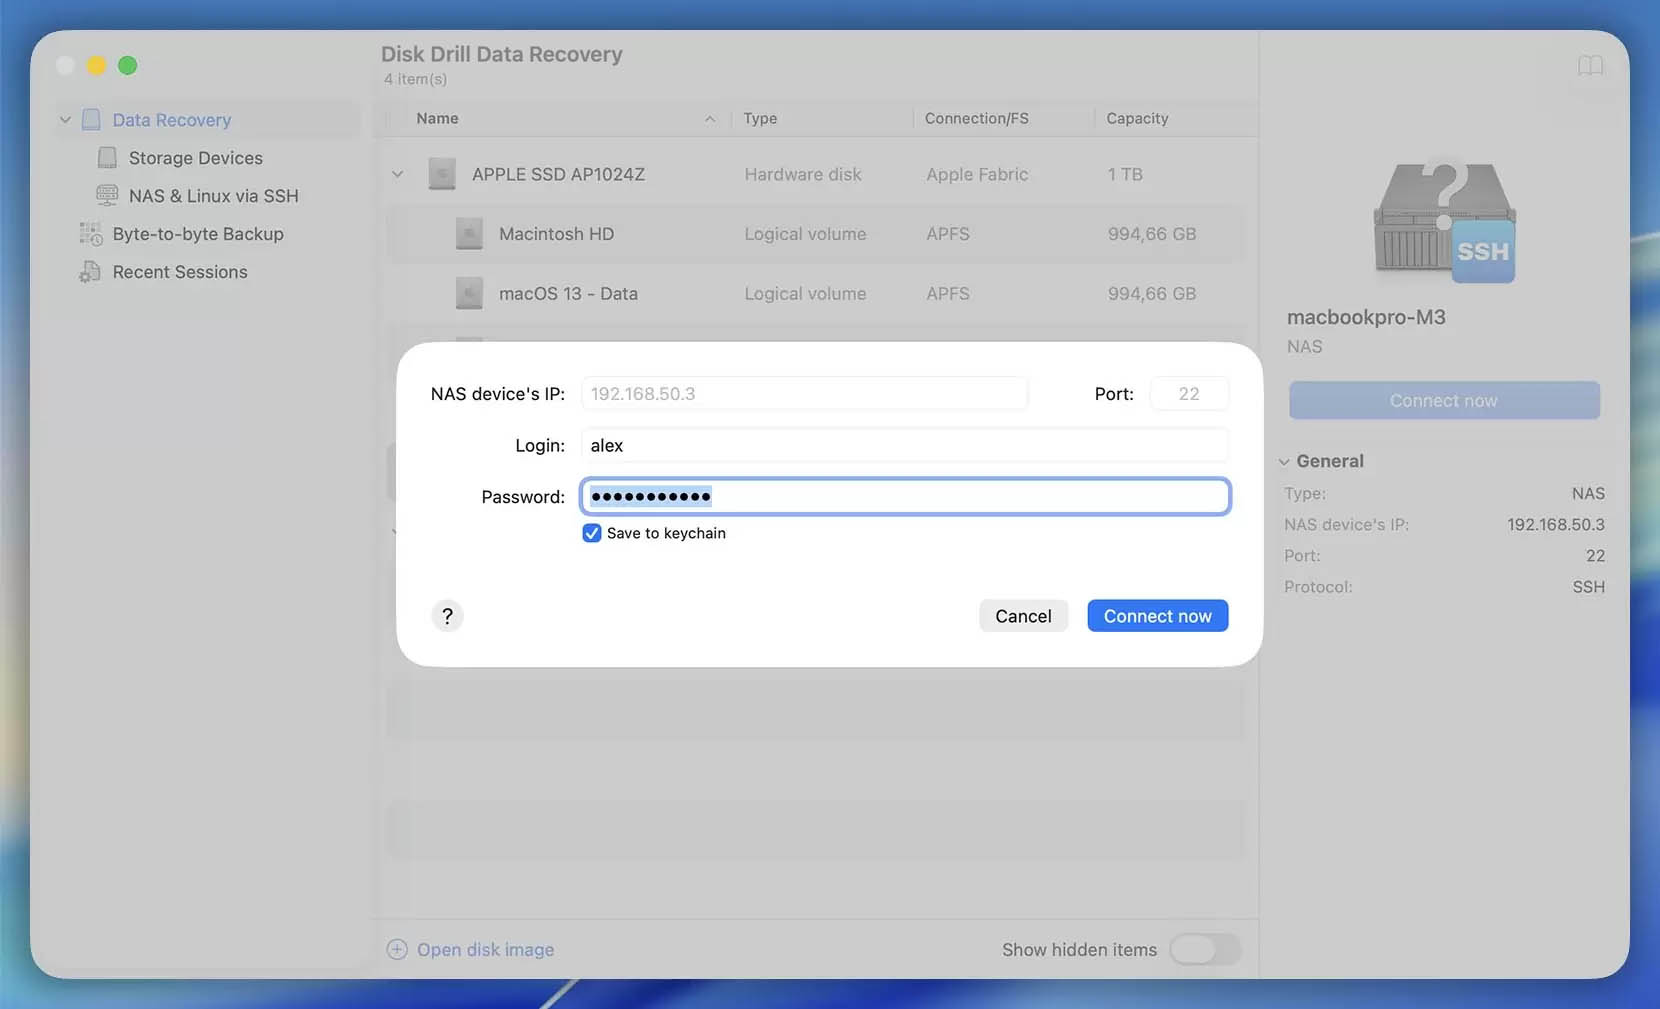
- You’ll now be able to scan or backup all available drives connected to that Mac.
That is all you need to do to start recovering your data and files. We wish you the best of luck! If you need help just drop us a line!
5. Setting the Necessary Permissions to Preview Files
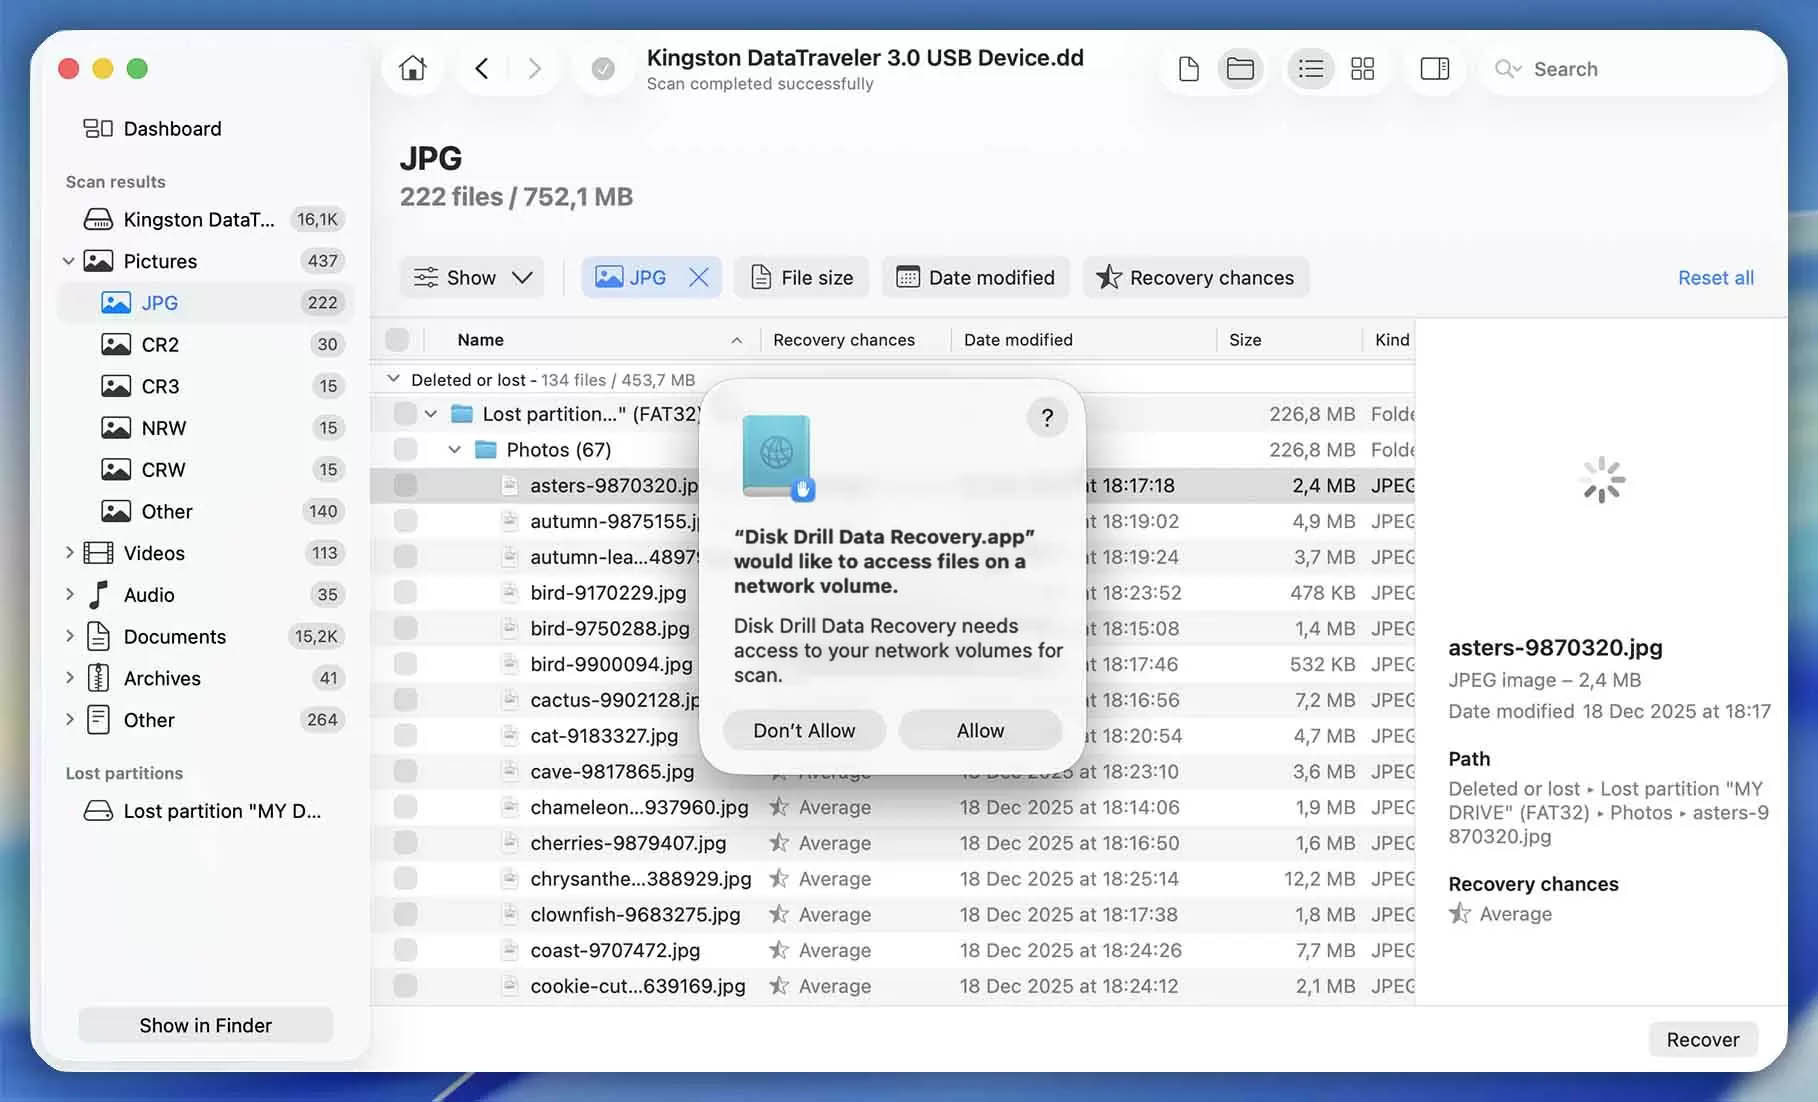
After you scan your device, the next step is to preview your recoverable files before restoring them. One of the most useful features in Disk Drill Data Recovery is its built-in preview, which supports a wide range of file types (photos, videos, documents, and more).
The first time you click a file to preview it, macOS may prompt you to allow Disk Drill Data Recovery to access a network volume. This is expected: Disk Drill Data Recovery uses a virtual network drive to securely display preview versions of files found during the scan.
When you see the permission prompt, click Allow button to permit access. This lets Disk Drill Data Recovery generate file previews so you can confirm the right files before you start the recovery process.
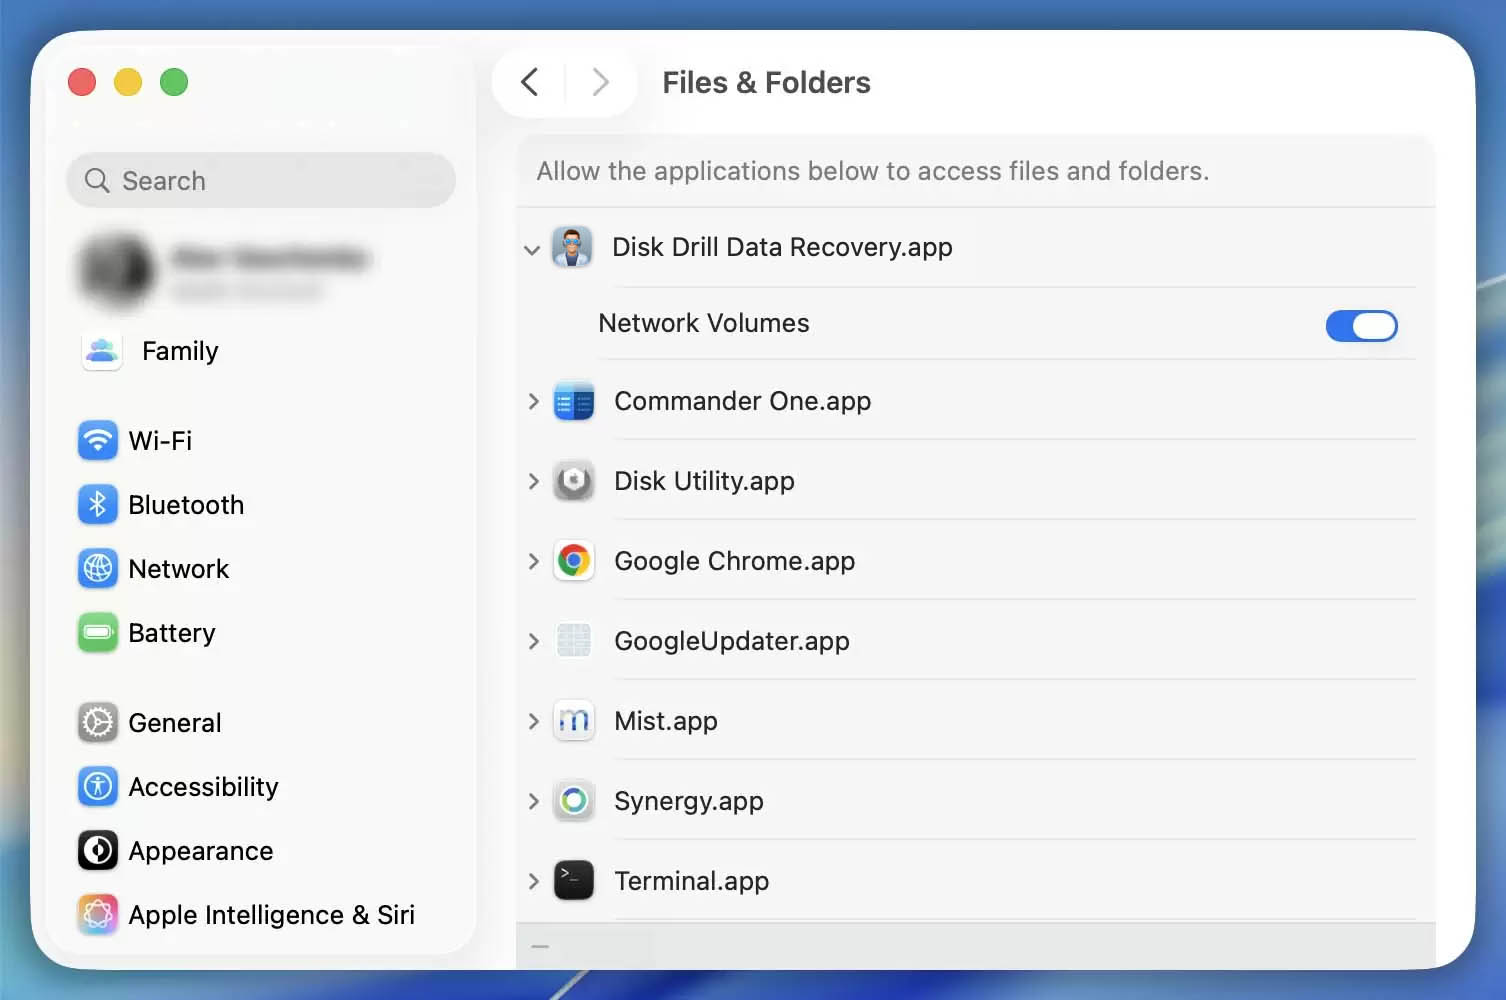
If you previously clicked Don’t Allow, don’t worry — you can turn this permission back on in just a minute. Follow these steps to grant Network Volumes access so file preview works properly:
- Open System Settings → Privacy & Security → Files & Folders
- Find and expand Disk Drill Data Recovery
- Turn Network Volumes On
After that, go back to Disk Drill Data Recovery and try previewing the file again.
Option #2: Recover From a Disk Image
When you download an app from the Mac App Store it is working in a “sandbox” mode, this means that it cannot ask for your root (master) password. This is for your protection against malicious apps, but it also prevents our recovery app from accessing your disks directly to read and recover your data, a crucial part of the file recovery process. Since your Mac will not grant the necessary root (admin) privileges to reclaim lost files automatically, there is no way for Disk Drill Data Recovery to read your data! For the best chance at a successful recovery, Disk Drill Data Recovery (by CleverFiles) works from a byte‑for‑byte (binary) copy of the affected storage device—often called a “RAW disk image“. You will need to create this image file manually before you can start recovering your lost data.
You can create the disk image(s) using the following steps:
- Run Disk Utility, it’s a standard macOS system app.
- Choose the drive to recover from on the left.
- Initiate a new backup in one of the following ways:
- Go to File → New Image → Image from “YOUR_DISK_NAME”.
- Right-click the drive on the list and choose Image from “YOUR_DISK_NAME”.
- Create a new disk image:
- macOS 26: Set “RAW Image” as the format. Then set encryption method to “None”.
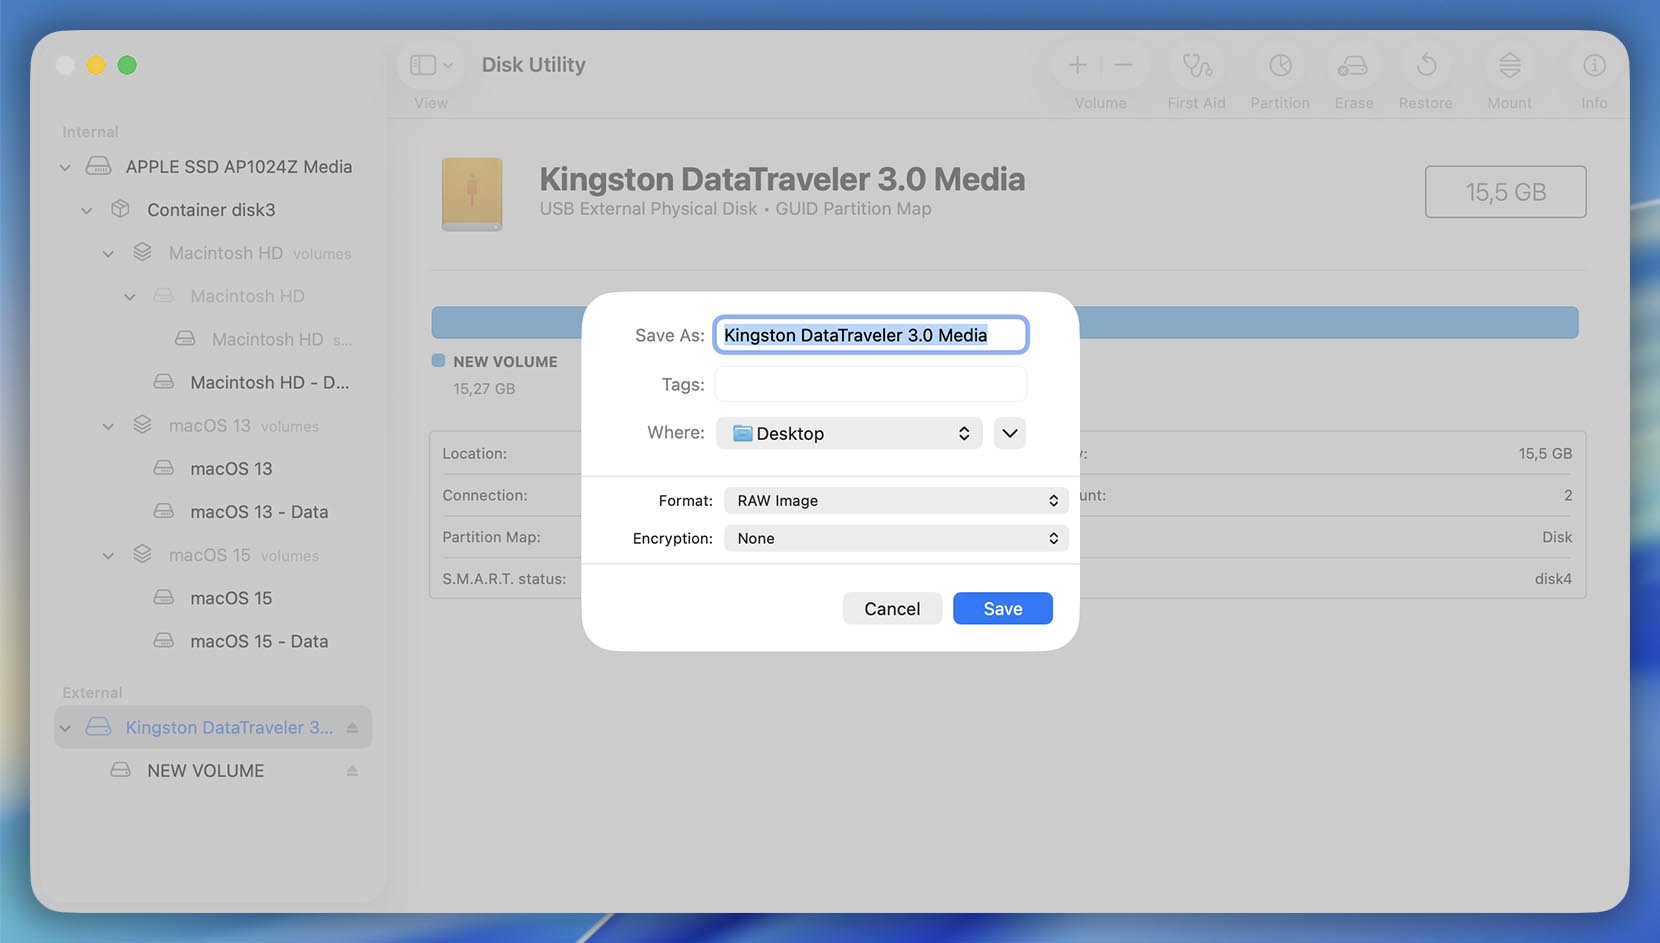
- macOS 15 and earlier: Set “read/write” as the format. Then set encryption method to “None”.
- macOS 26: Set “RAW Image” as the format. Then set encryption method to “None”.
- Save your disk image to any drive except the affected (original) one, an external hard drive is usually ideal. Mind the required disk space, it has to be bigger than the disk image you are creating.
- Return to the Disk Drill Data Recovery window and load the new DMG file by drag and drop or open it using File then “Open Disk Image” in the menu options.
Congratulations, you are now ready to recover your deleted data! You should have no issues loading your disk image into our apps if you follow the above steps. This method also has the added advantage of speed, recovery is generally much faster from a disk image. You do not have to worry about bad sectors slowing down your data recovery as with other methods.
Option #3: Create a Disk Image via Terminal
If the Disk Utility disk image does not work, you still have other data recovery options. You will still need a disk image, in this case we will be creating one via Terminal. Sometimes the Disk Utility method will not properly copy all of your deleted data to the image file thus causing issues when you try to perform the recovery.
On the other hand, Terminal gets around the access restrictions to guarantee all your data recovery efforts work as expected. It does require more work, familiarity with command line tools and some precautions to avoid damaging your disk in the process, but the chances to get your files back are higher. It’s still very simple and straightforward, we promise!
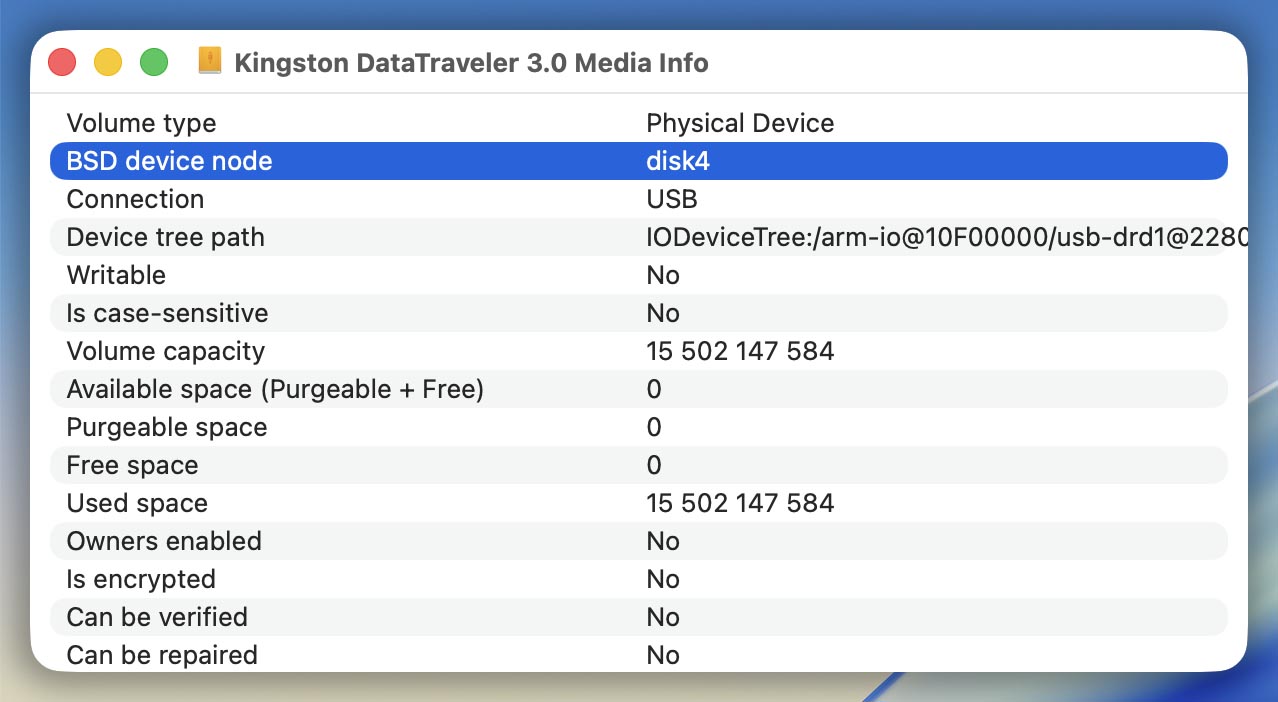
- First, you must find out the “BSD device node” for the disk or partition that has your deleted data. You can do this through Disk Utility (as in option #2). You do this by clicking the disk in the drive list and then choosing “Get Info” from the popup menu. This will show you a long table of data. You need to find and make note of the “BSD device node” entry on this list. It will say something like “disk04“, write/copy this information down for later.
- Launch Terminal to start creating the disk image. You will need to type (or paste) the following commands to complete the process:
sudo dd if=/dev/disk4 of=/users/%USERNAME%/Desktop/disk.dmg bs=131072 conv=noerror,sync status=progress
- And then…
sudo chmod 777 /users/%USERNAME%/Desktop/disk.dmgℹ️ Pro Tip: You can change the disk image file name and location as you see fit, mind the amount of required disk space, and whether the location where the backup will be created is part of your iCloud Drive or Dropbox, etc. - You might be asked by macOS to unmount your disk before creating a backup. In that case, use the following command before initiating the backup process (disk4 should be your disk’s BSD device node):
diskutil unmountDisk /dev/disk4
- Creating the file will take some time to complete, once finished you will find your
disk.dmgfile stored safely on your Desktop.