Working on motion graphics and video editing can be a tedious process. Thus, losing a project file, such as a DIR file, can be especially frustrating. However, there are ways that can help you retrieve these accidentally deleted or unsaved files and get back hours of hard work.
What Is DIR File Format?
Before we understand the recovery process that will help you retrieve a missing or deleted DIR file that has completely disappeared, it is useful for users to understand what is a DIR file, and the kind of data it is associated with.
The DIR extension is used by the multimedia program, Adobe Director. It is a project file that contains the various resources being used in the Director project. Importantly, it doesn’t store the actual video file, or motion graphic that is being edited. Therefore, you cannot run a DIR file using a video player.
A typical DIR file will contain all the project’s resources, as well as information about the media files associated with it. In addition to this, it also houses the scripting code and the timeline configurations, which define the sequences of a movie project.
It’s important to note that DIR files need to be first produced into a .dcr (Director Compressed Resource) file in order to be playable by Adobe Shockwave. Naturally, DIR files are not usually distributed as they are, they are first exported as a video or Shockwave compatible file.
After understanding what an DIR file means, we can choose from the multiple solutions listed below so that you can resume your day-to-day work on the computer. The solutions will help you recover the DIR files, even if you forgot to save them properly. Let’s get to the actual file recovery solutions listed in the sections below.
How to Recover Deleted DIR Files
There are plenty of methods that can help you recover deleted DIR files. The good news is that all of them are easily doable by a novice user, provided you follow the steps properly.
However, to greatly improve your chances of recovering the lost DIR files, keep in mind the data recovery tips listed below:
- 🛑 DON’T create or write new data to the storage device that stored the DIR files you need to recover.
- 🛠️ START the data recovery process as soon as possible to negate the chances of new files being created or copied to the storage device.
- 🥇 USE the data recovery with the highest success rate, first. With every additional data recovery attempt, the chances of recovering data decrease.
Users should note, that in the case of TRIM enabled SSDs it may be impossible to recover the lost data. Make sure you’re aware of the type of storage device you’re using.
How to Recover DIR Files With Software
Your best bet for recovering lost DIR files, is to use third-party recovery software. This is mainly because using one is easier than you think, and they have one of the highest recovery chances among the recovery methods included in this article.
One such data recovery software is Disk Drill. Using the program, you can recover almost any type of file (including a DIR file) within a few clicks. Features such as S.M.A.R.T Disk Monitoring and saved searches will make your life easier too.
Here’s how to recover DIR files using Disk Drill:
Step 1: Download Disk Drill for Windows or Mac.

Step 2: Run the setup wizard. Follow the on-screen steps to proceed with the installation of Disk Drill.
Step 3: Double-click on the Disk Drill icon on the desktop. Accept the license agreement to proceed further.
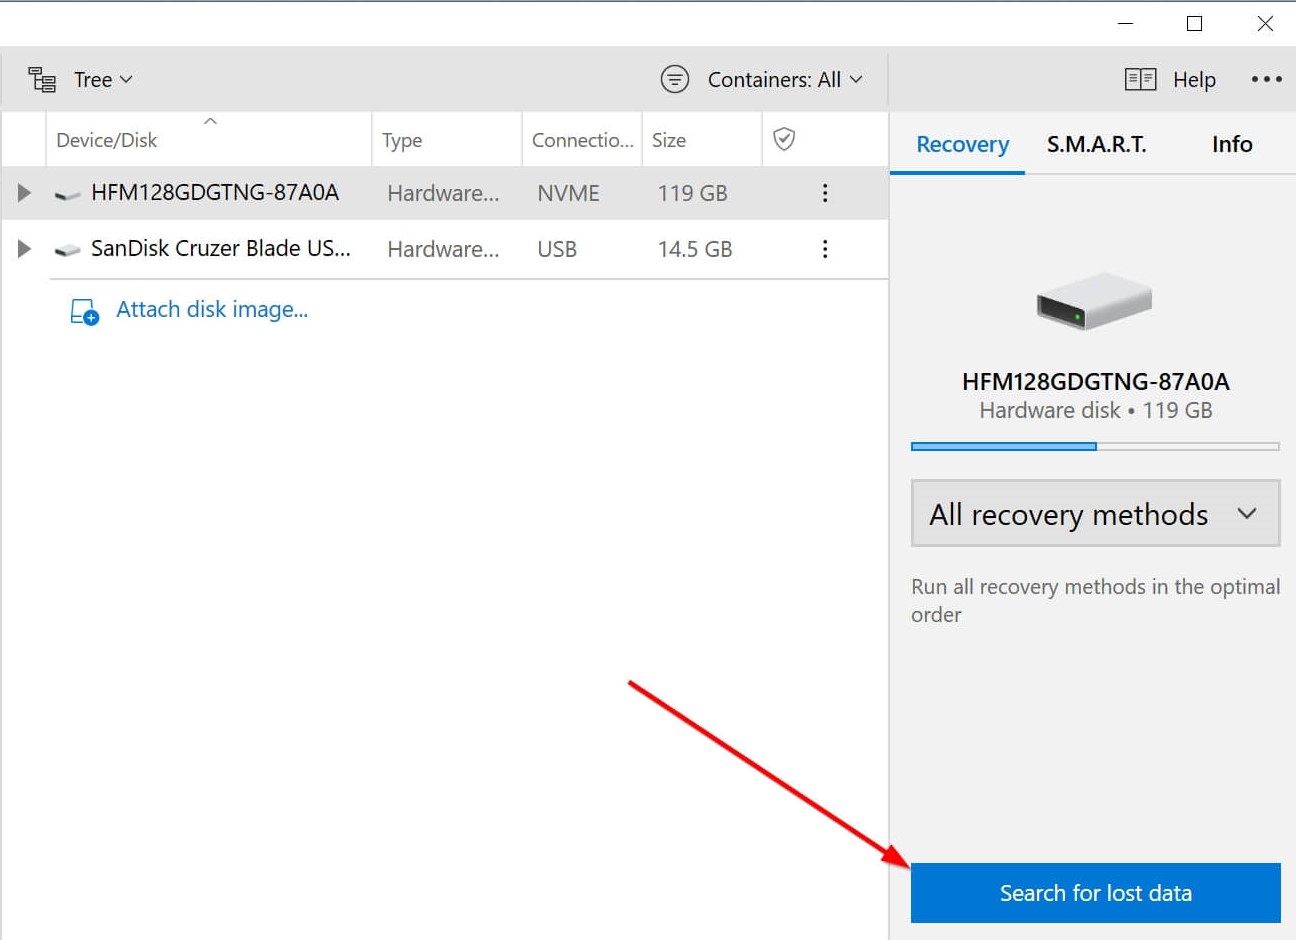
Step 3: Select the hard drive or device on which the deleted DIR file was stored, and then click on the Search for lost data option.
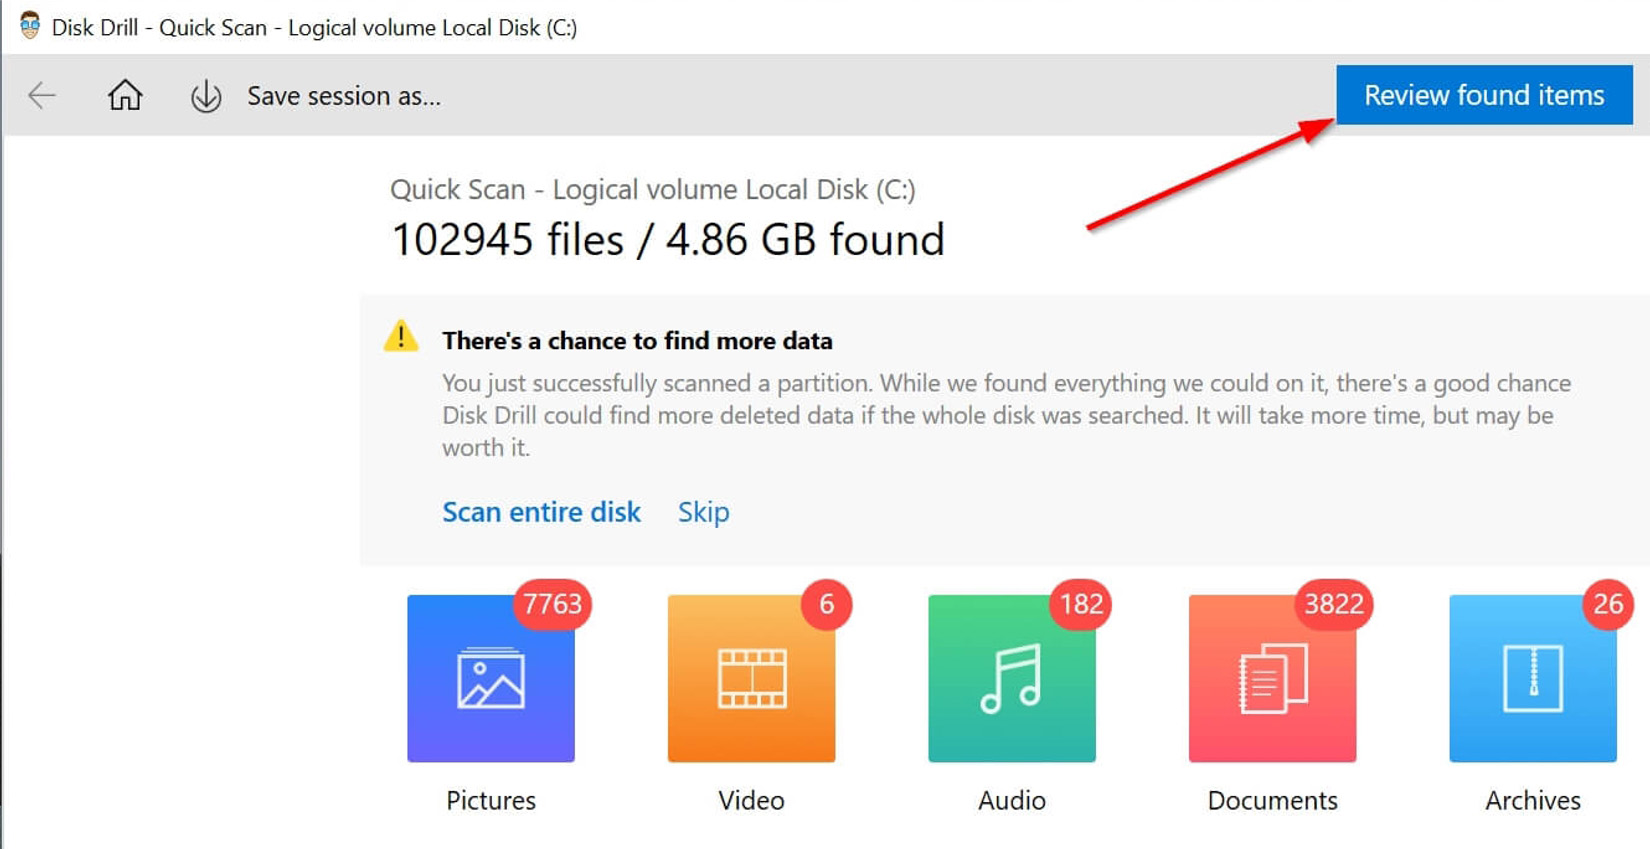
Step 4: After the scan is complete, click on the Review found items option to see discovered files. Disk Drill allows you to preview files during the scan as well.
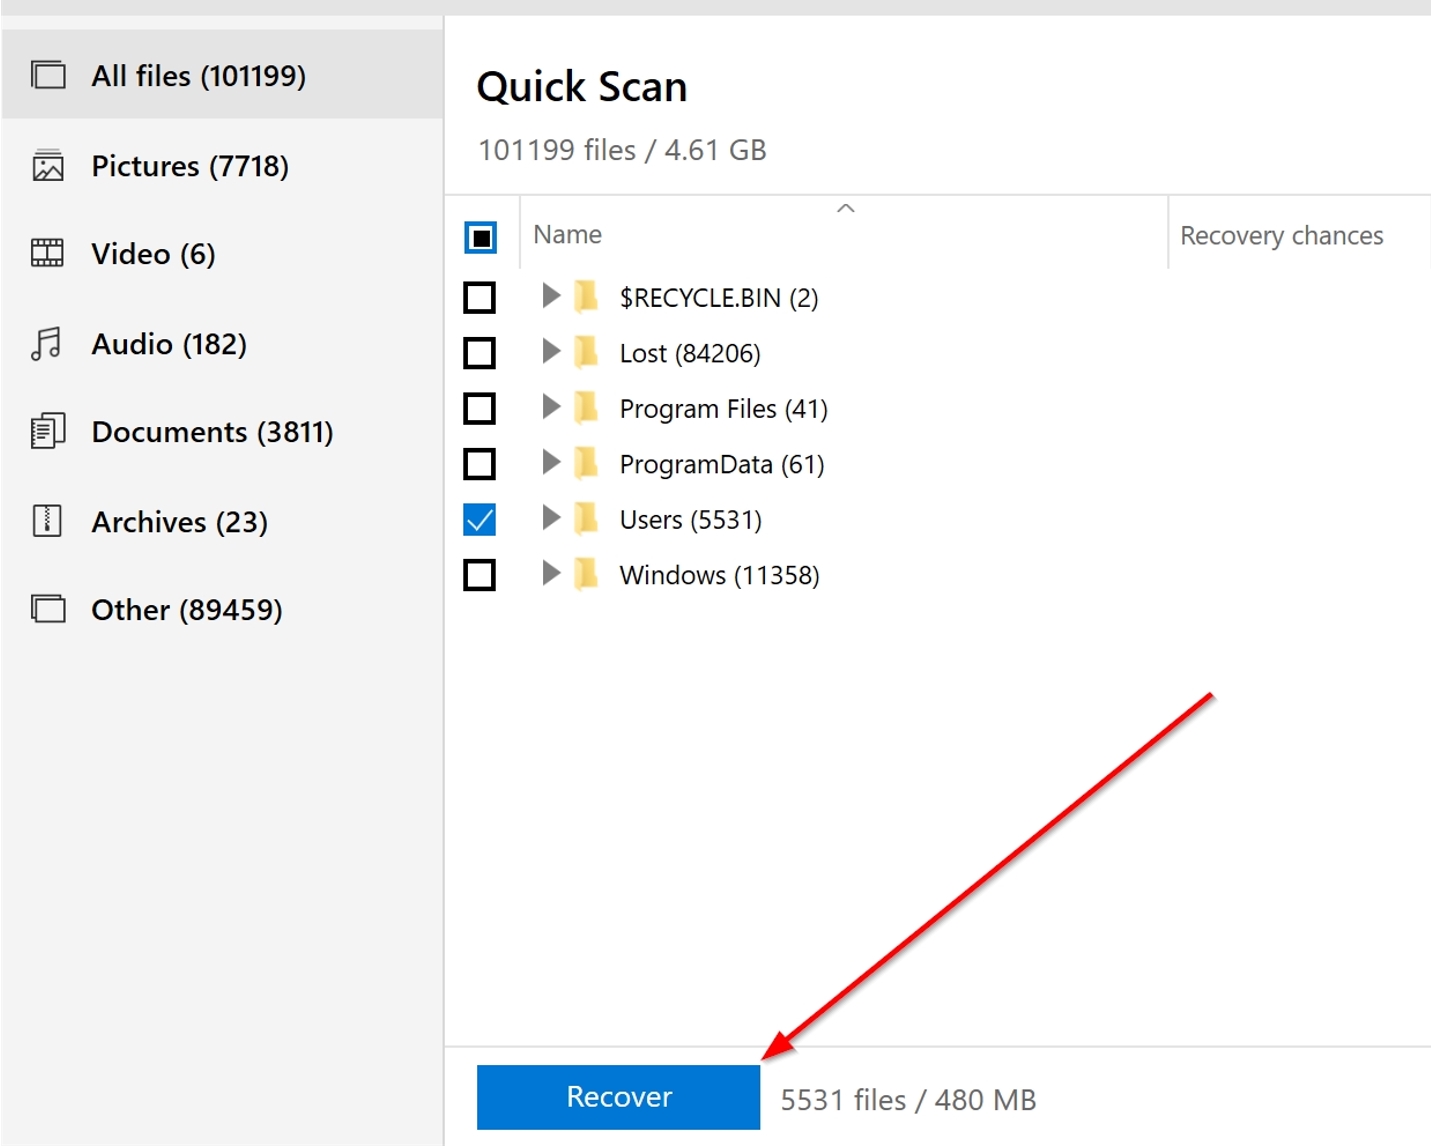
Step 5: Select the DIR files you want to recover. You can use the filter feature to narrow down the results.
Step 6: Click the Recover button and choose a recovery folder. Remember to use a folder that is on a different storage device than the original one.
The steps listed above will help you recover your lost DIR files in no time.
If you’re short on time, using the Quick Scan option from the drop-down menu is advisable. But, you won’t find as many files using this option. In all other cases, it’s better to use All scan options.
Recover DIR from Windows Recycle Bin or Mac Trash
Provided, you didn’t delete your files permanently, both Windows and Mac have folders that store deleted files until you restore or delete them from those folders as well. These directories are called the Recycle Bin and Trash, in Windows and Mac, respectively.
Here’s how you can recover deleted DIR files from these folders:
Windows Recycle Bin
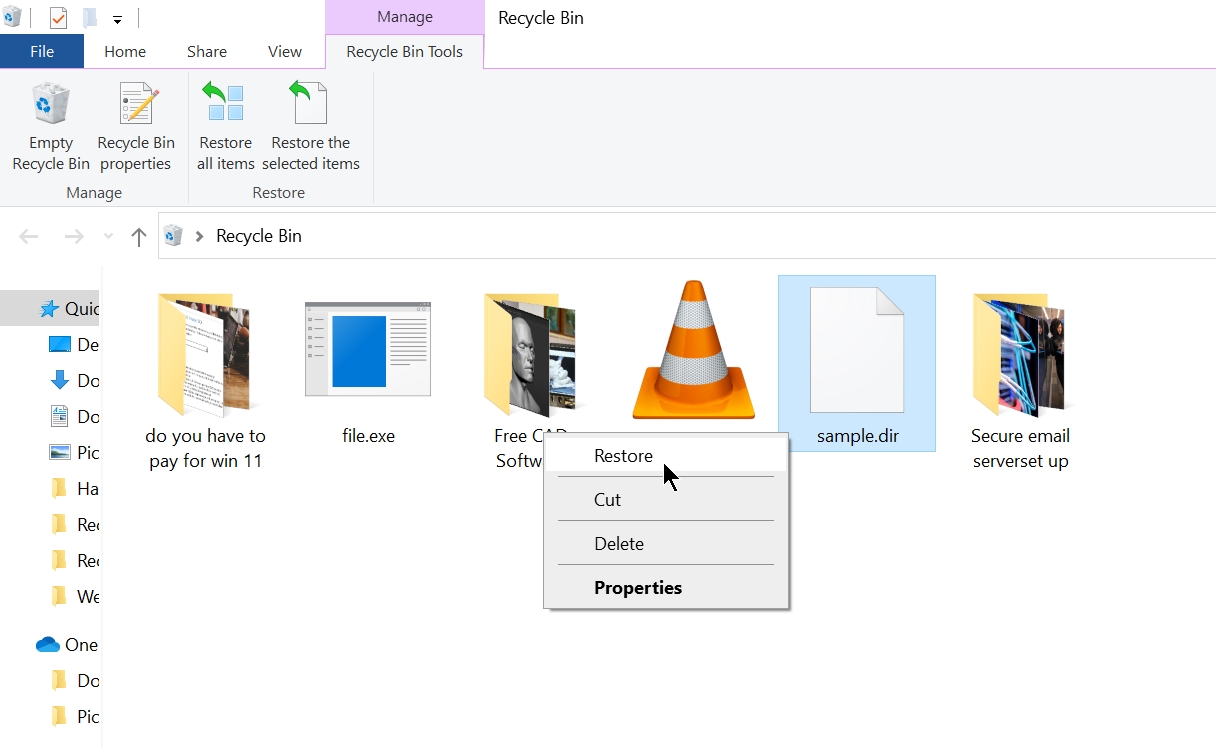
Step 1: Double-click the Recycle Bin icon on the desktop.

Step 2: Select the DIR files you want to recover.
Step 3: Right-click the file, then click Restore to move the file back to its original folder. Alternatively, you can drag and drop the file to a folder of your choice.
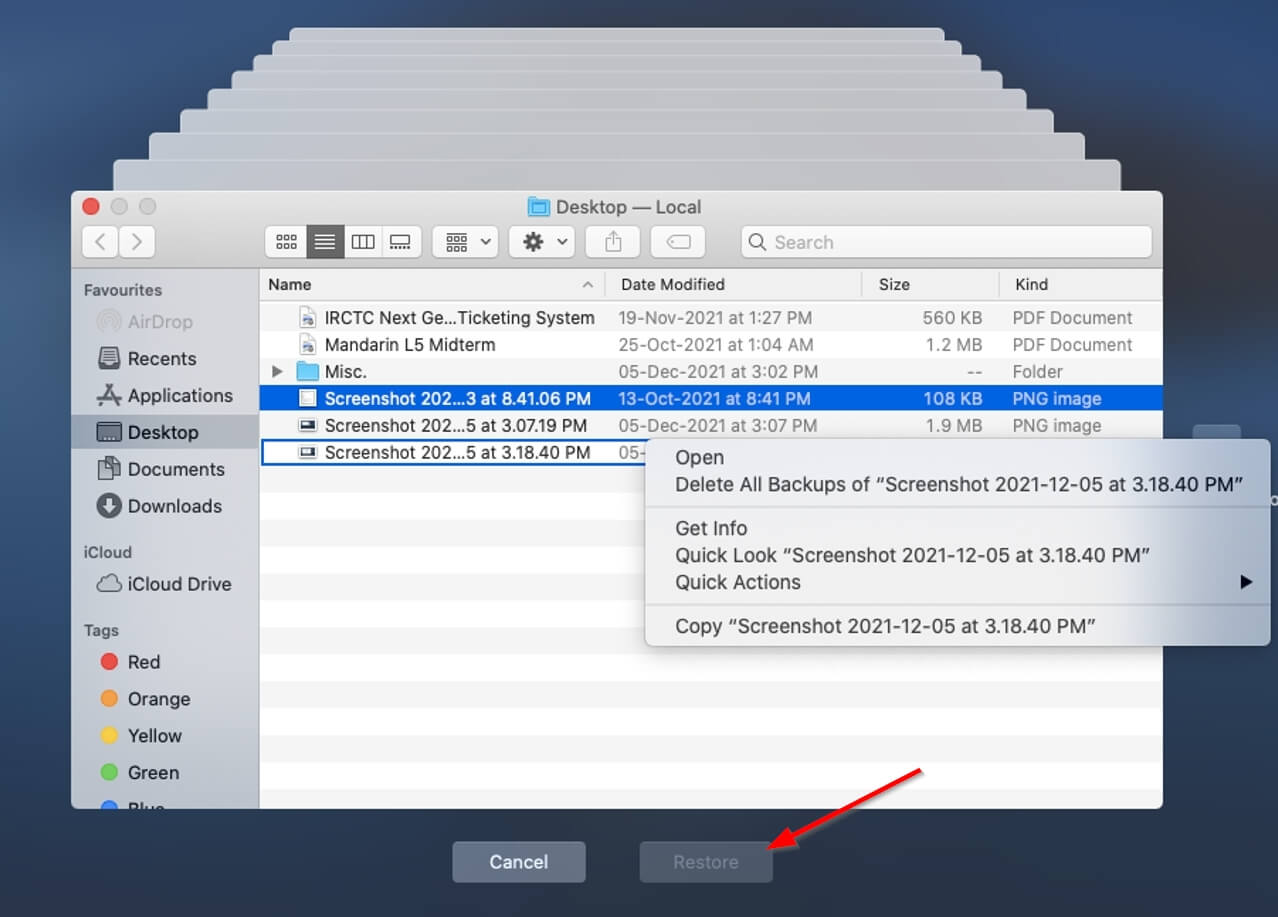
Mac Trash
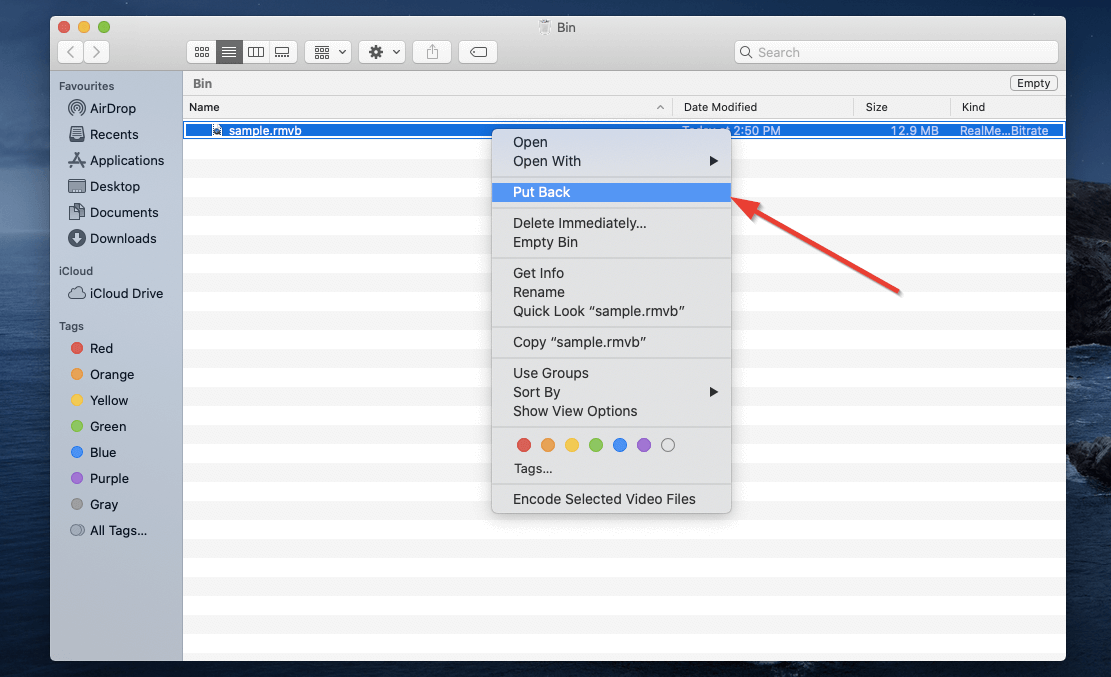
Step 1: Click the Trash icon on the Dock.
![]()
Step 2: Select the DIR files you want to recover.
Step 3: Drag and drop the files to a folder of your choice, or right-click the DIR file and choose the Put Back option.
Restore DIR Files Using Windows File History and Mac Time Machine
Sometimes, the Recycle Bin and Trash may not have the deleted files. In such cases, you can resort to the integrated backup features in both Mac, and Windows. These features are called File History and Time Machine on Windows and Mac, respectively.
However, both these features require you to have enabled them earlier, so they could store a backup of your files. Also, the original folder of the deleted DIR files should have been selected as a folder to back up.
Windows File History
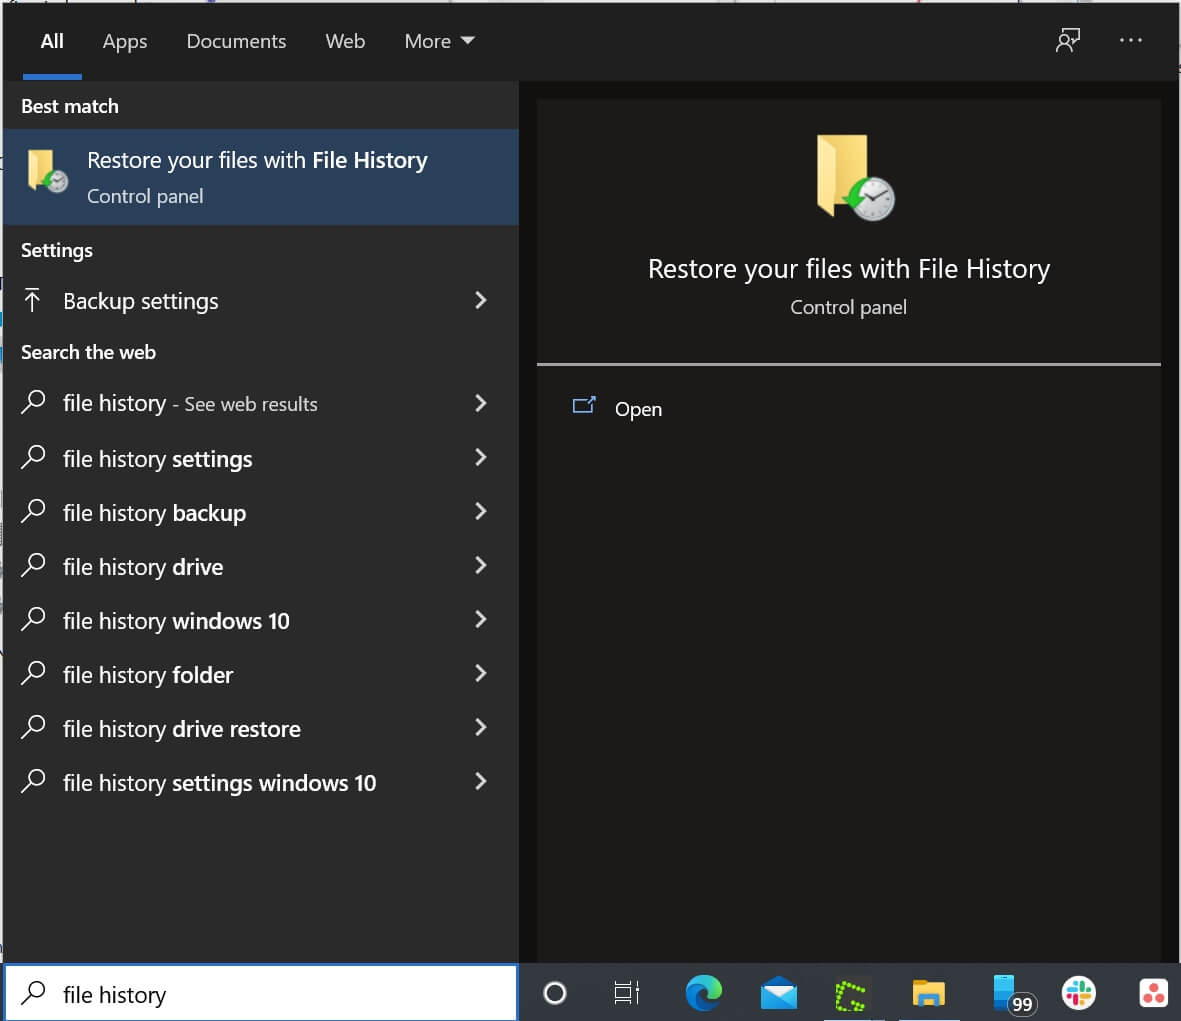
Step 1: Enter “file history” in the Start menu search bar.
Step 2: Click the Restore your files with File History option from the search results.
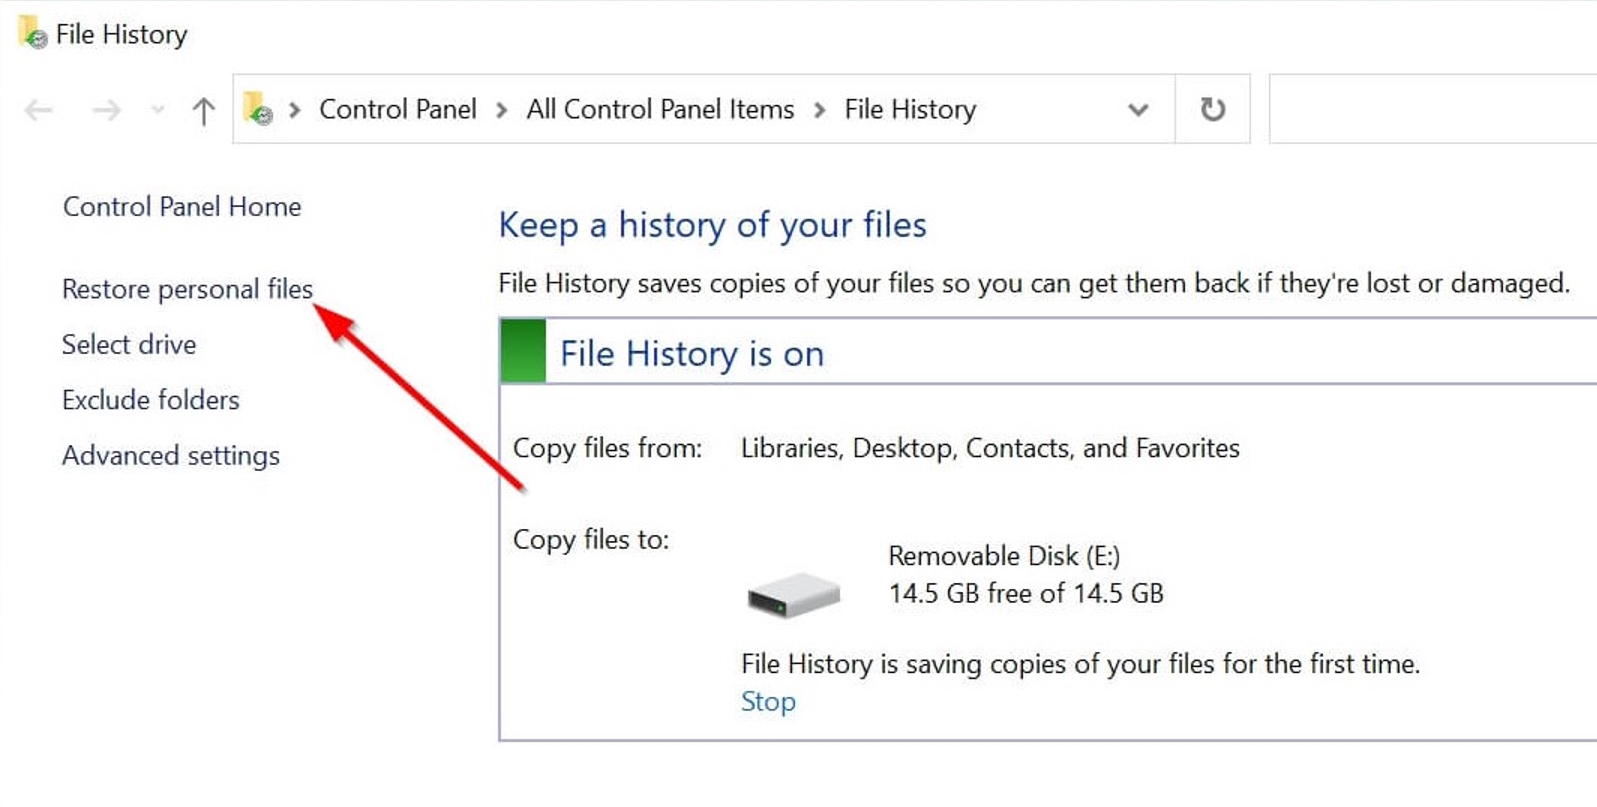
Step 3: Click the Restore personal files option on the left side of the window. Do this only if you see the File History Control Panel page opens.
Step 4: Look for the folder that had your deleted DIR files.
Step 5: Browse through your available backups until you find the one that contains your deleted DIR files.
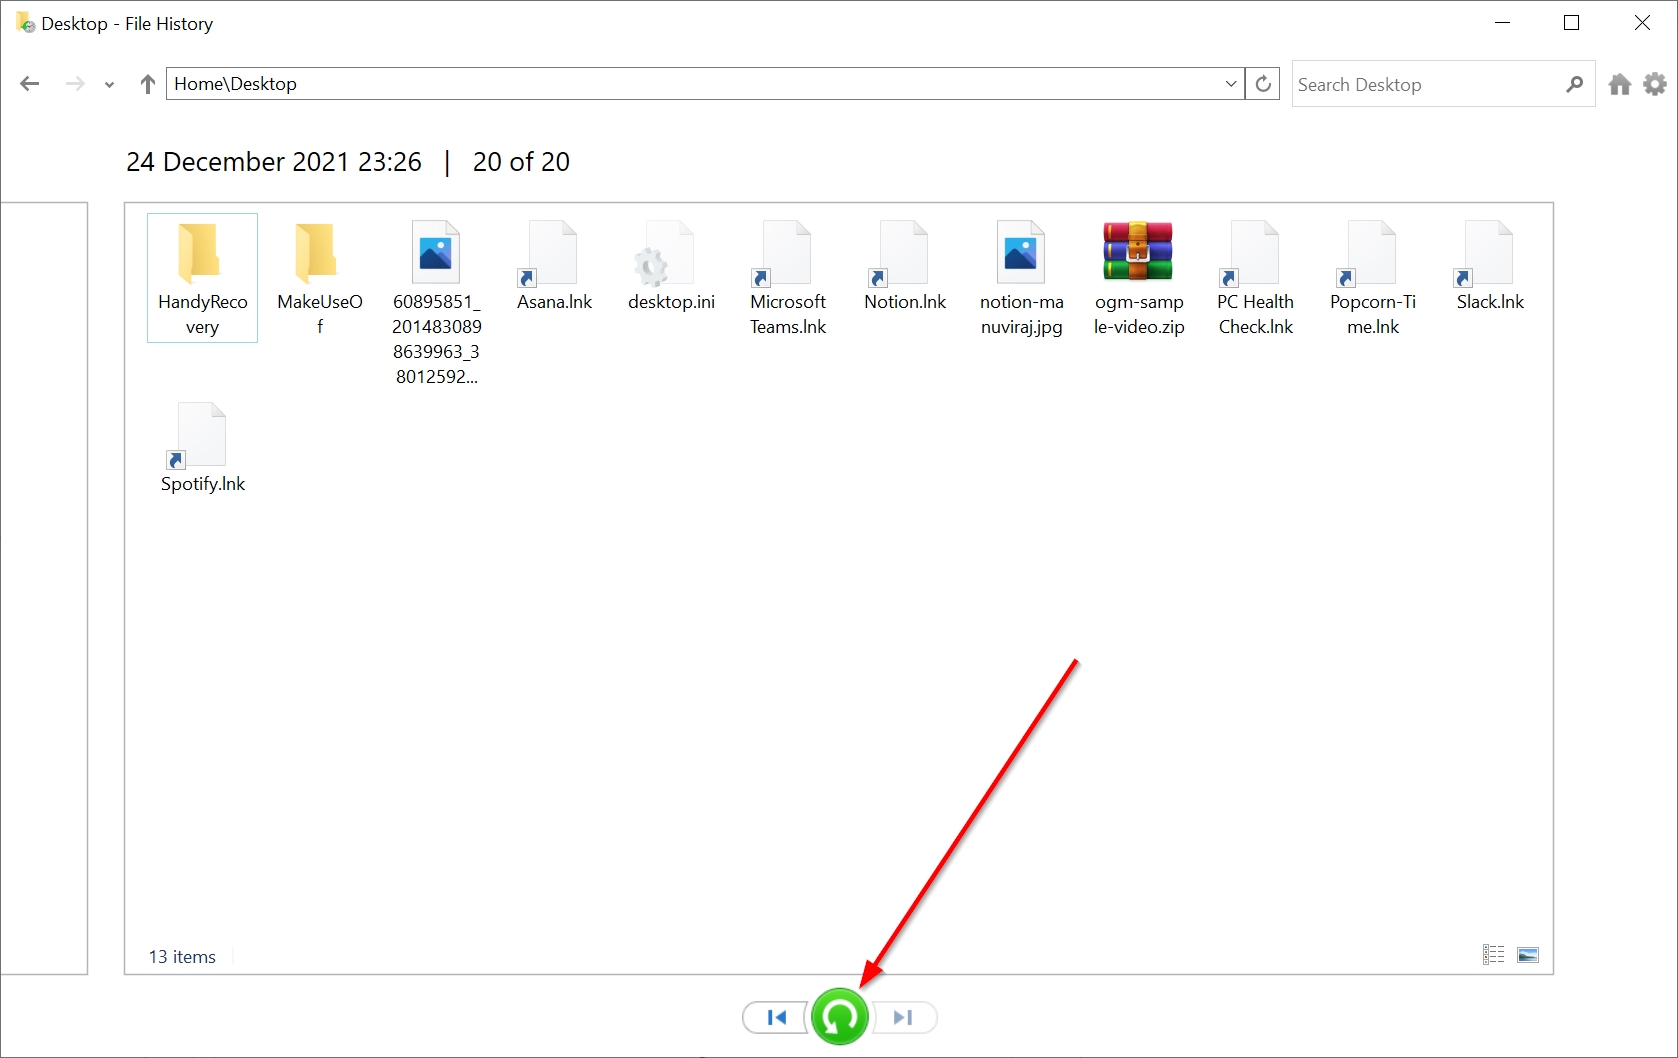
Step 6: Select the DIR files you want to recover.
Step 7: Click on the green recover button at the bottom of the window to restore the files.
Mac Time Machine
Step 1: Press the command (⌘) buttonand tap the space bar to open Spotlight. Type in “time machine” and press Return.
Step 2: Navigate to the folder where your DIR files are located.
Step 3: Browse through the backups until you find the one containing the deleted DIR files.
Step 4: Select the DIR files you want to recover, then click Restore.
If the backup features were enabled, both File History and Time Machine will restore your deleted DIR files to their original locations.
How to Open DIR Files on Mac and Windows
A DIR file is a very specific file type that can only be opened using Adobe Director. Though, you can export it in any video format and then play it as a video file.
If you’re unable to open a DIR file, use the Open with option after right-clicking on it. First, ensure that you have Adobe Director installed on your system.
Tips to Avoid DIR File Loss
If you have recovered your lost DIR files, here are some tips that will help prevent file loss from happening in the first place.
- Back up your DIR files: As soon as you get a new device, it’s important to switch on the back-up feature. If you’re not satisfied with the performance of the in-built back-up programs, you can always consider third-party ones.
- Diversify your back-up channels: Keep a back-up of all your critical data in three different places- two external storage devices, and one cloud platform.
- Use a good antivirus program: It’s always a good idea to invest in a good antivirus program. Computer viruses are one of the leading causes of data loss, and it’s better to practice safe browsing to further enhance your security against them.
- Save your work regularly: When working on an Adobe Director project, always save your work as frequently as you can. This will prevent the project file from disappearing or corrupting in case the software crashes or there is a sudden power cut.