We all want to get the most out of our devices. Unfortunately, your Android device comes heavily locked down. For most people, this is a good thing. No program can change important settings or tamper with system software, protecting you from malicious apps. However, the high security limits how much control you have over it. If you need advanced access to your smartphone or tablet, you must know how to root Android devices.
People have rooted Android devices since the first phones came on the market. This was because the phones did not live up to their potential. They were loaded with horrible bloatware that wasted your data and your battery life. Rooting was the only way to fix them.
Similar to jailbreaking an iPhone, to root Android devices is to give you superuser access to the operating system.
Android phones and tablets run on a Linux-based operating system with user permissions and file-system ownership. You use your Linux-like user account every time you sign into your phone. From there, you are allowed to do certain things based on your user permissions. The apps you install also have user accounts, based off yours. On top of these, all Android devices have a master user account called Root, be it Android N 7.0, or Android O 8.0.
Normally, we do not have access to the root user. Only the manufacturer and your carrier have the login information for it. For most people, this is a good thing. It prevents malicious apps from getting ahold of the system, and it keeps you from breaking your phone. But, if you need top-level access, you have no other option but to root your phone. Rooting lets you log into the root user account and have complete control over your device.
Why Root Android Devices?
Because you can ruin your phone by rooting it, you might be wondering if you should do it. The correct answer is: yes, no, maybe. All three answers are valid responses, as for “whether or not you should root your device” will come down to your situation and why you need to root it. Some people do it because they can. Others want to remove unwanted pre-installed apps. Still, others need to root their devices to add features or use special functions such as using Disk Drill to recover lost data. Rooting is not for everyone, though. It does come with risks. For one, you lower the reliability of some safety features, making you solely responsible for the security and integrity of your device and anything on it. Rooting the device will most probably void your warranty because of this. You can even turn your phone into a paperweight if you get it wrong.
Getting Ready to Root Android Devices
The standard method is to put your device in debug mode and use the Android SDK or a bootloader unlocker. To do this, you must install the Android SDK as well as Android USB drivers on to your Mac. You also must connect your device to your Mac. For most Android 6, 7, 8 devices, you need a Micro-USB or a USB Type-C cable for this. Once plugged in, you must give the bootloader permission to be unlocked. You can do this by enabling the “USB debug mode” from the Developer Menu. You can get to the menu by going to the About phone section of your device’s settings, and tapping the build number five times to enter Developer mode. You will find the Developer options on the main setting page under OEM unlocking. After this, you might have to reconnect your device to your Mac or restart it.
How to Root Android Tablet Devices and Phones
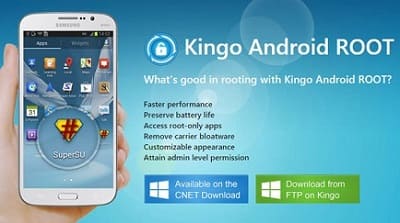
With your phone or tablet unlocked, you can start rooting it. Most people will want to use a commercial root app. Commercial rooting apps, such as Kingo Root, are straight forward, and you can use them without a computer.
Most apps will not work with all phones though. So, you must make sure that the rooting app you choose will work with your device. While most apps are safe, there is enough of a concern that you should take some precautions before using them.
How to Root Android Devices Depends on Your Device
How you root Android phone systems and tablets depends on the type of device you have. Most manufacturers add their own security features on top of what Google adds by default. Thus, you must root your device accordingly. Some devices are easy to root, while others are not. Speaking of today, almost all Android devices can be rooted, whether they are running Android 5.1, or Android 6.0.1 or newer Android 7 and 8.
Rooting Your Samsung Galaxy S7 Phone
Samsung used to sell “developer editions”, but has stopped producing them due to low sales and their contracts with carriers. Your carrier does not want you to root your phone, and many only offer encrypted phones that cannot be rooted. This is usually the case for U.S. versions. You might be able to use the following instructions to root your phone, but there is no way to know if it will work until you try it. Either way, you must make sure you unlocked the bootloader before you can proceed, as instructed above.
Once unlocked, you can start the rooting process, and for Samsung Galaxy S phones you need the Heimdall program to do that. Heimdall is a low-level firmware flashing tool that can overwrite your phone’s ROM. You must make sure you use the right image file though. If you use a wrong image or a bad one, you can brick the phone or tablet. You will have a rooted Android device once the program finishes uploading files. You can restart the Android 7.1 (Nougat) phone to check for errors.
Rooting Your Samsung Galaxy S8 Phone
The Galaxy S8 also runs on Andoid 7.0 (Nougat) with all due upgrades, and it’s much easier to root than its predecessors. You will need the CF-Auto-Root app from Chainfire to do it, but the app will work regardless of your device’s current firmware version.
Before you root your S8, you must unlock it as instructed earlier. Just make sure you get the S8 USB drivers. We also recommend that you back up your files before you start as well and that your S8 has more than 70% of charge.

Once ready, you can root your S8 as follows:
- Check and confirm that CF-Auto-Root will work with your S8’s model number.
- Download and install both CF-Auto-Root and Heimdall apps to your Mac.
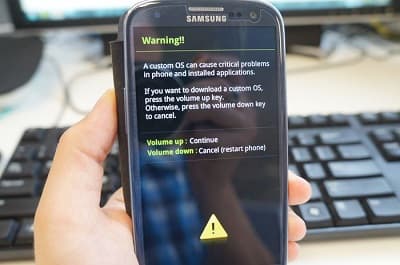
- Switch your phone off and enter into download mode by pressing and holding the Volume Down and Bixby buttons simultaneously followed by the Power key.
- Press Volume Up key once to confirm at the construction Android robot sig.
- Run Heimdall and connect your S8 to your Mac.
- Once connected, click the AP / PDA button and select the CF-Auto-Root.tar.md5 file.
- With Auto Reboot and Factory Reset selected, click on Start to initiate the root process.
Once complete, you will get a PASS message and the “ID: COM” box will turn yellow to green. Your Android device should reboot automatically into Recovery mode and then install the necessary files. You can disconnect your device once your phone returns to the Home screen.
Other Phones
There are over 12,000 current Android models out there to list them here. Some of them will be easier to root than others. Some have manufacturer-approved rooting apps, while others will require a third-party app. We recommend checking out other online resources from the XDA Developers forums to find the solution you need.
Once you root your phone or tablet, you can start using apps such as our Disk Drill data recovery app. You can even use these apps to restore your device back to its factory settings after you no longer need a rooted device. Just remember that we cannot be responsible for what happens after you root your device. You are doing it at your own discretion. If you have any questions or need help with Android data recovery in Disk Drill, feel free to contact us.