Modern electronic devices, from smartphones to digital cameras, heavily rely on SD cards—both full-sized SD cards and microSD cards—to store important files. However, with frequent use comes the risk of damage, which can manifest in two main forms: logical and physical.
Logical damage refers to issues with the file system or data deletion/corruption, while physical damage involves the actual hardware of the memory card being compromised. This article is primarily focused on the recovery of logically damaged SD cards, but we will also outline our recommended approach for the recovery of physically damaged SD cards.
Signs and Possible Causes of a Damaged/Broken SD Memory Card
| Problem | Solution |
| Files are missing | |
| SD card not detected | |
| Read/write errors | |
| Wrong capacity | |
| Unknown files present | |
| Visible physical damage |
When doctors diagnose their patients, they look for symptoms, which are clear signs that something is not right. Experienced doctors can recognize various symptoms so well that they can make the right diagnosis way before the lab results come in and confirm it.
Just like the human body, storage devices typically show certain signs when there’s something wrong with them. Here are some of the most common signs indicating that an SD memory card is corrupted:
SD card not detected

- Sign: You insert your SD card into your camera’s or computer’s SD card, but the card doesn’t show up.
- Explanation: This common sign of SD card damage can be caused by extensive file system corruption or an incompatible file system. The file system may have become damaged due to improper ejection, power loss, or other factors. Additionally, some devices may not recognize certain file systems used by the SD card.
Read/write errors

- Sign: You take a picture, but your camera displays an error message, telling you that it was unable to write the file to your SD card.
- Explanation: Errors like this may be a sign of a worn-out SD card with too many bad sectors. You can attempt to repair it using the methods below, but it might be best to get a new SD card instead—just to be safe.
Wrong capacity

- Sign: Your SD card is supposed to have a capacity of, let’s say 64 GB, but your camera or computer sees less than that.
- Explanation: SD cards sometimes display the wrong capacity when they are formatted improperly or when the partition table, which is a table that describes how the storage device on which it’s located is formatted, becomes damaged.
Files missing

- Sign: You open the content of your SD card but discover that certain files that should be there are missing.
- Explanation: Files suddenly disappear from memory cards for two main reasons. First, they become so damaged that they start to become indistinguishable from empty storage space. Second, the files receive the hidden attribute, which causes them to appear deleted even though they are still in their original locations.
Unknown files present

- Sign: You open the content of your SD card and discover unknown files that shouldn’t be there. These files typically have strange names and sometimes lack file extensions.
- Explanation: Unknown files may appear on your SD card for several different reasons, including file system damage, malware attack, software bug, and user error. In many cases, you can simply delete them and move on. But if they appear again, then you need to investigate the issue more carefully.
Visible physical damage

- Sign: Your SD card has visible physical damage, such as cracks, bends, or broken parts.
- Explanation: Physical damage to an SD card can occur due to various reasons, such as improper handling, accidental drops, or exposure to extreme conditions. When an SD card is physically broken, it may not function correctly, and data stored on it may become inaccessible. In some cases, the damage may be severe enough to render the card completely unusable. If you notice any physical damage to your SD card, you should stop using it immediately and seek professional data recovery services to retrieve your data.
How to Retrieve Data from a Damaged SD Card with Data Recovery Software
Whenever you lose important data due to logical SD card damage, your first step should be to back up and recover the broken SD card using SD card data recovery software designed specifically to locate fragments of files on a half-functioning or non-functioning storage medium and recover them back.
One SD card data recovery software application that can be used to create a byte-to-byte backup of any logically damaged SD card and reliably recover data from it is Disk Drill. This tool allows you to attempt data recovery without further manipulating the original SD card, which might risk causing additional damage or data loss.
Here’s how simple it is to back up a damaged SD card with Disk Drill:
- Step 1: Download Disk Drill from its official website and install it on your computer.
- Step 2: Connect the damaged SD card to your computer. Should you encounter prompts from Windows suggesting formatting the device to make it usable again, resist the urge to do so as it could lead to further data loss or, in the worst case, make data recovery completely impossible.
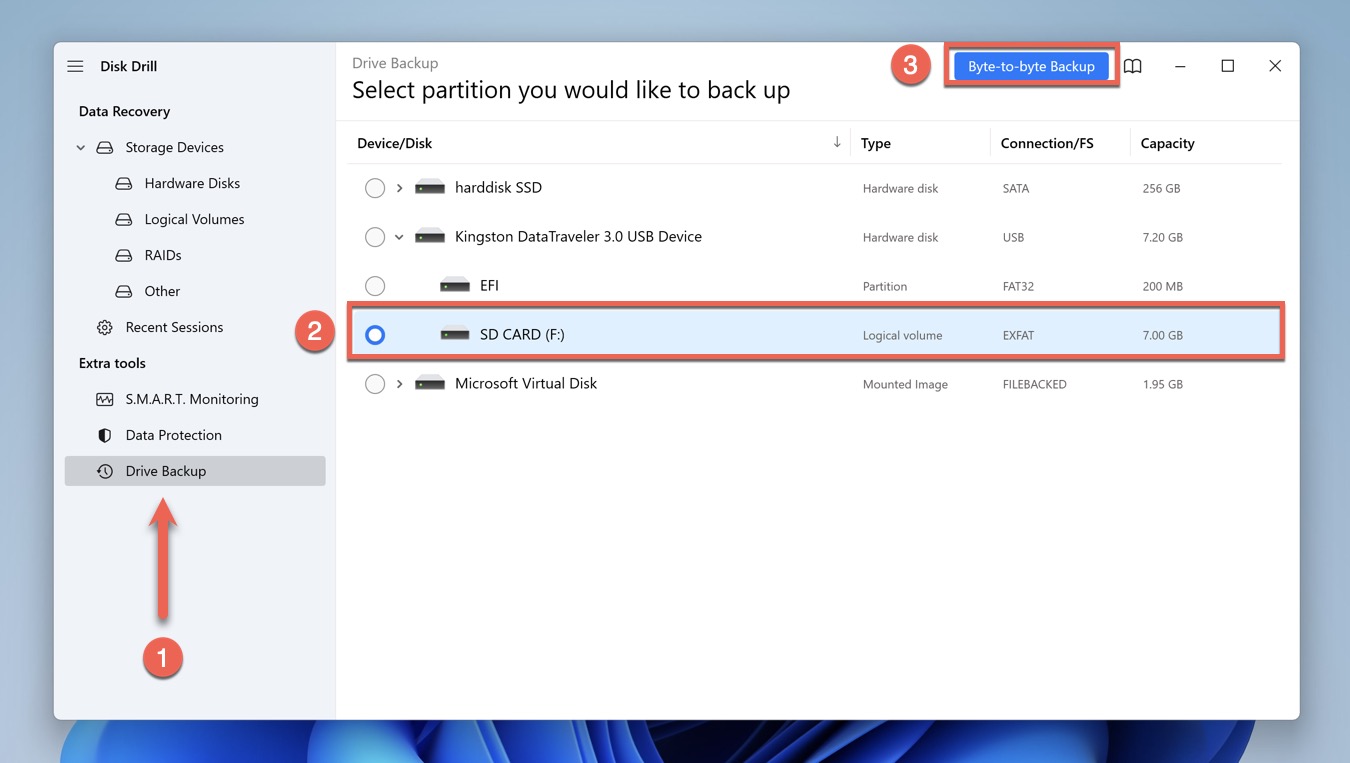
- Step 3: Launch Disk Drill and select the Drive Backup tool from the left pane.
- Step 4: Choose your damaged SD card and click the blue Byte-to-byte Backup button.
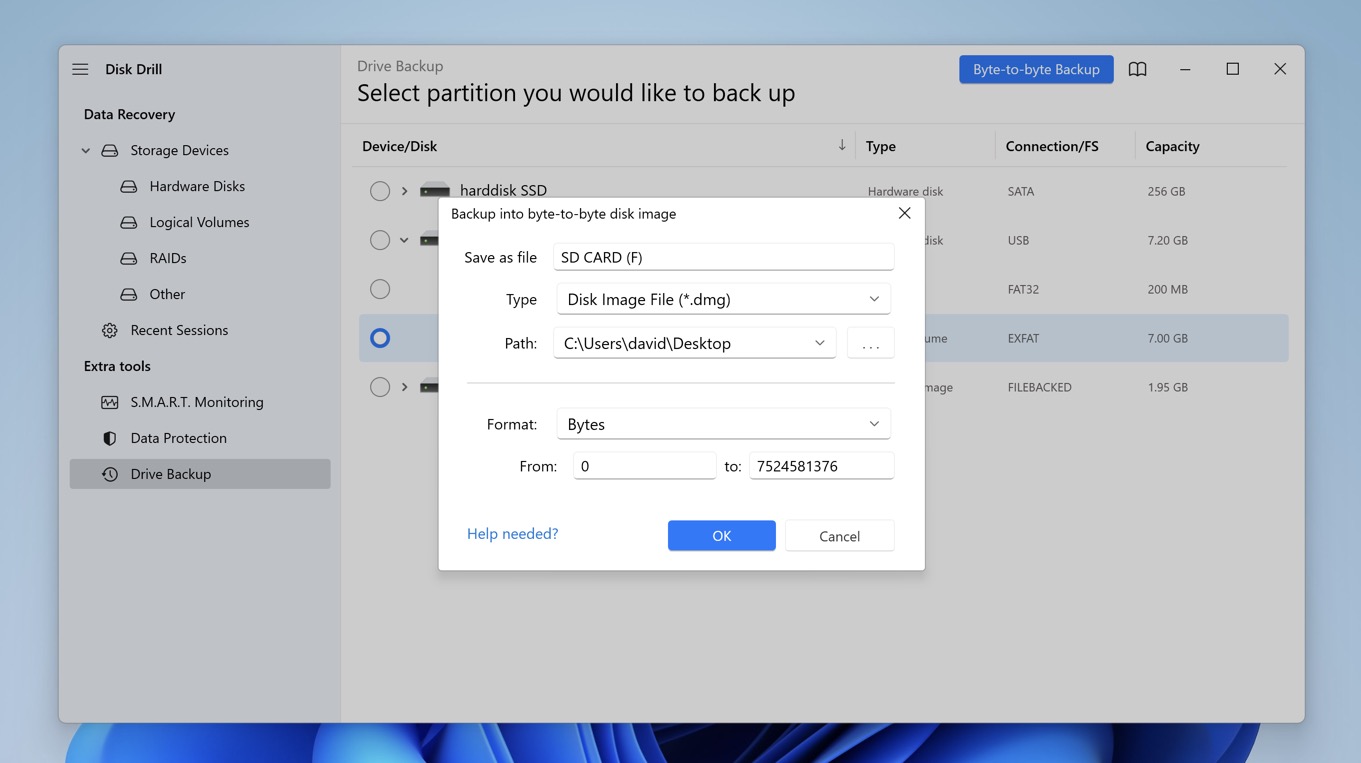
- Step 5: Tell Disk Drill where it should save the backup image and click OK. Depending on the size and speed of your SD card, it might take a while for the backup process to finish, so be patient and don’t interrupt it.

Now that your damaged SD card has been backed up into a convenient image file, you can safely store it someplace safe because you won’t need it for the next part, which is the recovery of your lost data from the backup image.
Follow these steps to recover your data from the byte-to-byte backup image:
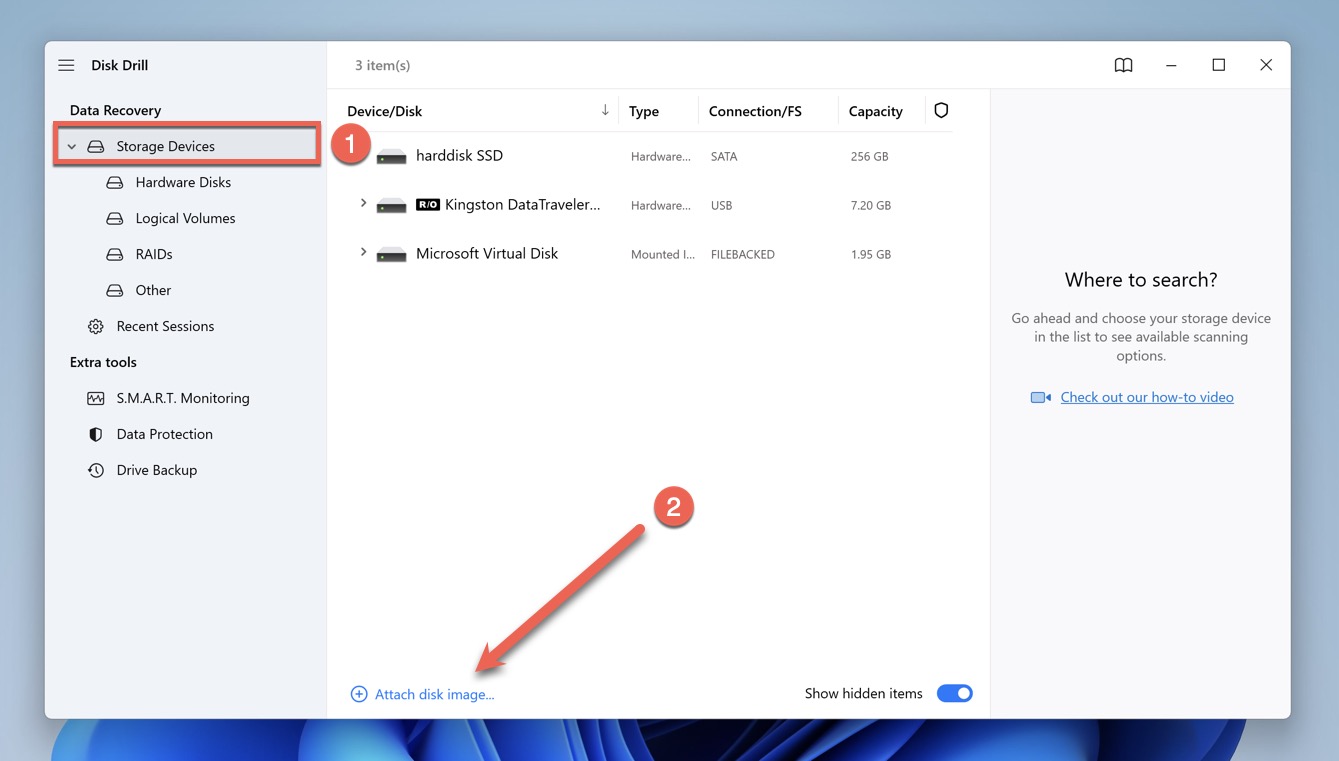
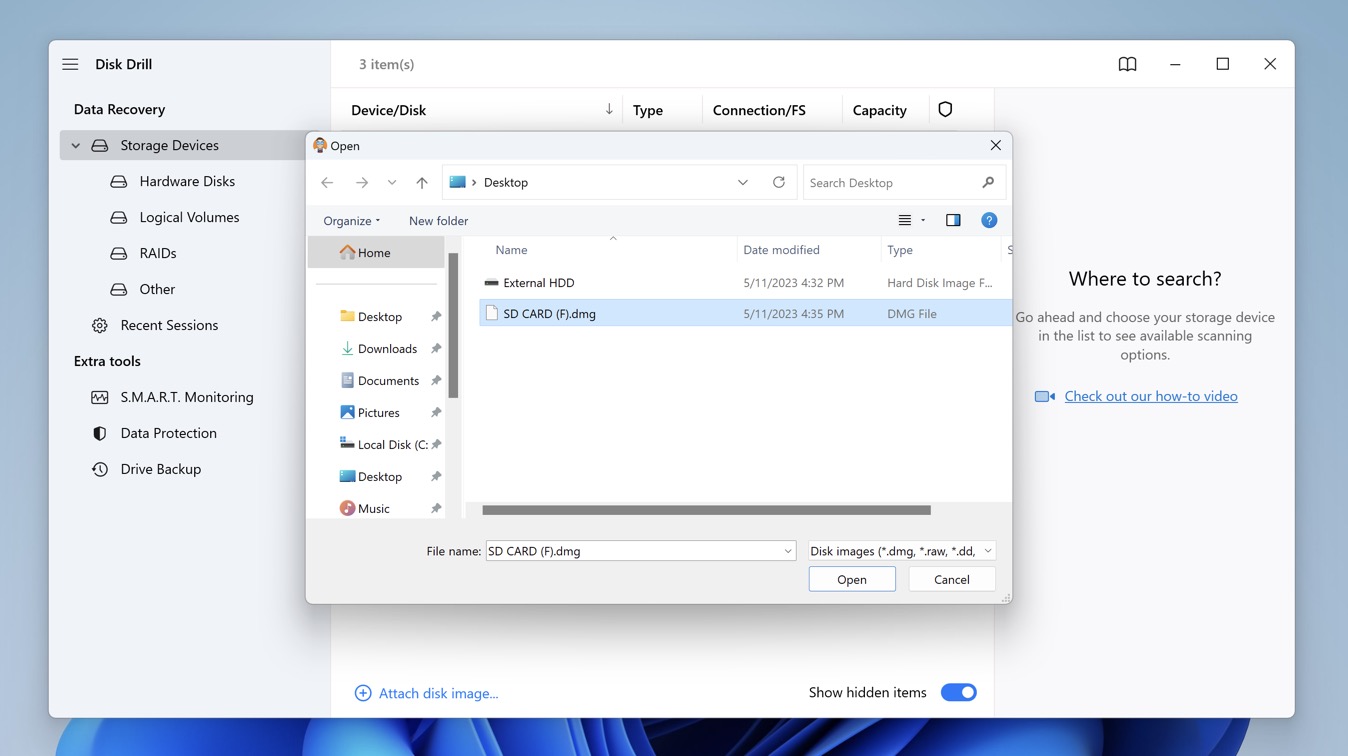
- Step 1: Switch to the Storage Devices tab and click on “Attach disk image.”
- Step 2: Select the byte-to-byte backup image you’ve just created and click “Open.”
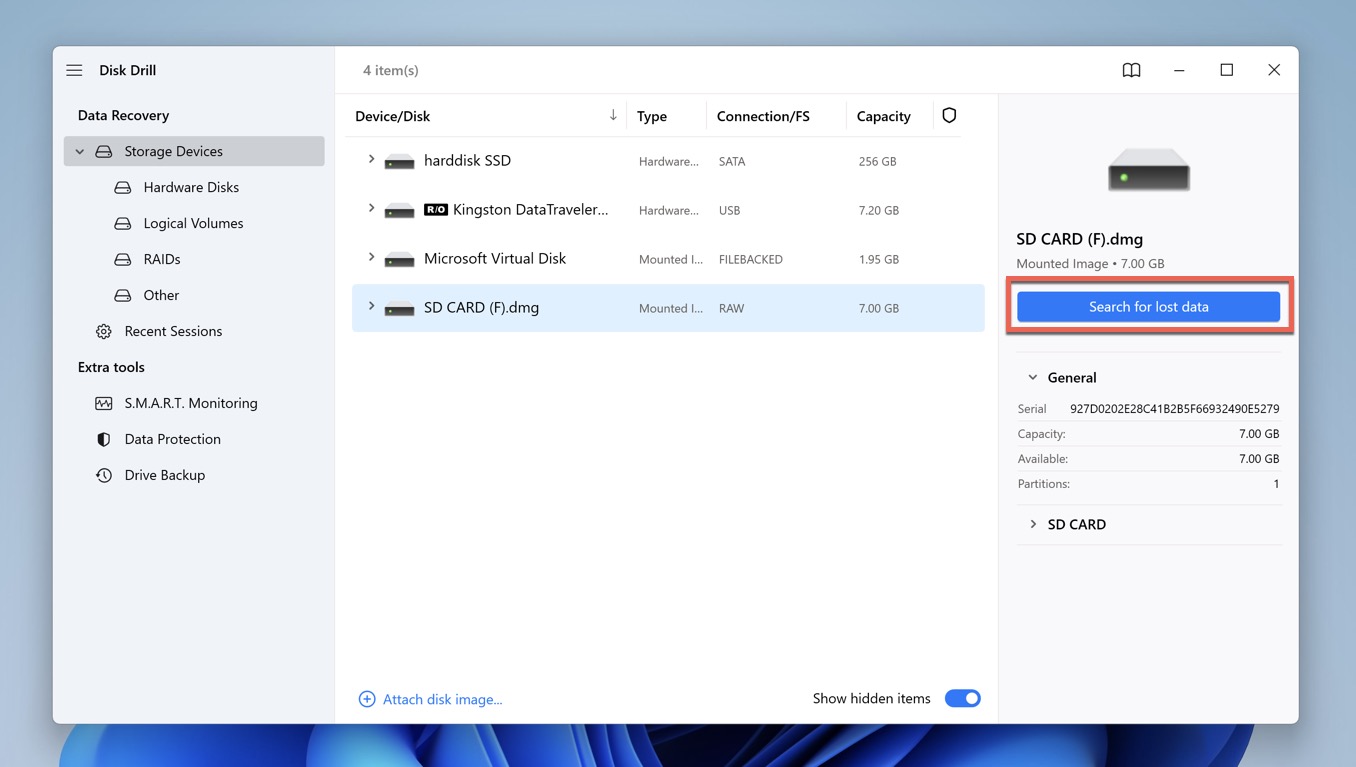
- Step 3: Choose the image you’ve just mounted from the list of available storage devices and click “Search for lost data.”
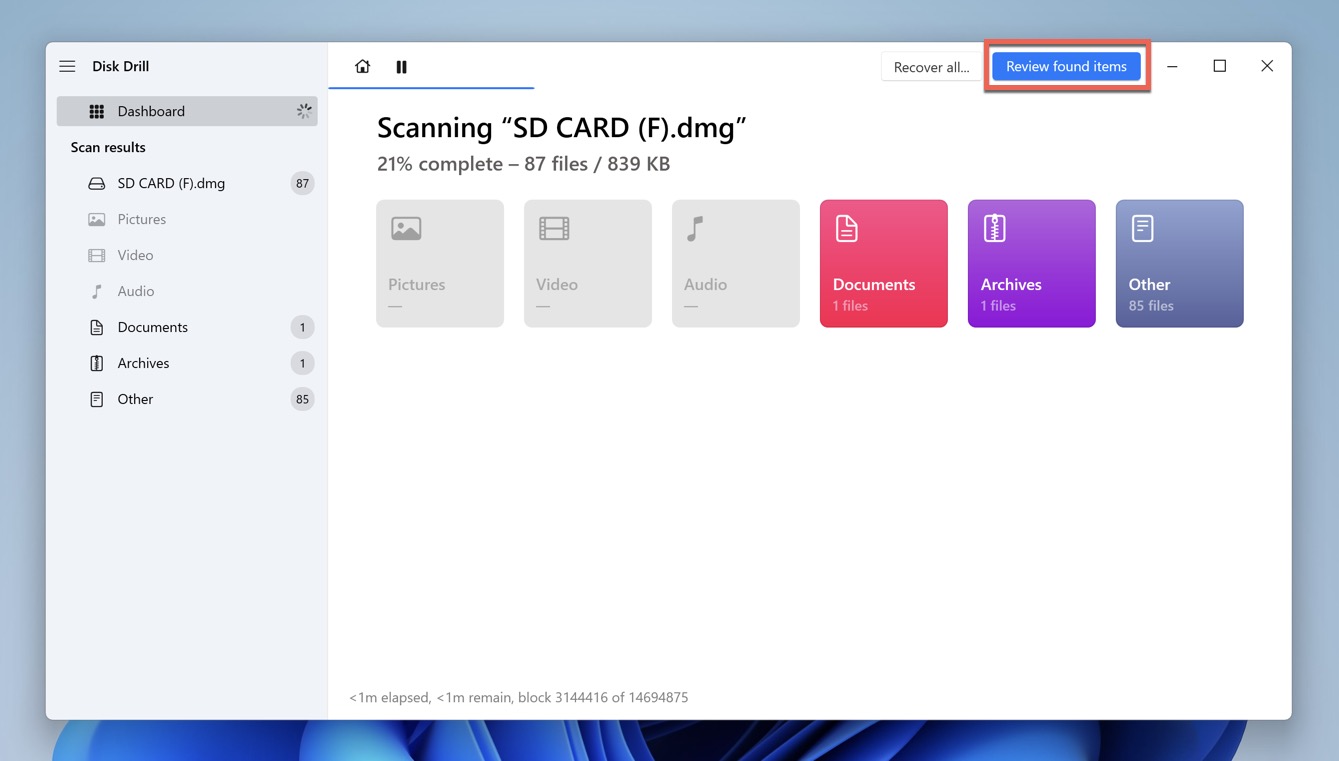
- Step 4: Wait until Disk Drill completes the analysis of the image and then click on “Review found items” to see the results. If you don’t want to wait until the end of the scanning process, then you can choose to review found items sooner. Just know that the list of results won’t be complete.
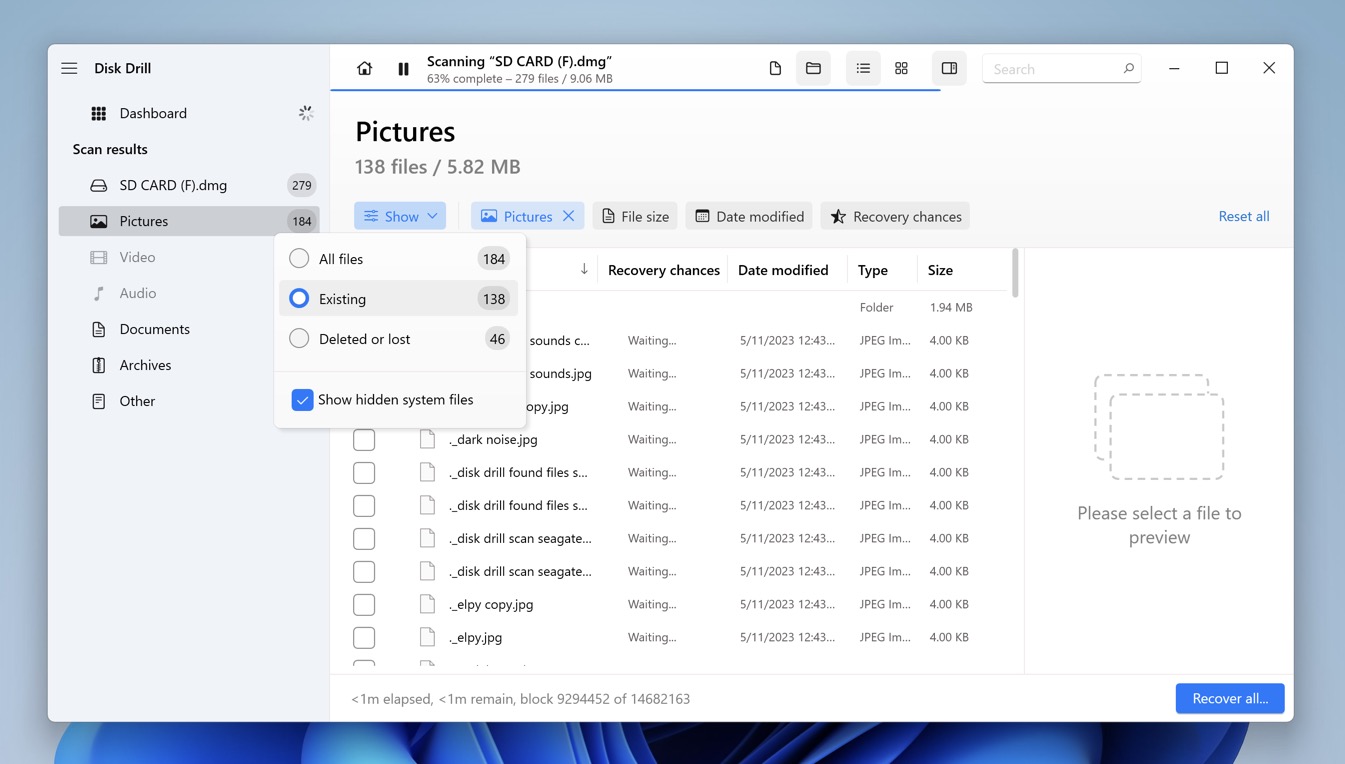
- Step 5: Select all data you want to recover. By default, Disk Drill displays Deleted, Reconstructed, as well as Existing files. If you’re looking only for files that have been, for example, deleted by mistake, then you can click the Show button and configure Disk Drill to display nothing but them. You can also take advantage of Disk Drill’s other filters, its search bar, and its preview feature to locate what you’re looking for.
- Step 6: Click the “Recover” button and then specify a location for your recovered data. Click “Next” to save your data to the specified location.
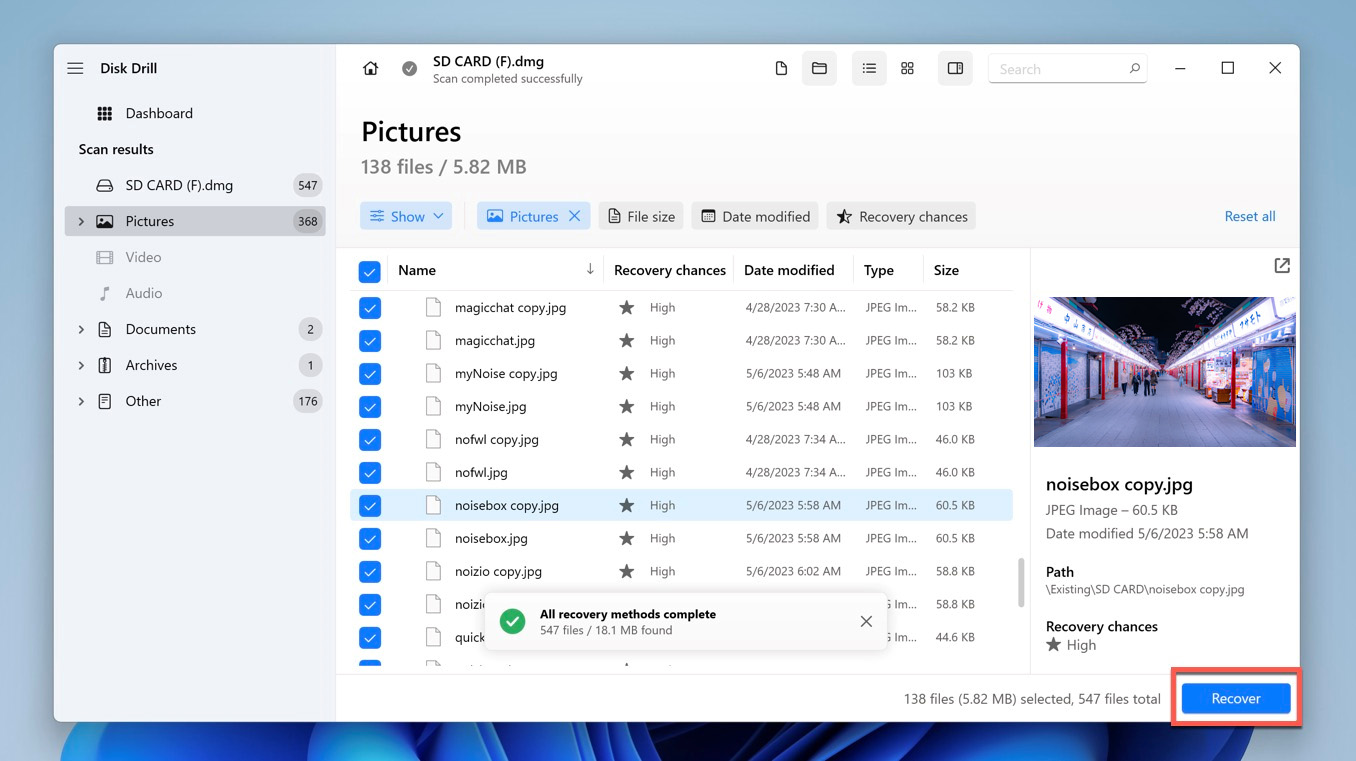
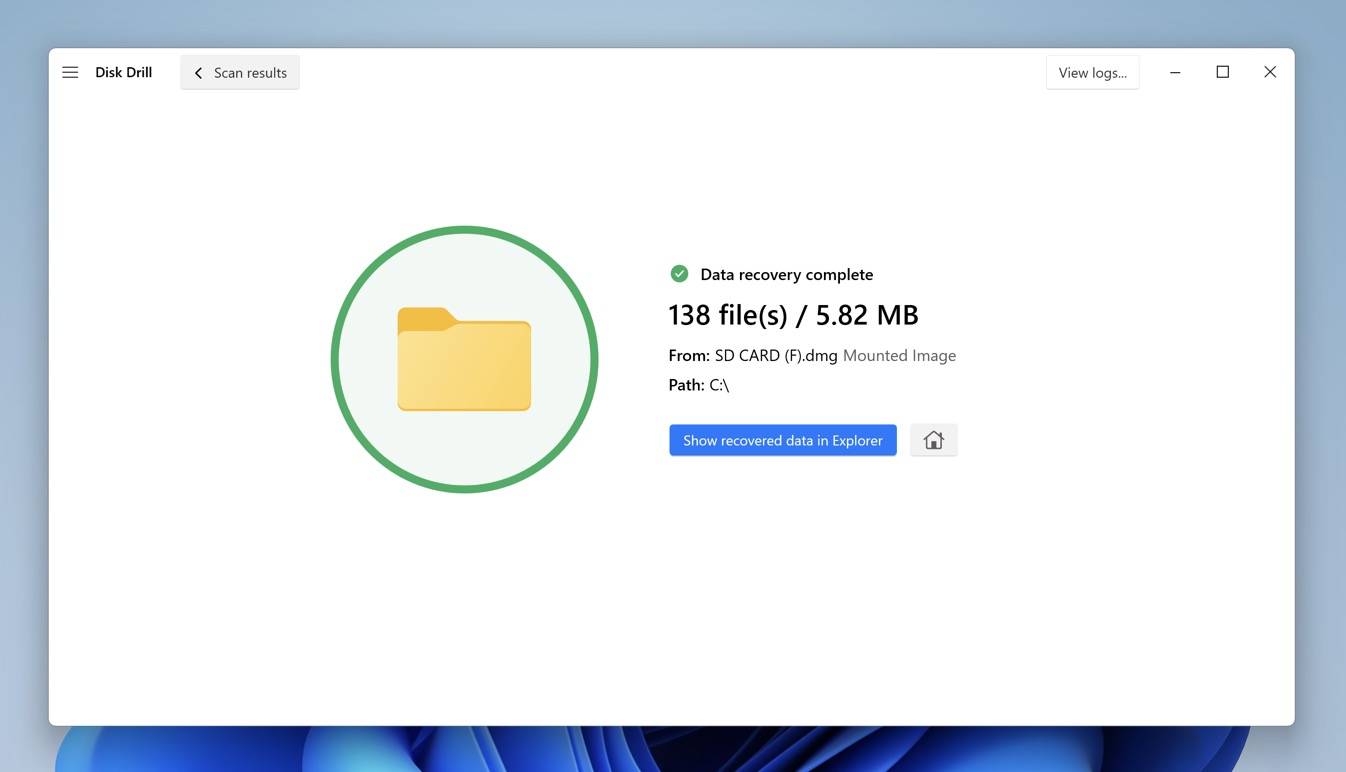
- Step 7: Click the “Show recovered data in Explorer” option and check if your data has really all been successfully recovered (it almost certainly has).
Using sophisticated data recovery algorithms and an extensive database of more than 400 file signatures, Disk Drill will recover all data that would otherwise be forever lost, and it will do so quickly, affordably, and on demand.
How to Fix a Damaged or Physically Broken SD Card with and without Formatting
For every problem, there’s a solution; and for every damaged SD card, there are several.
Some ways of recovering data from a damaged SD card don’t require formatting, while others do. You can read our comprehensive overview of 11 solutions on how to fix a corrupted SD card and repair logical damage to familiarize yourself with the most available methods before you commit to any specific one.
But if you’re short on time and are interested only in the most effective methods, you can simply read the following quick summary of multiple major solutions on how to fix a damaged SD card (with and without a computer):
Method 1: Scan the SD Card Using CHKDSK
CHKDSK is a file system repair utility in Windows, and you can use it to recover a damaged SD card with one simple command.
- Open the Command Prompt by typing “cmd” in the search box on the taskbar.
- Enter the following command and press Enter: chkdsk X: /r (replace X with the letter assigned to your SD card).
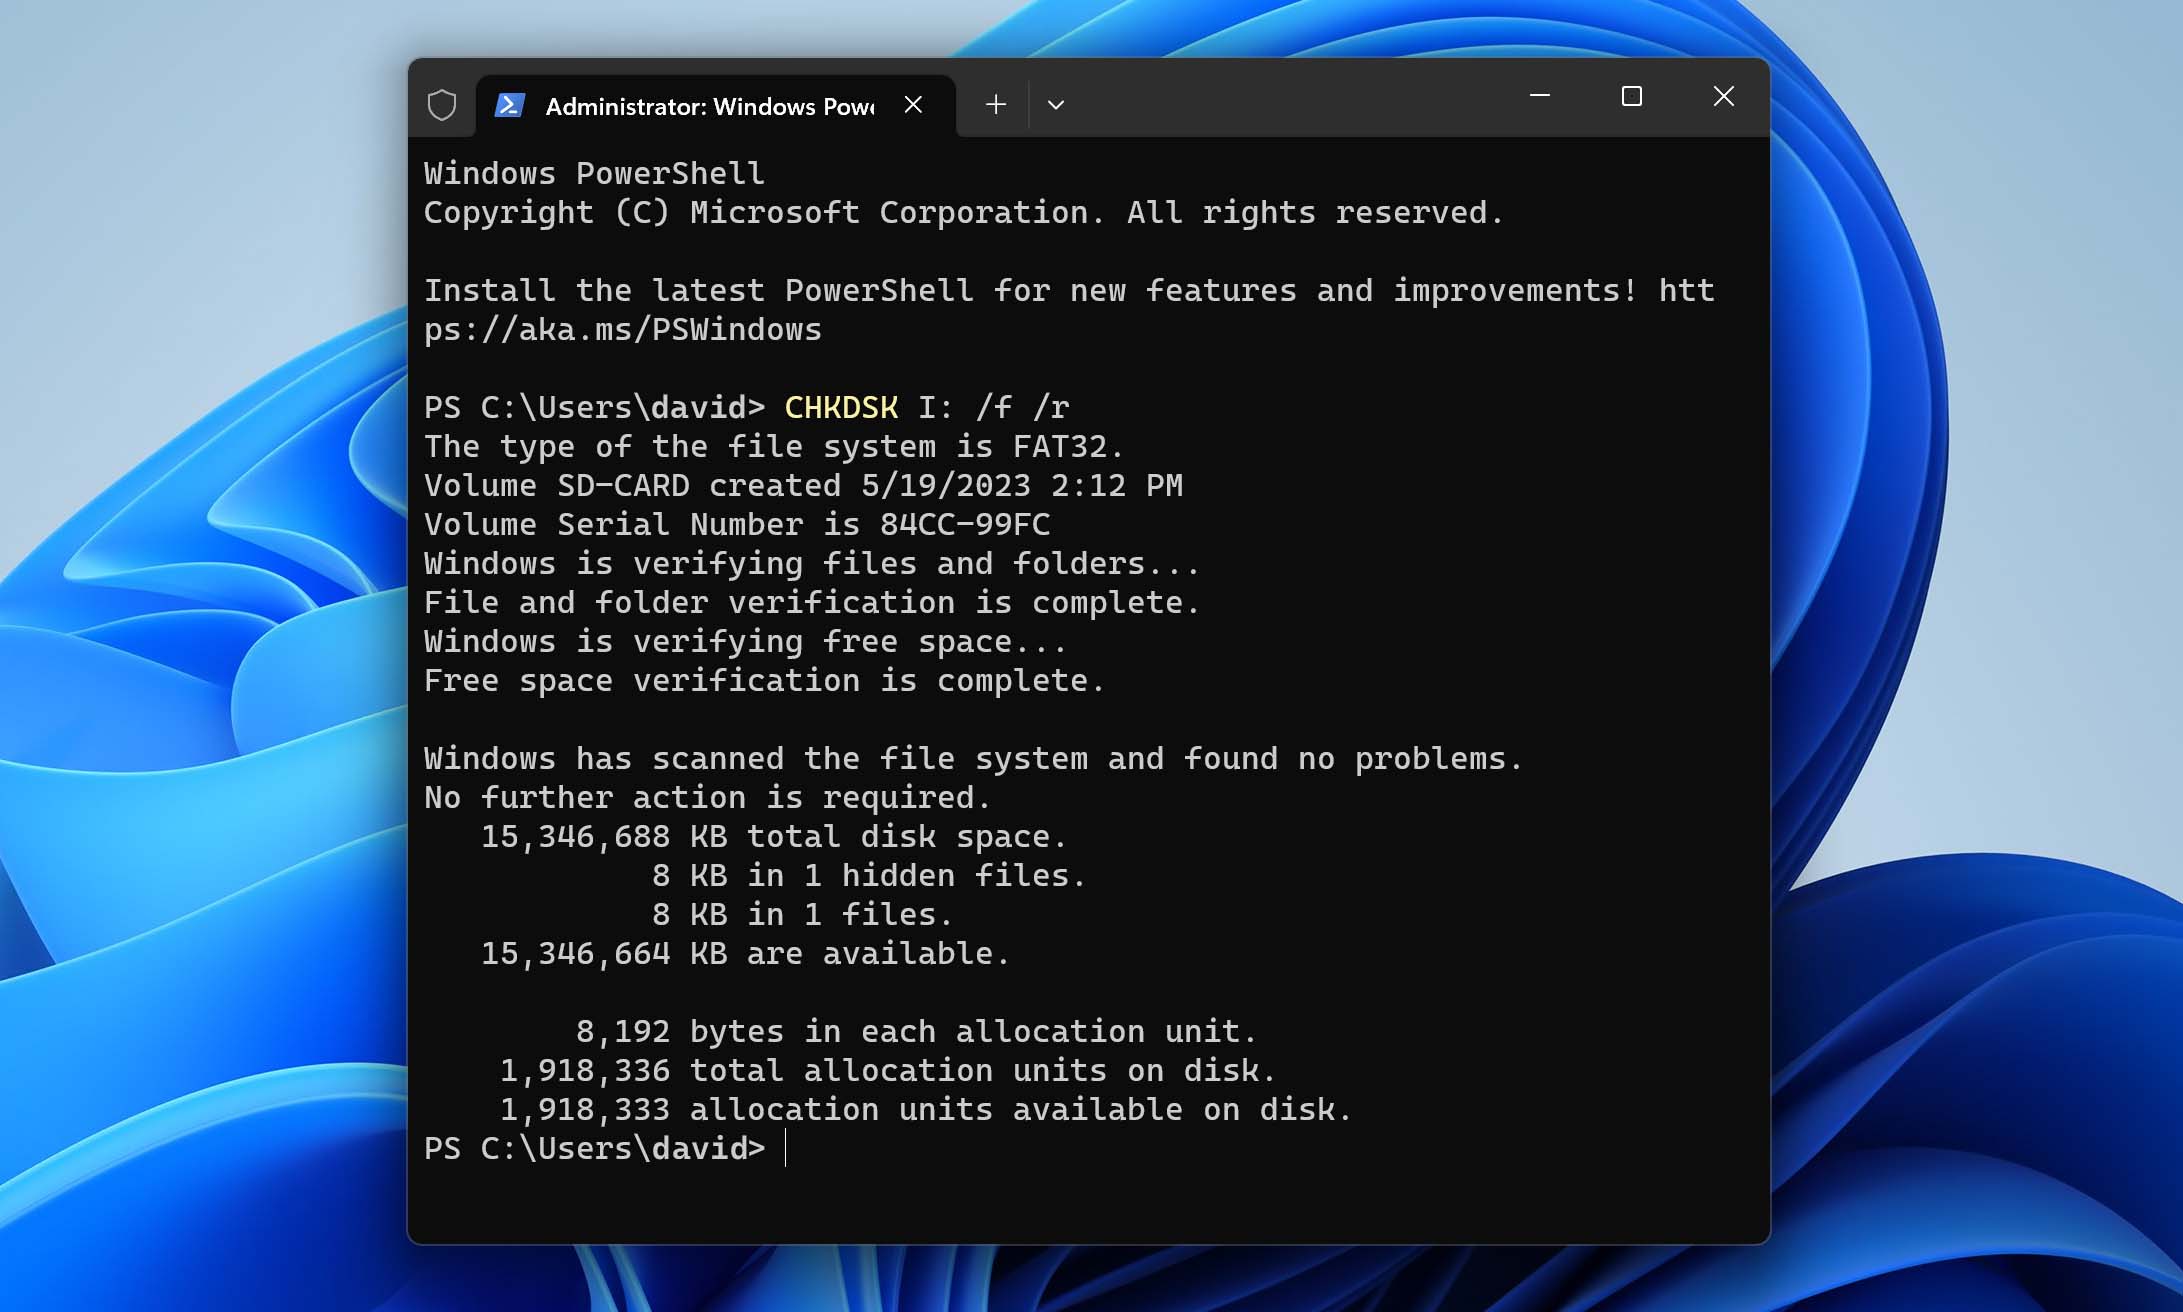
- Wait for CHKDSK to finish.
Method 2: Access the SD Card Using a Different Device
While not exactly a fix, this method is often all it takes to access an unreadable SD card and copy all data from it to a safe location. Best of all, you don’t even need another computer since most Android smartphones, smart TVs, and video game consoles can read SD cards.
If you don’t have another device with an SD card slot, then at least buy a cheap external memory card reader to rule out the possibility of your current memory card reader (internal or external) being the cause of your issues.
More tech-savvy users can create a live USB drive with a Linux distribution that supports a wide range of file systems, like Ubuntu, and use it to access the files stored on the SD card. This approach allows you to bypass potential compatibility issues with file systems that Windows doesn’t recognize.
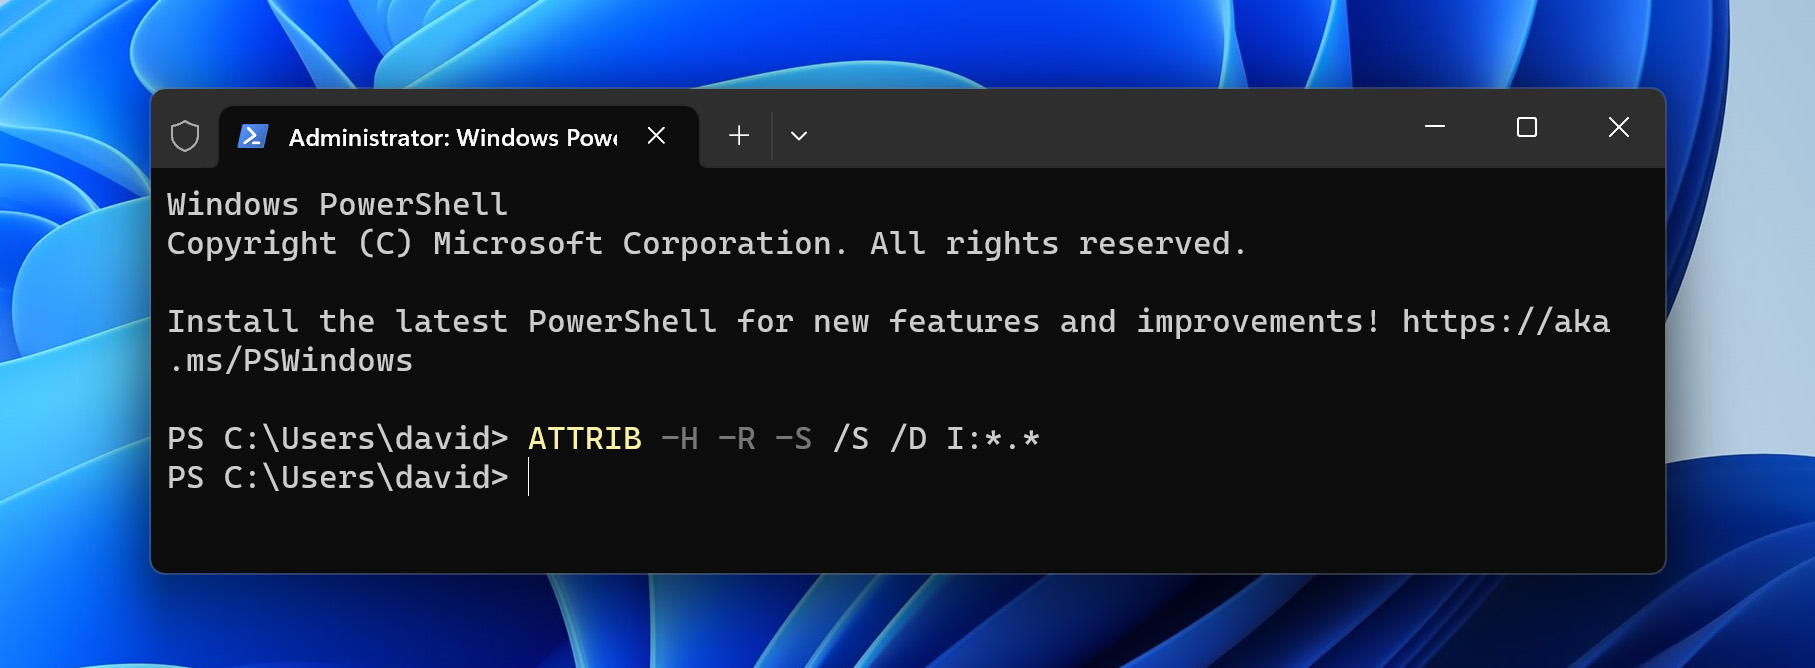
Method 3: Fix File Attributes to Unhide Hidden Files
Your files have various attributes that specify how they can be displayed and manipulated. When file attributes become messed up, bad things can happen, such as you losing the ability to access them.
The good news is that you can fix file attributes to unhide hidden files with a single command.
- Open the Start menu, type “Terminal” in the search box, and launch the Terminal app as administrator.
- Enter the following command and press Enter: ATTRIB -H -R -S /S /D X:*.*
Method 4: Run Windows Error Checking Tool
In addition to the CHKDSK file system repair utility, Windows comes with a graphical error checking tool that does basically the same thing but differently.
- Launch File Explorer.
- Select This PC from the left pane.
- Right-click your SD card.
- Select the Properties option.
- Go to the Tools tab.
- Click the Check button under Error checking.
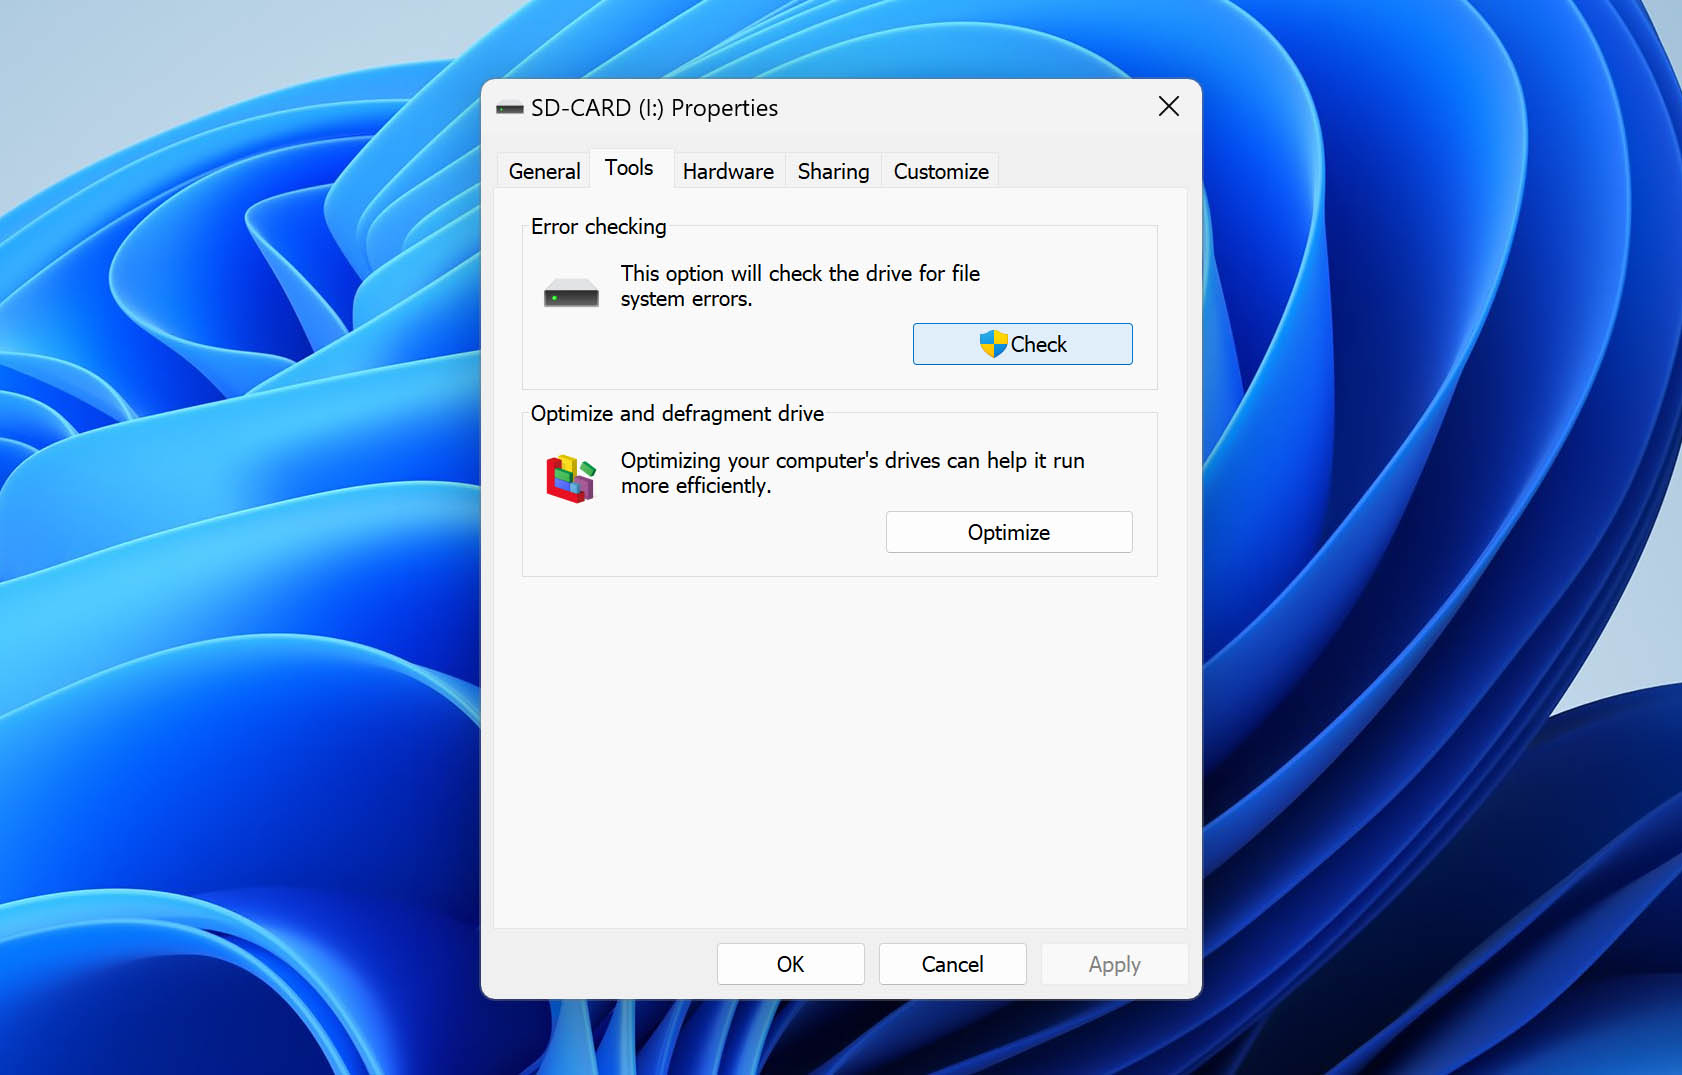
- Wait for the tool to check your SD card for file system errors.
Method 5: Assign a New Drive Letter to the SD Card
Is your SD card detected by Windows but impossible to access because it’s not listed as an available storage device? Then it’s possible that it doesn’t have a drive letter assigned to it. And if the SD card has a drive letter, but you can’t access its contents, changing the drive letter might help resolve the issue by forcing the system to reinitialize the card.
Follow these steps to assign a new drive letter:
- Press Win + X and select Disk Management.
- Right-click your SD card and select the Change Drive Letter and Paths option.

- Click the Add button to assign a new drive letter to the SD card.
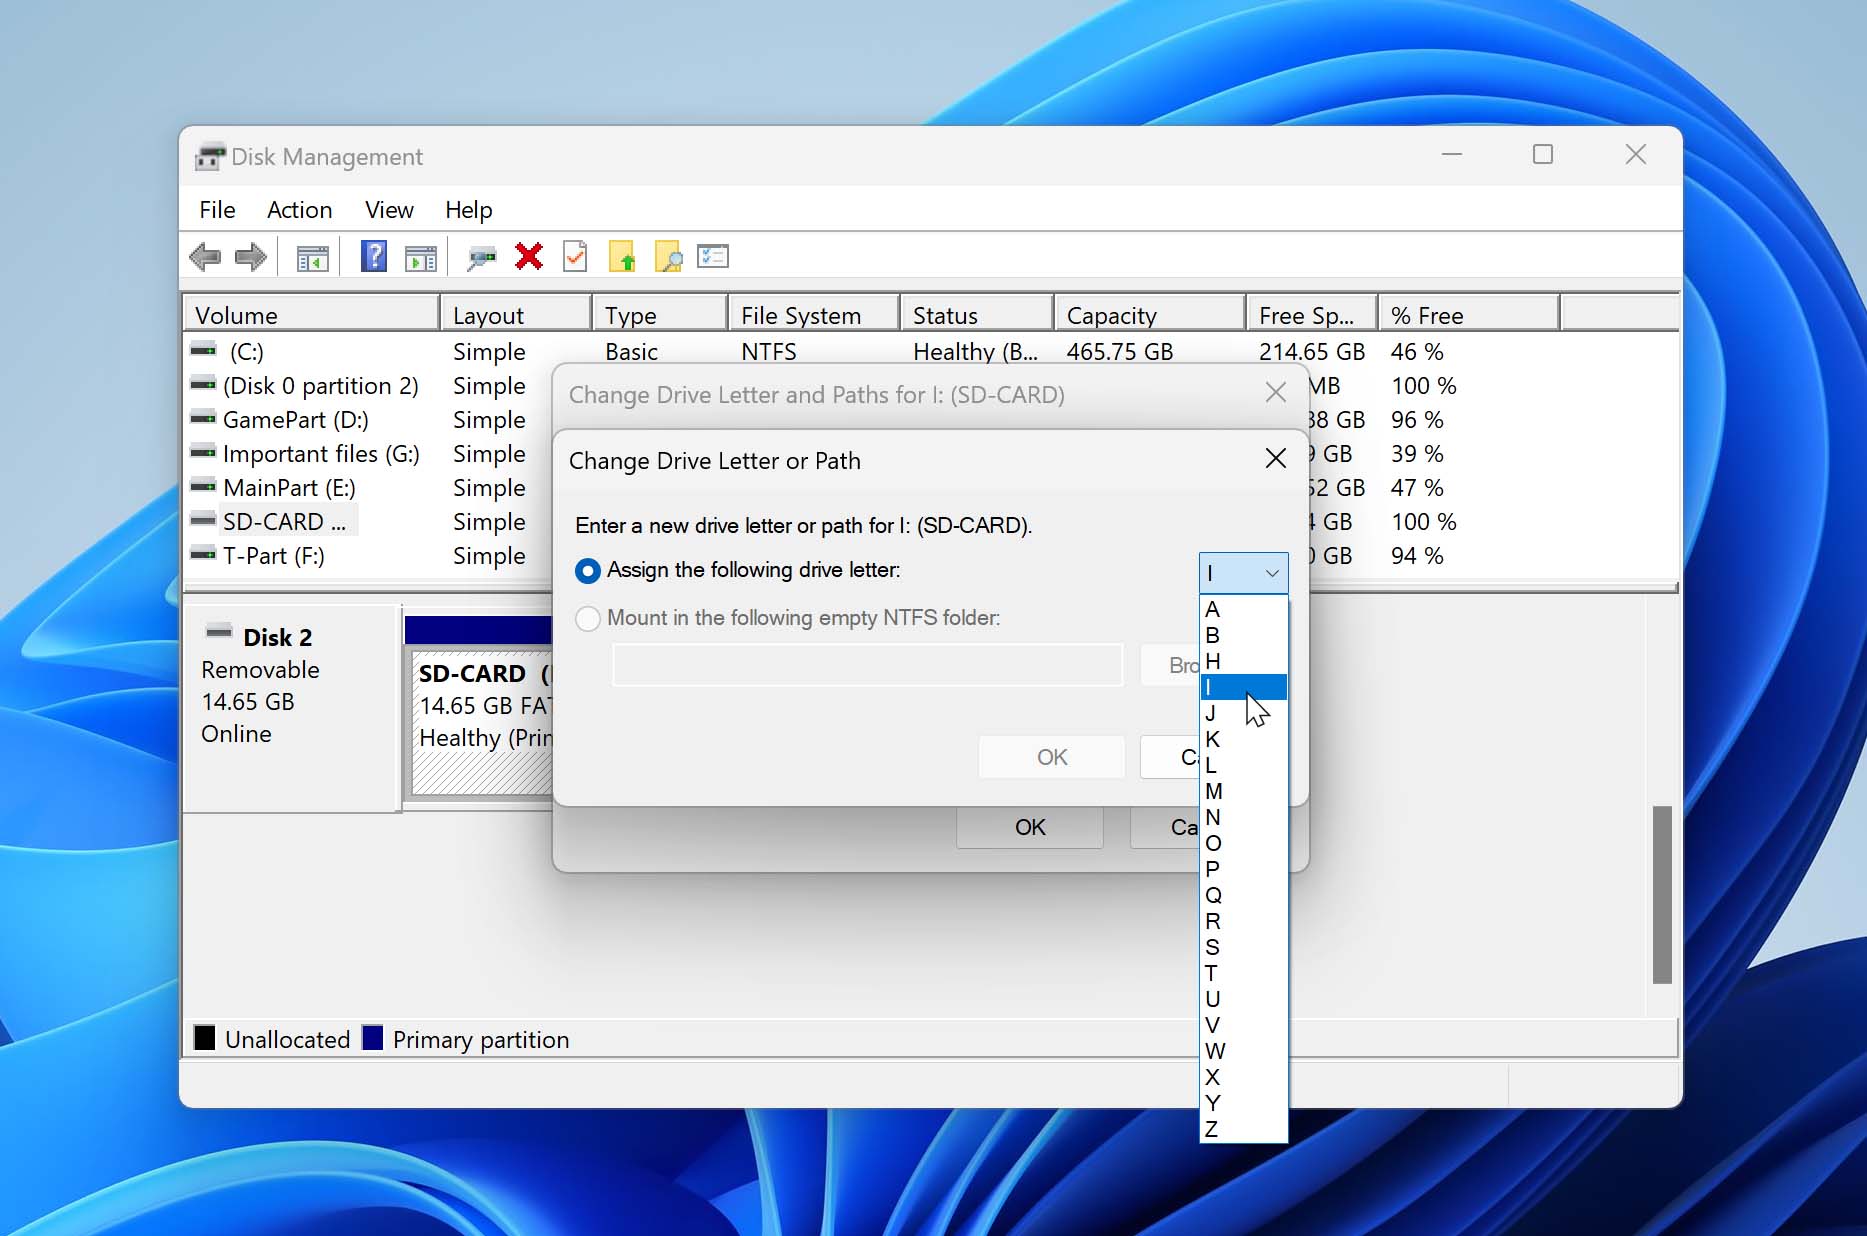
You can also use the Disk Management utility to change an existing drive letter by selecting the Change option instead of the Add option.
Method 6: Reinstall SD Card Drivers
Your SD card communicates with your operating system and all software running on it with the help of system drivers. A faulty operating system update or poorly thought-out tinkering attempt can damage system drivers and make it impossible to access the content of your SD card. To fix this problem, you need to reinstall SD card drivers.
- Press Win + X and select Device Manager.
- Expand the portable devices section.
- Right-click your SD card and choose the Uninstall device option.
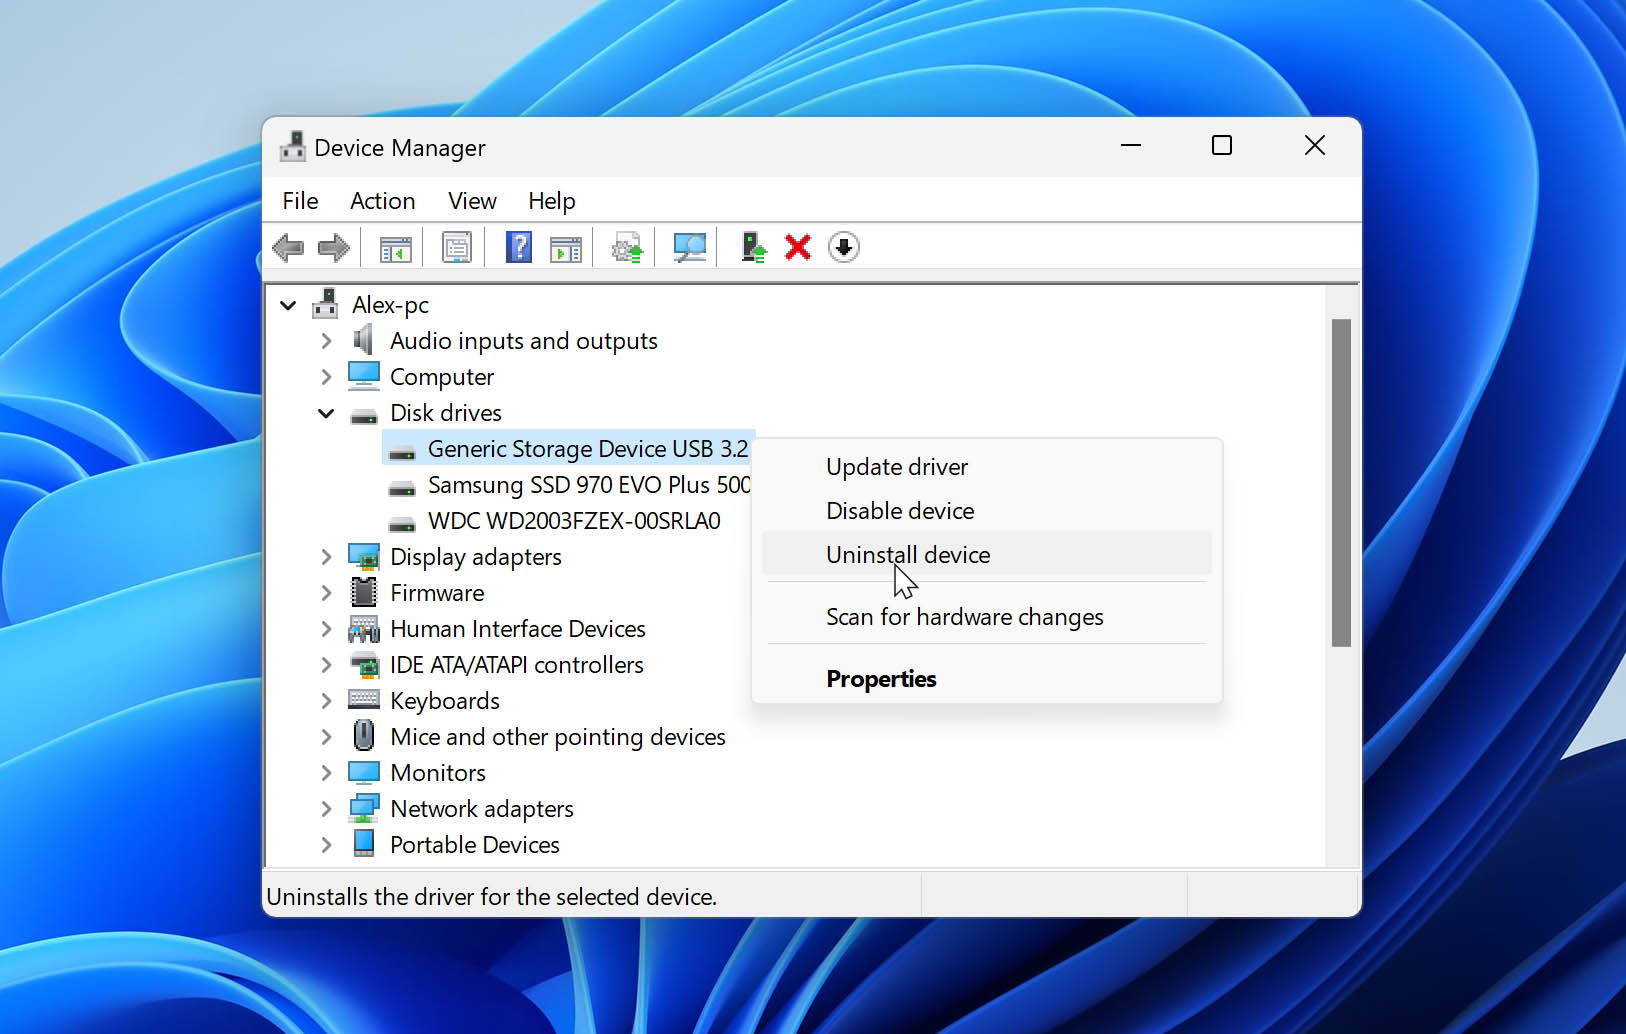
- Disconnect the SD card from your computer.
- Restart your computer and connect your SD card. Windows will automatically install the correct drivers.
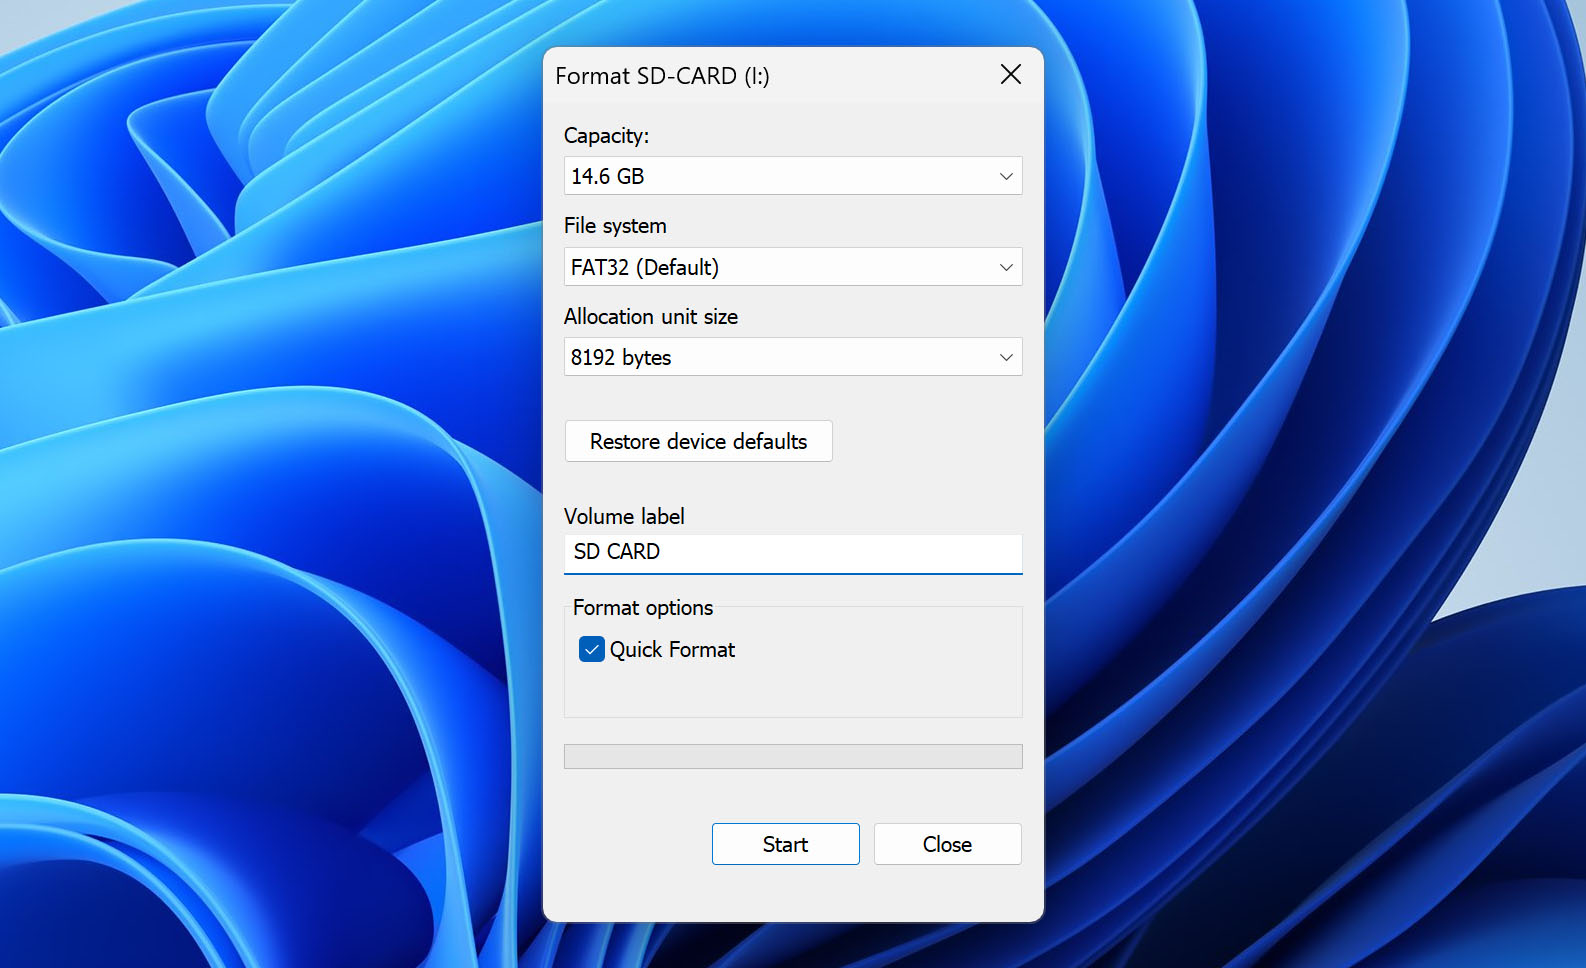
Method 7: Format the SD Card
Yes, we understand that you want to avoid formatting, but if your SD card is triggering all kinds of error messages or refusing to cooperate at all, then it might really be best to format it and start from scratch.
Formatting isn’t actually as destructive as it seems (at least when the Quick format method is used). What happens when you format an SD card or any other storage device is that all storage space is marked as empty, allowing new data to be stored in its place. Until that happens, the original data is still exactly where it was, and you can restore it using data recovery software by following the instructions provided earlier in this article.
Of course, formatting is still an inherently risky thing to do when dealing with a damaged SD card as it could potentially further the card’s damage, so we recommend creating a full SD card backup as a precautionary measure. Once the backup is ready, you can follow these steps:
- Press Win + X and select Disk Management.
- Right-click your SD card and select the Format option.
- Uncheck the Perform a quick format option, choose your file system (FAT32 is a good choice if you’re not sure), and click OK.
Use Data Recovery Service for Damaged SD Card Recovery

It’s true that SD card data recovery software like Disk Drill can quickly and reliably recover lost data from most corrupted memory cards, but it can’t retrieve data from physically broken SD cards that no longer function properly.
Instead of attempting to perform a DIY repair of the broken SD card (something that rarely has a successful ending), you should instead send the SD card to a professional data recovery center and let it recover your data for you.
Here’s how most professional data recovery centers work:
- You initiate your data recovery request by providing as much detail about the affected medium, the circumstances surrounding the data loss, and the lost data.
- You pack and ship your storage device using a provided address label that you can simply print and attach to your package.
- A data recovery professional will examine the storage device and get back to you with a free failure report and a guaranteed price quote.
- You approve the quote and wait for your data.
- The data recovery center will ship your data back to you on a DVD, flash, or external hard drive.
How to Prevent an SD Card from Getting Corrupted
Usually, SD card corruption can be solved using the tools and techniques described in this article—but not always. To avoid losing important data, you should learn how to prevent your SD card from getting corrupted in the first place, and you can start by familiarizing yourself with the following tips and tricks:
- ⏏️ Always safely eject: Don’t be lazy and always click the eject button before you yank out your SD card from your SD card reader. The eject button will ensure that all read/write operations have finished, preventing logical damage, especially corruption.
- 🛡️ Use a protective case: SD cards are fragile, and the teensy-weensy plastic case that protects the flash memory chip just doesn’t do it in harsher conditions. A protective case doesn’t cost much, but it can go a long way in helping your SD card survive close encounters with water and other elements.
- 1️⃣ One card per device: It’s always a good idea to dedicate each SD card to a specific device. Some devices don’t like to share storage space with others, and they may corrupt important data stored by other devices.
- 🤹♂️ More is merrier: Instead of putting all your eggs in one basket, you should buy multiple SD cards and switch between them. That way, you will still have at least some of your data even if one of your SD cards becomes irreparably damaged.
- 💰 Spend extra, worry less: Brand-name SD cards are more reliable than their no-name counterparts—that’s an indisputable fact. By spending a few extra dollars when buying a new SD card, you can save yourself a lot of trouble later.
Conclusion
Just because your SD card has become damaged doesn’t necessarily mean that the files stored on it are gone for good. In this article, we’ve described multiple methods that you can use to fix the damage and recover your files. We hope that at least one method will produce the desired results and help you avoid a data loss disaster.
FAQ
Yes, most damaged SD cards can be recovered, either using professional data recovery software or data recovery services. To ensure successful recovery, you need to stop using the SD card as soon as possible because you could otherwise overwrite your lost files and make them unrecoverable.
To recover data from a damaged SD card, you need to:
- Download, install and launch Disk Drill data recovery application.
- Connect the physically damaged SD card to your computer.
- Scan the damaged SD card.
- Preview the files that can be recovered.
- Recover your files to a safe location.
That depends on whether we’re talking about physical or logical damage. Physical damage may cause the actual flash memory chip on which data is stored to stop working, while logical damage may cause files to disappear.
When it comes to logical damage, your best bet is SD card recovery software, which can be used to undelete lost files with a few simple clicks. Physical damage is much more difficult to deal with, typically requiring the services of a professional data recovery center.
Modern operating systems come with utilities that make it possible to repair logical damage without formatting. Windows has a command-line tool called CHKDSK, while macOS has the First Aid feature in Disk Utility.
If the SD card has been physically broken, and the flash memory chip isn’t in one piece anymore, then it’s likely that you won’t be able to recover your pictures—not even with the help of professional data recovery services.
You can tell that your microSD card is damaged if it start to show one or more signs of SD card damage, which we describe in detail in this article.