Recovering files from your Mac’s internal hard drive is a bit more complicated than recovering it from an external drive or device. The reason for this is that anything you do on your Mac, after you realize that a file has been deleted or lost, causes precious data to be overwritten. Just leaving it running, without any programs open, can still overwrite data. And the data that gets overwritten may be just the file(s) that you are trying to save.
So, if you haven’t already done so, we recommend that you SHUT YOUR MAC DOWN immediately and read through these instructions on another computer or mobile device.
There is only one exception to this rule, and that is if you had Disk Drill installed previous to your data loss and you had Recovery Vault and/or Guaranteed Recovery enabled to protect your hard drive. If this is the case, proceed to How to Use Recovery Vault and Guaranteed Recovery.
If you have a specific file type that you need recovered, check What File Types Can Disk Drill Recover? to see if your file type is supported before you begin.
There are three recovery options you can use, with the best option listed first.
Recovery Option #1: Access the Mac in Target Disc Mode
In the best-case scenario, you have a second Mac available, and both Macs have either a FireWire or Thunderbolt port. With this option, you can access the hard drive of the Mac with the lost files, while minimizing system usage. You can buy a FireWire or Thunderbolt cable at most office supply or electronics stores. There are also Thunderbolt to FireWire adapters available.
Alternatively, you might need to use a USB-C cable, those are only available from third-party manufacturers.
Follow this Apple Support Document to learn how to use Target Disc Mode. Once you have successfully connected to the target Mac, you can proceed with downloading and installing Disc Drill on the active Mac.
There are some Macs that don’t have FireWire or Thunderbolt ports. If this is the case (and you are comfortable with dismantling your computer) you could remove the internal hard drive and then connect it to another Mac as an external drive, using a hard drive to usb adapter such as this one.
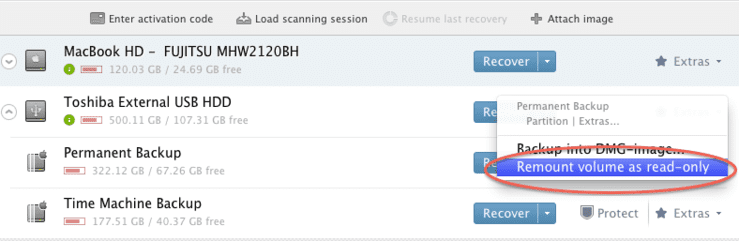
In either case, when you start scanning, be sure to select the option under Extras to Remount Volume as Read-Only.
Recovery Option #2: Run Disk Drill in Portable Mode
If you do not have a second Mac available, and you don’t have Disk Drill already installed, the best thing to do is to install Disk Drill on an external drive. This is called “Portable Mode”. Note that if you are trying to recover from a Mac that is having trouble starting up, you will need to install Disk Drill on a bootable drive.
Once you have Disk Drill running in portable mode, you can then use Disk Drill to make copy of your entire hard drive volume onto the external drive, which will give you the best chances of recovery. Copying your hard drive is optional, but recommended, so have a large external drive ready if possible.
- Shut down all programs on your Mac with the exception of your Internet browser.
- Connect a USB flash drive or external hard drive to your Mac.
- Go to
getdiskdrill to download the app. - The Disk Drill app will automatically be downloaded to your Downloads folder. (If your browser asks you where to save the file, select the desired folder and click Save.) It may take a couple minutes to download.
- When the download is finished, quit your browser application.
- Go to your Downloads folder and double-click on the Disk Drill disk image.
- Read the license agreement and click Agree to continue.
- You will see the Disk Drill icon and your Applications folder icon. This is where it is different from the regular installation. Do NOT drag it to your Applications folder. Instead, drag the Disk Drill icon to your external drive icon. The application will install on the external drive.
- When the installation is done, double-click on the application to launch it.
- Upon opening the app, you may be asked which options you wish to enable. Uncheck all of them. You do not want to install anything additional at this time.
- A pop-up window may appear saying that Disk Drill wants to make changes to your computer. This is required for Disk Drill to scan your system. Type in the admin password and click OK to continue.
- You are now ready to scan for your lost files. On the main screen, you will see a list of the drives and devices available to be scanned.
- Click on the name of your hard drive to reveal each of its partitions.
- This step is optional, but recommended for the best data recovery chances. Connect an external hard drive to your Mac that has enough space to save your entire hard drive partition to it. Click Extras next to the volume you wish to recover files from and select Backup Into DMG Image. Important! Be sure to select the external drive as the target location before clicking Save. (Click the small black arrow next to “Save As” to view more location choices). Do NOT save it anywhere on your internal hard drive or you will overwrite data! If you do not have a big enough external drive, skip this step and move on to step 16.
- If you backed up to a DMG Image, go to the Disk Drill menu bar and select File > Attach Non-Mountable Images, then navigate to where you saved the disk image, select it, and click Attach. Once the disk shows up as a volume in Disk Drill, click Recover next to the volume name.
- If you did not backup to a DMG Image, simply click Recover next to your hard drive partition.
- Wait for Disk Drill to finish scanning. If you have a large hard drive or disk, this may take a while. You can preview files at any time during the scan. If no files are found, refer to Scanning FAQs.
- Filter the results as needed by keyword, file type, file size and date.
- From this point forward, you can Preview the found files using the instructions in our How to Recover Files with Disk Drill Basic. If you were not able to Backup to a DMG Image, then we recommend immediately upgrading to Disk Drill PRO, so that you can save and preview the results from an external disk.
Recovery Option #3: You Already Have Disk Drill Installed
If you already had Disk Drill installed, but you didn’t have Recovery Vault or Guaranteed Recovery enabled, using Target Disk Mode (option #1 above) is still the best option. But if you don’t have access to a second Mac, then launch Disk Drill and start with Step #10 above.